2015 DODGE VIPER light
[x] Cancel search: lightPage 24 of 148

TURN SIGNALS/WIPER/WASHER/HIGH BEAMS LEVER
Wipers
Intermittent, Low And High Operation
•Rotatetheendofthelevertothefirstdetentpositionforoneoffiveintermittent
settings, the second detent for low wiper operation and the third detent for high wiper
operation.
Washer Operation
•Pushtheendoftheleverinwardtotheseconddetentandholdforaslongassprayis
desired.
Mist Feature
•Whenasinglewipetoclearoffroadmistorsprayfromapassingvehicleisneeded,
push the washer knob, located on the end of the multifunction lever, inward to the first
detent and release. The wipers will cycle one time and automatically shut off.
High Beams
•Pushtheleverawayfromyoutoactivatethehighbeams.
Ahighbeamsymbolwillilluminateintheclustertoindicatethehighbeamsareon.
NOTE:
For safe driving, turn off the high beams when oncoming traffic is present to prevent
headlight glare and as a courtesy to other motorists.
Turn Signal/Wiper/Washer/High Beam Lever
OPERATING YOUR VEHICLE
22
Page 25 of 148

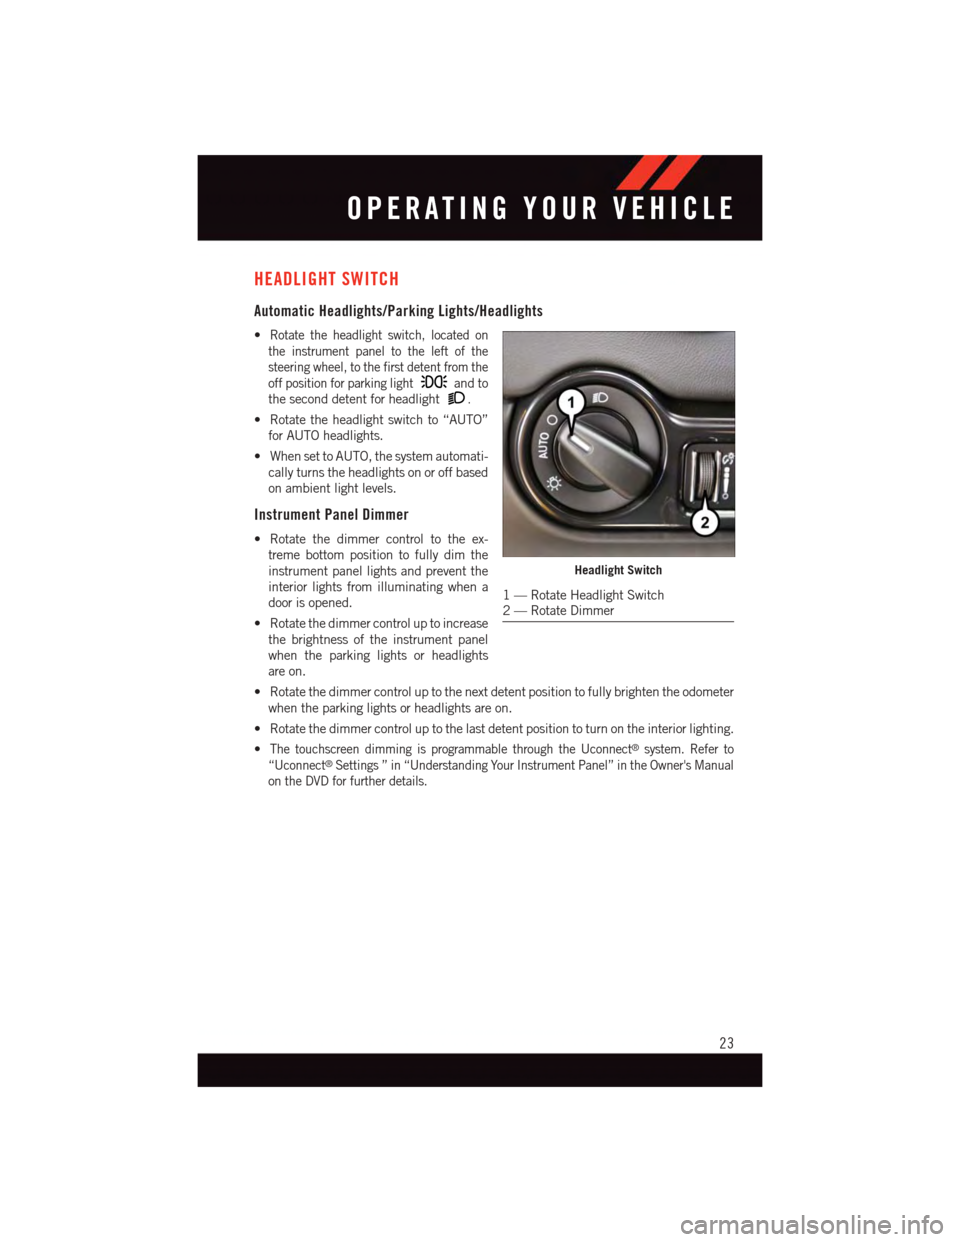
HEADLIGHT SWITCH
Automatic Headlights/Parking Lights/Headlights
•Rotate the headlight switch, located on
the instrument panel to the left of the
steering wheel, to the first detent from the
off position for parking lightand to
the second detent for headlight.
•Rotatetheheadlightswitchto“AUTO”
for AUTO headlights.
•WhensettoAUTO,thesystemautomati-
cally turns the headlights on or off based
on ambient light levels.
Instrument Panel Dimmer
•Rotatethedimmercontroltotheex-
treme bottom position to fully dim the
instrument panel lights and prevent the
interior lights from illuminating when a
door is opened.
•Rotatethedimmercontroluptoincrease
the brightness of the instrument panel
when the parking lights or headlights
are on.
•Rotatethedimmercontroluptothenextdetentpositiontofullybrightentheodometer
when the parking lights or headlights are on.
•Rotatethedimmercontroluptothelastdetentpositiontoturnontheinteriorlighting.
•The touchscreen dimming is programmable through the Uconnect®system. Refer to
“Uconnect®Settings ” in “Understanding Your Instrument Panel” in the Owner's Manual
on the DVD for further details.
Headlight Switch
1—RotateHeadlightSwitch2—RotateDimmer
OPERATING YOUR VEHICLE
23
Page 29 of 148

ELECTRONIC CONTROL DAMPING SYSTEM
•Thisvehiclemaybeequippedwithanelectroniccontrolleddampeningsystem.This
system reduces body roll and pitch in many driving situations including cornering,
acceleration and braking.
•Thissystemallowsforastreetsuspensiondampingsettingorafirmerracesuspension
damping setting. There are two modes of operation:
STREET MODE
•Thismodewillgiveasporty,butcomfort-
able ride.
•Thismodeisdriverselectablewhenthe
vehicle is placed in STREET mode (push
the “STREET” button on the Instrument
Panel).
NOTE:
The suspension mode will lock and stay in
whatever the driver selects even when the
ignition is turned off and the car restarted.
•Thismodeisintendedforasmoother
ride on the various types of pavement
and road conditions while still providing
damping levels appropriate extreme
capabilities.
RACE MODE
•RacemodeisdriverselectablewhenthevehicleisplacedinRACEmode(pushthe
“RACE” button on the Instrument Panel).
•Thismodeisfortrackuseonlyandwillsupplymaximumgriptothetires.
•WhenRACEmodeisenabled,ashocksymbolwith“RACE”nexttoitwilllightupinthe
instrument cluster.
NOTE:
The RACE setting will provide a firmer ride.
Mode Buttons
1—RACEButton2—STREETButton
OPERATING YOUR VEHICLE
27
Page 30 of 148

ELECTRONIC STABILITY CONTROL (ESC)
•TheESCcorrectsforoversteeringandundersteeringthevehiclebyapplyingthebrake
of the appropriate wheel. Engine power may also be reduced to assist in counteracting
the condition of oversteer or understeer and help the vehicle maintain the desired path.
•InfullonmodeESCutilizessensorsinthevehicletodeterminethepaththatthedriver
intends to steer the vehicle and compares it to the actual path of the vehicle. When the
actual path does not match the intended path, the ESC applies the brake of the
appropriate wheel to assist in counteracting the condition of oversteer or understeer.
Electronic Stability Control (ESC) Operating Modes
The ESC system may have five available operating modes:
ESC On
•ThisisthenormaloperatingmodefortheESCsystem.Wheneverthevehicleisstarted,
the ESC system will be in this mode. The ESC On mode should be used for most driving
situations. The ESC should only be turned OFF for specific reasons as noted in the
following paragraphs.
ESC Full Off
•TheESCOffmodeisintendedforoff-highwayoroff-roaduseonlyandshouldnotbeused on any public roadways. In this mode, all TCS and ESC stability features areturned OFF. To enter the “Full Off” mode, push and hold the “ESC Off” switch for fiveseconds while the vehicle is stopped with the engine running. After five seconds, achime will sound, the “ESC Activation/Malfunction Indicator Light” will illuminate, andthe “ESC OFF” message will display in the vehicle cluster (left of the odometer). The“ESC OFF” message may appear in the Driver Information Display (DID). To turn ESCON again, momentarily push the “ESC Off” switch.
Sport Mode
•Sportmodehasreducedtractioncontrolandreducedstabilitycontrol.Toenterthe
“Sport Mode” mode, push the “ESC” switch once (located on the steering wheel). The
“ESC SPORT” light will illuminate, and the “ESC SPORT” message will display in the
vehicle cluster (left of the odometer).
Track Mode
•Tr a c k M o d e h a s n o t r a c t i o n c o n t r o l a n d h a s r e d u c e d s t a b i l i t y c o n t r o l . To e n t e r t h e “ Tr a c k
Mode” mode, push the “ESC” switch twice. The “ESC TRACK” light will illuminate, and
the “ESC TRACK” message will display in the vehicle cluster (left of the odometer).
OPERATING YOUR VEHICLE
28
Page 31 of 148

Rain Mode
•Rainmodeoffersincreasedtractioncontrolandstabilitycontrolforlowtraction
conditions such as wet roads, dry roads during cold temperatures, or when the driver
wants enhanced stability due to lack of familiarity or experience with the vehicle’s
response. To enter the “Rain Mode” mode, push the “ESC” switch three times. The
“ESC RAIN” light will illuminate, and the “ESC RAIN” message will display in the
vehicle cluster (left of the odometer).
NOTE:
Some models may not offer “Sport” or “Track” Mode.
WARNING!
The Electronic Stability Control System (ESC) cannot prevent the natural laws of physics
from acting on the vehicle, nor can it increase the traction afforded by prevailing road
conditions. ESC cannot prevent all accidents, including those resulting from excessive
speed in turns, driving on very slippery surfaces, or hydroplaning. ESC also cannot
prevent accidents resulting from loss of vehicle control due to inappropriate driver input
for the conditions. Only a safe, attentive, and skillful driver can prevent accidents. The
capabilities of an ESC equipped vehicle must never be exploited in a reckless or
dangerous manner which could jeopardize the user’s safety or the safety of others.
MANUAL TRANSMISSION 1 TO 4 SKIP SHIFT
•SkipShiftisenabledwhenvehiclespeedisgreaterthan16MPH
(26 km/h) but less than 18 MPH (29 km/h) and the accelerator is
at 20% or less.
•Foroptimalfueleconomy,underlowaccelerationconditions,your
vehicle will only allow you to shift from first gear to fourth gear.
Additionally, the skip shift message will appear in the tachometer.
•RefertoyourOwner'sManualontheDVDforfurtherinformation.
Skip
Shift
133
22
55RR
6
OPERATING YOUR VEHICLE
29
Page 32 of 148

ADDING FUEL
1. Press the fuel filler door release switch (located in the driver's door map pocket).
2. Open the fuel filler door.
3. There is no fuel filler cap. A flapper door inside the pipe seals the system.
4. Insert the fuel nozzle fully into the filler pipe – the nozzle opens and holds the flapper
door while refueling.
NOTE:
Only the correct size nozzle opens the latches allowing the flapper door to open.
5. Fill the vehicle with fuel – when the fuel nozzle “clicks” or shuts off the fuel tank is full.
6. Remove the fuel nozzle and close the fuel door.
NOTE:
Afunnelisprovided(locatedinthetrunkinthesparetirearea)toopentheflapper
door to allow for emergency refueling with a gas can.
CAUTION!
To a v o i d f u e l s p i l l a g e a n d o v e r f i l l i n g , d o n o t “ t o p o f f ” t h e f u e l t a n k a f t e r f i l l i n g .
WARNING!
•Neverhaveanysmokingmaterialslitinornearthevehiclewhenthefueldooris
open or the tank is being filled.
•Neveraddfuelwhentheengineisrunning.Thisisinviolationofmoststateand
federal fire regulations and may cause the “Malfunction Indicator Light” to turn on.
•Afiremayresultiffuelispumpedintoaportablecontainerthatisinsideofavehicle.
Yo u c o u l d b e b u r n e d . A l w a y s p l a c e f u e l c o n t a i n e r s o n t h e g r o u n d w h i l e f i l l i n g .
OPERATING YOUR VEHICLE
30
Page 42 of 148

2. Press “Start” on the reminder screen or select “Uconnect Registration” under the “All
Apps” or “Favorites Apps” tab on the Apps list.
3. The Uconnect®Access Registration App will open and display step-by-step instruc-
tions to start your registration.
4. Enter your email address into the radio touchscreen.
5. A message will display on the touchscreen indicating your email submission was
accepted. In a few minutes, you will receive an email which will allow you to register
your vehicle for Uconnect®Access. You should open this email and begin your
Uconnect®Access registration within 72 hours.
6. Check for an email from Uconnect®Access that contains your personalized registra-
tion link. If you don't see it, check your spam or junk mail folder. Open the email and
click on the link to continue registering.
NOTE:
For security reasons, this link is valid for 72 hours from the time you’ve submitted your
email address into the radio touchscreen. If the link has expired, simply re-enter your
email address into the Uconnect®Registration App on the radio touchscreen to receive
another link. The secured registration link will take you through the Uconnect®Access
registration process step by step.
7. To unlock the full potential of Uconnect®Access in your vehicle, you will need to create
or validate an existing Mopar Owner Connect account previously (Owner Center).
Uconnect®along with Mopar Owner Connect have joined forces to create one
destination to manage all of your vehicle needs, from managing your Uconnect®
Access account, to tracking service history and finding recommended accessories for
your vehicle. If you already have a Mopar Owner Connect account, log in to the website
with your existing username/email and password. For assistance with this web based
registration process, call Uconnect®Care at 1-855-792-4241.
8. Once you are logged in to your Mopar Owner Connect account, you will create a
personal Uconnect®Security PIN. The Uconnect®Security PIN will be required to
authenticate you when accessing your account via Uconnect®Care or performing any
remote services such as Remote Door Lock/Unlock or Remote Horn & Lights.
9. If your vehicle qualifies for a trial package it will be presented. Simply agree to the
Uconnect®Te r m s o f S e r v i c e ( c h e c k b o x ) a n d t h e n s e l e c t t h e “ S t a r t S e r v i c e ” b u t t o n .
At this point your vehicle is registered with Uconnect®Access. Continue to set up Via
Mobile. Apps will be downloaded the next time you start your vehicle. If the Apps have not
appeared after 24 hours, please contact Uconnect®Care.
ELECTRONICS
40
Page 43 of 148

Download The Uconnect® Access App
The Uconnect®Access smartphone app allows you to remotely lock or unlock your doors,
start your engine (if equipped) and activate your horn and lights from virtually anywhere.
The smartphone app also features Via Mobile (if equipped) which uses your smartphone’s
data plan to access your personal Pandora®,iHeartRadio,SlackerRadioandAha™by
HARMAN accounts and control them using your vehicle touchscreen.
The Uconnect®Access app is only compatible with select iPhone®and Android smart-
phones. Visit UconnectPhone.com or call 1-877-855-8400 to confirm that your smart-
phone is compatible with Uconnect®.Onceyou’veconfirmedyoursmartphoneis
compatible, Android and iPhone®users should visit their respective app store and search
for “Uconnect Access” to download the app.
Set Up Your Via Mobile Profile — If Equipped
Setting up your Via Mobile profile means entering your login information for each App so that
they can work in your vehicle. Complete your Via Mobile Profile online during registration of
your Uconnect®Access system. Access this page by logging into your Mopar Owner Connect
account (moparownerconnect.com), going to Edit Profile, then Via Mobile Profile.
If you already have an account with these Apps, scroll down and press the “Link” button
to enter your information. If you do not have an account, you can create a new one.
Aha™ by HARMAN (www.aharadio.com)
•EnteryouremailaddressandpasswordforAha™,orcreateanewAha™account.
•YoucanlinkyourFacebook,TwitterorSlackeraccountsontheAha™website.
iHeartRadio (www.iHeartRadio.com)
•EnteryouremailaddressandpasswordforiHeartRadio,orcreateanewiHeartRadio
account.
•Select“Activate”tocontinue,
•Select“Close”tocompleteactivation.
Pandora® (www.pandora.com)
•EnteryourPandora®username/email address and password, then click “Save.”
•CreateanewPandora®account.
Slacker Radio (www.slacker.com)
•EnteryourSlackerusername/emailaddressandpassword,thenclick“Save.”
•CreateanewSlackerRadioaccount.
Invite family and friends to use the Via Mobile Apps in your vehicle by setting up their own
Via Mobile profile.
ELECTRONICS
41