Page 3 of 140

INTRODUCTION/WELCOME
WELCOME FROM CHRYSLERGROUP LLC..................2
CONTROLS AT A GLANCE
DRIVER COCKPIT...............4INSTRUMENT CLUSTER...........6
GETTING STARTED
KEY FOB . . . . . . . . . . . . . . . . . . . . . 8REMOTE START . . . . . . . . . . . . . . . . 9KEYLESS ENTER-N-GO™.........10VEHICLE SECURITY ALARM........14SEAT BELT SYSTEMS............15SUPPLEMENTAL RESTRAINT SYSTEM(SRS) — AIR BAGS.............16CHILD RESTRAINTS............19HEAD RESTRAINTS.............25FRONT SEATS................27REAR SEATS.................30HEATED SEATS . . . . . . . . . . . . . . . 32HEATED STEERING WHEEL........33TILT/TELESCOPING STEERINGCOLUMN...................34
OPERATING YOUR VEHICLE
ENGINE BREAK-INRECOMMENDATIONS............35TURN SIGNAL/WIPER/WASHER/HIGHBEAM LEVER.................36HEADLIGHT SWITCH............37ELECTRONIC SPEED CONTROL......38CLIMATE CONTROL.............40PA R K V I E W®REAR BACK-UP CAMERA . . 43POWER SUNROOF..............44WIND BUFFETING..............45
ELECTRONICS
YOUR VEHICLE'S SOUND SYSTEM....46IDENTIFYING YOUR RADIO.........48Uconnect®4.3 & 4.3S AT A GLANCE . . . 49Uconnect®8.4 & 8.4N AT A GLANCE . . . 51RADIO.....................53SiriusXM SATELLITE RADIO.........55iPod®/CD/AUX CONTROLS..........57GARMIN®NAVIGATION...........59SiriusXM TRAVEL LINK...........64PLAYING iPod®/USB/MP3 DEVICES....65Uconnect®PHONE..............66Uconnect®VOICE COMMAND(8.4 & 8.4N ONLY)..............72VIDEO ENTERTAINMENTSYSTEM (VES™)...............75STEERING WHEEL AUDIO CONTROLS . . 76ELECTRONIC VEHICLE INFORMATIONCENTER (EVIC)................76PROGRAMMABLE FEATURES.......77
UNIVERSAL GARAGE DOOR OPENER(HomeLink®).................78POWER INVERTER.............81POWER OUTLETS..............82
UTILITY
TRAILER TOWING WEIGHTS (MAXIMUMTRAILER WEIGHT RATINGS)........84RECREATIONAL TOWING (BEHINDMOTORHOME, ETC.)............85
WHAT TO DO IN EMERGENCIES
ROADSIDE ASSISTANCE..........86INSTRUMENT CLUSTER WARNINGLIGHTS....................86INSTRUMENT CLUSTER INDICATORLIGHTS....................91IF YOUR ENGINE OVERHEATS.......92JACKING AND TIRE CHANGING......93JUMP-STARTING..............101SHIFT LEVER OVERRIDE.........104TOWING A DISABLED VEHICLE.....105FREEING A STUCK VEHICLE.......105EVENT DATA RECORDER (EDR).....106
MAINTAINING YOUR VEHICLE
OPENING THE HOOD...........107ENGINE COMPARTMENT.........108FLUID CAPACITIES............112FLUIDS, LUBRICANTS AND GENUINEPA RT S . . . . . . . . . . . . . . . . . . . . 1 1 2MAINTENANCE PROCEDURES......114MAINTENANCE SCHEDULE........114MAINTENANCE RECORD.........118FUSES....................119TIRE PRESSURES.............121SPARE TIRES — IF EQUIPPED......122WHEEL AND WHEEL TRIM CARE....124REPLACEMENT BULBS..........124
CONSUMER ASSISTANCE
CHRYSLER GROUP LLC CUSTOMERCENTER...................126CHRYSLER CANADA INC. CUSTOMERCENTER...................126ASSISTANCE FOR THE HEARINGIMPAIRED..................126PUBLICATIONS ORDERING........126REPORTING SAFETY DEFECTS IN THEUNITED STATES..............127
MOPAR® ACCESSORIES
AUTHENTIC ACCESSORIES BYMOPAR®...................128
FREQUENTLY ASKED QUESTIONS
FREQUENTLY ASKED QUESTIONS....129
INDEX.....................130
TABLE OF CONTENTS
Page 16 of 140

VEHICLE SECURITY ALARM
This Vehicle Security Alarm monitors the doors, liftgate, and ignition switch for unauthor-
ized operation.
When the alarm is activated, the interior switches for door locks are disabled. The Vehicle
Security Alarm provides both audio and visual signals repeatedly for three minutes. If the
disturbance is still present (driver's door, passenger door, other doors, ignition) after three
minutes, the parking lights and tail lights will flash for an additional 15 minutes.
To Arm:
•PushtheKeylessEnter-N-Go™START/STOPbuttonuntiltheElectronicVehicle
Information Center (EVIC) indicates that the vehicle ignition is “OFF”. Push the power
door lock switch while the door is open, push the Key Fob LOCK button, or with one of
the Key Fobs located outside the vehicle and within 5 ft (1.5 m) of the driver's and
passenger front door handles, push the Keyless Enter-N-Go™ LOCK button located on
the door handle.
NOTE:
After pushing the Keyless Enter-N-Go™ LOCK button, you must wait two seconds before
you can lock or unlock the vehicle via the door handle.
To Disarm:
•PushtheKeyFobUNLOCKbuttonorwithoneoftheKeyFobslocatedoutsidethe
vehicle and within 5 ft (1.5 m) of the driver's and passenger front door handles, grab the
Keyless Enter-N-Go™ door handle and enter the vehicle, then push the Keyless
Enter-N-Go™ START/STOP button (requires at least one valid Key Fob in the vehicle).
GETTING STARTED
14
Page 48 of 140
YOUR VEHICLE'S SOUND SYSTEM
1. Uconnect®Voice Command Button pg. 72
2. Uconnect®Phone Button pg. 66
3. Steering Wheel Audio control (Left) pg. 76
4. Steering Wheel Audio control (Right) pg. 76
5. Volume Knob/Audio Mute Button
6. Uconnect®Radio pg. 48
ELECTRONICS
46
Page 49 of 140
7. Tune/Scroll Knob/Browse/Enter Button
8. SD Card Slot (push in to insert/eject) pg. 66
9. Front Power Outlet pg. 82
10. CD Slot
11. CD Eject Button
12. Audio Jack/USB Port pg. 65
ELECTRONICS
47
Page 52 of 140

Audio Settings
•PushtheSETTINGSbuttononthefaceplateontherightsideoftheunit.
•Thenscrolldownandpressthe“Audio”buttononthetouchscreentogettotheAudio
menu.
•TheAudioMenushowsthefollowingoptionsforyoutocustomizeyouraudiosettings.
•Equalizer
•Balance/Fade
•SpeedAdjustVolume
•Pressthe“Exit”buttononthetouchscreentoexitfromtheAudioMenu.
Equalizer
•Pressthe“Equalizer”buttononthetouchscreentoadjusttheBass,MidandTreble.
Use the “+” or “–” button on the touchscreen to adjust the equalizer to your desired
settings. Press the “Done” button on the touchscreen when done.
Balance/Fade
•Pressthe“Balance/Fade”buttononthetouchscreentoadjustthesoundfromthe
speakers. Use the “arrow” button on the touchscreen to adjust the sound level from the
front and rear or right and left side speakers. Press the center “C” button on the
touchscreen to reset the balance and fade to the factory setting. Press the “Done”
button on the touchscreen when done.
Speed Adjust Volume
•Pressthe“SpeedAdjustVolume”buttononthetouchscreentoselectbetweenOFF,1,
2or3.Thiswilldecreasetheradiovolumerelativetoadecreaseinvehiclespeed.Press
the “Done” button on the touchscreen when done.
ELECTRONICS
50
Page 54 of 140

Setting The Time
•Model8.4NsynchronizestimeautomaticallyviaGPS,soshouldnotrequireanytime
adjustment. If you do need to set the time manually, follow the instructions below for
Model 8.4.
•ForModel8.4,turntheuniton,thenpressthe“TimeDisplay”atthetopofthescreen.
Press “Yes”.
•Ifthetimeisnotdisplayedatthetopofthescreen,press“More”buttononthe
touchscreen and then “Settings” button on the touchscreen. In the Settings screen,
press the “Clock” button on the touchscreen, then check or uncheck this option.
•Press“+”or“–”nexttoSetTimeHoursandSetTimeMinutestoadjustthetime.
•Ifthesefeaturesarenotavailable,uncheckthe“Sync”withGPSbox.
•Press“X”tosaveyoursettingsandexitoutoftheClockSettingscreen.
Audio Settings
•Pressthe“Audio”buttononthetouchscreentoactivatetheAudiosettingsscreento
adjust Balance\Fade, Equalizer and Speed Adjusted Volume.
•YoucanreturntotheRadioscreenbypressingthe“X”locatedatthetopright.
Balance/Fade
•Pressthe“Balance/Fade”buttononthetouchscreentoBalanceaudiobetweenthe
front speakers or fade the audio between the rear and front speakers.
•Pressingthe“Front,”“Rear,””Left”or“Right”buttonsonthetouchscreenorpress
and drag the red Speaker Icon to adjust the Balance/Fade.
Equalizer
•Pressthe“Equalizer”buttononthetouchscreentoactivatetheEqualizerscreen.
•Pressthe“+”or“–”buttonsonthetouchscreen,orbypressinganddraggingoverthe
level bar for each of the equalizer bands. The level value, which spans between ±9, is
displayed at the bottom of each of the Bands.
Speed Adjusted Volume
•Pressthe“SpeedAdjustedVolume”buttononthetouchscreentoactivatetheSpeed
Adjusted Volume screen. The Speed Adjusted Volume is adjusted by pressing the “+”
and “–” buttons or by pressing and dragging over the level bar. This alters the automatic
adjustment of the audio volume with variation to vehicle speed.
ELECTRONICS
52
Page 55 of 140
RADIO
Models 4.3 & 4.3S
1—RadioStationPresets5—AudioSettings2—ViewAllPresets6—DirectTuneRadioStation3—SeekUp7—RadioBand4—Channel/StationInformation 8—SeekDown
ELECTRONICS
53
Page 56 of 140

•ToaccesstheRadiomode,pushtheRADIObuttonontheupperleftsideofthe
faceplate (4.3 & 4.3S) or the “Radio” button on the touchscreen at the lower left of the
screen (8.4 & 8.4N).
•Unlessotherwisenoted,theinformationprovidedontheoperationandfunctionalityof
the radios in this section is common to all Uconnect®radios.
Selecting Radio Stations
•Pressthe“Radioband”buttononthetouchscreentocyclethroughAM,FMorSAT
(4.3 & 4.3S) or the desired radio band (AM, FM or SAT) button on the touchscreen (8.4
&8.4N).SiriusXMSatelliteRadioisnotavailableonthe4.3.
Seek Up/Seek Down
•Pressthe“Seekarrow”buttonsonthetouchscreenforlessthantwosecondstoseek
through radio stations.
•Pressandholdeither“Seekarrow”buttononthetouchscreenformorethantwo
seconds to bypass stations without stopping. The radio will stop at the next listenable
station once the arrow button on the touchscreen is released.
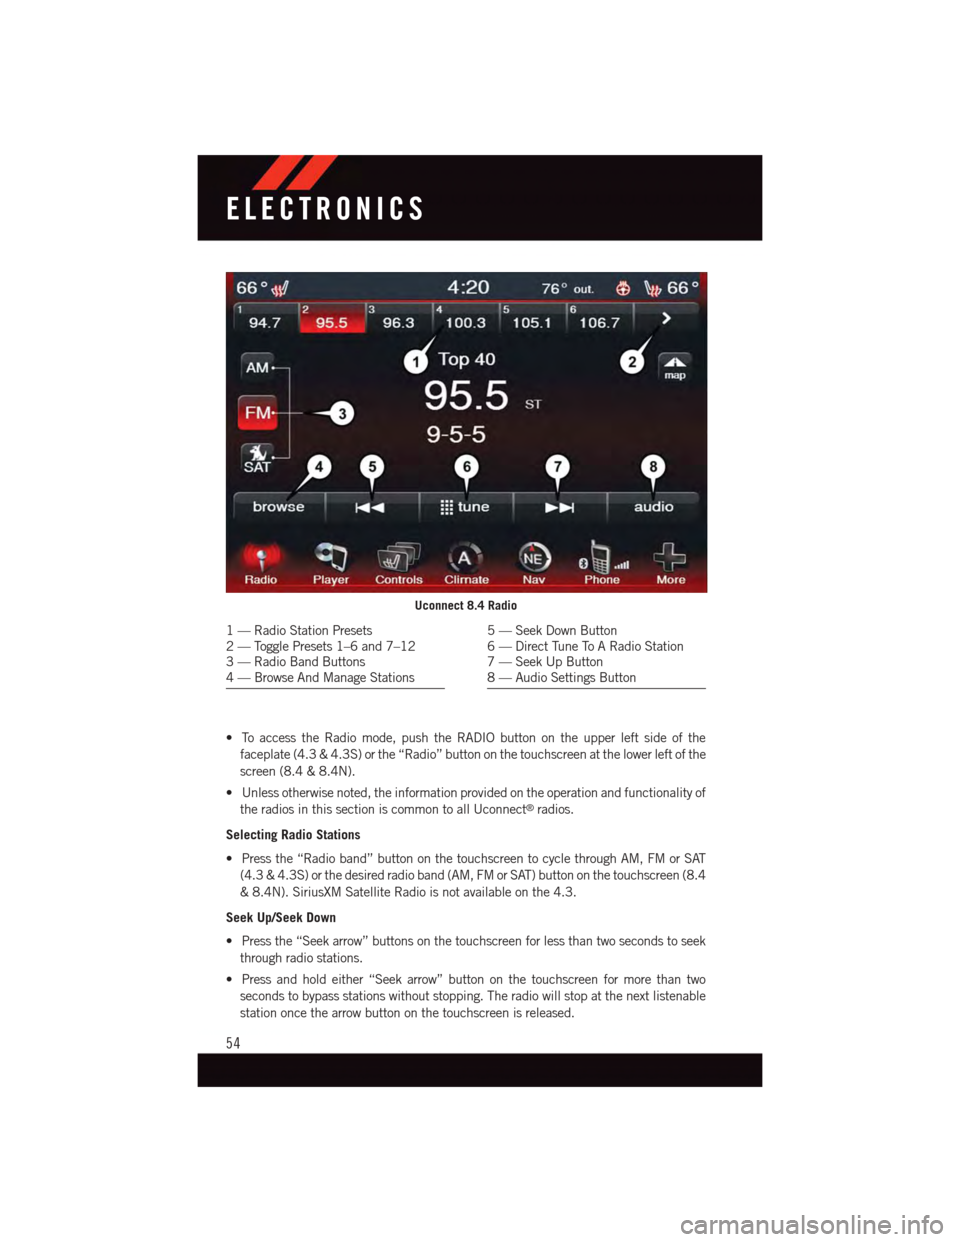
Uconnect 8.4 Radio
1—RadioStationPresets2—TogglePresets1–6and7–123—RadioBandButtons4—BrowseAndManageStations
5—SeekDownButton6—DirectTuneToARadioStation7—SeekUpButton8—AudioSettingsButton
ELECTRONICS
54