2015 DODGE JOURNEY ESP
[x] Cancel search: ESPPage 4 of 140

WELCOME FROM CHRYSLER GROUP LLC
Congratulations on selecting your new Chrysler Group LLC vehicle. Be assured that it
represents precision workmanship, distinctive styling, and high quality - all essentials that
are traditional to our vehicles.
Yo u r n e w C h r y s l e r G r o u p L L C v e h i c l e h a s c h a r a c t e r i s t i c s t o e n h a n c e t h e d r i v e r ' s c o n t r o l
under some driving conditions. These are to assist the driver and are never a substitute for
attentive driving. They can never take the driver's place. Always drive carefully.
Yo u r n e w v e h i c l e h a s m a n y f e a t u r e s f o r t h e c o m f o r t a n d c o n v e n i e n c e o f y o u a n d y o u r
passengers. Some of these should not be used when driving because they take your eyes
from the road or your attention from driving. Never text while driving or take your eyes more
than momentarily off the road.
This guide illustrates and describes the operation of features and equipment that are
either standard or optional on this vehicle. This guide may also include a description of
features and equipment that are no longer available or were not ordered on this vehicle.
Please disregard any features and equipment described in this guide that are not available
on this vehicle. Chrysler Group LLC reserves the right to make changes in design and
specifications and/or make additions to or improvements to its products without imposing
any obligation upon itself to install them on products previously manufactured.
This User Guide has been prepared to help you quickly become acquainted with the
important features of your vehicle. It contains most things you will need to operate and
maintain the vehicle, including emergency information.
The DVD includes a computer application containing detailed owner's information which
can be viewed on a personal computer or MAC computer. The multimedia DVD also
includes videos which can be played on any standard DVD player (including the
Uconnect®To u c h s c r e e n R a d i o s i f e q u i p p e d w i t h D V D p l a y e r c a p a b i l i t i e s ) . A d d i t i o n a l
DVD operational information is located on the back of the DVD sleeve.
For complete owner information, refer to your Owner's Manual on the DVD in the owner’s
kit provided at the time of new vehicle purchase.For your convenience, the information
contained on the DVD may also be printed and saved for future reference.
Chrysler Group LLC is committed to protecting our environment and natural resources. By
converting from paper to electronic delivery for the majority of the user information for
your vehicle, together we greatly reduce the demand for tree-based products and lessen
the stress on our environment.
VEHICLES SOLD IN CANADA
With respect to any vehicles sold in Canada, the name Chrysler Group LLC shall be
deemed to be deleted and the name Chrysler Canada Inc. used in substitution (excluding
legal lines).
INTRODUCTION/WELCOME
2
Page 18 of 140

SUPPLEMENTAL RESTRAINT SYSTEM (SRS) — AIR BAGS
Air Bag System Components
Yo u r v e h i c l e m a y b e e q u i p p e d w i t h t h e f o l l o w i n g a i r b a g s y s t e m c o m p o n e n t s :
•OccupantRestraintController(ORC)
•AirBagWarningLight
•SteeringWheelandColumn
•InstrumentPanel
•KneeImpactBolsters
•AdvancedFrontAirBags
•SupplementalSideAirBags
•SupplementalKneeAirBags
•FrontandSideImpactSensors
•SeatBeltPretenioners
•SeatBeltBuckleSwitch
•SeatTrackPositionSensors
Advanced Front Air Bags
•ThisvehiclehasAdvancedFrontAirBagsforboththedriverandfrontpassengerasa
supplement to the seat belt restraint systems. The Advanced Front Air Bags will not
deploy in every type of collision.
•AdvancedFrontAirBagsaredesignedtoprovideadditionalprotectionbysupplement-
ing the seat belts. Advanced Front Air Bags are not expected to reduce the risk of injury
in rear, side, or rollover collisions.
•TheAdvancedFrontAirBagswillnotdeployinallfrontalcollisions,includingsome
that may produce substantial vehicle damage — for example, some pole collisions,
truck underrides, and angle offset collisions.
•Ontheotherhand,dependingonthetypeandlocationofimpact,AdvancedFrontAir
Bags may deploy in crashes with little vehicle front-end damage but that produce a
severe initial deceleration.
•Becauseairbagsensorsmeasurevehicledecelerationovertime,vehiclespeedand
damage by themselves are not good indicators of whether or not an air bag should have
deployed.
•Seatbeltsarenecessaryforyourprotectioninallcollisions,andalsoareneededtohelp
keep you in position, away from an inflating air bag.
•Theairbagsmustbereadytoinflateforyourprotectioninacollision.TheOccupant
Restraint Controller (ORC) monitors the internal circuits and interconnecting wiring
associated with air bag system electrical components.
GETTING STARTED
16
Page 35 of 140

WARNING!
•Personswhoareunabletofeelpaintotheskinbecauseofadvancedage,chronic
illness, diabetes, spinal cord injury, medication, alcohol use, exhaustion or other
physical conditions must exercise care when using the seat heater. It may cause
burns even at low temperatures, especially if used for long periods of time.
•Donotplaceanythingontheseatthatinsulatesagainstheat,suchasablanketor
cushion. This may cause the seat heater to overheat. Sitting in a seat that has been
overheated could cause serious burns due to the increased surface temperature of
the seat.
HEATED STEERING WHEEL
The steering wheel contains a heating element that heats the steering wheel to one
temperature setting.
The heated steering wheel control button is located within the Uconnect®system. You can
gain access to the control buttons through the climate screen or the controls screen.
•Presstheheatedsteeringwheelbuttononce to turn the heating element ON.
•Presstheheatedsteeringwheelbuttonasecondtimetoturntheheatingelement
OFF.
Once the heated steering wheel has been turned on, it will operate for up to 80 minutes
before automatically shutting off. The heated steering wheel can shut off early or may not
turn on when the steering wheel is already warm.
NOTE:
Vehicle Equipped With Remote Start
On models that are equipped with remote start, this feature can be programmed to come
on during a remote start through the Uconnect®system. Refer to “Uconnect®Settings”
in “Understanding Your Instrument Panel” in the Owner's Manual on the DVD.
WARNING!
•Personswhoareunabletofeelpaintotheskinbecauseofadvancedage,chronic
illness, diabetes, spinal cord injury, medication, alcohol use, exhaustion, or other
physical conditions must exercise care when using the steering wheel heater. It may
cause burns even at low temperatures, especially if used for long periods.
•Donotplaceanythingonthesteeringwheelthatinsulatesagainstheat,suchasa
blanket or steering wheel covers of any type and material. This may cause the
steering wheel heater to overheat.
GETTING STARTED
33
Page 52 of 140

Audio Settings
•PushtheSETTINGSbuttononthefaceplateontherightsideoftheunit.
•Thenscrolldownandpressthe“Audio”buttononthetouchscreentogettotheAudio
menu.
•TheAudioMenushowsthefollowingoptionsforyoutocustomizeyouraudiosettings.
•Equalizer
•Balance/Fade
•SpeedAdjustVolume
•Pressthe“Exit”buttononthetouchscreentoexitfromtheAudioMenu.
Equalizer
•Pressthe“Equalizer”buttononthetouchscreentoadjusttheBass,MidandTreble.
Use the “+” or “–” button on the touchscreen to adjust the equalizer to your desired
settings. Press the “Done” button on the touchscreen when done.
Balance/Fade
•Pressthe“Balance/Fade”buttononthetouchscreentoadjustthesoundfromthe
speakers. Use the “arrow” button on the touchscreen to adjust the sound level from the
front and rear or right and left side speakers. Press the center “C” button on the
touchscreen to reset the balance and fade to the factory setting. Press the “Done”
button on the touchscreen when done.
Speed Adjust Volume
•Pressthe“SpeedAdjustVolume”buttononthetouchscreentoselectbetweenOFF,1,
2or3.Thiswilldecreasetheradiovolumerelativetoadecreaseinvehiclespeed.Press
the “Done” button on the touchscreen when done.
ELECTRONICS
50
Page 54 of 140

Setting The Time
•Model8.4NsynchronizestimeautomaticallyviaGPS,soshouldnotrequireanytime
adjustment. If you do need to set the time manually, follow the instructions below for
Model 8.4.
•ForModel8.4,turntheuniton,thenpressthe“TimeDisplay”atthetopofthescreen.
Press “Yes”.
•Ifthetimeisnotdisplayedatthetopofthescreen,press“More”buttononthe
touchscreen and then “Settings” button on the touchscreen. In the Settings screen,
press the “Clock” button on the touchscreen, then check or uncheck this option.
•Press“+”or“–”nexttoSetTimeHoursandSetTimeMinutestoadjustthetime.
•Ifthesefeaturesarenotavailable,uncheckthe“Sync”withGPSbox.
•Press“X”tosaveyoursettingsandexitoutoftheClockSettingscreen.
Audio Settings
•Pressthe“Audio”buttononthetouchscreentoactivatetheAudiosettingsscreento
adjust Balance\Fade, Equalizer and Speed Adjusted Volume.
•YoucanreturntotheRadioscreenbypressingthe“X”locatedatthetopright.
Balance/Fade
•Pressthe“Balance/Fade”buttononthetouchscreentoBalanceaudiobetweenthe
front speakers or fade the audio between the rear and front speakers.
•Pressingthe“Front,”“Rear,””Left”or“Right”buttonsonthetouchscreenorpress
and drag the red Speaker Icon to adjust the Balance/Fade.
Equalizer
•Pressthe“Equalizer”buttononthetouchscreentoactivatetheEqualizerscreen.
•Pressthe“+”or“–”buttonsonthetouchscreen,orbypressinganddraggingoverthe
level bar for each of the equalizer bands. The level value, which spans between ±9, is
displayed at the bottom of each of the Bands.
Speed Adjusted Volume
•Pressthe“SpeedAdjustedVolume”buttononthetouchscreentoactivatetheSpeed
Adjusted Volume screen. The Speed Adjusted Volume is adjusted by pressing the “+”
and “–” buttons or by pressing and dragging over the level bar. This alters the automatic
adjustment of the audio volume with variation to vehicle speed.
ELECTRONICS
52
Page 62 of 140

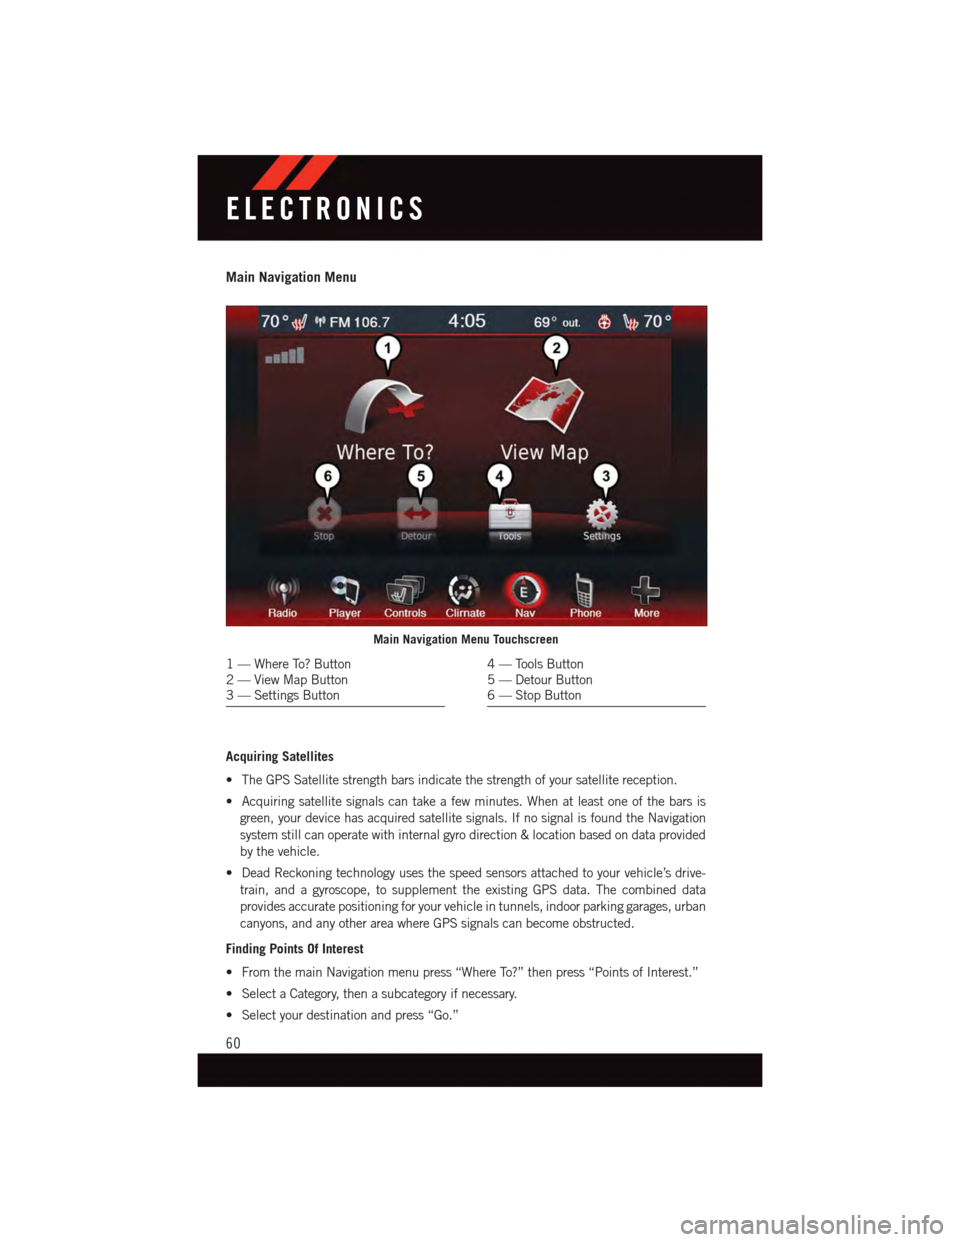
Main Navigation Menu
Acquiring Satellites
•TheGPSSatellitestrengthbarsindicatethestrengthofyoursatellitereception.
•Acquiringsatellitesignalscantakeafewminutes.Whenatleastoneofthebarsis
green, your device has acquired satellite signals. If no signal is found the Navigation
system still can operate with internal gyro direction & location based on data provided
by the vehicle.
•DeadReckoningtechnologyusesthespeedsensorsattachedtoyourvehicle’sdrive-
train, and a gyroscope, to supplement the existing GPS data. The combined data
provides accurate positioning for your vehicle in tunnels, indoor parking garages, urban
canyons, and any other area where GPS signals can become obstructed.
Finding Points Of Interest
•FromthemainNavigationmenupress“WhereTo?”thenpress“PointsofInterest.”
•SelectaCategory,thenasubcategoryifnecessary.
•Selectyourdestinationandpress“Go.”
Main Navigation Menu Touchscreen
1—WhereTo?Button2—ViewMapButton3—SettingsButton
4—ToolsButton5—DetourButton6—StopButton
ELECTRONICS
60
Page 77 of 140

WARNING!
Any voice commanded system should be used only in safe driving conditions following
applicable laws regarding phone use. Your attention should be focused on safely
operating the vehicle. Failure to do so may result in a collision causing you and others
to be severely injured or killed.
VIDEO ENTERTAINMENT SYSTEM (VES™)
System Operation
•Thescreenislocatedontheheadlinerbehindthefrontseat.Tolowerthescreen,press
the release button located in the rear of the overhead console.
•Thesystemmaybecontrolledbythefrontseatoccupantsusingthetouchscreenradio,
or by the rear seat occupants using the remote control.
•Thevideoscreendisplaysinformationinasplit-screenformat.Theleftsideofthe
screen is referred to as Channel 1 and the right side of the screen is referred to as
Channel 2. All modes except video modes are displayed in a split-screen format.
•Tousetheheadphones,pressthepowerbuttonlocatedontherightearcup.Selectthe
channel on the headphones (1 or 2) that corresponds to the channel selected on the
VES™ screen.
Operation Of The Remote
The remote control operates similarly to any DVD remote you have used before and allows
the rear seat passengers to change stations, tracks, discs and audio/video modes and is
designed to control either channel by using the selector switch located on the right side of
the remote.
•Selectanaudiochannel(Rear1fordriver'ssiderearscreenandRear2forpassenger's
side rear screen), then press the “source” button and using the up and down arrows,
highlight disc from the menu and press the “OK” button.
•Pressthepopup/menubuttontonavigatethediscmenuandoptions.
Pressing the MODE button causes the Mode Selection menu to appear on the VES™
screen. Use the remote control arrow buttons to scroll through the available modes, then
press ENTER to select the desired mode.
Pressing the power button will turn the VES™ system ON/OFF.
Auxiliary Audio/Video Input Jacks
•TheAuxjacksarelocatedontherearofthecenterconsole.
•ConnectthevideogameorotherexternalmediadevicestotheAUXjacksfollowingthe
color coding for VES™ jacks.
•Usingeitherthetouchscreenradioorremotecontrol,selectAUXfromtheRearVES™
Control or Mode Selection screen.
•Refertoyourvehicle'sOwnersManualontheDVDforfurtherdetails.
ELECTRONICS
75
Page 79 of 140

Compass Calibration
This compass is self-calibrating, which eliminates the need to set the compass manually.
When the vehicle is new, the compass may appear erratic and the EVIC will display “CAL”
until the compass is calibrated.
Yo u m a y a l s o c a l i b r a t e t h e c o m p a s s b y c o m p l e t i n g o n e o r m o r e 3 6 0 d e g r e e t u r n s ( i n a n
area free from large metal or metallic objects) until the “CAL” message displayed in the
EVIC turns off. The compass will now function normally.
PROGRAMMABLE FEATURES
Electronic Vehicle Information Center (EVIC) — If Equipped
•TheEVICcanbeusedtovieworchangethefollowingsettings.PushtheUPor
DOWNbutton until System Setup displays, then push the SELECTbutton.
Scroll through the settings using the UP or DOWN buttons. Push the SELECT
button to change the setting. Push the BACK button to scroll back to a previous menu
or sub menu.
•Fuel Economy•Average Fuel Economy•DistanceToEmpty(DTE)•MilesPerGallon(MPG)
•Tr i p I n f o•Tr i p A•TripB•ElapsedTime
•Vehicle Speed•Ti r e P S I
•Messages•VehicleInfo(CustomerInformation
Features)
Uconnect® 4.3 Customer Programmable Features
•TheUconnect®4.3 system allows you to access Customer Programmable feature
settings such as Display, Clock, Safety/Assistance, Lights, Doors & Locks, Heated
Seats, Engine Off Operation, Compass Settings, Audio, Phone/ Bluetooth®and SIRIUS
Setup through buttons on the faceplate and buttons on the touchscreen.
•Pressthe“Settings”buttonontherightsideoftheunittoaccesstheSettingsscreen,
use the “Page Up/Down” buttons on the touchscreen to scroll through the following
settings. The following feature settings are available:
•Display•AutoOnComfort&RemoteStart
•Clock•EngineOffOptions
•Safety/Assistance•Audio
•Lights•Phone/Bluetooth®
•Doors&Locks•SIRIUSSetup
ELECTRONICS
77