2015 DODGE DART center console
[x] Cancel search: center consolePage 21 of 164

Lighter Weight Passengers (Including Small Adults)
When a lighter weight passenger, including a small adult, occupies the front passenger
seat, the OCS may reduce the inflation rate of the Passenger Advanced Front Air Bag. This
does not mean that the OCS is working improperly.
Do not decrease OR increase the front passenger’s seated weight on the front passenger
seat
The front passenger’s seated weight must be properly positioned on the front passenger
seat. Failure to do so may result in serious injury or death. The OCS determines the most
probable classification of the occupant that it detects. The OCS will detect the front
passenger’s decreased or increased seated weight, which may result in an adjusted
inflation rate of the Passenger Advanced Front Air Bag in a collision. This does not mean
that the OCS is working improperly. Decreasing the front passenger’s seated weight on the
front passenger seat may result in a reduced-power deployment of the Passenger
Advanced Front Air Bag. Increasing the front passenger’s seated weight on the front
passenger seat may result in a full-power deployment of the Passenger Advanced Front Air
Bag. Examples of improper front passenger seating include:
•Thefrontpassenger’sweightistransferredtoanotherpartofthevehicle(likethedoor,
arm rest or instrument panel).
•Thefrontpassengerleansforward,sideways,orturnstofacetherearofthevehicle.
•Thefrontpassenger’sseatbackisnotinthefulluprightposition.
•Thefrontpassengercarriesorholdsanobjectwhileseated(e.g.,backpack,box,etc.).
•Objectsarelodgedunderthefrontpassengerseat.
•Objectsarelodgedbetweenthefrontpassengerseatandcenterconsole.
•Accessoriesthatmaychangetheseatedweightonthefrontpassengerseatare
attached to the front passenger seat.
•Anythingthatmaydecreaseorincreasethefrontpassenger’sseatedweight.
GETTING STARTED
19
Page 58 of 164

Audio Jack Operation
The Audio Jack allows a portable device,
such as an MP3 player or an iPod®to be
plugged into the center console and utilize
the vehicle’s audio system, using a 3.5 mm
stereo audio cable, to amplify the source
and play through the vehicle speakers.
Pushing the PLAYER button will change the
mode to auxiliary device if the Audio Jack is
connected, allowing the music from your
portable device to play through the vehicle's
speakers.
The functions of the portable device are
controlled using the device buttons. The
volume may be controlled using the radio or
portable device.
USB Port
Connect your iPod®/MP3 or compatible de-
vice using a USB cable into the USB Port.
USB Memory sticks with audio files can also be used. Then, audio from the device can be
played on the vehicles sound system while providing metadata (artist, track title, album,
etc.) information on the radio display.
Pushing the PLAYER button will change the device mode between connected auxiliary
devices.
When connected, the MP3 Player/compatible USB device can be controlled using the
radio or Steering Wheel Audio Controls or Voice Commands to play, skip to the next or
previous track, browse, and list the contents.
The MP3/WMA Player battery charges when plugged into the USB port (if supported by
the specific device).
To r o u t e t h e a u d i o c a b l e o u t o f t h e c e n t e r c o n s o l e , u s e t h e a c c e s s c u t o u t o n t h e r i g h t s i d e
of the console.
NOTE:
•YourvehiclecannotbeequippedwiththeUSBPortwithouthavingtheavailable
Uconnect®Voice Command feature.
•WhenconnectingyourMP3/WMAPlayerdeviceforthefirsttime,thesystemmaytake
several minutes to read your music, depending on the number of files. For example, the
system will take approximately five minutes for every 1,000 songs loaded on the
device. However, music on the device will play while reading continues in the
background. Also during the reading process, the Shuffle and Browse functions will be
USB/Audio Jack
1—USB/AUXJack2—AudioCableAccess
ELECTRONICS
56
Page 67 of 164

Remote CD/Disc Player — If Equipped
The CD/Disc Player is located inside the
center console.
With the printed side facing the rear of the
car, insert the disc into the disc slot inside
the center console. The radio pulls the disc
in automatically. The radio selects the ap-
propriate mode after the disc is recognized,
and starts playing the first track.
Remote CD/Disc Player
1—USBPort2—PowerOutlet3—Audio/AUXJack4—CD/DiscSlot
ELECTRONICS
65
Page 73 of 164

•Toroutetheaudiocableoutofthecenterconsole,usetheaccesscutoutontheright
side of the console.
NOTE:
When connecting your MP3 Player device
for the first time, the system may take
several minutes to read your music, de-
pending on the number of files. For ex-
ample, the system will take approximately
five minutes for every 1000 songs loaded
on the device. Also during the reading pro-
cess, the Shuffle and Browse functions will
be disabled. This process is needed to en-
sure the full use of your MP3 Player fea-
tures and only happens the first time it is
connected. After the first time, the reading
process of your MP3 Player will take con-
siderably less time unless changes are
made or new songs are added to the play-
list.
•TheUSBportsupportscertainMini,Classic,Nano,Touch,andiPhone®devices. The
USB port also supports playing music from compatible external USB Mass Storage
Class memory devices. Some iPod®software versions may not fully support the USB
port features. Please visit Apple’s website for iPod®software updates.
Audio Jack
The Audio Jack allows a portable device, such as an MP3 player or an iPod®to be plugged
into the radio and utilize the vehicle’s sound system, using a standard 3.5 mm audio
cable, to amplify the source and play through the vehicle speakers.
Press the “Player” button on the touchscreen on the then choose AUX source will change
the mode to auxiliary device if the Audio Jack is connected, allowing the music from your
portable device to be heard through the vehicle's speakers.
The functions of the portable device are controlled using the device controls. The volume
may be controlled using the radio or portable device.
To r o u t e t h e a u d i o c a b l e o u t o f t h e c e n t e r c o n s o l e , u s e t h e a c c e s s c u t o u t o n t h e r i g h t s i d e
of the console.
USB/MP3/Audio Cable Access
ELECTRONICS
71
Page 74 of 164

Remote CD/Disc Player — If Equipped
The CD/Disc Player is located inside the center console.
With the printed side facing the rear of the car, lift up the protective door and insert the
disc into the disc slot. The radio pulls the disc in automatically. The radio selects the
appropriate mode after the disc is recognized, and starts playing the first track.
The CD/Disc can also be selected by pressing the “Player” button on the touchscreen,
then press the “Source” button on the touchscreen and then press the “Disc” button on
the touchscreen.
NOTE:
•DependingontheCD/Discbeingused,youwillonlybeabletobrowsebyfolder.
•ThereareVoiceCommandsavailablewhileinthismode.RefertotheUconnect®Voice
Command section in this guide.
Bluetooth® Streaming Audio
•IfequippedwithUconnect®Voice Command, your Bluetooth-equipped MP3 Player
devices, cell phones or other media players, may also be able to stream music to your
vehicle's sound system. Your connected device must be Bluetooth-compatible, and
paired with your Uconnect®system (see Uconnect®Phone section or
www.UconnectPhone.com for pairing instructions). You can access the music from
your connected Bluetooth®device by touching the Source soft-key while in Player
mode.
Garmin® Navigation (8.4N Only)
Uconnect®8.4N integrates Garmin’s consumer-friendly navigation into your vehicle.
Garmin Navigation includes Lane Assist and Junction View, Speed Limit information, and
adatabasewithoversixmillionpointsofinterest.
Press the “Nav” button on the touchscreen in the menu bar to access the Navigation
system.
Changing The Navigation Voice Prompt Volume
1. Program a destination.
2. While traveling on your route, press the upper left area of the map screen where your
next turn is displayed.
3. The Navigation system will then repeat the distance to your next turn.
4. While the Navigation system is speaking, use the ON/OFF VOLUME rotary knob to
adjust the volume to a comfortable level. Please note the volume setting for Navigation
Voice Prompt is different than the audio system.
ELECTRONICS
72
Page 96 of 164

Uconnect® 8.4 CUSTOMER PROGRAMMABLE FEATURES
The Uconnect®8.4 system allows you to access Customer Programmable feature settings
such as Display, Clock, Safety/Assistance, Lights, Doors & Locks, Heated Seats, Engine
Off Operation, Compass Settings, Audio, Phone/Bluetooth®and SiriusXM Setup through
buttons on the touchscreen.
Press the “More” button on the touchscreen on the bottom of the screen, then press the
“Settings” button on the touchscreen to access the Settings screen. When making a
selection, scroll up or down until the preferred setting is highlighted, then press and
release the preferred setting until a check-mark appears next to the setting, showing that
setting has been selected. The following feature settings are available:
•Display•Clock
•Safety/Assistance•Lights
•Doors&Locks•Auto-OnComfort&RemoteStart
•EngineOffOptions•CompassSettings
•Audio•Phone/Bluetooth®
•SiriusXMSetup
UNIVERSAL GARAGE DOOR OPENER (HomeLink®)
HomeLink®replaces up to three hand-held transmitters that operate devices such as
garage door openers, motorized gates, lighting or home security systems. The HomeLink®
unit is powered by your vehicles 12 Volt battery.
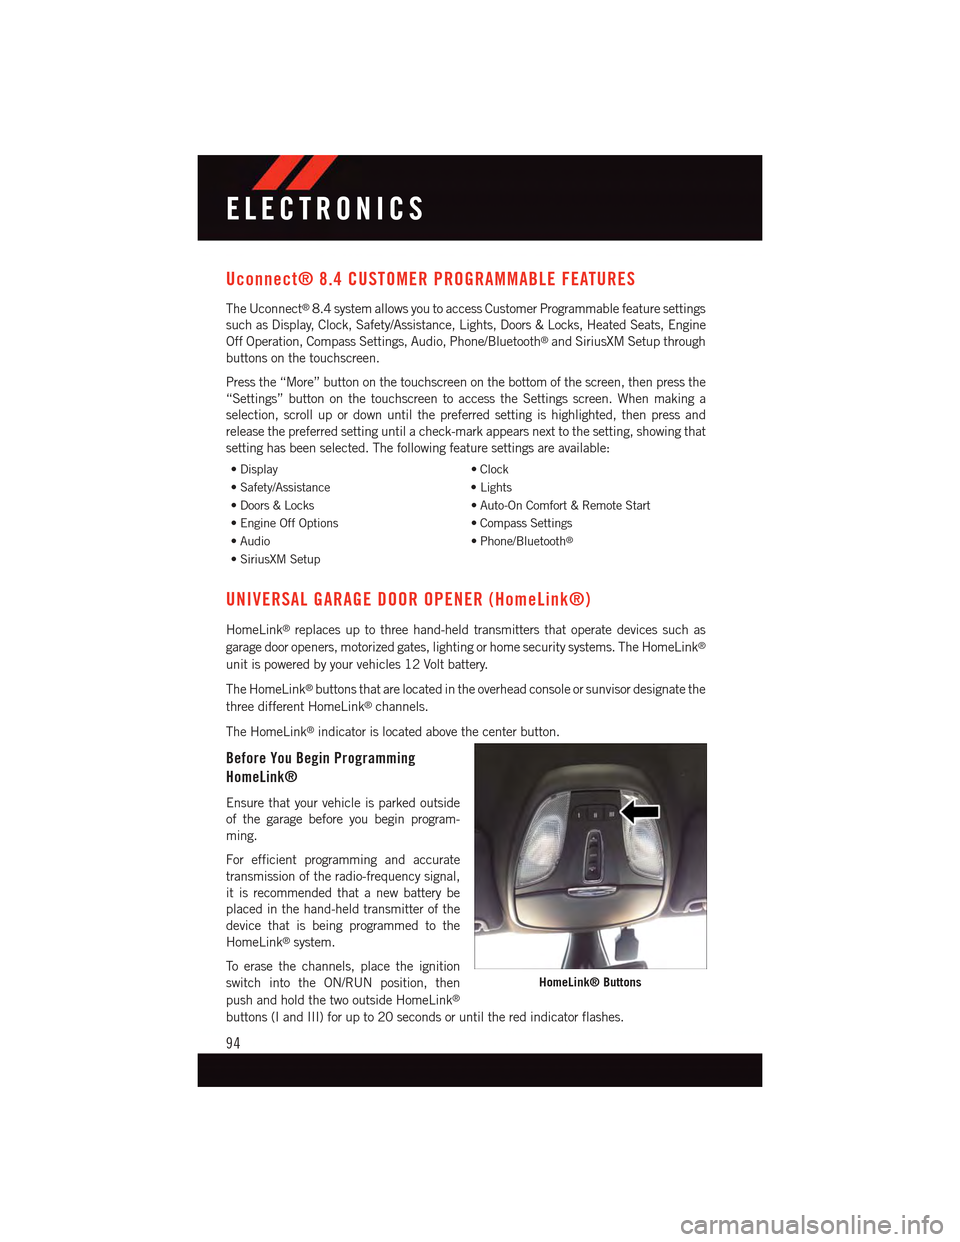
The HomeLink®buttons that are located in the overhead console or sunvisor designate the
three different HomeLink®channels.
The HomeLink®indicator is located above the center button.
Before You Begin Programming
HomeLink®
Ensure that your vehicle is parked outside
of the garage before you begin program-
ming.
For efficient programming and accurate
transmission of the radio-frequency signal,
it is recommended that a new battery be
placed in the hand-held transmitter of the
device that is being programmed to the
HomeLink®system.
To e r a s e t h e c h a n n e l s , p l a c e t h e i g n i t i o n
switch into the ON/RUN position, then
push and hold the two outside HomeLink®
buttons (I and III) for up to 20 seconds or until the red indicator flashes.
HomeLink® Buttons
ELECTRONICS
94
Page 99 of 164

POWER OUTLET
There is a 12 Volt power outlet located in
the front storage bin below the radio. This
outlet has power available when the ignition
switch in the ON position.
Asecond12Voltpoweroutletislocated
inside the center console (if equipped).
This outlet has power available when the
ignition switch is in the LOCK, ON, or ACC
position.
NOTE:
•Donotexceedthemaximumpowerof
160 Watts (13 Amps) at 12 Volts. If the
160 Watt (13 Amp) power rating is ex-
ceeded, the fuse protecting the system
will need to be replaced.
•Poweroutletsaredesignedforaccessoryplugsonly.Donotinsertanyotherobjectin
the power outlet as this will damage the outlet and blow the fuse. Improper use of the
power outlet can cause damage not covered by your new vehicle warranty.
Front Power Outlet
Power Outlet Fuses
1—F30Fuse20AmpYellowPowerOutlet — Center Console2—F84Fuse20AmpYellowCigarLighter/Power Outlet Instrument Panel
ELECTRONICS
97
Page 124 of 164

WARNING!
•Whentemperaturesarebelowthefreezingpoint,electrolyteinadischargedbattery
may freeze. Do not attempt jump-starting because the battery could rupture or
explode and cause personal injury. Battery temperature must be brought above the
freezing point before attempting a jump-start.
•Takecaretoavoidtheradiatorcoolingfanwheneverthehoodisraised.Itcanstart
anytime the ignition switch is on. You can be injured by moving fan blades.
•Removeanymetaljewelry,suchaswatchbandsorbracelets,thatmightmakean
inadvertent electrical contact. You could be severely injured.
•Batteriescontainsulfuricacidthatcanburnyourskinoreyesandgenerate
hydrogen gas which is flammable and explosive. Keep open flames or sparks away
from the battery.
•Donotallowvehiclestotoucheachotherasthiscouldestablishaground
connection and personal injury could result.
•Failuretofollowthisprocedurecouldresultinpersonalinjuryorpropertydamage
due to battery explosion.
•Donotconnectthecabletothenegativepost(-)ofthedischargedbattery.The
resulting electrical spark could cause the battery to explode and could result in
personal injury.
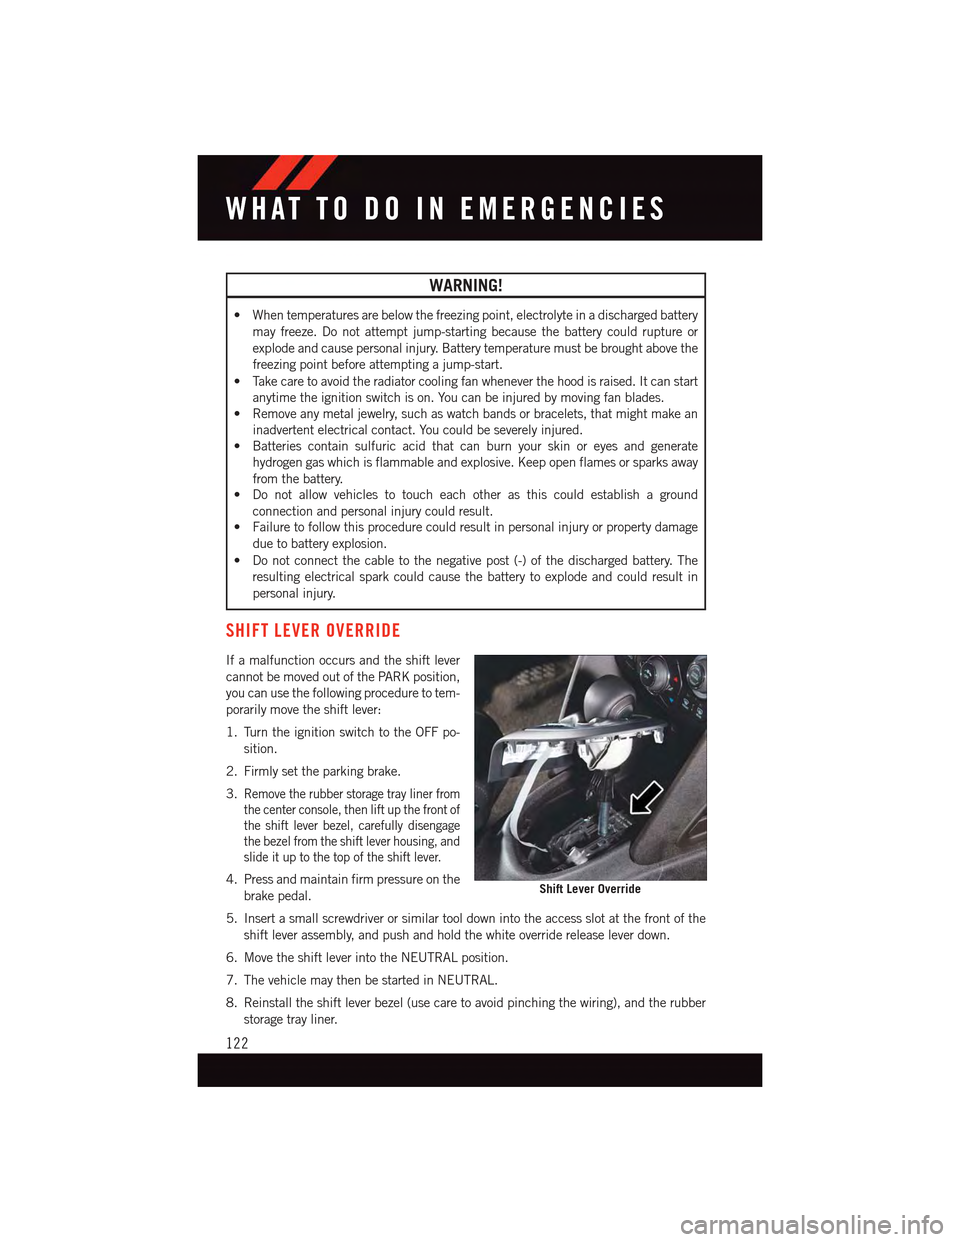
SHIFT LEVER OVERRIDE
If a malfunction occurs and the shift lever
cannot be moved out of the PARK position,
you can use the following procedure to tem-
porarily move the shift lever:
1. Turn the ignition switch to the OFF po-
sition.
2. Firmly set the parking brake.
3.Remove the rubber storage tray liner from
the center console, then lift up the front of
the shift lever bezel, carefully disengage
the bezel from the shift lever housing, and
slide it up to the top of the shift lever.
4. Press and maintain firm pressure on the
brake pedal.
5. Insert a small screwdriver or similar tool down into the access slot at the front of the
shift lever assembly, and push and hold the white override release lever down.
6. Move the shift lever into the NEUTRAL position.
7. The vehicle may then be started in NEUTRAL.
8. Reinstall the shift lever bezel (use care to avoid pinching the wiring), and the rubber
storage tray liner.
Shift Lever Override
WHAT TO DO IN EMERGENCIES
122