2015 DODGE DART ignition
[x] Cancel search: ignitionPage 107 of 164

Vehicles Not Equipped With Keyless Enter-N-Go™
1. Turn the ignition switch to the ON/RUN position (do not start the engine).
2. Fully depress the accelerator pedal, slowly, three times within 10 seconds.
3. Turn the ignition switch to the OFF/LOCK position.
Using The EVIC Menu
Vehicles Equipped With Passive Entry
•Withoutpressingthebrakepedal,presstheENGINESTART/STOPbuttonandcycle
the ignition to the ON/RUN position (Do not start the engine.)
•PressandreleasetheDOWNarrow button to scroll downward through the main
menu to “Vehicle Info”.
•PressandreleasetheRIGHTarrow button to access the ”Oil Life” screen.
•PressandholdtheRIGHTarrow button for one second to access the ”Oil Life
Reset” screen.
•PressandholdtheDOWNarrow button until the screen shows 100% oil life.
•PressandreleasetheUparrowbuttontoexittheEVICscreen.
Vehicles Not Equipped With Passive Entry
•Withoutpressingthebrakepedal,cycletheignitiontotheON/RUNposition(Donot
start the engine.)
•PressandreleasetheDOWNarrow button to scroll downward through the main
menu to “Vehicle Info”.
•PressandreleasetheRIGHTarrow button to access the ”Oil Life” screen.
•PressandholdtheRIGHTarrow button for one second to access the ”Oil Life
Reset” screen.
•PressandholdtheDOWNarrow button until the screen shows 100% oil life.
•PressandreleasetheUparrowbuttontoexittheEVICscreen.
NOTE:
If the indicator message illuminates when you start the vehicle, the oil change indicator
system did not reset. If necessary, repeat this procedure.
WHAT TO DO IN EMERGENCIES
105
Page 108 of 164

INSTRUMENT CLUSTER INDICATOR LIGHTS
-TurnSignalIndicator
The arrows will flash with the exterior turn signals when the turn signal lever is operated.
Atonewillchime,andaEVIC/DIDmessagewillappearifeitherturnsignalisleftonfor
more than 1 mile (1.6 km).
NOTE:
If either indicator flashes at a rapid rate, check for a defective outside light bulb.
-HighBeamIndicator
Indicates that headlights are on high beam.
-FrontFogLightIndicator
This indicator will illuminate when the front fog lights are on.
-VehicleSecurityLight
This light will flash rapidly for approximately 15 seconds when the vehicle security alarm
is arming. The light will flash at a slower speed continuously after the alarm is set. The
security light will also come on for about three seconds when the ignition is first turned on.
-ElectronicSpeedControlONIndicator
This indicator will illuminate when the electronic speed control has been activated to the
“ON” position.
-ElectronicSpeedControlSETIndicator
This indicator will illuminate when the cruising speed has been set.
-ElectronicStabilityControl(ESC)OFFIndicatorLight
This light indicates the Electronic Stability Control (ESC) is off.
-WindshieldWasherFluidLowIndicator
This indicator will illuminate when the windshield washer fluid is low.
WHAT TO DO IN EMERGENCIES
106
Page 111 of 164

Preparations For Jacking
1. Park the vehicle on a firm, level surface as far from the edge of the roadway as possible.
Avoid icy or slippery areas.
2. Turn on the Hazard Warning flasher.
3. Set the parking brake.
4. Place the shift lever into PARK.
5. Turn OFF the ignition.
6. Block the front and rear of the wheel diagonally opposite of the jacking position. For
example, if changing the right front tire, block the left rear wheel.
NOTE:
Passengers should not remain in the vehicle
when the vehicle is being jacked.
Jacking And Changing A Tire
1. Remove the spare tire, jack, and wheel
bolt wrench.
2. If equipped with aluminum wheels
where the center cap covers the wheel
bolts, use the wheel bolt wrench to pry
the center cap off carefully before rais-
ing the vehicle.
Wheel Blocked
Warning Label
WHAT TO DO IN EMERGENCIES
109
Page 117 of 164

Tire Service Kit Usage Precautions
•ReplacetheTireServiceKitSealantBottle(1)andSealantHose(6)priortothe
expiration date (printed on the bottle label) to assure optimum operation of the system.
Refer to “Sealing A Tire With Tire Service Kit” section (F) “Sealant Bottle and Hose
Replacement.”
•TheSealantBottle(1)andSealantHose(6)areaonetireapplicationuse.Aftereach
use, always replace these components immediately at an authorized dealer.
•WhentheTireServiceKitsealantisinaliquidform,cleanwater,andadampclothwill
remove the material from the vehicle or tire and wheel components. Once the sealant
dries, it can easily be peeled off and properly discarded.
•Foroptimumperformance,makesurethevalvestemonthewheelisfreeofdebris
before connecting the Tire Service Kit.
•Yo u c a n u s e t h e Ti r e S e r v i c e K i t a i r p u m p t o i n f l a t e b i c y c l e t i r e s . T h e k i t a l s o c o m e s w i t h t w oneedles, located in the Accessory Storage Compartment (on the bottom of the air pump) forinflating sport balls, rafts, or similar inflatable items. However, use only the Air Pump Hose(7) and make sure the Mode Select Knob (5) is in the Air Mode when inflating such itemsto avoid injecting sealant into them. The Tire Service Kit Sealant is only intended to sealpunctures less than 1/4 inch (6 mm) diameter in the tread of your vehicle.
•DonotliftorcarrytheTireServiceKitbythehoses.
Sealing A Tire With Tire Service Kit
(A) Whenever You Stop To Use Tire Service Kit:
1. Pull over to a safe location and turn on the vehicle’s Hazard Warning flashers.
2.Verify that the valve stem (on the wheel with the deflated tire) is in a position that is near
to the ground. This will allow the Tire Service Kit Hoses (6) and (7) to reach the valve stem
and keep the Tire Service Kit flat on the ground. This will provide the best positioning of the
kit when injecting the sealant into the deflated tire and running the air pump. Move the
vehicle as necessary to place the valve stem in this position before proceeding.
3. Place the transmission in PARK (auto transmission) or in Gear (manual transmission)
and cycle the ignition to the OFF position.
4. Set the parking brake.
(B) Setting Up To Use Tire Service Kit:
1. Turn the Mode Select Knob (5) to the Sealant Mode position.
2. Uncoil the Sealant Hose (6) and then remove the cap from the fitting at the end of the
hose.
3. Place the Tire Service Kit flat on the ground next to the deflated tire.
4. Remove the cap from the valve stem and then screw the fitting at the end of the
Sealant Hose (6) onto the valve stem.
5. Uncoil the Power Plug (8) and insert the plug into the vehicle’s 12 Volt power outlet.
6. Do not remove foreign objects (e.g., screws or nails) from the tire.
WHAT TO DO IN EMERGENCIES
115
Page 122 of 164

JUMP-STARTING
If your vehicle has a discharged battery it
can be jump-started using a set of jumper
cables and a battery in another vehicle or by
using a portable battery booster pack.
Jump-starting can be dangerous if done
improperly so please follow the procedures
in this section carefully.
NOTE:
When using a portable battery booster pack
follow the manufacturer’s operating instruc-
tions and precautions.
Preparations For Jump-Start
The battery in your vehicle is located in the
front of the engine compartment, behind
the left headlight assembly.
NOTE:
The positive battery post is covered with a protective cap. Lift up on the cap to gain access
to the positive battery post.
•Settheparkingbrake,shifttheautomatictransmissionintoPARK(manualtransmis-
sion in NEUTRAL) and turn the ignition to LOCK.
•Turnofftheheater,radio,andallunnecessaryelectricalaccessories.
•Ifusinganothervehicletojump-startthebattery,parkthevehiclewithinthejumper
cables reach, set the parking brake and make sure the ignition is OFF.
Jump-Starting Procedure
1. Connect the positive(+)end of the jumper cable to the positive(+)post of the vehicle
with the discharged battery.
2. Connect the opposite end of the positive(+)jumper cable to the positive(+)post of the
booster battery.
3. Connect the negative(-)end of the jumper cable to the negative(-)post of the booster
battery.
4. Connect the opposite end of the negative(-)jumper cable to a good engine ground
(exposed metal part of the discharged vehicle’s engine) away from the battery and the
fuel injection system.
5. Start the engine in the vehicle that has the booster battery, let the engine idle a few
minutes, and then start the engine in the vehicle with the discharged battery.
Positive Post (Under Cover)
WHAT TO DO IN EMERGENCIES
120
Page 124 of 164

WARNING!
•Whentemperaturesarebelowthefreezingpoint,electrolyteinadischargedbattery
may freeze. Do not attempt jump-starting because the battery could rupture or
explode and cause personal injury. Battery temperature must be brought above the
freezing point before attempting a jump-start.
•Takecaretoavoidtheradiatorcoolingfanwheneverthehoodisraised.Itcanstart
anytime the ignition switch is on. You can be injured by moving fan blades.
•Removeanymetaljewelry,suchaswatchbandsorbracelets,thatmightmakean
inadvertent electrical contact. You could be severely injured.
•Batteriescontainsulfuricacidthatcanburnyourskinoreyesandgenerate
hydrogen gas which is flammable and explosive. Keep open flames or sparks away
from the battery.
•Donotallowvehiclestotoucheachotherasthiscouldestablishaground
connection and personal injury could result.
•Failuretofollowthisprocedurecouldresultinpersonalinjuryorpropertydamage
due to battery explosion.
•Donotconnectthecabletothenegativepost(-)ofthedischargedbattery.The
resulting electrical spark could cause the battery to explode and could result in
personal injury.
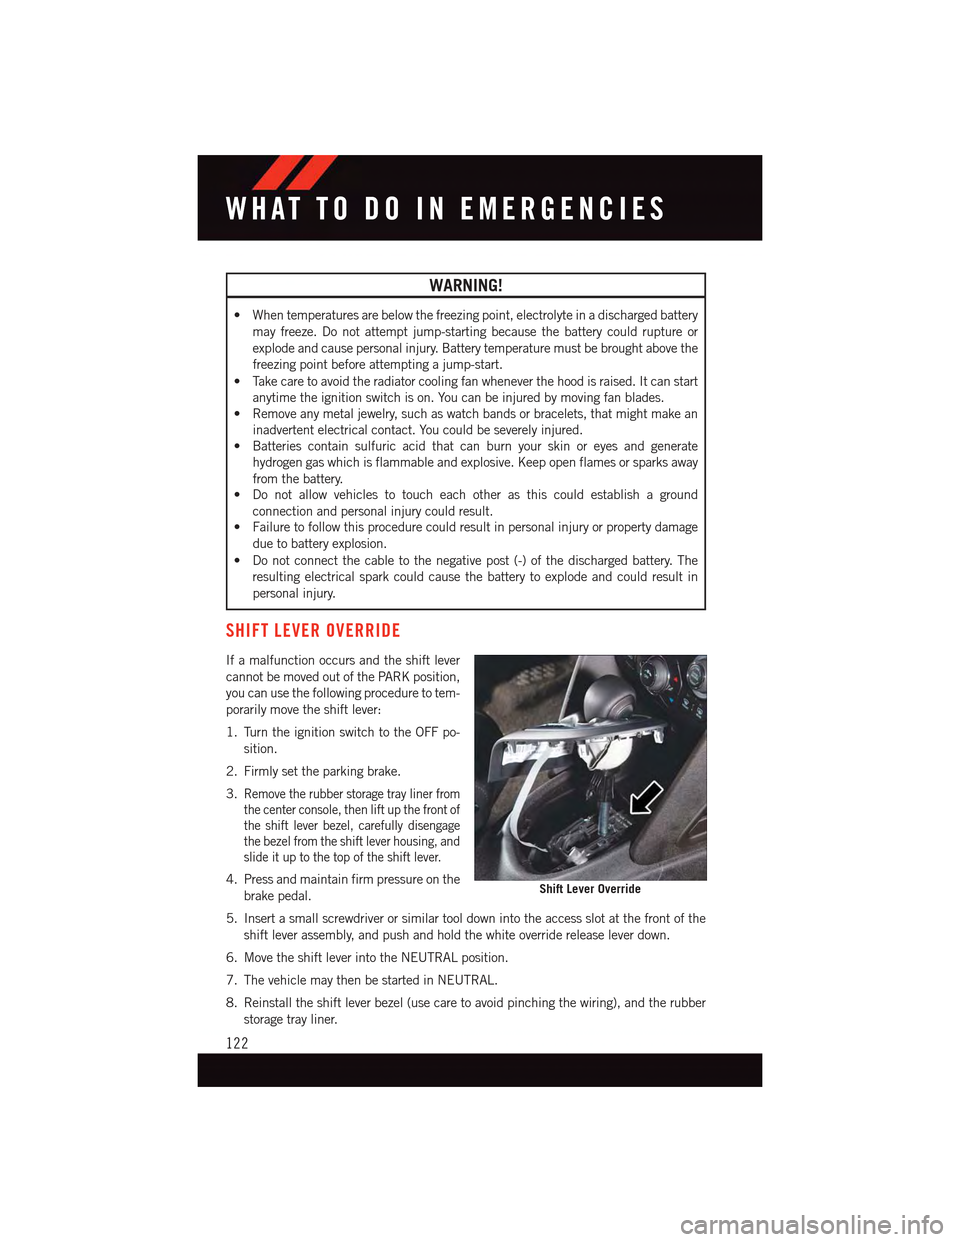
SHIFT LEVER OVERRIDE
If a malfunction occurs and the shift lever
cannot be moved out of the PARK position,
you can use the following procedure to tem-
porarily move the shift lever:
1. Turn the ignition switch to the OFF po-
sition.
2. Firmly set the parking brake.
3.Remove the rubber storage tray liner from
the center console, then lift up the front of
the shift lever bezel, carefully disengage
the bezel from the shift lever housing, and
slide it up to the top of the shift lever.
4. Press and maintain firm pressure on the
brake pedal.
5. Insert a small screwdriver or similar tool down into the access slot at the front of the
shift lever assembly, and push and hold the white override release lever down.
6. Move the shift lever into the NEUTRAL position.
7. The vehicle may then be started in NEUTRAL.
8. Reinstall the shift lever bezel (use care to avoid pinching the wiring), and the rubber
storage tray liner.
Shift Lever Override
WHAT TO DO IN EMERGENCIES
122
Page 142 of 164

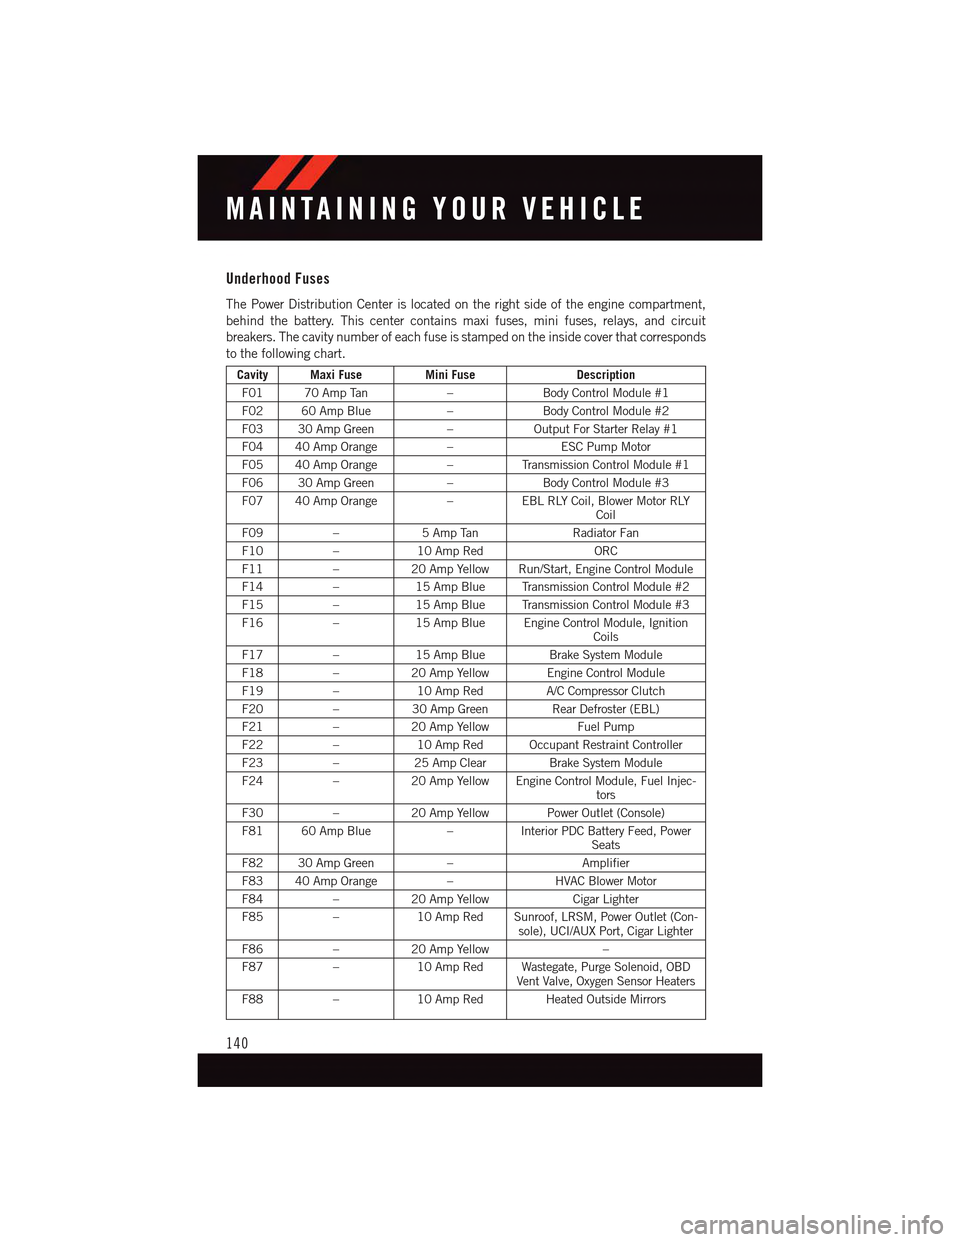
Underhood Fuses
The Power Distribution Center is located on the right side of the engine compartment,
behind the battery. This center contains maxi fuses, mini fuses, relays, and circuit
breakers. The cavity number of each fuse is stamped on the inside cover that corresponds
to the following chart.
Cavity Maxi FuseMini FuseDescription
F01 70 Amp Tan–Body Control Module #1
F02 60 Amp Blue–Body Control Module #2
F03 30 Amp Green–Output For Starter Relay #1
F04 40 Amp Orange–ESC Pump Motor
F05 40 Amp Orange–Tr a n s m i s s i o n C o n t r o l M o d u l e # 1
F06 30 Amp Green–Body Control Module #3
F07 40 Amp Orange–EBL RLY Coil, Blower Motor RLYCoil
F09–5AmpTanRadiator Fan
F10–10 Amp RedORC
F11–20 Amp Yellow Run/Start, Engine Control Module
F14–15 Amp Blue Transmission Control Module #2
F15–15 Amp Blue Transmission Control Module #3
F16–15 Amp Blue Engine Control Module, IgnitionCoils
F17–15 Amp BlueBrake System Module
F18–20 Amp Yellow Engine Control Module
F19–10 Amp RedA/C Compressor Clutch
F20–30 Amp GreenRear Defroster (EBL)
F21–20 Amp YellowFuel Pump
F22–10 Amp Red Occupant Restraint Controller
F23–25 Amp ClearBrake System Module
F24–20 Amp Yellow Engine Control Module, Fuel Injec-tors
F30–20 Amp Yellow Power Outlet (Console)
F81 60 Amp Blue–Interior PDC Battery Feed, PowerSeats
F82 30 Amp Green–Amplifier
F83 40 Amp Orange–HVAC Blower Motor
F84–20 Amp YellowCigar Lighter
F85–10 Amp Red Sunroof, LRSM, Power Outlet (Con-sole), UCI/AUX Port, Cigar Lighter
F86–20 Amp Yellow–
F87–10 Amp Red Wastegate, Purge Solenoid, OBDVent Valve, Oxygen Sensor Heaters
F88–10 Amp Red Heated Outside Mirrors
MAINTAINING YOUR VEHICLE
140