2015 DODGE DART ECU
[x] Cancel search: ECUPage 28 of 164

WARNING!
•Inacollision,anunrestrainedchild,evenatinybaby,canbecomeaprojectile
inside the vehicle. The force required to hold even an infant on your lap could
become so great that you could not hold the child, no matter how strong you are.
The child and others could be severely injured or killed. Any child riding in your
vehicle should be in a proper restraint for the child's size.
•Rearward-facingchildseatsmustneverbeusedinthefrontseatofavehiclewith
afrontpassengerairbag.Anairbagdeploymentcouldcausesevereinjuryordeath
to infants in this position.
•Onlyusearearward-facingchildrestraintinavehiclewitharearseat.
•ImproperinstallationofachildrestrainttotheLATCHanchoragescanleadto
failure of an infant or child restraint. The child could be severely injured or killed.
Follow the manufacturer’s directions exactly when installing an infant or child
restraint.
•Anincorrectlyanchoredtetherstrapcouldleadtoincreasedheadmotionand
possible injury to the child. Use only the anchor positions directly behind the child
seat to secure a child restraint top tether strap.
•Ifyourvehicleisequippedwithasplitrearseat,makesurethetetherstrapdoesnot
slip into the opening between the seatbacks as you remove slack in the strap.
HEAD RESTRAINTS
Head restraints are designed to reduce the risk of injury by restricting head movement in
the event of a rear impact. Head restraints should be adjusted so that the top of the head
restraint is located above the top of your ear.
WARNING!
The head restraints for all occupants must be properly installed and adjusted prior to
operating the vehicle or occupying a seat. Head restraints should never be adjusted
while the vehicle is in motion. Driving a vehicle with the head restraints improperly
adjusted or removed could cause serious injury or death in the event of a collision.
Reactive Head Restraints — Front Seats
The front driver and passenger seats are equipped with Reactive Head Restraints (RHR).
In the event of a rear impact the RHRs will automatically extend forward minimizing the
gap between the back of the occupants head and the RHR.
The RHRs will automatically return to their normal position following a rear impact. If the
RHRs do not return to their normal position see your authorized dealer immediately.
To r a i s e t h e h e a d r e s t r a i n t , p u l l u p w a r d o n t h e h e a d r e s t r a i n t . To l o w e r t h e h e a d r e s t r a i n t ,
press the release button, located at the base of the head restraint, and push downward on
the head restraint.
GETTING STARTED
26
Page 31 of 164

REAR SEAT
Folding Rear Seatback
Pull on the loops, located near the outer top
of the seatbacks, to fold down either or both
seatbacks. These loops can be tucked away
when not in use.
When the seatback is raised to the upright
position, make sure it is latched by strongly
pulling on the top of the seatback above the
seat loop.
WARNING!
•Becertainthattheseatbackissecurelylockedintoposition.Iftheseatbackisnot
securely locked into position, the seat will not provide the proper stability for child
seats and/or passengers. An improperly latched seat could cause you and others to
severely injured or killed.
•Thecargoareaintherearofthevehicle(withtherearseatbacksinthelocked-upor
folded-down position) should not be used as a play area by children when the
vehicle is in motion. They could be severely injured or killed in a collision. Children
should be seated and using the proper restraint system.
HEATED SEATS
Front Heated Seats
The front heated seats control buttons are located within the Uconnect®system. You can
gain access to the control buttons through the climate screen or the controls screen.
•Presstheheatedseatbuttononce to turn the High setting On.
•PresstheheatedseatbuttonasecondtimetoturntheLowsettingOn.
•PresstheheatedseatbuttonathirdtimetoturntheheatingelementsOff.
If the High-level setting is selected, the system will automatically switch to Low-level after
approximately 60 minutes. The Low-level setting will turn Off automatically after approxi-
mately 45 minutes.
Seatback Loops Locations
GETTING STARTED
29
Page 48 of 164

NOTE:
If three consecutive sunroof close attempts result in Pinch Protect reversals, the fourth
close attempt will be a Manual Close movement with Pinch Protect disabled.
WARNING!
•Donotletchildrenplaywiththesunroof.Neverleavechildrenunattendedina
vehicle, or with access to an unlocked vehicle. Do not leave the Key Fob in or near
the vehicle, and do not leave the ignition of a vehicle equipped with Keyless
Enter-N-Go™ in the ACC or ON/RUN mode. Occupants, particularly unattended
children, can become entrapped by the power sunroof while operating the power
sunroof switch. Such entrapment may result in serious injury or death.
•Inacollision,thereisagreaterriskofbeingthrownfromavehiclewithanopen
sunroof. You could also be severely injured or killed. Always fasten your seat belt
properly and make sure all passengers are properly secured.
•Donotallowsmallchildrentooperatethesunroof.Neverallowyourfingers,other
body parts, or any object to project through the sunroof opening. Injury may result.
MANUAL TRANSMISSION — IF EQUIPPED
Be sure the transmission is in first gear, not third, when starting from a standing position.
Damage to the clutch can result from starting in third gear.
Never drive with your foot resting on the clutch pedal, and never try to hold the vehicle on
ahillwiththeclutchpedalpartiallyengaged.Thiswillcauseabnormalwearontheclutch.
Shifting Into Reverse
To s h i f t i n t o R e v e r s e p u l l u p o n t h e l o c k o u t r i n g ( l o c a t e d u n d e r t h e s h i f t k n o b ) a n d s h i f t t h e
transmission into Reverse.
NOTE:
•NevershiftintoREVERSEuntilthevehiclehascometoacompletestop.
•Duringcoldweather,untilthetransmissionlubricantiswarm,youmayexperience
slightly higher shift efforts. This is normal and not harmful to the transmission.
OPERATING YOUR VEHICLE
46
Page 56 of 164

Store Radio Presets
When you are receiving a station that you wish to commit to pushbutton memory, push and
hold the button (1–5) you wish to lock onto this station for three seconds.
Yo u m a y a d d a s e c o n d o r t h i r d s t a t i o n t o e a c h p u s h b u t t o n b y r e p e a t i n g t h e a b o v e
procedure with this exception: Push the “A–B–C” button to select the A, B or C mode.
Each button can be set for up to three stations in both AM and FM. This allows a total of
15 AM, 15 FM and 15 SXM stations to be stored into push-button memory.
INFO Button
Push the INFO button for an RDS station (one with call letters displayed). The radio will
return a Radio Text message broadcast from an FM station (FM mode only).
Player Button
Pushing the “Player” button will allow you to switch from AM/FM/SXM modes to Player
mode (AUX/CD/Bluetooth®Steaming (BT)/USB).
MENU Button
Pushing the MENU button allows you to scroll between the setting sub-menus. Once the
desired sub-menu setting is highlighted push the TUNE/SCROLL knob to select the
setting. The following items are selectable:
Radio Mode
•Audio—SelectingtheAudiosub-menuwillallowyoutoadjusttheBass,MidRange,
Tr e b l e , B a l a n c e o r F a d e , j u s t l i k e p u s h i n g t h e A U D I O h a r d c o n t r o l . I f t h e B A C K b u t t o n
is pushed the radio will return to the Main Menu.
•Clock—SelectingClockwillallowyoutosettheclock.Adjustthehoursbyturningthe
TUNE/SCROLL control knob. After adjusting the hours, push the ENTER/BROWSE
button to set the minutes. The minutes will highlight. Adjust the minutes using the
right side TUNE/SCROLL control knob. Press the ENTER/BROWSE button to save time
change.
Player Mode
•Player Browse—SelectingPlayerBrowsewillgototheappropriatebrowsemenu
depending on the device currently playing (will function the same as pushing the
browse button while in that mode). This will only appear in the menu if the device
currently playing can support these features.
•Shuffle (SHFL)—Thisfunctionshuffles(randomizestheorderofthefiles).Thiswill
only appear in the menu if the device currently playing can support these features.
•Repeat (RPT)—WhenRepeatisactivated,thecurrentlyplayingsongwillbeginagain
when it ends. It will continue to cycle through the same song until repeat is turned Off.
Repeat will be turned off once one for the following conditions are met: 1) The source
is ejected 2) A different track list within that source is initiated 3) The REPEAT button
is toggled OFF. This will only appear in the menu if the device currently playing can
support these features.
ELECTRONICS
54
Page 60 of 164

NOTE:
For assistance in pairing your phone, contact Uconnect®customer support at
1-877-855-8400 or visit UconnectPhone.com for phone compatibility, pairing instruc-
tions and details. Canadian Residents: call 1-800-465-2001 (English) or
1-800-387-9983 (French) or visit UconnectPhone.com.
When your phone finds the system, select “Uconnect” as the paired device.
Complete The Pairing Procedure
When prompted on the phone, enter the 4-digit PIN number shown on the radio display.
If your phone asks you to accept a connection request from Uconnect®,select“Yes”.If
available, check the box telling it not to ask again – that way your phone will automatically
connect each time you start the vehicle.
Phonebook Download — Automatic Phonebook Transfer From Mobile Phone
If equipped and specifically supported by your phone, Uconnect®Phone automatically
downloads names (text names) and number entries from your mobile phone’s phonebook.
Specific Bluetooth®Phones with Phone Book Access Profile may support this feature.
See UconnectPhone.com for supported phones.
Automatic download and update, if supported, begins as soon as the Bluetooth®wireless
phone connection is made to the Uconnect®Phone, for example, after you start the
vehicle.
NOTE:
Yo u m a y b e a s k e d f o r p e r m i s s i o n t o i n i t i a t e t h e p h o n e b o o k d o w n l o a d .
•Amaximumof1,000entriesperphonewillbedownloadedandupdatedeverytimea
phone is connected to the Uconnect®Phone.
•Dependingonthemaximumnumberofentriesdownloaded,theremaybeashortdelay
before the latest downloaded names can be used. Until then, if available, the previously
downloaded phonebook is available for use.
•Onlythephonebookofthecurrentlyconnectedmobilephoneisaccessible.
•Onlythemobilephone’sphonebookisdownloaded.SIMcardphonebookisnotpartof
the Mobile phonebook.
•ThisdownloadedphonebookcannotbeeditedordeletedontheUconnect®Phone.
These can only be edited on the mobile phone. The changes are transferred and
updated to Uconnect®Phone on the next phone connection.
Making A Phone Call
•Pushthe“Phone”button.
•AftertheBEEP,say“dial”(or“call”aname).
ELECTRONICS
58
Page 96 of 164

Uconnect® 8.4 CUSTOMER PROGRAMMABLE FEATURES
The Uconnect®8.4 system allows you to access Customer Programmable feature settings
such as Display, Clock, Safety/Assistance, Lights, Doors & Locks, Heated Seats, Engine
Off Operation, Compass Settings, Audio, Phone/Bluetooth®and SiriusXM Setup through
buttons on the touchscreen.
Press the “More” button on the touchscreen on the bottom of the screen, then press the
“Settings” button on the touchscreen to access the Settings screen. When making a
selection, scroll up or down until the preferred setting is highlighted, then press and
release the preferred setting until a check-mark appears next to the setting, showing that
setting has been selected. The following feature settings are available:
•Display•Clock
•Safety/Assistance•Lights
•Doors&Locks•Auto-OnComfort&RemoteStart
•EngineOffOptions•CompassSettings
•Audio•Phone/Bluetooth®
•SiriusXMSetup
UNIVERSAL GARAGE DOOR OPENER (HomeLink®)
HomeLink®replaces up to three hand-held transmitters that operate devices such as
garage door openers, motorized gates, lighting or home security systems. The HomeLink®
unit is powered by your vehicles 12 Volt battery.
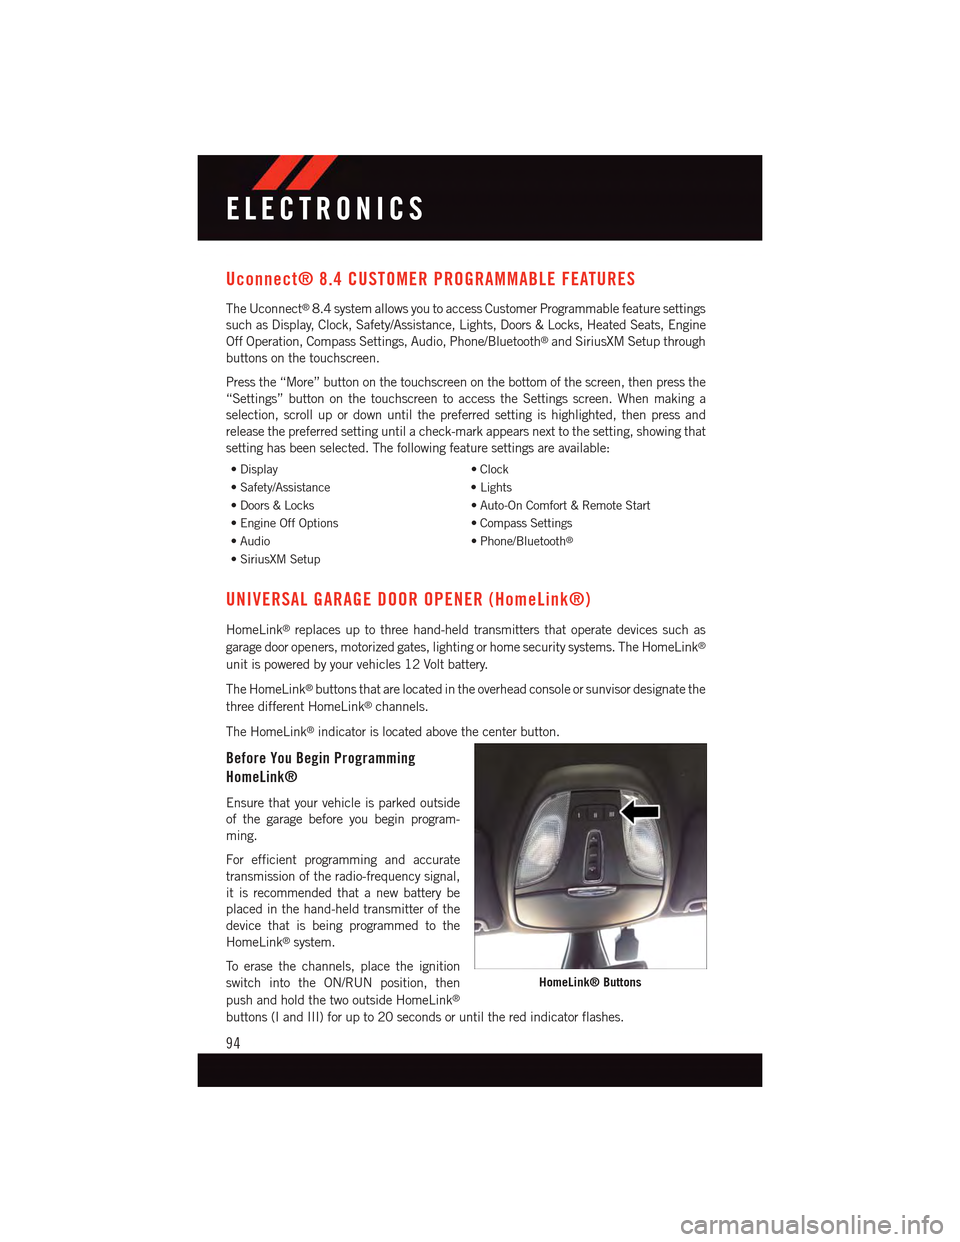
The HomeLink®buttons that are located in the overhead console or sunvisor designate the
three different HomeLink®channels.
The HomeLink®indicator is located above the center button.
Before You Begin Programming
HomeLink®
Ensure that your vehicle is parked outside
of the garage before you begin program-
ming.
For efficient programming and accurate
transmission of the radio-frequency signal,
it is recommended that a new battery be
placed in the hand-held transmitter of the
device that is being programmed to the
HomeLink®system.
To e r a s e t h e c h a n n e l s , p l a c e t h e i g n i t i o n
switch into the ON/RUN position, then
push and hold the two outside HomeLink®
buttons (I and III) for up to 20 seconds or until the red indicator flashes.
HomeLink® Buttons
ELECTRONICS
94
Page 98 of 164

Programming A Non-Rolling Code
For programming Garage Door Openers manufactured before 1995.
1. Turn the ignition switch to the ON/RUN position.
2. Place the hand-held transmitter 1 to 3 inches (3 to 8 cm) away from the HomeLink®
button you want to program while keeping the HomeLink®indicator light in view.
3. Push and hold the HomeLink®button you want to program while you push and hold
the hand-held transmitter button.
4. Continue to hold both buttons and observe the indicator light. The Homelink®
indicator will flash slowly and then rapidly after Homelink®has received the frequency
signal from the hand-held transmitter. Release both buttons after the indicator light
changes from slow to rapid.
5. Press and hold the programmed HomeLink®button and observe the indicator light.
•Iftheindicatorlightstaysonconstantly,programmingiscompleteandthegarage
door (or device) should activate when the HomeLink®button is pressed.
To p r o g r a m t h e t w o r e m a i n i n g H o m e L i n k®buttons, repeat each step for each remaining
button. DO NOT erase the channels.
Using HomeLink®
To o p e r a t e , p u s h a n d r e l e a s e t h e p r o g r a m m e d H o m e L i n k®button. Activation will now
occur for the programmed device (e.g., garage door opener, gate operator, security system,
entry door lock, home/office lighting, etc.). The hand-held transmitter of the device may
also be used at any time.
WARNING!
•Yourmotorizeddoororgatewillopenandclosewhileyouareprogrammingthe
universal transceiver. Do not program the transceiver if people or pets are in the
path of the door or gate.
•Donotrunyourvehicleinaclosedgarageorconfinedareawhileprogrammingthe
transceiver. Exhaust gas from your vehicle contains Carbon Monoxide (CO) which is
odorless and colorless. Carbon Monoxide is poisonous when inhaled and can cause
you and others to be severely injured or killed.
ELECTRONICS
96
Page 101 of 164

NOTE:
Vehicles equipped with a manual transmission or a DDCT transmission (1.4L turbo
engine) may be recreationally towed (flat towed) at any legal highway speed, for any
distance, if the transmission is inNEUTRAL.ForvehicleswithDDCTtransmission(1.4L
turbo automatic), refer to "Shift Lever Override" in "What to Do in Emergencies" for
instructions on shifting the transmission into NEUTRAL when the ignition is OFF. If the
ignition is left in the ACC position, it may be helpful to disconnect the negative battery
cable (and secure it away from the battery post), to avoid draining the battery.
CAUTION!
•DO NOTflat tow any 2.0L or 2.4L engine vehicle equipped with an automatic
transmission. Damage to the drivetrain will result. If these vehicles require towing,
make sure all the wheels are OFF the ground.
•Donotdollytowthisvehicle.Useofatowingdollycancausesignificantdamageto
your vehicle. Damage from improper towing is not covered under the New Vehicle
Limited Warranty.
•Towingthisvehicleinviolationoftheaboverequirementscancausesevere
transmission damage. Damage from improper towing is not covered under the New
Vehicle Limited Warranty.
UTILITY
99