Page 158 of 664
Voice Training
For users experiencing difficulty with the system recogniz-
ing their voice commands or numbers, the Uconnect®
Phone Voice Training feature may be used. To enter this
training mode, follow one of the two following procedures:
•From outside the Uconnect® Phone mode (e.g., from
radio mode), push and hold the Voice Command
button for five seconds until the session begins,
or,
•Push the Voice Commandbutton and say the
“Voice Training,” “System Training,” or “Start Voice
Training” command.
You can either push the Uconnect® Phone button to restore
the factory setting or repeat the words and phrases when
prompted by the Uconnect® Phone. For best results, the
Voice Training session should be completed when the
vehicle is parked with the engine running, all windows
closed, and the blower fan switched off.
This procedure may be repeated with a new user. The
system will adapt to the last trained voice only.
Reset
To Reset all settings using Voice Command:
1. Push the Phonebutton.
2. After the “Ready” prompt and the following beep, say
“Setup,” then “Reset.”
•This will delete all phone pairing, phone book en-
tries, and other settings in all language modes. The
System will prompt you before resetting to factory
settings.
Voice Command
Uconnect® Voice Command Tutorial
To hear a brief tutorial of the Voice Command features,
push the Voice Commandbutton and say “Voice
Command Tutorial.”
156 UNDERSTANDING THE FEATURES OF YOUR VEHICLE
Page 168 of 664
Turn SMS Incoming Announcement ON/OFF
Turning the SMS Incoming Announcement OFF will stop
the system from announcing the new incoming mes-
sages.
•Push the Phonebutton.
•After the “Ready” prompt and the following beep, say
“Setup, SMS Incoming Message Announcement,” you
will then be given a choice to change it.
Bluetooth® Communication Link
Mobile phones have been found to lose connection to the
Uconnect® Phone. When this happens, the connection
can generally be reestablished by switching the phone
off/on. Your mobile phone is recommended to remain in
Bluetooth® ON mode.
General Information
This device complies with Part 15 of the FCC rules and
RSS 210 of Industry Canada. Operation is subject to the
following conditions:
•Changes or modifications not expressly approved by
the party responsible for compliance could void the
user’s authority to operate the equipment.
•This device may not cause harmful interference.
•This device must accept any interference received,
including interference that may cause undesired op-
eration.
166 UNDERSTANDING THE FEATURES OF YOUR VEHICLE
Page 201 of 664
11. See you in minutes.
12. Stuck in traffic.
13. Start without me.
14. Where are you?
15. Are you there yet?
16. I need directions.
17. I’m lost.
18. See you later.
Bluetooth® Communication Link
Mobile phones have been found to lose connection to the
Uconnect® Phone. When this happens, the connection
can generally be re-established by switching the mobile
phone OFF/ON. Your mobile phone is recommended to
remain in Bluetooth® ON mode.
Power-Up
After switching the ignition key from OFF to either the
ON or ACC position, or after a language change, you
must wait at least 15 seconds prior to using the system.
3
UNDERSTANDING THE FEATURES OF YOUR VEHICLE 199
Page 209 of 664
Commands
The Voice Command system understands two types of
commands, Universal commands and Local commands.
Universal commands are available at all times. Local
commands are available if the supported radio mode is
active.
Changing The Volume
1. Start a dialogue by pushing the Voice Command
button.
2. Say a command (e.g., “Help”).
3. Use the ON/OFF VOLUME rotary knob to adjust the
volume to a comfortable level while the Voice Com-
mand system is speaking. Please note the volume
setting for Voice Command is different than the audio
system.
Main Menu
Start a dialogue by pushing the Voice Command
button. You may say “Main Menu” to switch to
the main menu.
In this mode, you can say the following commands:
•“Radio AM” (to switch to the radio AM mode)
•“Radio FM” (to switch to radio FM mode)
•“Sat” (to switch to Satellite radio mode)
•“Disc” (to switch to the disc mode)
•“USB” (to switch to USB mode)
•“Bluetooth Streaming” (to switch to Bluetooth®
Streaming mode)
•“Memo” (to switch to the memo recorder)
•“System Setup” (to switch to system setup)
3
UNDERSTANDING THE FEATURES OF YOUR VEHICLE 207
Page 212 of 664
Memo Mode
To switch to the voice recorder mode, say “Memo.” In
this mode, you may say the following commands:
•“New Memo” (to record a new memo) — During the
recording, you may push the Voice Command
button to stop recording. You proceed by say-
ing one of the following commands:
– “Save” (to save the memo)
– “Continue” (to continue recording)
– “Delete” (to delete the recording)
•“Play Memos” (to play previously recorded memos) —
During the playback you may push the Voice Com-
mandbutton to stop playing memos. You pro-
ceed by saying one of the following commands:
– “Repeat” (to repeat a memo)
– “Next” (to play the next memo)
– “Previous” (to play the previous memo)
– “Delete” (to delete a memo)
– “Delete All” (to delete all memos)
Setup
To switch to system setup, you may say one of the
following:
•“Change to setup”
•“Switch to system setup”
•“Main menu setup”
•“Switch to setup”
In this mode, you may say the following commands:
•“Language English”
•“Language French”
•“Language Spanish”
210 UNDERSTANDING THE FEATURES OF YOUR VEHICLE
Page 215 of 664
At any point, if the system does not recognize one of your
commands, you will be prompted to repeat it.
To hear available commands, push the Uconnect® Voice
Commandbutton and say “Help.” You will hear
available commands for the screen displayed.
Uconnect® Voice Commands
The Uconnect® Voice Command system understands
two types of commands. Universal commands are avail-
able at all times. Local commands are available if the
supported radio mode is active.
Start a dialogue by pushing the Uconnect® Voice Com-
mandbutton.
Changing The Volume
1. Start a dialogue by pushing the Voice Command
button.
2. Say a command (e.g., “Help”).
3. Use the ON/OFF VOLUME rotary knob to adjust the
volume to a comfortable level while the Voice Com-
mand system is speaking. Please note the volume
setting for Voice Command is different than the audio
system.
Starting Voice Recognition (VR) Session In
Radio/Player Modes
In this mode, you can say the following commands:
NOTE:The commands can be said on any screen when
a call is not active after pushing the Uconnect® Voice
Commandbutton.
Source
To switch to the audio source, say “Change source to
Disc” for example. This command can be given in any
mode or screen:
•“Track” (#) (to change the track)
3
UNDERSTANDING THE FEATURES OF YOUR VEHICLE 213
Page 239 of 664
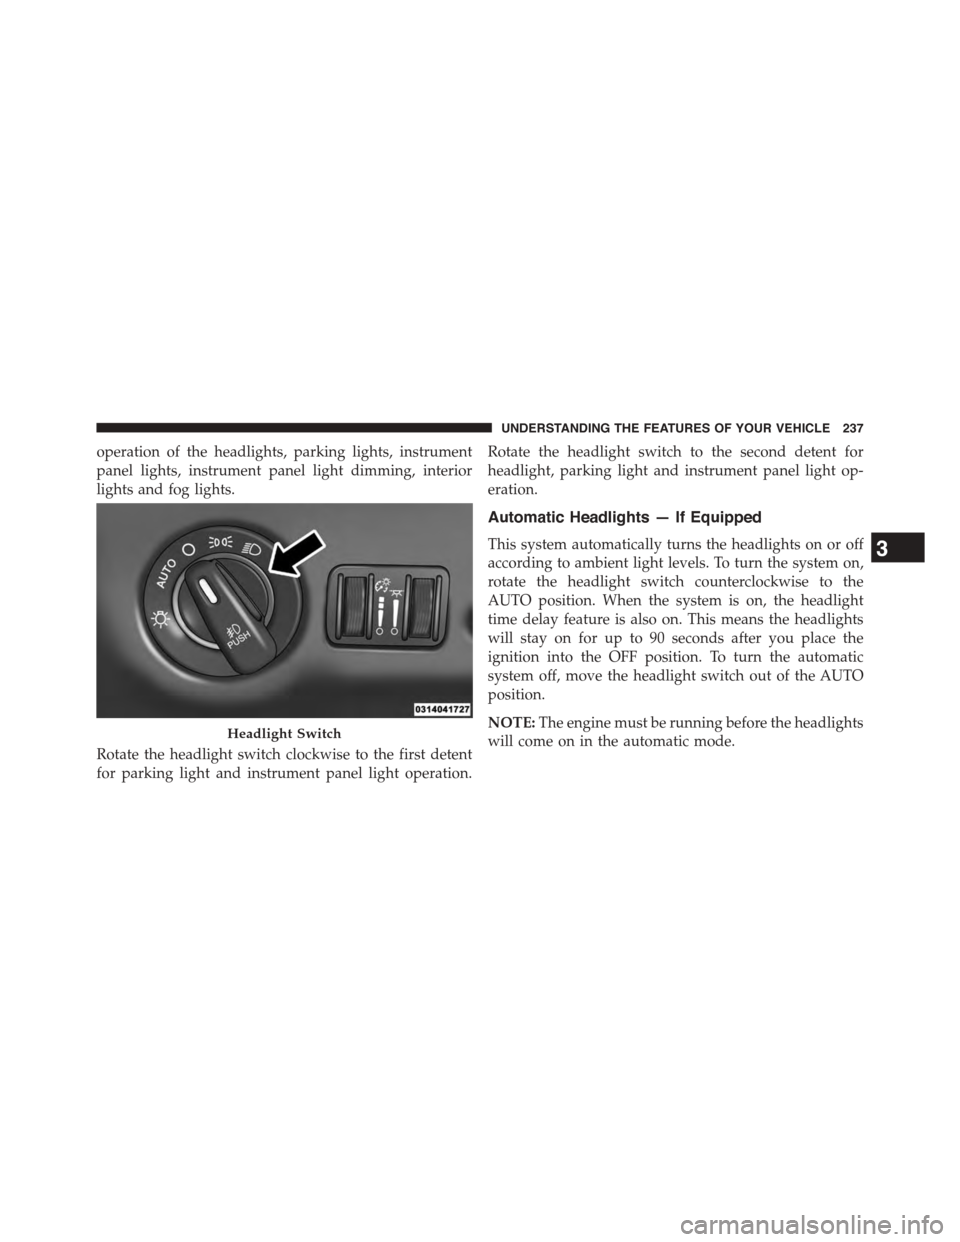
operation of the headlights, parking lights, instrument
panel lights, instrument panel light dimming, interior
lights and fog lights.
Rotate the headlight switch clockwise to the first detent
for parking light and instrument panel light operation.
Rotate the headlight switch to the second detent for
headlight, parking light and instrument panel light op-
eration.
Automatic Headlights — If Equipped
This system automatically turns the headlights on or off
according to ambient light levels. To turn the system on,
rotate the headlight switch counterclockwise to the
AUTO position. When the system is on, the headlight
time delay feature is also on. This means the headlights
will stay on for up to 90 seconds after you place the
ignition into the OFF position. To turn the automatic
system off, move the headlight switch out of the AUTO
position.
NOTE:The engine must be running before the headlights
will come on in the automatic mode.Headlight Switch
3
UNDERSTANDING THE FEATURES OF YOUR VEHICLE 237
Page 248 of 664
Dome Light Position
Rotate the left dimmer control completely upward to the
second detent to turn on the interior lights. The interior
lights will remain on when the dimmer control is in this
position.
Interior Light Defeat (OFF)
Rotate the left dimmer control to the extreme bottom
“OFF” position. The interior lights will remain off when
the doors are open.
Parade Mode (Daytime Brightness Feature)
Rotate the instrument panel dimmer control upward to
the first detent. This feature brightens all text displays
such as the odometer, Electronic Vehicle Information
Center (EVIC) or Driver Information Display (DID), and
radio when the position lights or headlights are on.
WINDSHIELD WIPERS AND WASHERS
The multifunction lever operates the windshield wipers
and washer when the ignition is placed in the ON/RUN
or ACC position. The multifunction lever is located on
the left side of the steering column.
Windshield Wiper/Washer Control
246 UNDERSTANDING THE FEATURES OF YOUR VEHICLE