2015 DODGE CHARGER manual radio set
[x] Cancel search: manual radio setPage 31 of 236

Power Lumbar
•Pushtheswitchforwardtoincreasethe
lumbar support. Push the switch rear-
ward to decrease the lumbar support.
•Pushingupwardordownwardonthe
switch will raise and lower the position of
the support.
Memory Seat
The memory seat feature allows you to
set two different driver seating positions
(excluding lumbar position), outside mir-
rors, radio station preset settings and tilt/
telescoping steering column position (if
equipped). The memory seat buttons are
located on the driver's door panel.
To s e t a m e m o r y p o s i t i o n :
1. Cycle the vehicles ignition to the ON
position.
2. Adjust all memory profile settings.
3. Push and release the S (SET) button.
4. Push and release the 1 or 2 button
within five seconds.
NOTE:
Before programming your RKE transmitters, you must select the feature through the
Uconnect®system. Refer to “Uconnect®Settings” in “Understanding Your Instrument
Panel” in the Owner's Manual on the DVD for further details.
To p r o g r a m a K e y F o b t o t h e m e m o r y p o s i t i o n :
1. Cycle the vehicles ignition to the OFF position.
2. Select the desired memory profile 1 or 2.
Power Lumbar Switch
Driver’s Memory Buttons
GETTING STARTED
29
Page 44 of 236

HEADLIGHT SWITCH
Automatic Headlights/Parking Lights/Headlights
•Rotate the headlight switch, located on
the instrument panel to the left of the
steering wheel, to the first detent from the
off position for parking lightand to
the second detent for headlight.
•Withtheparkinglightsorlowbeam
headlights on, push the headlight switch
for front fog lights. Pushing the switch a
second time will deactivate the front fog
lights. Turning the headlight switch off
will also deactivate the front fog lights.
•Rotatetheheadlightswitchto“AUTO”
for AUTO headlights.
•WhensettoAUTO,thesystemautomati-
cally turns the headlights on or off based
on ambient light levels.
Automatic High Beams
The Automatic High Beams system provides increased forward lighting at night by automat-
ing high beam control through the use of a digital camera mounted above the inside rearview
mirror. This camera detects vehicle specific light and automatically switches from high
beams to low beams until the approaching vehicle is out of view. This feature is program-
mable through the Uconnect®system. Refer to “Uconnect®Settings” in “Understanding
Yo u r I n s t r u m e n t P a n e l ” i n t h e O w n e r ' s M a n u a l o n t h e D V D f o r f u r t h e r d e t a i l s .
Instrument Panel Dimmer
•Rotatethedimmercontroltotheextremebottompositiontofullydimtheinstrument
panel lights and prevent the interior lights from illuminating when a door is opened.
•Rotatethedimmercontroluptoincreasethebrightnessoftheinstrumentpaneland
cupholders when the parking lights or headlights are on.
•Rotatethedimmercontroluptothenextdetentpositiontofullybrightentheodometer
and radio when the parking lights or headlights are on.
•Rotatethedimmercontroluptothelastdetentpositiontoturnontheinteriorlighting.
•Ifyourvehicleisequippedwithatouchscreen,thedimmingisprogrammablethrough
the Uconnect®system. Refer to “Uconnect®Settings” in “Understanding Your Instru-
ment Panel” in the Owner's Manual on the DVD for further details.
Ambient Light Dimmer
•Rotatetheambientlightcontrolupordowntoincreaseordecreasethebrightnessof
the release handle, map pocket (if equipped), overhead and floor lighting when the
parking lights or headlights are on.
•Rotatetoextremebottompositiontoturnoff.
Headlight Switch
1—AutomaticHeadlights2—RotateHeadlightSwitch3—RotateDimmer4—RotateAmbient
OPERATING YOUR VEHICLE
42
Page 94 of 236

Setting The Time
Model 8.4AN synchronizes time automatically via GPS, so it should not require any time
adjustment. If you do need to set the time manually, follow the instructions below for
Model 8.4A.
1. Turn the unit on, then press the “Time Display” at the top of the screen. Press “Yes.”
NOTE:
If the time is not displayed at the top of the screen, press the “Controls” or the “Apps”
button on the touchscreen, then the “Settings” button on the touchscreen. In the Settings
screen, press the “Clock” button on the touchscreen.
2. Press “+” or “–” next to Set Time Hours and Set Time Minutes to adjust the time.
3. If these features are not available, uncheck the Sync with GPS box.
4. Press “X” to save your settings and exit out of the Clock Setting screen.
Audio Settings
To a d j u s t t h e A u d i o s e t t i n g s :
1. Press the “Media” or “Radio” button on the touchscreen.
2. Press the “Audio” button on the touchscreen to activate the Audio settings screen to
adjust Balance/Fade, Equalizer and Speed Adjusted Volume.
3. You can return to the Radio screen by pressing the “X” located at the top right.
Balance/Fade
To a d j u s t t h e B a l a n c e / F a d e s e t t i n g s :
1. Press the “Media” or “Radio” button on the touchscreen.
2. Press the “Audio” button on the touchscreen to activate the Audio settings screen to
adjust Balance/Fade, Equalizer and Speed Adjusted Volume.
3. Press the “Balance/Fade” button on the touchscreen to Balance audio between the
front speakers or fade the audio between the rear and front speakers.
4. Pressing the “Front,” “Rear,” “Left” or “Right” button on the touchscreens or press
and drag the Speaker Icon to adjust the Balance/Fade.
ELECTRONICS
92
Page 121 of 236

Setting The Time
Model 8.4AN synchronizes time automatically via GPS, so it should not require any time
adjustment. If you do need to set the time manually, follow the instructions below for
Model 8.4A.
1. Turn the unit on, then press the “Time Display” at the top of the screen. Press “Yes.”
NOTE:
If the time is not displayed at the top of the screen, press the “Controls” or the “Apps”
button on the touchscreen, then the “Settings” button on the touchscreen. In the Settings
screen, press the “Clock” button on the touchscreen.
2. Press “+” or “–” next to Set Time Hours and Set Time Minutes to adjust the time.
3. If these features are not available, uncheck the Sync with GPS box.
4. Press “X” to save your settings and exit out of the Clock Setting screen.
Audio Settings
To a d j u s t t h e A u d i o s e t t i n g s :
1. Press the “Media” or “Radio” button on the touchscreen.
2. Press the “Audio” button on the touchscreen to activate the Audio settings screen to
adjust Balance/Fade, Equalizer and Speed Adjusted Volume.
3. You can return to the Radio screen by pressing the “X” located at the top right.
Balance/Fade
To a d j u s t t h e B a l a n c e / F a d e s e t t i n g s :
1. Press the “Media” or “Radio” button on the touchscreen.
2. Press the “Audio” button on the touchscreen to activate the Audio settings screen to
adjust Balance/Fade, Equalizer and Speed Adjusted Volume.
3. Press the “Balance/Fade” button on the touchscreen to Balance audio between the
front speakers or fade the audio between the rear and front speakers.
4. Pressing the “Front,” “Rear,” “Left” or “Right” button on the touchscreens or press
and drag the Speaker Icon to adjust the Balance/Fade.
ELECTRONICS
119
Page 136 of 236

If the Uconnect®Phone Buttonexists on your steering wheel, you then have the
Uconnect®Phone features.
Refer to theUnderstand The Features Of Your Vehiclesection of your vehicle's Owner's
Manual on the DVD for further details.
NOTE:
•TheUconnect®Phone requires a mobile phone equipped with the Bluetooth®
Hands-Free Profile, Version 1.0 or higher.
•Mostmobilephones/devicesarecompatiblewiththeUconnect®system, however
some mobile phones/devices may not be equipped with all of the required features to
utilize all of the Uconnect®system features.
•ForUconnect®Customer Care:
•U.S.residentsvisitUconnectPhone.comorcall1-877-855-8400.
•CanadianResidentsvisitUconnectPhone.comorcall,1-800-465-2001(English)or
1-800-387-9983 (French).
Pairing (Wirelessly Connecting) Your Mobile Phone To The Uconnect® System
Mobile phone pairing is the process of establishing a wireless connection between a
cellular phone and the Uconnect®system.
NOTE:
•To u s e t h e U c o n n e c t®Phone feature, you first must determine if your mobile phone and
software are compatible with the Uconnect®system. Please visitUconnectPhone.com for
complete mobile phone compatibility information.
•Mobilephonepairingisnotavailablewhilethevehicleisinmotion.
•Amaximumof10mobilephonescanbepairedtotheUconnect®system.
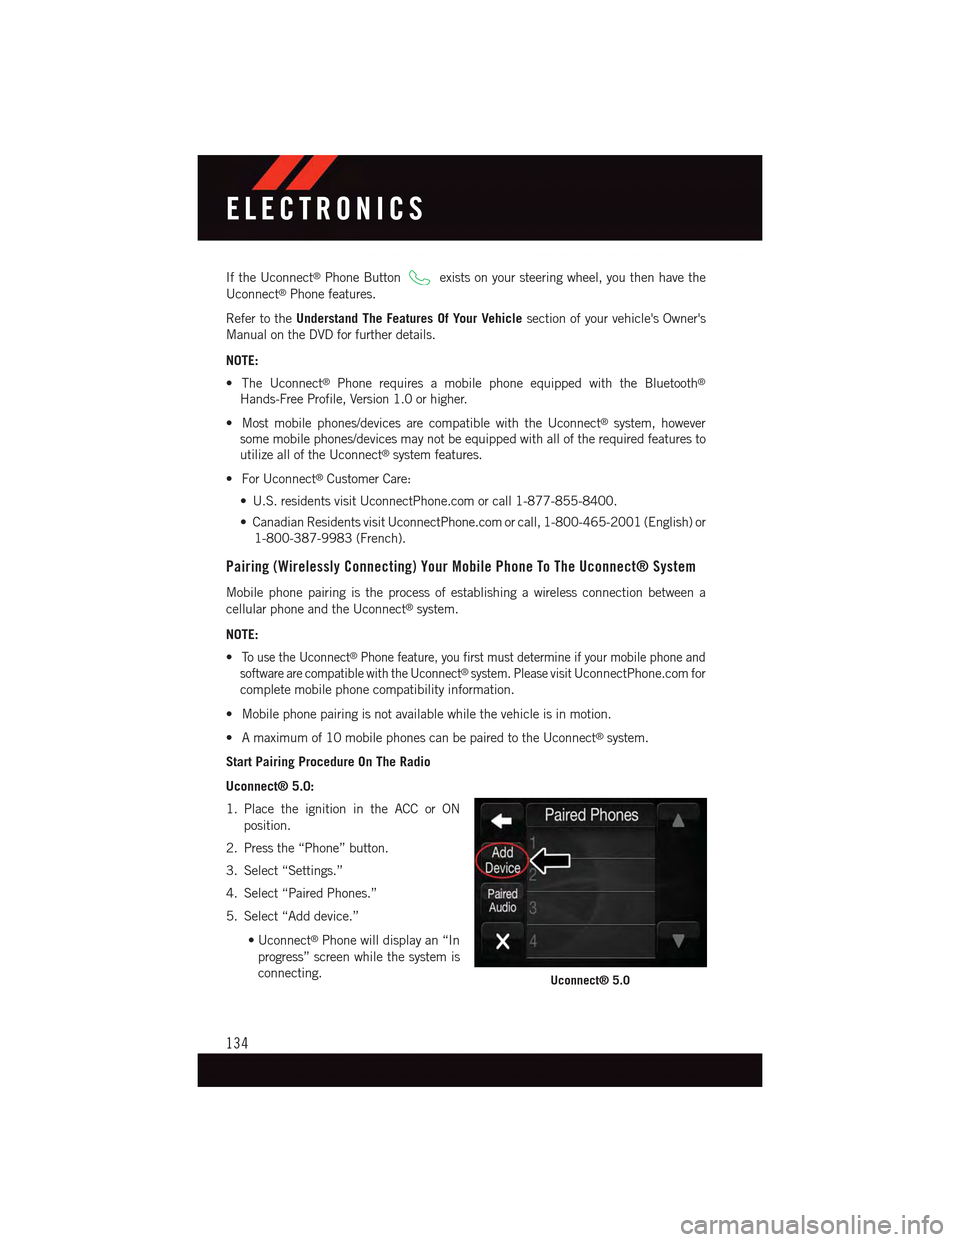
Start Pairing Procedure On The Radio
Uconnect® 5.0:
1. Place the ignition in the ACC or ON
position.
2. Press the “Phone” button.
3. Select “Settings.”
4. Select “Paired Phones.”
5. Select “Add device.”
•Uconnect®Phone will display an “In
progress” screen while the system is
connecting.Uconnect® 5.0
ELECTRONICS
134
Page 140 of 236

Phonebook
The Uconnect®system will automatically sync your phonebook from your paired phone, if
this feature is supported by your phone. Phonebook contacts are updated each time that
the phone is connected. If your phone book entries do not appear, check the settings on
your phone. Some phones require you to enable this feature manually.
•YourphonebookcanbebrowsedontheUconnect®system touchscreen, but editing
can only be done on your phone. To browse, press the “Phone” button on the
touchscreen, then the “Phonebook” button on the touchscreen.
Favorite phonebook entries can be saved as Favorites for quicker access. Favorites are
shown at the top of the main phone screen.
Voice Command Tips
•Speakingcompletenames(i.e;CallJohnDoevs.CallJohn)willresultingreatersystem
accuracy.
•Youcan“link”commandstogetherforfasterresults.Say“CallJohnDoe,mobile,”for
example.
•Ifyouarelisteningtoavailablevoicecommandoptions,youdonothavetolistentothe
entire list. When you hear the command that you need, push thebutton on the
steering wheel, wait for the beep and say your command.
Changing The Volume
•StartadialoguebypushingthePhonebutton,thensayacommandforexample
-"Help".
•UsetheradioVOLUME/MUTErotaryknobtoadjustthevolumetoacomfortablelevel
while the Uconnect®system is speaking. Please note the volume setting for Uconnect®
is different than the audio system.
NOTE:
To a c c e s s h e l p , p u s h t h e U c o n n e c t®Phonebutton on the steering wheel and say
"help." Press the display or press either the Phoneor VRbutton and say
"cancel" to cancel the help session.
Incoming Text Messages
After pairing your Uconnect®system with a Bluetooth®enabled mobile device with the
Message Access Profile (MAP), the Uconnect®system can announce a new incoming text
message and read it to you over the vehicle’s audio system.
NOTE:
Only incoming text messages received during the current ignition cycle can be viewed/
read.
ELECTRONICS
138
Page 149 of 236

PROGRAMMABLE FEATURES
Driver Information Display (DID)
The DID can be used to view or change the following settings. Push the UPor DOWN
button to scroll through the main menus, then push the RIGHTbutton to scroll
through the submenus of each menu item. Push theBACKbutton to scroll back to a
previous menu or sub menu.
•Speedometer•Audio
•VehicleInfo•Messages
•DriverAssist—IfEquipped•ScreenSetup
•FuelEconomy•SpeedWarning—IfEquipped
•Trip•Diagnostic—IfEquipped
Uconnect® Customer Programmable Features
The Uconnect®system allows you to access Customer Programmable feature settings
such as Display, Units, Voice, Clock, Safety & Driving Assistance, Lights, Doors & Locks,
Auto-On Comfort, Engine Off Options, Audio, Phone/Bluetooth®,SiriusXMSetup,Restore
Settings, Clear Personal Data, System Information, and Compass Settings (5.0 Radio
Only) through buttons on the touchscreen.
NOTE:
If equipped with the Super Track Pak option please refer to the “Drive Mode Supplement”
within your Owners Information Kit for further descriptions of these modes.
•Pressthe“Controls”buttonlocatednearthebottomofthetouchscreen,thenpressthe
“Settings” button on the touchscreen to access the Settings screen. When making a
selection, scroll up or down until the preferred setting is highlighted, then press and
release the preferred setting until a check-mark appears next to the setting, showing
that setting has been selected. The following feature settings are available:
•Display•EngineOffOptions
•Units•Audio
•Voice•Phone/Bluetooth®
•Clock•SiriusXMSetup
•Safety&DrivingAssistance•RestoreSettings
•Lights•ClearPersonalData
•Doors&Locks•SystemInformation
•Auto-OnComfort•Compass(5.0RadioOnly)
Refer to “Uconnect Settings/Customer Programmable Features” found within “Under-
standing Your Instrument Panel” located in your Owner's Manual on the DVD for further
information.
ELECTRONICS
147
Page 228 of 236

Set Up Your Via Mobile ProfileUconnect®..............67Signals, Turn............41,163Sirius Satellite Radio.......95,122SIRIUS Travel Link . . . . . . . . . . .130Sound Systems (Radio).........64Spare Tire.........166, 214, 215Spark Plugs...........195, 196SpecificationsFuel (Gasoline) . . . . . . .195, 196Oil . . . . . . . . . . . . . .195, 196Speed ControlAccel/Decel.............43Distance Setting (ACC Only)....44Mode Setting (ACC Only)......47Speed Control (Cruise Control).....43SRT Performance Features......155StartingRemote...............13SteeringTi l t C o l u m n . . . . . . . . . . . . . 3 6Wheel, Heated...........34Steering Wheel Audio Controls....142Sun Roof . . . . . . . . . . . . . . . . .60Supplemental Restraint System -Air Bag . . . . . . . . . . . . . . . .20
Te m p e r a t u r e C o n t r o l , A u t o m a t i c(ATC) . . . . . . . . . . . . . . . . .58Te t h e r A n c h o r, C h i l d R e s t r a i n t.....25Te x t M e s s a g i n g.............140Ti l t S t e e r i n g C o l u m n . . . . . . . . . . . 3 6Ti l t / Te l e s c o p i n g S t e e r i n g C o l u m nManual...............36Ti r e sAir Pressure............213Changing..........166, 168Compact Spare..........214Flat Changing . . . . . . . . . . .166Jacking . . . . . . . . . . . . . . .168Spare Tire.............166Ti r e S e r v i c e K i t.............172To w i n g . . . . . . . . . . . . . . . . . 1 5 2Disabled Vehicle..........182Recreational............152To w i n g V e h i c l e B e h i n d AMotorhome.............152
Tr a i l e r To w i n gTr a i l e r A n d To n g u e W e i g h t....152Tr a i l e r W e i g h t . . . . . . . . . . . . . . 1 5 2Tr a n s f e r C a s eFluid . . . . . . . . . . . . . . . .196Tr a n s m i s s i o nAutomatic . . . . . . . . . . . . . .53Fluid . . . . . . . . . .196, 197, 198Maintenance............198Tr u n k L i d ( D e c k L i d )........17,18Tr u n k R e l e a s e , E m e r g e n c y.......18Tr u n k R e l e a s e R e m o t e C o n t r o l.....17Tu r n S i g n a l s............41,163
Uconnect®
Access................65Set Up Your Via Mobile Profile . . .67Using Access............69Via Mobile Apps...........80Uconnect®5.0 . . . . . . . . . . . . .81Uconnect®8.4A . . . . . . . . . . . . .91Changing The Volume.......138Helpful Tips For Bluetooth . . . . .141Mute . . . . . . . . . . . . . . . .137Phonebook.............138Tr a n s f e r O n g o i n g C a l l B e t w e e nHandset And Vehicle.......137Voice Recognition Tips.......138Uconnect®8.4AN . . . . . . . . . . .118At A Glance............118Radio................121Uconnect®Access............65APP . . . . . . . . . . . . . . . . .67In Vehicle Features.........72Purchase Apps............68Uconnect®(Hands-Free Phone)Making A Phone Call.......137Receiving A Call..........137Uconnect®Voice Command . . .84, 103Using AccessUconnect®..............69
Via Mobile AppsUconnect®..............80Voice Command..........84,103Voice RecognitionSystem (VR)..........84,103
INDEX
226