2015 DODGE CHARGER steering
[x] Cancel search: steeringPage 127 of 236
When connected, the iPod®/compatible USB device can be controlled using the radio or
Steering Wheel Audio Controls to play, skip to the next or previous track, browse, and list
the contents.
The iPod®battery charges when plugged into the USB port (if supported by the specific
device.)
To r o u t e t h e U S B / i P o d®cable out of the center console, use the access cut out.
NOTE:
•WhenconnectingyouriPod®device for the first time, the system may take several
minutes to read your music, depending on the number of files. For example, the system
will take approximately five minutes for every 1,000 songs loaded on the device. Also
during the reading process, the Shuffle and Browse functions will be disabled. This
process is needed to ensure the full use of your iPod®features and only happens the
first time it is connected. After the first time, the reading process of your iPod®will take
considerably less time unless changes are made or new songs are added to the playlist.
•TheUSBportsupportscertainMini,Classic,Nano,Touch,andiPhone®devices. The
USB port also supports playing music from compatible external USB Mass Storage
Class memory devices. Some iPod®software versions may not fully support the USB
port features. Please visit Apple’s website for iPod®software updates.
Audio Jack (AUX)
The AUX allows a portable device, such as an MP3 player or an iPod®,tobepluggedinto
the radio and utilize the vehicle’s sound system, using a 3.5 mm audio cable, to amplify
the source and play through the vehicle speakers.
•Pressingthe“AUX”buttononthetouchscreenwillchangethemodetoauxiliarydevice
if the audio jack is connected, allowing the music from your portable device to be heard
through the vehicle's speakers. In order to activate the AUX, plug in the audio jack.
•Thefunctionsoftheportabledevicearecontrolledusingthedevicebuttons.The
volume may be controlled using the radio or portable device.
•Toroutetheaudiocableoutofthecenterconsole,usetheaccesscutoutinthefront
of the console.
Bluetooth® Streaming Audio
If using a Bluetooth®-equippeddevice,youmayalsobeabletostreammusictoyour
vehicle's sound system. Your connected device must be Bluetooth-compatible, and paired
with your system (see Uconnect®Phone for pairing instructions).
•YoucanaccessthemusicfromyourconnectedBluetooth®device by pressing the
“Bluetooth®”button on the touchscreen while in Media mode.
ELECTRONICS
125
Page 136 of 236
If the Uconnect®Phone Buttonexists on your steering wheel, you then have the
Uconnect®Phone features.
Refer to theUnderstand The Features Of Your Vehiclesection of your vehicle's Owner's
Manual on the DVD for further details.
NOTE:
•TheUconnect®Phone requires a mobile phone equipped with the Bluetooth®
Hands-Free Profile, Version 1.0 or higher.
•Mostmobilephones/devicesarecompatiblewiththeUconnect®system, however
some mobile phones/devices may not be equipped with all of the required features to
utilize all of the Uconnect®system features.
•ForUconnect®Customer Care:
•U.S.residentsvisitUconnectPhone.comorcall1-877-855-8400.
•CanadianResidentsvisitUconnectPhone.comorcall,1-800-465-2001(English)or
1-800-387-9983 (French).
Pairing (Wirelessly Connecting) Your Mobile Phone To The Uconnect® System
Mobile phone pairing is the process of establishing a wireless connection between a
cellular phone and the Uconnect®system.
NOTE:
•To u s e t h e U c o n n e c t®Phone feature, you first must determine if your mobile phone and
software are compatible with the Uconnect®system. Please visitUconnectPhone.com for
complete mobile phone compatibility information.
•Mobilephonepairingisnotavailablewhilethevehicleisinmotion.
•Amaximumof10mobilephonescanbepairedtotheUconnect®system.
Start Pairing Procedure On The Radio
Uconnect® 5.0:
1. Place the ignition in the ACC or ON
position.
2. Press the “Phone” button.
3. Select “Settings.”
4. Select “Paired Phones.”
5. Select “Add device.”
•Uconnect®Phone will display an “In
progress” screen while the system is
connecting.Uconnect® 5.0
ELECTRONICS
134
Page 139 of 236
Select The Android Mobile Phone's Priority Level
When the pairing process has successfully completed, the system will prompt you to
choose whether or not this is your favorite mobile phone. Selecting “Yes” will make this
mobile phone the highest priority. This mobile phone will take precedence over other
paired mobile phones within range and will connect to the Uconnect®system automati-
cally when entering the vehicle. Only one mobile phone and/or one Bluetooth audio device
can be connected to the Uconnect®system at a time. If “No” is selected, simply select
“Uconnect” from the mobile phone/audio device Bluetooth screen, and the Uconnect®
system will reconnect to the Bluetooth device.
Yo u a r e n o w r e a d y t o m a k e h a n d s - f r e e c a l l s . P r e s s t h e U c o n n e c t®“Phone” button
on your steering wheel to begin.
NOTE:
Refer to UconnectPhone.com website for additional information on mobile phone pairing
and for a list of compatible phones.
Making A Phone Call
•PushtheUconnect®Phone button.
•Say“dial”thenthenumber(or“call”thenthenameaslistedinyourphone;see
Phonebook) after the BEEP.
NOTE:
Yo u c a n a l s o i n i t i a t e a c a l l b y u s i n g t h e t o u c h s c r e e n o n t h e U c o n n e c t®Phone main
screen.
Common Phone Commands (Examples)
•“CallJohnSmith”
•“CallJohnSmithmobile”
•“Dial12485551212”
•“Redial”
Receiving A Call – Accept (And End)
•Whenanincomingcallrings/isannouncedonUconnect®,pushthePhonebutton
.
•Toendacall,pushtheHangUporPhonebutton.
Mute (Or Unmute) Microphone During Call
•Duringacall,pressthe“Mute”buttononthePhonemainscreentomuteandunmute
the call.
Transfer Ongoing Call Between Handset And Vehicle
•Duringanon-goingcall,pressthe“Transfer”buttononthePhonemainscreento
transfer an on-going call between handset and vehicle.
ELECTRONICS
137
Page 140 of 236
Phonebook
The Uconnect®system will automatically sync your phonebook from your paired phone, if
this feature is supported by your phone. Phonebook contacts are updated each time that
the phone is connected. If your phone book entries do not appear, check the settings on
your phone. Some phones require you to enable this feature manually.
•YourphonebookcanbebrowsedontheUconnect®system touchscreen, but editing
can only be done on your phone. To browse, press the “Phone” button on the
touchscreen, then the “Phonebook” button on the touchscreen.
Favorite phonebook entries can be saved as Favorites for quicker access. Favorites are
shown at the top of the main phone screen.
Voice Command Tips
•Speakingcompletenames(i.e;CallJohnDoevs.CallJohn)willresultingreatersystem
accuracy.
•Youcan“link”commandstogetherforfasterresults.Say“CallJohnDoe,mobile,”for
example.
•Ifyouarelisteningtoavailablevoicecommandoptions,youdonothavetolistentothe
entire list. When you hear the command that you need, push thebutton on the
steering wheel, wait for the beep and say your command.
Changing The Volume
•StartadialoguebypushingthePhonebutton,thensayacommandforexample
-"Help".
•UsetheradioVOLUME/MUTErotaryknobtoadjustthevolumetoacomfortablelevel
while the Uconnect®system is speaking. Please note the volume setting for Uconnect®
is different than the audio system.
NOTE:
To a c c e s s h e l p , p u s h t h e U c o n n e c t®Phonebutton on the steering wheel and say
"help." Press the display or press either the Phoneor VRbutton and say
"cancel" to cancel the help session.
Incoming Text Messages
After pairing your Uconnect®system with a Bluetooth®enabled mobile device with the
Message Access Profile (MAP), the Uconnect®system can announce a new incoming text
message and read it to you over the vehicle’s audio system.
NOTE:
Only incoming text messages received during the current ignition cycle can be viewed/
read.
ELECTRONICS
138
Page 144 of 236
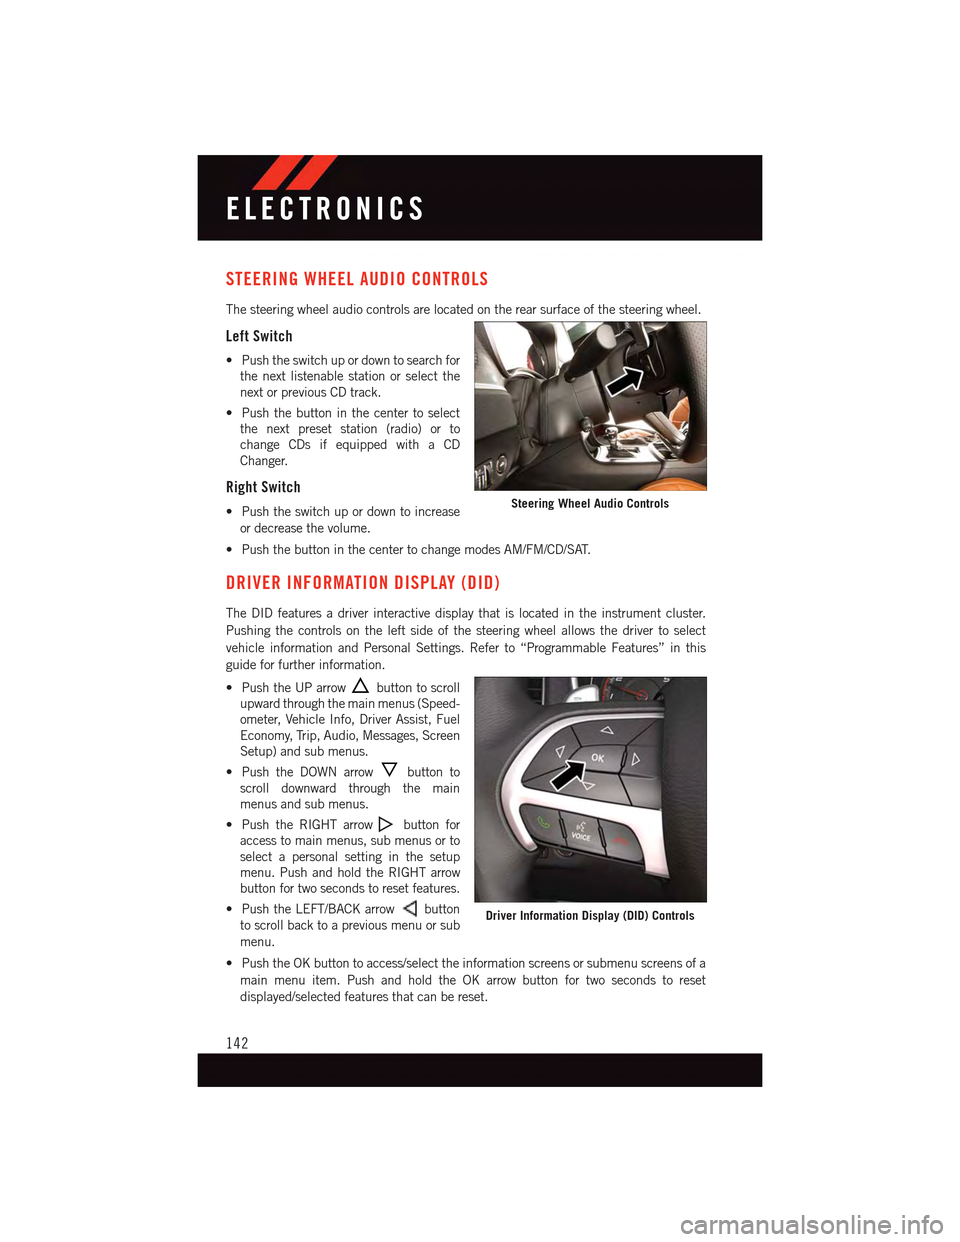
STEERING WHEEL AUDIO CONTROLS
The steering wheel audio controls are located on the rear surface of the steering wheel.
Left Switch
•Pushtheswitchupordowntosearchfor
the next listenable station or select the
next or previous CD track.
•Pushthebuttoninthecentertoselect
the next preset station (radio) or to
change CDs if equipped with a CD
Changer.
Right Switch
•Pushtheswitchupordowntoincrease
or decrease the volume.
•PushthebuttoninthecentertochangemodesAM/FM/CD/SAT.
DRIVER INFORMATION DISPLAY (DID)
The DID features a driver interactive display that is located in the instrument cluster.
Pushing the controls on the left side of the steering wheel allows the driver to select
vehicle information and Personal Settings. Refer to “Programmable Features” in this
guide for further information.
•PushtheUParrowbutton to scroll
upward through the main menus (Speed-
ometer, Vehicle Info, Driver Assist, Fuel
Economy, Trip, Audio, Messages, Screen
Setup) and sub menus.
•PushtheDOWNarrowbutton to
scroll downward through the main
menus and sub menus.
•PushtheRIGHTarrowbutton for
access to main menus, sub menus or to
select a personal setting in the setup
menu. Push and hold the RIGHT arrow
button for two seconds to reset features.
•PushtheLEFT/BACKarrowbutton
to scroll back to a previous menu or sub
menu.
•PushtheOKbuttontoaccess/selecttheinformationscreensorsubmenuscreensofa
main menu item. Push and hold the OK arrow button for two seconds to reset
displayed/selected features that can be reset.
Steering Wheel Audio Controls
Driver Information Display (DID) Controls
ELECTRONICS
142
Page 155 of 236

AUTOSTICK
Steering Wheel Mounted Paddle Shifters Or Console Mounted Shifter
•AutoStickisadriver-interactivetrans-
mission feature that offers manual gear
shifting to provide you with more control
of the vehicle. AutoStick allows you to
maximize engine braking, and improve
overall vehicle performance.
•This system can also provide you with
more control during passing, city driving,
cold slippery conditions, mountain driving,
trailer towing, and many other situations.
Operation
When the shift lever is in the DRIVE (D)
position, the transmission will operate au-
tomatically, shifting between the eight
available gears. To activate AutoStick, move
the shift lever into the MANUAL (M) posi-
tion (beside the DRIVE position). The cur-
rent transmission gear will be displayed in
the instrument cluster, along with a highlighted "M" (Manual) indication. When the shift
lever is in the MANUAL (M) position, tap the shift lever forward (-) (or tap the (-) shift
paddle on the steering wheel, if equipped) to downshift the transmission to the next lower
gear, or tap the lever rearward (+) (or tap the (+) shift paddle, if equipped) to command an
upshift.
NOTE:
Ta p p i n g o n e o f t h e s t e e r i n g w h e e l - m o u n t e d s h i f t p a d d l e s ( + / - ) , i f e q u i p p e d , w h i l e t h e s h i f t
lever is in DRIVE, will activate a temporary AutoStick mode. Tapping (-) to enter AutoStick
mode will downshift the transmission to the next lower gear, while using (+) to enter
AutoStick mode will retain the current gear. The current gear will be displayed in the
instrument cluster, but the "M" will not be highlighted. The transmission will revert back
to normal operation (if the shift lever remains in DRIVE) after a period of time, depending
on accelerator pedal activity.
1—(–)ShiftPaddle2—(+)ShiftPaddle
SRT
153
Page 159 of 236

Timers
When the Timers Page is selected you will be able to select from following “Tickets”:
Current
•Pressingthe“Current”buttondisplaysa“realtime”summaryofperformancetimers.
Last
•Pressingthe“Last”buttondisplaysthelastrecordedrunofperformancetimers.
Best
•Pressingthe“Best”buttondisplaysthebestrecordedrunofperformancetimers,
except for braking data.
Save
•Pressingthe“Save”buttonwillletyousavethelastrun.Anysavedrunover10,will
overwrite the last saved run for Uconnect®System storage.
Gauges 1
When selected, this screen displays the following values:
•CoolantTemperature
•OilPressure
•OilTemperature
•BatteryVoltage(6.2LOnly)
•TransOilTemp(6.2LOnly)
Gauges 2
When selected, this screen displays the following values for the 6.2L:
•BoostPressure
•AirFuelRatio
•Inter-Cooler(I/C)CoolantTemperature
•IntakeAirTemperature
When selected, this screen displays the following values for the 6.4L:
•BatteryVoltage
•IntakeAirTemperature
•TransmissionTemperature
G-Force
When selected, this screen displays the following values:
•LateralG-ForceLeftandRight
•LongitudinalG-ForceForeandAft
•PeakG-ForcesForeAft,LeftandRight
•VehicleSpeed
•SteeringWheelAngle
SRT
157
Page 185 of 236

FREEING A STUCK VEHICLE
If your vehicle becomes stuck in mud, sand or snow, it can often be moved using a rocking
motion. Turn the steering wheel right and left to clear the area around the front wheels.
Push and hold the lock button on the shift lever. Then, shift back and forth between
REVERSE and DRIVE, while gently pushing the accelerator. Use the least amount of
accelerator pedal pressure that will maintain the rocking motion, without spinning the
wheels or racing the engine.
NOTE:
•ShiftsbetweenDRIVEandREVERSEcanonlybeachievedatwheelspeedsof5mph
(8 km/h) or less. Whenever the transmission remains in NEUTRAL for more than
2seconds,youmustpushthebrakepedaltoengageDRIVEorREVERSE.
•Pushthe“ESCOff”switch,toplacetheElectronicStabilityControl(ESC)systemin
“Partial Off” mode, before rocking the vehicle. Once the vehicle has been freed, push
the “ESC Off” switch again to restore "ESC On" mode.
CAUTION!
•When“rocking”astuckvehiclebyshiftingbetweenREVERSEandDRIVE,donot
spin the wheels faster than 15 mph (24 km/h), or drivetrain damage may result.
•Revvingtheengineorspinningthewheelstoofastmayleadtotransmission
overheating and failure. It can also damage the tires. Do not spin the wheels above
30 mph (48 km/h) while in gear (no transmission shifting occurring).
WARNING!
Fast spinning tires can be dangerous. Forces generated by excessive wheel speeds may
cause tire damage or failure. A tire could explode and injure someone. Do not spin your
vehicle's wheels faster than 30 mph (48 km/h) when you are stuck. Do not let anyone
near a spinning wheel, no matter what the speed.
WHAT TO DO IN EMERGENCIES
183