Page 185 of 429

Remove Favorites
Press the “Remove Favorites” tab at the top of the screen.
Press the “Delete All” button on the touchscreen to delete
all of the Favorites or press the “Trash Can” icon next to
the Favorite to be deleted.
Alert Settings
Press the “Alert Setting” tab at the top of the screen. The
Alert Settings menu allows you to choose from a Visual
alert or Audible and Visual alert when one of your
favorites is airing on any of the SiriusXM channels.
Game Zone
Press the “Game Zone” button, located at the left of the
Browse screen. This feature provides you with the ability
to select teams, edit the selection, and set alerts.
On Air
Press the “On-Air” tab at the top of the screen. The
On-Air list provides a list of Channels currently airing
any of the items in the Selections list, and pressing any of
the items in the list tunes the radio to that channel.
Select Teams
Press the “Select Teams” button on the touchscreen to
activate the League Scroll list. Press the chosen league
and a scroll list of all teams within the league will appear,
then you can select a team by pressing the corresponding
box. A check mark appears for all teams that are chosen.
Remove Selection
Press the “Remove Selection” tab at the top of the screen.
Press the “Delete All” button on the touchscreen to delete
all of the Selections or press the “Trash Can Icon” next to
the Selection to be deleted.
184 Uconnect® 8.4A — If Equipped
Page 186 of 429
Alert Settings
Press the “Alert Setting” tab at the top of the screen. The
Alert Settings menu allows you to choose from “Alert me
to on-air games upon start” or “Alert upon score update”
or both when one or more of your selections is airing on
any of the SiriusXM channels.
Audio
Press of the “Audio” button on the touchscreen to
activate the Audio settings screen to adjust
Balance\Fade, Equalizer, and Speed Adjusted Volume.
You can return to the Radio screen by pressing the “X”
located at the top right.
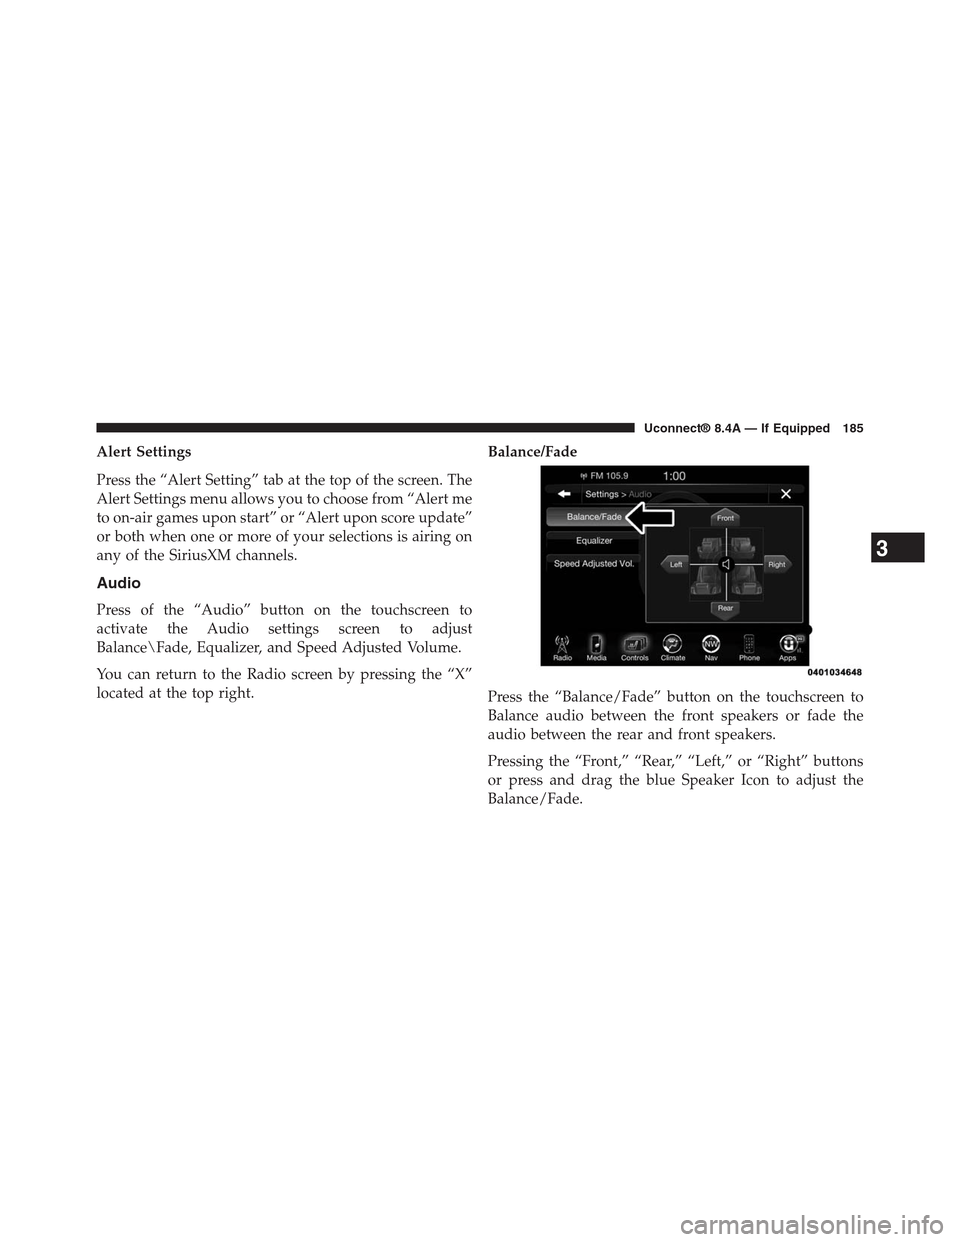
Balance/Fade
Press the “Balance/Fade” button on the touchscreen to
Balance audio between the front speakers or fade the
audio between the rear and front speakers.
Pressing the “Front,” “Rear,” “Left,” or “Right” buttons
or press and drag the blue Speaker Icon to adjust the
Balance/Fade.
3
Uconnect® 8.4A — If Equipped 185
Page 187 of 429
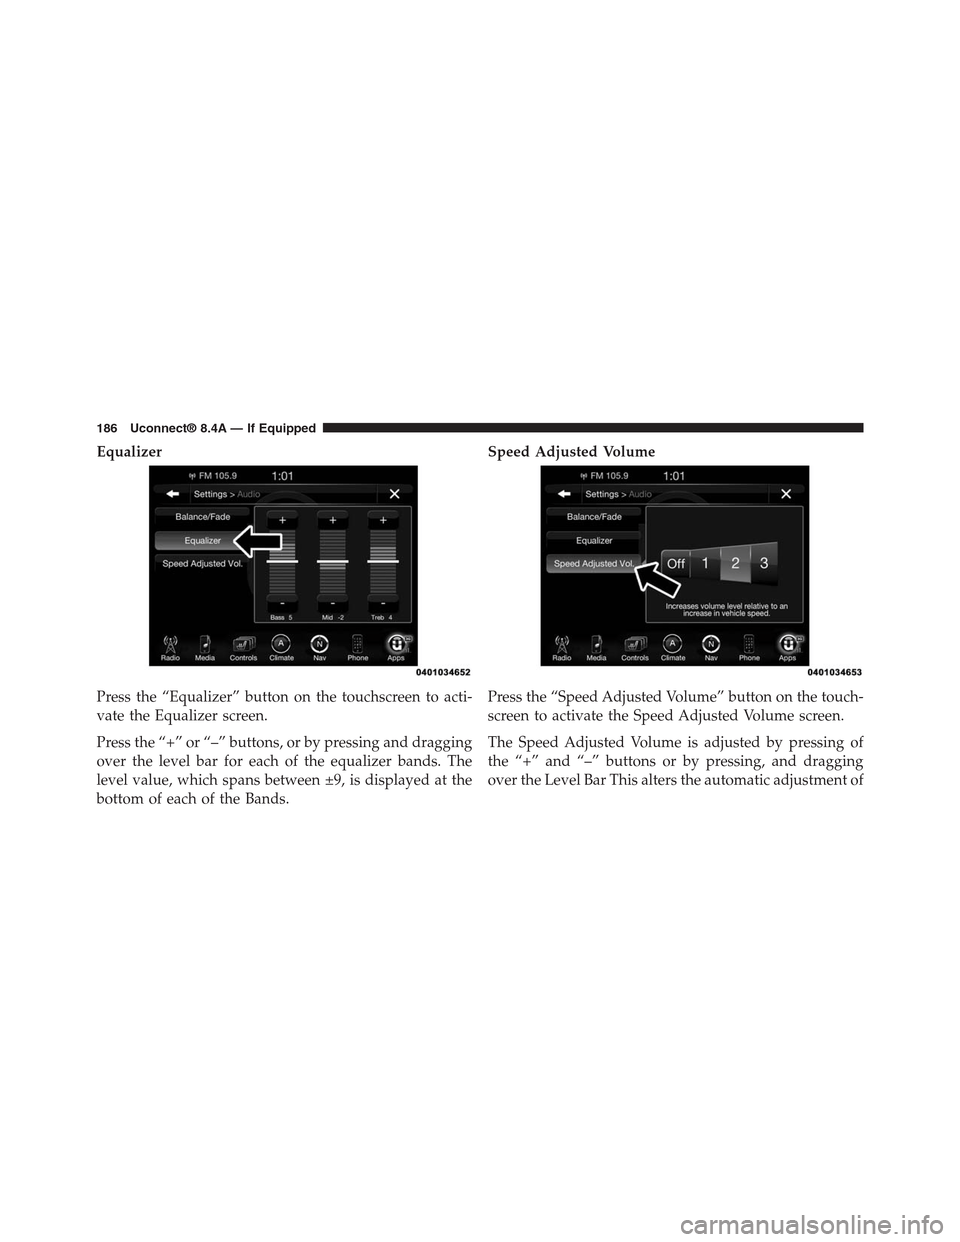
Equalizer
Press the “Equalizer” button on the touchscreen to acti-
vate the Equalizer screen.
Press the “+” or “–” buttons, or by pressing and dragging
over the level bar for each of the equalizer bands. The
level value, which spans between ±9, is displayed at the
bottom of each of the Bands.
Speed Adjusted Volume
Press the “Speed Adjusted Volume” button on the touch-
screen to activate the Speed Adjusted Volume screen.
The Speed Adjusted Volume is adjusted by pressing of
the “+” and “–” buttons or by pressing, and dragging
over the Level Bar This alters the automatic adjustment of
186 Uconnect® 8.4A — If Equipped
Page 188 of 429

the audio volume with variation to vehicle speed. Vol-
ume increases automatically as speed increase to com-
pensate for normal road noise.
Surround Sound (If Equipped)
Press the “On” button on the touchscreen to activate
Surround Sound. Press “Off” to deactivate this feature.
When Surround Sound is On, you can hear audio coming
from every direction as in a movie theatre or home
theatre system.
MEDIA MODE
Disc Mode — If Equipped
Overview
Disc Mode is entered by either inserting a Disc or
pressing the “Disc” button on the left side of the display.
Once in Media Mode, press the “Source” button on the
touchscreen and select “Disc.”
A “Insert Disc” message will be displayed on the screen
in the Disc mode when a Disc is not present in the Radio.
Seek Up/Seek Down
Press and release the Seek Upbutton on the touch-
screen for the next selection on the Disc. Press and
release the Seek Downbutton on the touchscreen to
return to the beginning of the current selection, or to
return to the beginning of the previous selection if the
Disc is within the first three seconds of the current
selection.
Browse
Press the “Browse” button on the touchscreen to display
the browse window. The left side of the browse window
displays a list of ways you can browse through the
contents of the Disc. If supported by the device, you can
browse by Folders, Artists, Playlists, Albums, Songs, etc.
Press the desired button on the touchscreen on the left
side of the screen. The center of the browse window
3
Uconnect® 8.4A — If Equipped 187
Page 189 of 429

shows items and it’s sub-functions, which can be scrolled
by pressing the “Up” and “Down” buttons to the right.
The TUNE/SCROLL knob can also be used to scroll.
Media Mode
Press the “Media” button on the touchscreen to select the
desired audio source: Disc.
Repeat
Press the “Repeat” button on the touchscreen to toggle
the repeat functionality. The Repeat button on the touch-
screen is highlighted when active. The Radio will con-
tinue to play the current track, repeatedly, as long as the
repeat is active.
Shuffle
Press the “Shuffle” button on the touchscreen to play the
selections on the compact disc in random order to
provide an interesting change of pace. Press the button
on the touchscreen a second time to turn this feature off.
Info
Press the “Info” button on the touchscreen to display the
current track information. Press the “Info” button on the
touchscreen a second time to cancel this feature.
Tracks
Press the “trks” button on the touchscreen to display a
pop up with the Song List. The currently playing song is
indicated by an arrow and lines above and below the
song title. When in the Tracks List screen you can rotate
the TUNE/SCROLL knob to highlight a track (indicated
by the line above and below the track name) and then
push the ENTER/BROWSE knob to start playing that
track.
Pressing the “trks” button on the touchscreen while the
pop up is displayed will close the pop up.
188 Uconnect® 8.4A — If Equipped
Page 190 of 429

USB/iPod® Mode
Overview
USB/iPod® Mode is entered by either inserting a USB
device or iPod® and cable into the USB Port or press the
“iPod®” button on the left side of the display.
Seek Up/Seek Down
Press and release the Seek Upbutton on the touch-
screen for the next selection on the USB device/iPod®.
Press and release the Seek Downbutton on the
touchscreen to return to the beginning of the current
selection, or to return to the beginning of the previous
selection if the USB device/iPod® is within the first
three seconds of the current selection.
Browse
Press the “Browse” button on the touchscreen to display
the browse window. The left side of the browse window
displays a list of ways you can browse through the
contents of the USB device/iPod®. If supported by the
device, you can browse by Folders, Artists, Playlists,
Albums, Songs, etc. Press the desired button on the left
side of the screen. The center of the browse window
shows items and it’s sub-functions, which can be scrolled
by pressing the “Up” and “Down” buttons to the right.
The TUNE/SCROLL knob can also be used to scroll.
Media Mode
Press the “Media” button on the touchscreen to select the
desired audio source: USB.
Repeat
Press the “Repeat” button on the touchscreen to toggle
the repeat functionality. The Repeat button on the touch-
screen is highlighted when active. The Radio will con-
tinue to play the current track, repeatedly, as long as the
repeat is active.
3
Uconnect® 8.4A — If Equipped 189
Page 191 of 429

Shuffle
Press the “Shuffle” button on the touchscreen to play the
selections on the USB/iPod® device in random order to
provide an interesting change of pace. Press the “Shuffle”
button on the touchscreen a second time to turn this
feature off.
Info
Press the “Info” button on the touchscreen to display the
current track information. Press the “Info” button on the
touchscreen a second time to cancel this feature.
Tracks
Press the “trks” button on the touchscreen to display a
pop up with the Song List. The currently playing song is
indicated by an arrow and lines above and below the
song title. When in the trks List screen you can rotate the
TUNE/SCROLL knob to highlight a track (indicated by
the line above and below the track name) and then push
the ENTER/BROWSE knob to start playing that track.
Pressing the “trks” button on the touchscreen while the
pop up is displayed will close the pop up.
Audio
Refer to Radio Mode for adjusting the audio settings.
AUX Mode
Overview
AUX (Auxiliary Mode) is entered by inserting an AUX
device using a cable with a 3.5 mm audio jack into the
AUX port or by pressing the AUX button on the left side
of the display.
Inserting Auxiliary Device
Gently insert the Auxiliary device cable into the AUX
Port. If you insert an Auxiliary device with the ignition
190 Uconnect® 8.4A — If Equipped
Page 192 of 429

ON and the radio ON, the unit will switch to AUX mode
and begin to play when you insert the device cable.
Controlling The Auxiliary Device
The control of the auxiliary device (e.g., selecting play-
lists, play, fast forward, etc.) cannot be provided by the
radio; use the device controls instead. Adjust the volume
with the VOLUME/MUTE rotary knob, or with the
volume of the attached device.
NOTE:The vehicle radio unit is acting as the amplifier
for audio output from the Auxiliary device. Therefore if
the volume control on the Auxiliary device is set too low,
there will be insufficient audio signal for the radio unit to
play the music on the device.
Media Mode
Press the “Media” button on the touchscreen to select the
desired audio source: AUX
Audio
Refer to Radio Mode for adjusting the audio settings.
SD Card Mode — If Equipped
Overview
SD Card Mode is entered by either inserting a SD Card
into the SD Card slot or press the “SD Card” button on
the left side of the display.
Seek Up/Seek Down
Press and release the Seek Upbutton on the touch-
screen for the next selection on the SD Card. Press and
release the Seek Downbutton on the touchscreen to
return to the beginning of the current selection, or to
return to the beginning of the previous selection if the
SD Card is within the first three seconds of the current
selection.
3
Uconnect® 8.4A — If Equipped 191