2015 DODGE CHARGER steering wheel
[x] Cancel search: steering wheelPage 411 of 638
(-) (or tap the (-) shift paddle on the steering wheel, if
equipped) to downshift the transmission to the next
lower gear, or tap the lever rearward (+) (or tap the (+)
shift paddle, if equipped) to command an upshift.
NOTE:Tapping one of the steering wheel-mounted shift
paddles (+/-), if equipped, while the shift lever is in
DRIVE, will activate a temporary AutoStick mode. Tap-
ping (-) to enter AutoStick mode will downshift the
transmission to the next lower gear, while using (+) to
enter AutoStick mode will retain the current gear. The
current gear will be displayed in the instrument cluster,
but the#M#will not be highlighted. The transmission will
revert back to normal operation (if the shift lever remains
in DRIVE) after a period of time, depending on accelera-
tor pedal activity.
In AutoStick mode, the transmission will shift up or
down when (+/-) is manually selected by the driver
(using the shift lever, or the shift paddles [if equipped]),
unless an engine lugging or overspeed condition would
result. It will remain in the selected gear until another
upshift or downshift is chosen, except as described
below.
•In temporary AutoStick mode (shift lever in DRIVE), the
transmission will automatically shift up when maxi-
mum engine speed is reached. If the accelerator is fully
depressed, the transmission will downshift when pos-
sible (based on current vehicle speed and gear, except
6.4L models). Lack of accelerator pedal activity will
cause the transmission to revert to automatic operation.
•If normal AutoStick mode is engaged (shift lever in
MANUAL position), manual gear selection will be
maintained until the shift lever is returned to DRIVE,
or as described below. The transmission will not
upshift automatically at redline in this mode, nor will
downshifts be obtained if the accelerator pedal is
pressed to the floor.
5
STARTING AND OPERATING 409
Page 413 of 638
WARNING!
Do not downshift for additional engine braking on a
slippery surface. The drive wheels could lose their
grip and the vehicle could skid, causing a collision or
personal injury.
SPORT MODE — WITHOUT PERFORMANCE
CONTROL
Your vehicle is equipped with a Sport Mode feature. This
mode is a configuration set up for typical enthusiast
driving. The engine, transmission, and steering systems
are all set to their SPORT settings. Sport Mode will
provide improved throttle response and modified shift-
ing for an enhanced driving experience, as well the
greatest amount of steering feel. This mode may be
activated and deactivated by pressing the Sport button
on the instrument panel switch bank.
For vehicles equipped with Drive Modes, Refer to “Per-
formance Control — If Equipped” within “Uconnect
Settings” in “Understanding Your Instrument Panel”
chapter for further information.
ALL-WHEEL DRIVE (AWD) — IF EQUIPPED
This vehicle is equipped with an active on-demand
All-Wheel Drive (AWD) system which makes available
optimum traction for a wide variety of road surface and
driving conditions. The system minimizes wheel slip by
automatically redirecting torque to the front and rear
wheels as necessary.
To maximize fuel economy, your AWD vehicle automati-
cally defaults to rear-wheel drive (RWD) when road and
environmental conditions are such that wheel slip is
unlikely to occur. When specific road and environmental
conditions require increased levels of road traction, the
vehicle automatically shifts into AWD mode. Automatic
5
STARTING AND OPERATING 411
Page 425 of 638
WARNING!(Continued)
•The ABS cannot prevent the natural laws of phys-
ics from acting on the vehicle, nor can it increase
braking or steering efficiency beyond that afforded
by the condition of the vehicle brakes and tires or
the traction afforded.
•The ABS cannot prevent collisions, including those
resulting from excessive speed in turns, following
another vehicle too closely, or hydroplaning.
•The capabilities of an ABS equipped vehicle must
never be exploited in a reckless or dangerous
manner that could jeopardize the user’s safety or
the safety of others.
All vehicle wheels and tires must be the same size and
type and tires must be properly inflated to produce
accurate signals for the computer.
Traction Control System (TCS)
This system monitors the amount of wheel spin of each
driven wheel. If wheel spin is detected, brake pressure is
applied to the slipping wheel(s) and engine power is
reduced to provide enhanced acceleration and stability.
A feature of the TCS system, Brake Limited Differential
(BLD), controls the wheel spin across a driven axle. If one
wheel on a driven axle is spinning faster than the other,
the system will apply the brake of the spinning wheel.
This will allow more engine torque to be applied to the
wheel that is not spinning. This feature remains active
even if TCS and ESC are in the “Sport Mode (Partial Off)”
or#Track Mode (Full Off)#mode. Refer to “Electronic
Stability Control (ESC)” in this section for more informa-
tion.
5
STARTING AND OPERATING 423
Page 427 of 638
Electronic Stability Control (ESC)
This system enhances directional control and stability of
the vehicle under various driving conditions. The ESC
corrects for oversteering and understeering the vehicle
by applying the brake of the appropriate wheel. Engine
power may also be reduced to assist in counteracting the
condition of oversteer or understeer and help the vehicle
maintain the desired path.
The ESC uses sensors in the vehicle to determine the path
that the driver intends to steer the vehicle and compares
it to the actual path of the vehicle. When the actual path
does not match the intended path, the ESC applies the
brake of the appropriate wheel to assist in counteracting
the condition of oversteer or understeer.
•Oversteer - when the vehicle is turning more than
appropriate for the steering wheel position.
•Understeer - when the vehicle is turning less than
appropriate for the steering wheel position.
WARNING!
The Electronic Stability Control (ESC) cannot pre-
vent the natural laws of physics from acting on the
vehicle, nor can it increase the traction afforded by
prevailing road conditions. ESC cannot prevent all
accidents, including those resulting from excessive
speed in turns, driving on very slippery surfaces, or
hydroplaning. ESC also cannot prevent collisions
resulting from loss of vehicle control due to inappro-
priate driver input for the conditions. Only a safe,
attentive, and skillful driver can prevent accidents.
The capabilities of an ESC equipped vehicle must
never be exploited in a reckless or dangerous manner
which could jeopardize the user ’s safety or the safety
of others.
5
STARTING AND OPERATING 425
Page 434 of 638
Synchronizing ESC
If the power supply is interrupted (battery
disconnected or discharged), the “ESC
Activation/Malfunction Indicator Light” may
illuminate with the engine running. If this
should occur, turn the steering wheel completely to the
left and then to the right. The “ESC Activation/
Malfunction Indicator Light” should go out. However, if
the light remains on, have the ESC and BAS checked at
your authorized dealer as soon as possible.
TIRE SAFETY INFORMATION
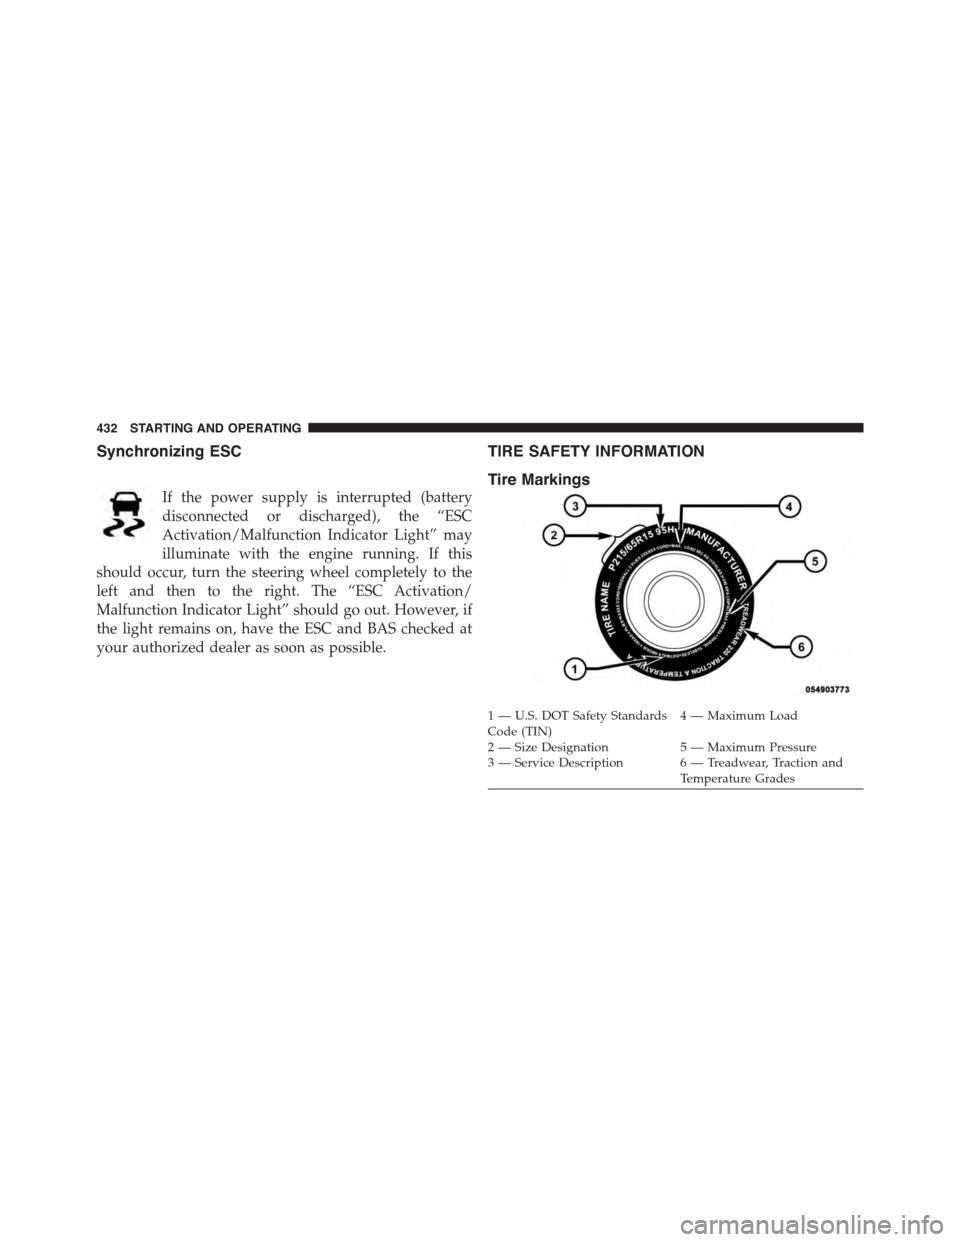
Tire Markings
1—U.S.DOTSafetyStandardsCode (TIN)4—MaximumLoad
2 — Size Designation 5 — Maximum Pressure3 — Service Description 6 — Treadwear, Traction andTemperature Grades
432 STARTING AND OPERATING
Page 457 of 638

wear and correct cold tire inflation pressures. The manu-
facturer strongly recommends that you use tires equiva-
lent to the originals in size, quality and performance
when replacement is needed. Refer to the paragraph on
“Tread Wear Indicator.” Refer to the Tire and Loading
Information placard or the Vehicle Certification Label for
the size designation of your tire. The Load Index and
Speed Symbol for your tire will be found on the original
equipment tire sidewall. See the Tire Sizing Chart ex-
ample found in the Tire Safety Information section of this
manual for more information relating to the Load Index
and Speed Symbol of a tire.
It is recommended to replace the two front tires or two
rear tires as a pair. Replacing just one tire can seriously
affect your vehicle’s handling. If you ever replace a
wheel, make sure that the wheel’s specifications match
those of the original wheels.
It is recommended you contact your authorized tire
dealer or original equipment dealer with any questions
you may have on tire specifications or capability. Failure
to use equivalent replacement tires may adversely affect
the safety, handling, and ride of your vehicle.
WARNING!
•Do not use a tire, wheel size or rating other than
that specified for your vehicle. Some combinations
of unapproved tires and wheels may change sus-
pension dimensions and performance characteris-
tics, resulting in changes to steering, handling, and
braking of your vehicle. This can cause unpredict-
able handling and stress to steering and suspen-
sion components. You could lose control and have
a collision resulting in serious injury or death. Use
only the tire and wheel sizes with load ratings
approved for your vehicle.
(Continued)
5
STARTING AND OPERATING 455
Page 488 of 638
Towing Requirements
To promote proper break-in of your new vehicle drive-
train components the following guidelines are recom-
mended:
WARNING!
Improper towing can lead to an injury collision.
Follow these guidelines to make your trailer towing
as safe as possible:
•Make certain that the load is secured in the trailer
and it will not shift during travel. When trailering
cargo that is not fully secured, dynamic load shifts
can occur that may be difficult for the driver to
control. You could lose control of your vehicle and
have a collision.
(Continued)
WARNING!(Continued)
•When hauling cargo or towing a trailer, do not
overload your vehicle or trailer. Overloading can
cause a loss of control, poor performance, or dam-
age to brakes, axle, engine, transmission, steering,
suspension, chassis structure, or tires.
•Safety chains must always be used between your
vehicle and trailer. Always connect the chains to
the frame or hook retainers of the vehicle hitch.
Cross the chains under the trailer tongue and allow
enough slack for turning corners.
•Vehicles with trailers should not be parked on a
grade. When parking, apply the parking brake on
the tow vehicle. Put the tow vehicle automatic
transmission in PARK. Always, block or%chock%
the trailer wheels.
•GCWR must not be exceeded.
(Continued)
486 STARTING AND OPERATING
Page 523 of 638
6. Once the engine is started, remove the jumper cables
in the reverse sequence:
Disconnecting The Jumper Cables
1. Disconnect the negative(-)end of the jumper cable
from the remote negative(-)post of the vehicle with
the discharged battery.
2. Disconnect the opposite end of the negative(-)jumper
cable from the negative(-)post of the booster battery.
3. Disconnect the positive(+)end of the jumper cable
from the positive(+)post of the booster battery.
4. Disconnect the opposite end of the positive(+)jumper
cable from the remote positive(+)post of the vehicle
with the discharged battery.
If frequent jump-starting is required to start your vehicle
you should have the battery and charging system in-
spected at your authorized dealer.
CAUTION!
Accessories plugged into the vehicle power outlets
draw power from the vehicle’s battery, even when not
in use (i.e., cellular phones, etc.). Eventually, if
plugged in long enough without engine operation,
the vehicle’s battery will discharge sufficiently to
degrade battery life and/or prevent the engine from
starting.
FREEING A STUCK VEHICLE
If your vehicle becomes stuck in mud, sand, or snow, it
can often be moved using a rocking motion. Turn the
steering wheel right and left to clear the area around the
front wheels. Push and hold the lock button on the shift
lever. Then shift back and forth between DRIVE and
REVERSE while gently pushing the accelerator. Use the
6
WHAT TO DO IN EMERGENCIES 521