Page 40 of 638
Do NOT grab the door handle when pushing the door
handle button. This could unlock the door(s).
NOTE:
•After pushing the door handle button, you must wait
two seconds before you can lock or unlock the doors,
using either Passive Entry door handle. This is done to
allow you to check if the vehicle is locked by pulling
the door handle, without the vehicle reacting and
unlocking.
•The Passive Entry system will not operate if the RKE
transmitter battery is dead.
The vehicle doors can also be locked by using the RKE
transmitter lock button or the lock button located on the
vehicle’s interior door panel.
Do NOT Grab The Handle When Locking
38 THINGS TO KNOW BEFORE STARTING YOUR VEHICLE
Page 44 of 638
Window Lockout Switch
The window lockout switch on the driver’s door trim
panel allows you to disable the window controls on the
rear passenger doors. To disable the window controls,
push and release the window lockout button (setting it in
the DOWN position). To enable the window controls,
push and release the window lockout button again
(setting it in the UP position).
Window Lockout Switch
42 THINGS TO KNOW BEFORE STARTING YOUR VEHICLE
Page 45 of 638

Wind Buffeting
Wind buffeting can be described as the perception of
pressure on the ears or a helicopter-type sound in the
ears. Your vehicle may exhibit wind buffeting with the
windows down, or the sunroof (if equipped) in certain
open or partially open positions. This is a normal occur-
rence and can be minimized. If the buffeting occurs with
the rear windows open, then open the front and rear
windows together to minimize the buffeting. If the
buffeting occurs with the sunroof open, adjust the sun-
roof opening to minimize the buffeting.
TRUNK LOCK AND RELEASE
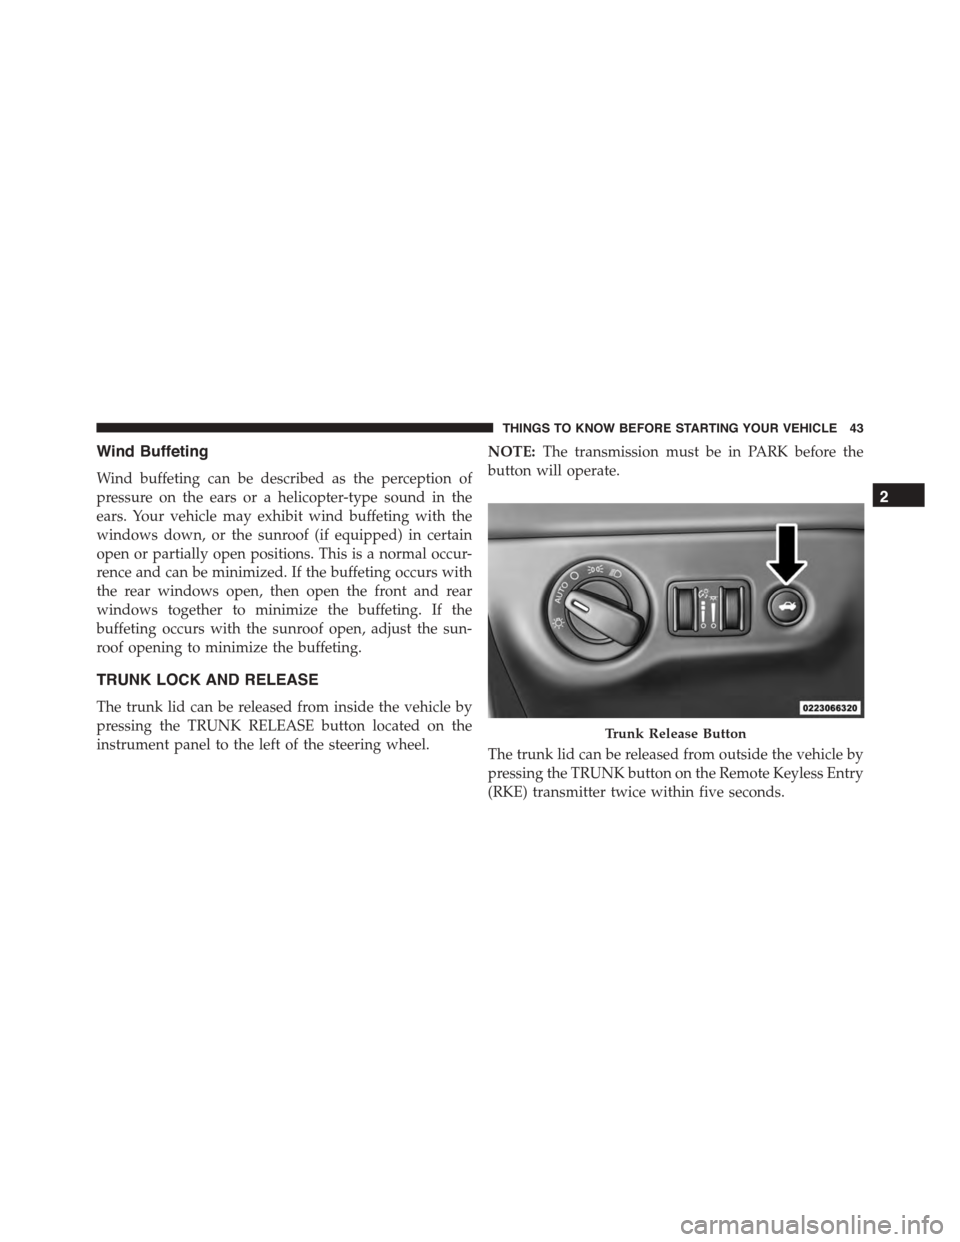
The trunk lid can be released from inside the vehicle by
pressing the TRUNK RELEASE button located on the
instrument panel to the left of the steering wheel.
NOTE:The transmission must be in PARK before the
button will operate.
The trunk lid can be released from outside the vehicle by
pressing the TRUNK button on the Remote Keyless Entry
(RKE) transmitter twice within five seconds.
Trunk Release Button
2
THINGS TO KNOW BEFORE STARTING YOUR VEHICLE 43
Page 47 of 638
Trunk Emergency Release
As a security measure, a Trunk Internal Emergency
Release lever is built into the trunk latching mechanism.
In the event of an individual being locked inside the
trunk, the trunk can be simply opened by pulling on the
glow-in-the-dark handle attached to the trunk latching
mechanism.
Trunk Emergency Internal Release
2
THINGS TO KNOW BEFORE STARTING YOUR VEHICLE 45
Page 51 of 638

NOTE:If BeltAlert has been deactivated, the Seat Belt
Reminder Light will continue to illuminate while the
driver ’s or outboard front passenger ’s (if equipped with
BeltAlert) seat belt remains unbuckled.
Lap/Shoulder Belts
All seating positions in your vehicle are equipped with
lap/shoulder belts.
The seat belt webbing retractor will lock only during very
sudden stops or collisions. This feature allows the shoul-
der part of the seat belt to move freely with you under
normal conditions. However, in a collision the seat belt
will lock and reduce your risk of striking the inside of the
vehicle or being thrown out of the vehicle.
WARNING!
•Relying on the air bags alone could lead to more
severe injuries in a collision. The air bags work
with your seat belt to restrain you properly. In
some collisions, the air bags won’t deploy at all.
Always wear your seat belt even though you have
air bags.
•In a collision, you and your passengers can suffer
much greater injuries if you are not properly buck-
led up. You can strike the interior of your vehicle or
other passengers, or you can be thrown out of the
vehicle. Always be sure you and others in your
vehicle are buckled up properly.
•It is dangerous to ride in a cargo area, inside or
outside of a vehicle. In a collision, people riding in
these areas are more likely to be seriously injured
or killed.
(Continued)
2
THINGS TO KNOW BEFORE STARTING YOUR VEHICLE 49
Page 56 of 638
3. Slide the latch plate upward over the folded webbing.
The folded webbing must enter the slot at the top of
the latch plate.
4. Continue to slide the latch plate up until it clears the
folded webbing and the seat belt is no longer twisted.
Adjustable Upper Shoulder Belt Anchorage
In the driver and front passenger seats, the top of the
shoulder belt can be adjusted upward or downward to
position the seat belt away from your neck. Push or
squeeze the anchorage button to release the anchorage,
and move it up or down to the position that serves you
best.As a guide, if you are shorter than average, you will
prefer the shoulder belt anchorage in a lower position,
and if you are taller than average, you will prefer the
shoulder belt anchorage in a higher position. After you
release the anchorage button, try to move it up or down
to make sure that it is locked in position.
Adjustable Anchorage
54 THINGS TO KNOW BEFORE STARTING YOUR VEHICLE
Page 57 of 638

NOTE:The adjustable upper shoulder belt anchorage is
equipped with an Easy Up feature. This feature allows
the shoulder belt anchorage to be adjusted in the upward
position without pushing or squeezing the release but-
ton. To verify the shoulder belt anchorage is latched, pull
downward on the shoulder belt anchorage until it is
locked into position.
Seat Belt Extender
If a seat belt is not long enough to fit properly, even when
the webbing is fully extended and the adjustable upper
shoulder belt anchorage (if equipped) is in its lowest
position, your authorized dealer can provide you with a
Seat Belt Extender. The Seat Belt Extender should be used
only if the existing seat belt is not long enough. When the
Seat Belt Extender is not required for a different occu-
pant, it must be removed.
WARNING!
•ONLY use a Seat Belt Extender if it is physically
required in order to properly fit the original seat
belt system. DO NOT USE the Seat Belt Extender
if, when worn, the distance between the front edge
of the Seat Belt Extender buckle and the center of
the occupant’s body is LESS than 6 inches.
•Using a Seat Belt Extender when not needed can
increase the risk of serious injury or death in a
collision. Only use the Seat Belt Extender when the
lap belt is not long enough and only use in the
recommended seating positions. Remove and store
the Seat Belt Extender when not needed.
Seat Belts And Pregnant Women
We recommend that pregnant women use the seat belts
throughout their pregnancy. Keeping the mother safe is
the best way to keep the baby safe.
2
THINGS TO KNOW BEFORE STARTING YOUR VEHICLE 55
Page 58 of 638

Pregnant women should wear the lap part of the seat belt
across the thighs and as snug across the hips as possible.
Keep the seat belt low so that it does not come across the
abdomen. That way the strong bones of the hips will take
the force if there is a collision.
Seat Belt Pretensioner
The front seat belt system is equipped with pretensioning
devices that are designed to remove slack from the seat
belt in the event of a collision. These devices may
improve the performance of the seat belt by removing
slack from the seat belt early in a collision. Pretensioners
work for all size occupants, including those in child
restraints.
NOTE:These devices are not a substitute for proper seat
belt placement by the occupant. The seat belt still must be
worn snugly and positioned properly.
The pretensioners are triggered by the Occupant Re-
straint Controller (ORC). Like the air bags, the preten-
sioners are single use items. A deployed pretensioner or
a deployed air bag must be replaced immediately.
Energy Management Feature
This vehicle has a seat belt system with an Energy
Management feature in the front seating positions that
may help further reduce the risk of injury in the event of
a collision. This seat belt system has a retractor assembly
that is designed to release webbing in a controlled
manner.
Automatic Locking Retractor (ALR) — If Equipped
The seat belts in the passenger seating positions may be
equipped with Switchable Automatic Locking Retractors
(ALR) which are used to secure a child restraint system.
For additional information, refer to “Installing Child
Restraints Using The Vehicle Seat Belt” under the “Child
56 THINGS TO KNOW BEFORE STARTING YOUR VEHICLE