Page 72 of 638
continues, see your doctor. If these particles settle on
your clothing, follow the garment manufacturer ’s in-
structions for cleaning.
Do not drive your vehicle after the air bags have de-
ployed. If you are involved in another collision, the air
bags will not be in place to protect you.
WARNING!
Deployed air bags and seat belt pretensioners cannot
protect you in another collision. Have the air bags,
seat belt pretensioners, and the seat belt retractor
assemblies replaced by an authorized dealer imme-
diately. Also, have the Occupant Restraint Controller
System serviced as well.
NOTE:
•Air bag covers may not be obvious in the interior trim,
but they will open during air bag deployment.
•After any collision, the vehicle should be taken to an
authorized dealer immediately.
Enhanced Accident Response System
In the event of an impact, if the communication network
remains intact, and the power remains intact, depending
on the nature of the event, the ORC will determine
whether to have the Enhanced Accident Response Sys-
tem perform the following functions:
•Cut off fuel to the engine.
•Flash hazard lights as long as the battery has power or
until the ignition is placed in the “OFF” position.
•Turn on the interior lights, which remain on as long as
the battery has power or until the ignition is placed in
the “OFF” position.
•Unlock the doors automatically.
70 THINGS TO KNOW BEFORE STARTING YOUR VEHICLE
Page 73 of 638
System Reset Procedure
In order to reset the Enhanced Accident Response System
functions after an event, the ignition must be changed
from ignition START or ON/RUN to ignition OFF.
Air Bag Warning Light
The air bags must be ready to inflate for your
protection in a collision. The Occupant Re-
straint Controller (ORC) monitors the internal
circuits and interconnecting wiring associated
with air bag system electrical components.
The ORC monitors the readiness of the electronic parts of
the air bag system whenever the ignition is in the START
or ON/RUN position. If the ignition is in the OFF
position or in the ACC position, the air bag system is not
on and the air bags will not inflate.
The ORC contains a backup power supply system that
may deploy the air bags even if the battery loses power or
it becomes disconnected prior to deployment.
The ORC turns on the Air Bag Warning Light in the
instrument panel for approximately four to eight seconds
for a self-check when the ignition is first placed in the
ON/RUN position. After the self-check, the Air Bag
Warning Light will turn off. If the ORC detects a mal-
function in any part of the system, it turns on the Air Bag
Warning Light, either momentarily or continuously. A
single chime will sound to alert you if the light comes on
again after initial startup.
The ORC also includes diagnostics that will illuminate
the instrument panel Air Bag Warning Light if a malfunc-
tion is detected that could affect the air bag system. The
diagnostics also record the nature of the malfunction.
While the air bag system is designed to be maintenance
2
THINGS TO KNOW BEFORE STARTING YOUR VEHICLE 71
Page 118 of 638
WARNING!(Continued)
•The Occupant Restraint Control module turns on
the Air Bag Warning Light on the instrument panel
if a malfunction in any part of the system is
detected. If the Air Bag Warning Light is illumi-
nated, the air bag system may not be working
properly and the 9-1-1 system may not be able to
send a signal to a 9-1-1 operator. If the Air Bag
Warning Light is illuminated, have an authorized
dealer service the ORC system immediately.
Even if the 9-1-1 Call system is fully functional, factors
beyond Chrysler Group LLC’s control may prevent or
stop the 9-1-1 Call system operation. These include, but
are not limited to, the following factors:
•Delayed accessories mode is active.
•The ignition is in the OFF position.
•The vehicle’s electrical systems are not intact.
•The 9-1-1 Call system software and/or hardware are
damaged during a crash.
•The vehicle battery loses power or becomes discon-
nected during a vehicle crash.
•Wireless and/or Global Positioning Satellite signals
are unavailable or obstructed.
•Equipment malfunction at the 9-1-1 operator facility.
•Operator error by the 9-1-1 operator.
•Wireless network congestion.
•Weather.
•Buildings, structures, geographic terrain, or tunnels.
11 6 U N D E R S TA N D I N G T H E F E AT U R E S O F Y O U R V E H I C L E
Page 163 of 638
Interior Lights
The interior lights come on when a door is opened.
To protect the battery, the interior lights will turn off
automatically 10 minutes after the ignition is moved to
the LOCK position. This will occur if the interior lights
were switched on manually or are on because a door is
open. This includes the glove box light and the trunk
light. To restore interior light operation, either place the
ignition in the ON/RUN position or cycle the light
switch.
Dimmer Controls
The dimmer control is part of the headlight switch and is
located on the left side of the instrument panel.
Dimmer Controls
3
UNDERSTANDING THE FEATURES OF YOUR VEHICLE 161
Page 234 of 638
Sunglasses Bin Door
At the front of the console a compartment is provided for
the storage of a pair of sunglasses. The storage compart-
ment access is a “push/push” design. Push the chrome
pad on the door to open. Push the chrome pad on the
door to close.
GARAGE DOOR OPENER — IF EQUIPPED
HomeLink® replaces up to three hand-held transmitters
that operate devices such as garage door openers, motor-
ized gates, lighting or home security systems. The
HomeLink® unit is powered by your vehicles 12 Volt
battery.
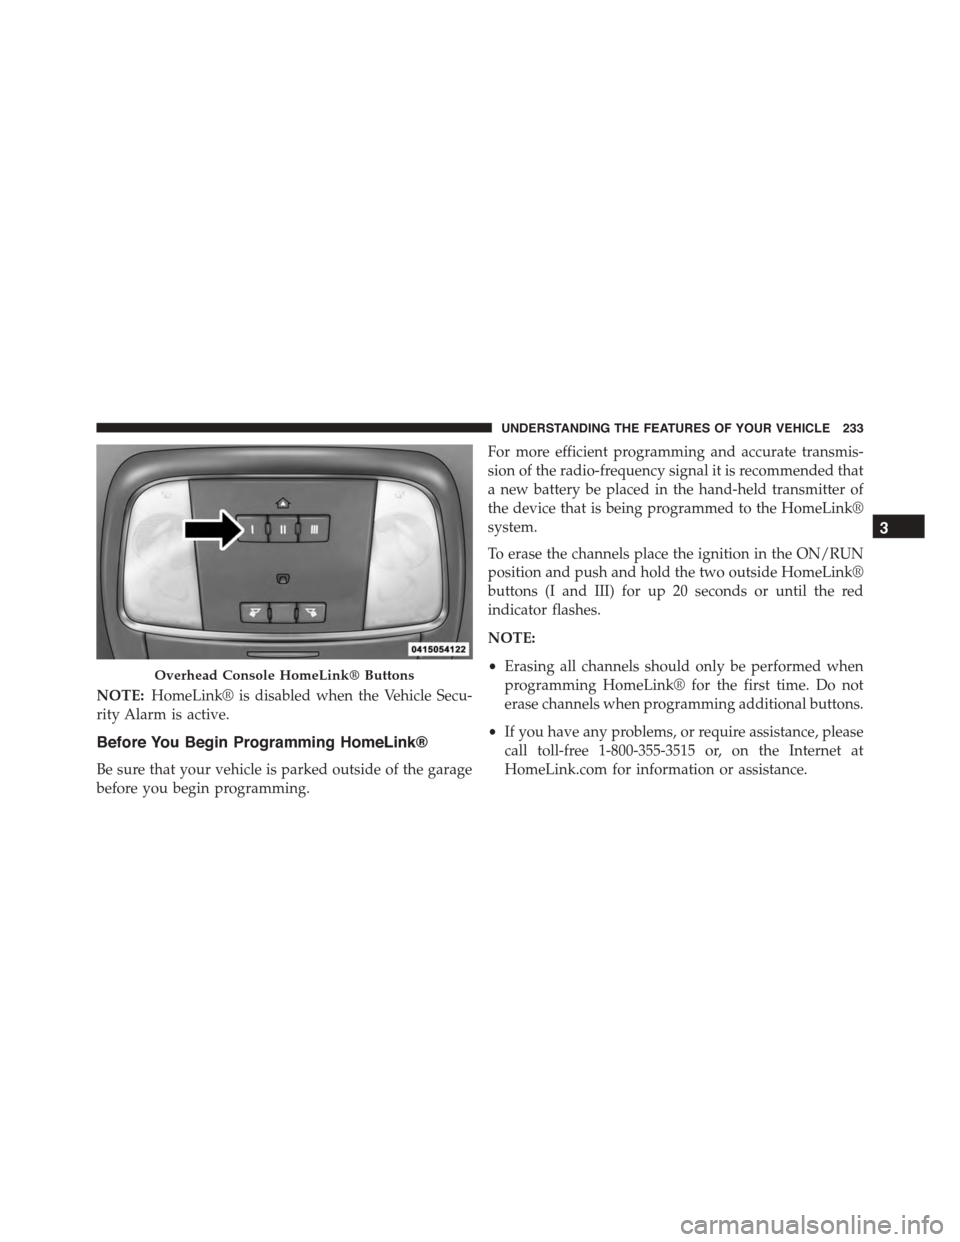
The HomeLink® buttons, located on either the overhead
console, headliner or sunvisor, designate the three differ-
ent HomeLink® channels. The HomeLink® indicator is
located above the center button.
Sunglasses Bin Door
232 UNDERSTANDING THE FEATURES OF YOUR VEHICLE
Page 235 of 638
NOTE:HomeLink® is disabled when the Vehicle Secu-
rity Alarm is active.
Before You Begin Programming HomeLink®
Be sure that your vehicle is parked outside of the garage
before you begin programming.
For more efficient programming and accurate transmis-
sion of the radio-frequency signal it is recommended that
a new battery be placed in the hand-held transmitter of
the device that is being programmed to the HomeLink®
system.
To erase the channels place the ignition in the ON/RUN
position and push and hold the two outside HomeLink®
buttons (I and III) for up 20 seconds or until the red
indicator flashes.
NOTE:
•Erasing all channels should only be performed when
programming HomeLink® for the first time. Do not
erase channels when programming additional buttons.
•If you have any problems, or require assistance, please
call toll-free 1-800-355-3515 or, on the Internet at
HomeLink.com for information or assistance.
Overhead Console HomeLink® Buttons
3
UNDERSTANDING THE FEATURES OF YOUR VEHICLE 233
Page 241 of 638

Using HomeLink®
To operate, push and release the programmed
HomeLink® button. Activation will now occur for the
programmed device (i.e., garage door opener, gate opera-
tor, security system, entry door lock, home/office light-
ing, etc.,). The hand-held transmitter of the device may
also be used at any time.
Security
It is advised to erase all channels before you sell or turn
in your vehicle.
To do this, push and hold the two outside buttons for 20
seconds until the red indicator flashes. Note that all
channels will be erased. Individual channels cannot be
erased.
The HomeLink® Universal Transceiver is disabled when
the Vehicle Security Alarm is active.
Troubleshooting Tips
If you are having trouble programming HomeLink®,
here are some of the most common solutions:
•Replace the battery in the original hand-held transmit-
ter.
•Push the LEARN button on the Garage Door Opener
to complete the training for a Rolling Code.
•Did you unplug the device for programming and
remember to plug it back in?
If you have any problems, or require assistance, please
call toll-free 1-800-355-3515 or, on the Internet at
HomeLink.com for information or assistance.
3
UNDERSTANDING THE FEATURES OF YOUR VEHICLE 239
Page 246 of 638
Sunroof Maintenance
Use only a non-abrasive cleaner and a soft cloth to clean
the glass panel.
Ignition Off Operation
NOTE:
•The power sunroof switch can remain active for up to
approximately ten minutes after the vehicles ignition is
placed to the Off position. Opening either front door
will cancel this feature.
•This feature is programmable using the Uconnect®
System. Refer to “Uconnect® Settings” in “Under-
standing Your Instrument Panel” for further informa-
tion.
ELECTRICAL POWER OUTLETS
Your vehicle is equipped with one 12 Volt (13 Amp)
power outlet on the instrument panel and one 12 Volt (10
Amp) power outlet in the center console that can be used
to power cellular phones, small electronics and other low
powered electrical accessories. The power outlets are
labeled with either a “key” or a “battery” symbol to
indicate how the outlet is powered. Power outlets labeled
with a “key” are powered when the ignition switch is in
the ON or ACC position, while the outlets labeled with a
“battery” are connected directly to the battery and pow-
ered at all times.
244 UNDERSTANDING THE FEATURES OF YOUR VEHICLE