2015 DODGE CHALLENGER torque
[x] Cancel search: torquePage 242 of 603

Engine Torque
Engine Power
NOTE:Depending on what your vehicles configuration,
the Performance Pages feature must be initially launched
in order to view certain gauges through the DID display.
Refer to “Uconnect Settings®” in this section for further
information.
Performance Features
WARNING!
Measurement of vehicle statistics with the Perfor-
mance Features is intended for off-highway or off-
road use only and should not be done on any public
roadways. It is recommended that these features be
used in a controlled environment and within the
limits of the law. The capabilities of the vehicle as
(Continued)
WARNING!(Continued)
measured by the performance pages must never be
exploited in a reckless or dangerous manner, which
can jeopardize the user ’s safety or the safety of
others. Only a safe, attentive, and skillful driver can
prevent accidents.
Refer to “Driver Information Display (DID)” in “ Under-
standing Your Instrument Panel” for Main Menu/Sub-
Menu selectable items and navigation.
This mode provides performance based suspension tun-
ing with improved handling and acceleration through an
electronic controlled dampening system. This system
reduces body roll and pitch in many driving situations
including cornering, acceleration and braking.
240 UNDERSTANDING YOUR INSTRUMENT PANEL
Page 256 of 603

Units
After pressing the “Units” button on the touchscreen the
following settings will be available:
•Units
When in this display, you may select each unit of measure
independently displayed in the Driver Information Dis-
play (DID), and navigation system (if equipped). The
following selectable units of measure are listed below:
•Speed
Select from: “MPH” or “km/h.”
•Distance
Select from: “mi” or “km.”
•Fuel Consumption
Select from: “MPG” (US), “MPG” (UK), “L/100 km” or
“km/L.”
•Capacity
Select from: “gal” (US), “gal” (UK), or “L.”
•Pressure
Select from: “psi,” “kPa,” or “bar.”
•Temperature
Select from: “°C,” or “°F.”
•Power
Select from: “HP” (US), “HP” (UK), and “kW.”
•Torque
Select from: “lb-ft” or “Nm.”
•After the desired setting has been selected, press the
back arrow/Done button on the touchscreen to return
to the previous menu.
254 UNDERSTANDING YOUR INSTRUMENT PANEL
Page 274 of 603

•Power
Select from: “HP” (US), “HP” (UK), and “kW.”
•Torque
Select from: “lb-ft” or “Nm.”
•After the desired setting has been selected, press the
back arrow button on the touchscreen to return to the
previous menu.
Voice
•Voice Response Length
When in this display, you may change the Voice Re-
sponse Length settings. To change the Voice Response
Length, press the “Brief” or “Detailed” button on the
touchscreen until a check-mark appears next to the
setting, showing that setting has been selected. Press the
back arrow button on the touchscreen to return to the
previous menu.
•Show Command List
When in this display, you may change the Show Com-
mand List settings. To change the Show Command List
settings, press the “Always,” “With Help” or “Never”
button on the touchscreen until a check-mark appears
next to the setting, showing that setting has been se-
lected. Press the back arrow button on the touchscreen to
return to the previous menu.
Clock
After pressing the “Clock” button on the touchscreen the
following settings will be available:
•Sync Time With GPS
This feature will allow you to automatically have the
radio set the time. To change the Sync Time setting, press
the “Sync time with GPS” button on the touchscreen until
a check-mark appears next to the setting, showing that
272 UNDERSTANDING YOUR INSTRUMENT PANEL
Page 298 of 603

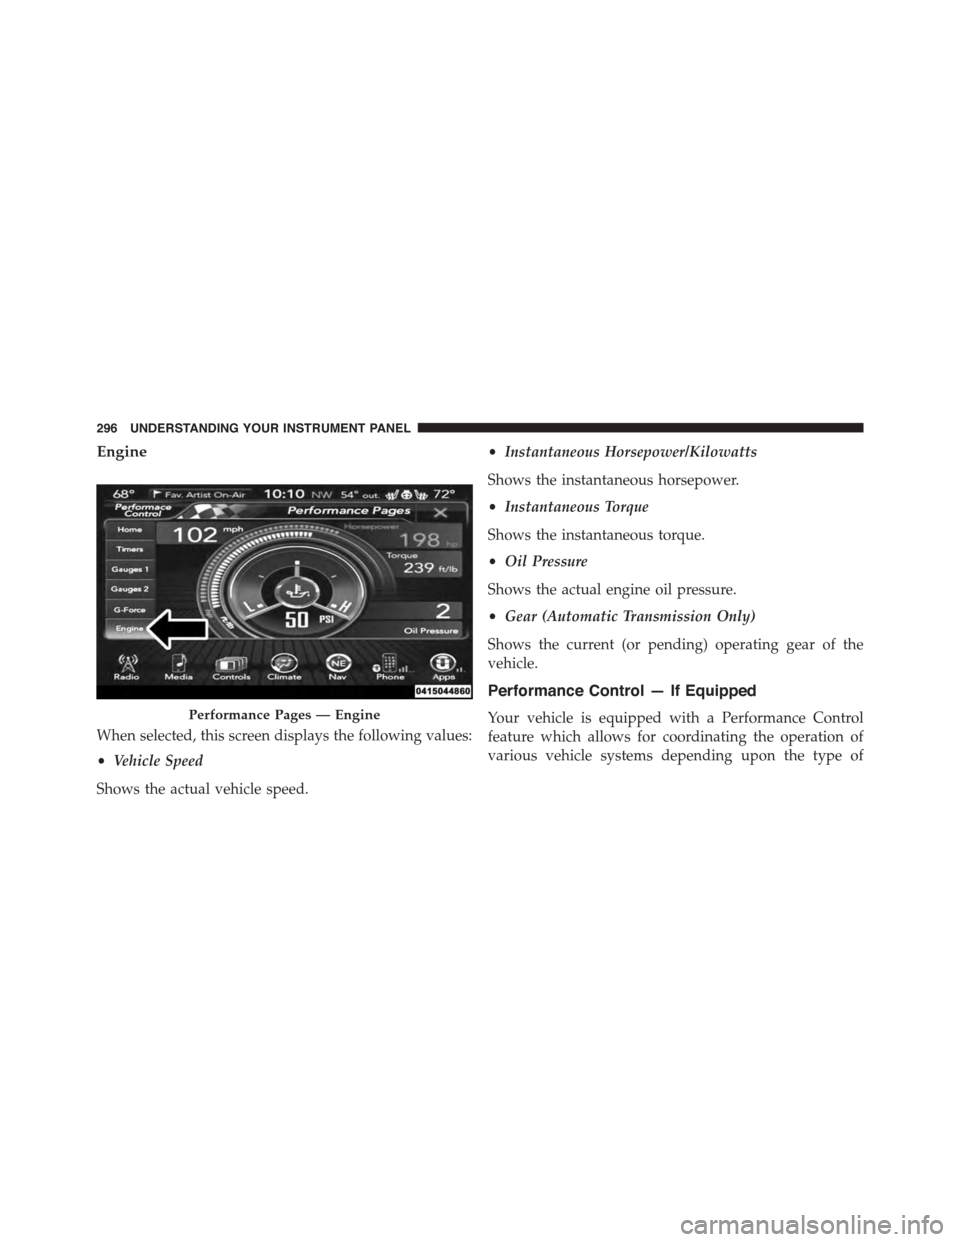
Engine
When selected, this screen displays the following values:
•Vehicle Speed
Shows the actual vehicle speed.
•Instantaneous Horsepower/Kilowatts
Shows the instantaneous horsepower.
•Instantaneous Torque
Shows the instantaneous torque.
•Oil Pressure
Shows the actual engine oil pressure.
•Gear (Automatic Transmission Only)
Shows the current (or pending) operating gear of the
vehicle.
Performance Control — If Equipped
Your vehicle is equipped with a Performance Control
feature which allows for coordinating the operation of
various vehicle systems depending upon the type of
Performance Pages — Engine
296 UNDERSTANDING YOUR INSTRUMENT PANEL
Page 301 of 603

•Launch Control is intended to be used on dry, paved
road surfaces only. Use on slippery or loose surfaces
may cause damage to vehicle components and is not
recommended.
Automatic Transmission — If Equipped
Launch Control is only available when the following
procedure is followed:
1. Press the “Apps” button on the touchscreen, select
“Performance Control”, and press the “Launch Con-
trol” button on the touchscreen or push the Super
Track Pak button on the integrated center stack switch
bank.
2. If desired, press the “Launch RPM Set-Up” button on
the touchscreen. This screen will allow you to adjust
your launch RPM for optimum launch/traction. To
adjust the Launch RPM, press and drag the slider bar,
or press the arrows on the touchscreen, to adjust the
holding RPM. Press the back arrow button on the
touchscreen when finished. The setting will be saved.
NOTE:The default RPM for launch control is a preset
factory value. Optimal launch RPM will depend on the
engine and tires on the vehicle, as well as the road and
weather conditions. Not all RPM settings will be usable
in all configurations and scenarios. If requested launch
RPM is not attainable in a given scenario, the engine will
provide the maximum amount of torque possible to get
as close as possible to the requested RPM.
3. Press the “Activate Launch Mode” button on the
touchscreen.
4. Ensure the vehicle is not moving and the steering
wheel is pointing straight.
5. Hold the brake pedal and verify the vehicle is in
“Drive.”
4
UNDERSTANDING YOUR INSTRUMENT PANEL 299
Page 303 of 603

the Launch RPM, press and drag the slider bar or press
the arrows on the touchscreen to adjust the holding
RPM. Press the back arrow button when finished. The
setting will be saved.
NOTE:The default for launch control is 3000 RPM.
Optimal launch RPM will depend on the engine and tires
on the vehicle, as well as road and weather conditions.
Not all RPM settings will be usable in all configurations
and scenarios. If requested launch RPM is not attainable
in a given scenario, the engine will provide the maximum
amount of torque possible to get as close as possible to
the requested RPM.
3. Press the “Activate Launch Mode” button on the
touchscreen.
4. Ensure the vehicle is not moving and the steering
wheel is pointing straight.
5. Fully depress the clutch pedal and verify the vehicle is
in first gear.
6. While holding the clutch depressed, rapidly apply the
accelerator pedal to wide open throttle. The engine
speed will hold at the RPM that was set in the “Launch
RPM Set-up” screen.
NOTE:Messages will appear in the Driver Information
Display (DID) to inform the driver if one or more of the
above conditions have not been met.
7. When conditions four through six have been met, the
DID will read “Launch Ready Release Clutch.” Re-
lease the clutch quickly and continue to hold wide
open throttle to launch. Execute shifts as described in
the section “Manual Transmission – Shifting.”
8. Keep the vehicle pointed straight. Launch control will
be active until the vehicle reaches 62 MPH (100 km/h).
4
UNDERSTANDING YOUR INSTRUMENT PANEL 301
Page 386 of 603

Anti-Lock Brake Warning Light
The “Anti-Lock Brake System (ABS) Warning
Light” monitors the Anti-Lock Brake System. The
light will come on when the ignition switch is
turned to the ON position and may stay on for as long as
four seconds.
If the “ABS Warning Light” remains on or comes on
while driving, it indicates that the anti-lock portion of the
brake system is not functioning and that service is
required. However, the conventional brake system will
continue to operate normally if the “Brake Warning
Light” is not on.
If the “ABS Warning Light” is on, the brake system
should be serviced as soon as possible to restore the
benefits of anti-lock brakes. If the “ABS Warning Light”
does not come on when the ignition switch is turned to
the ON position, have the bulb repaired as soon as
possible.
If both the “Brake Warning Light” and the “ABS Warning
Light” remain on, the ABS and EBD systems are not
functioning. Immediate repair to the ABS system is
required.
Traction Control System (TCS)
This system monitors the amount of wheel spin of each
driven wheel. If wheel spin is detected, brake pressure is
applied to the slipping wheel(s) and engine power is
reduced to provide enhanced acceleration and stability.
A feature of the TCS system, Brake Limited Differential
(BLD), controls the wheel spin across a driven axle. If one
wheel on a driven axle is spinning faster than the other,
the system will apply the brake of the spinning wheel.
This will allow more engine torque to be applied to the
wheel that is not spinning. This feature remains active
even if TCS and ESC are in the “Partial Off” or#Full Off#
mode. Refer to “Electronic Stability Control (ESC)” in this
section for more information.
384 STARTING AND OPERATING
Page 391 of 603

WARNING!
When in “Partial Off” mode, the TCS portion of ESC,
except for the limited wheel spin feature described in
the TCS section, has been disabled and the “ESC Off
Indicator Light” will be illuminated. When in “Par-
tial Off” mode, the enhanced vehicle stability offered
by the ESC system is reduced.
Full Off — If Equipped
This mode is intended for off-highway or off-road use
only and should not be used on any public roadways. In
this mode, all TCS and ESC stability features are turned
OFF. To enter the “Full Off” mode, press and hold the
“ESC Off” switch for five seconds while the vehicle is
stopped with the engine running. After five seconds, a
chime will sound, the “ESC OFF Indicator Light” will
illuminate, and the “ESC Off” message will display in the
vehicle odometer. The “ESC off” message may appear in
the Driver Information Display (DID). Refer to “Driver
Information Display (DID)” in “Understanding Your
Instrument Panel” for further information. To turn ESC
ON again, momentarily press the “ESC Off” switch.
NOTE:The#ESC off#message will display and the
audible chime will sound when the shift lever is moved
into the PARK position from any position other than
PARK and then moved out of the PARK position. This
will occur when the message was previously cleared.
WARNING!
In the ESC “Full Off” mode, the engine torque
reduction and stability features are disabled. There-
fore, the enhanced vehicle stability offered by ESC is
unavailable. In an emergency evasive maneuver, the
ESC system will not engage to assist in maintaining
stability.$ESC Off$mode is intended for off-highway
or off-road use only.
5
STARTING AND OPERATING 389