2015 DODGE CHALLENGER reset
[x] Cancel search: resetPage 67 of 603

System Reset Procedure
In order to reset the Enhanced Accident Response System
functions after an event, the ignition switch must be
changed from ignition START or ON/RUN to ignition
OFF.
Air Bag Warning Light
The air bags must be ready to inflate for your protection
in a collision. The Occupant Restraint Control-
ler (ORC) monitors the internal circuits and
interconnecting wiring associated with air bag
system electrical components.
The ORC monitors the readiness of the electronic parts of
the air bag system whenever the ignition switch is in the
START or ON/RUN position. If the ignition switch is in
the OFF position or in the ACC position, the air bag
system is not on and the air bags will not inflate.
The ORC contains a backup power supply system that
may deploy the air bags even if the battery loses power or
it becomes disconnected prior to deployment.
The ORC turns on the Air Bag Warning Light in the
instrument panel for approximately four to eight seconds
for a self-check when the ignition switch is first turned to
the ON/RUN position. After the self-check, the Air Bag
Warning Light will turn off. If the ORC detects a mal-
function in any part of the system, it turns on the Air Bag
Warning Light, either momentarily or continuously. A
single chime will sound to alert you if the light comes on
again after initial startup.
The ORC also includes diagnostics that will illuminate
the instrument panel Air Bag Warning Light if a malfunc-
tion is detected that could affect the air bag system. The
diagnostics also record the nature of the malfunction.
While the air bag system is designed to be maintenance
2
THINGS TO KNOW BEFORE STARTING YOUR VEHICLE 65
Page 157 of 603

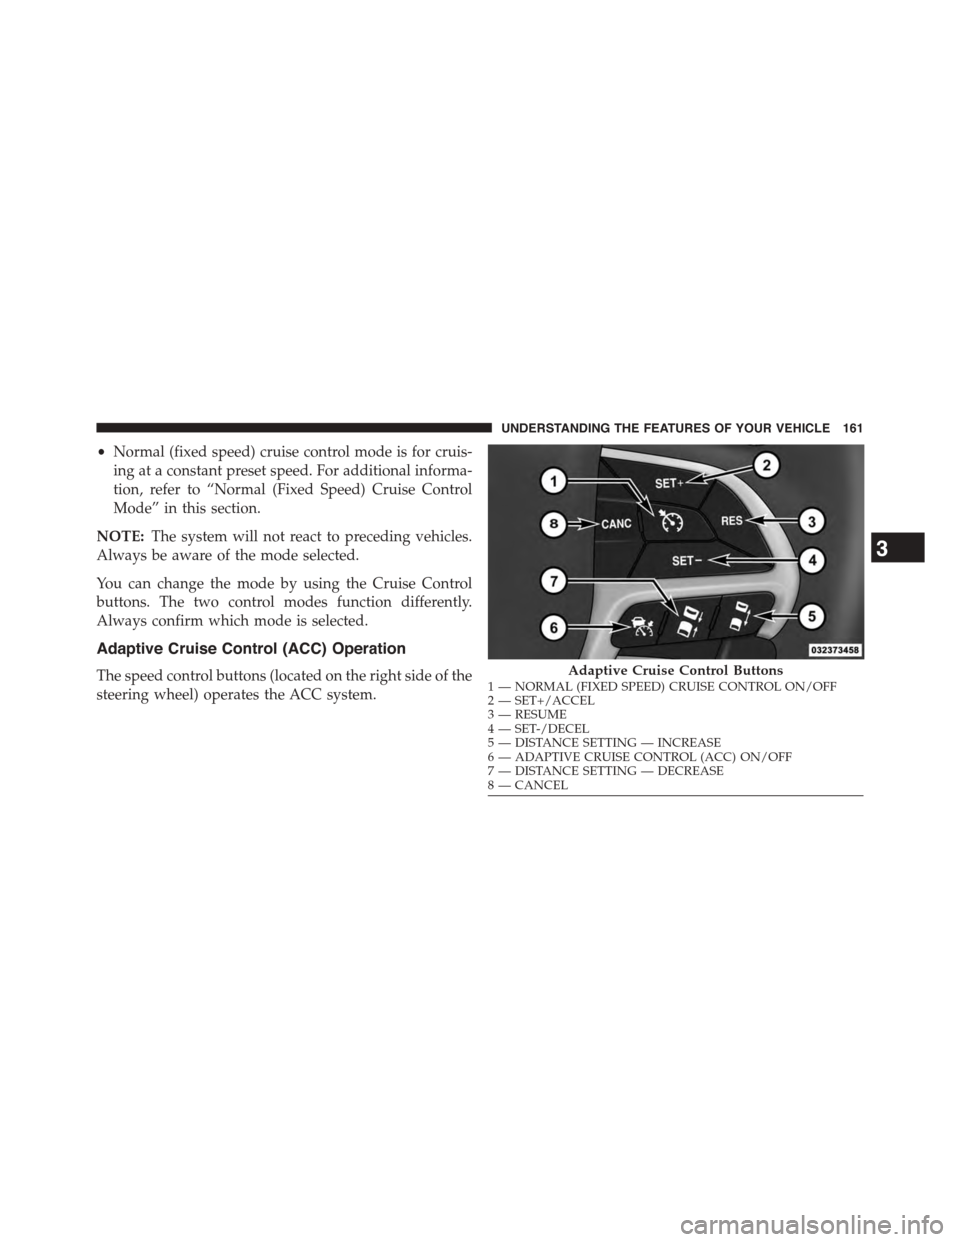
The Electronic Speed Control buttons are located on the
right side of the steering wheel.
NOTE:In order to ensure proper operation, the Elec-
tronic Speed Control System has been designed to shut
down if multiple Speed Control functions are operated at
the same time. If this occurs, the Electronic Speed Control
System can be reactivated by pushing the Electronic
Speed Control ON/OFF button and resetting the desired
vehicle set speed.
To Activate
Push the ON/OFF button to activate the electronic speed
control. CRUISE CONTROL READY will appear on the
instrument cluster to indicate the electronic speed control
is on. To turn the system off, push the ON/OFF button a
second time. CRUISE CONTROL OFF will appear on the
instrument cluster to indicate the electronic speed control
is off. The system should be turned off when not in use.
Electronic Speed Control Buttons
1—ON/OFF4—SET-/DECEL2—SET+/ACCEL5—CANCEL3—RESUME
3
UNDERSTANDING THE FEATURES OF YOUR VEHICLE 155
Page 161 of 603

ACC will allow you to keep cruise control engaged in
light to moderate traffic conditions without the constant
need to reset your cruise control. ACC utilizes a radar
sensor designed to detect a vehicle directly ahead of you.
NOTE:
•If the sensor does not detect a vehicle ahead of you,
ACC will maintain a fixed set speed.
•If the ACC sensor detects a vehicle ahead, ACC will
apply limited braking or acceleration (not to exceed
the original set speed) automatically to maintain a
preset following distance, while matching the speed of
the vehicle ahead.
WARNING!
•Adaptive Cruise Control (ACC) is a convenience
system. It is not a substitute for active driving
involvement. It is always the driver ’s responsibil-
ity to be attentive of road, traffic, and weather
conditions, vehicle speed, distance to the vehicle
ahead; and, most importantly, brake operation to
ensure safe operation of the vehicle under all road
conditions. Your complete attention is always re-
quired while driving to maintain safe control of
your vehicle. Failure to follow these warnings can
result in a collision and death or serious personal
injury.
•The ACC system:
•Does not react to pedestrians, oncoming vehicles,
and stationary objects (e.g., a stopped vehicle in a
traffic jam or a disabled vehicle).
(Continued)
3
UNDERSTANDING THE FEATURES OF YOUR VEHICLE 159
Page 163 of 603

•Normal (fixed speed) cruise control mode is for cruis-
ing at a constant preset speed. For additional informa-
tion, refer to “Normal (Fixed Speed) Cruise Control
Mode” in this section.
NOTE:The system will not react to preceding vehicles.
Always be aware of the mode selected.
You can change the mode by using the Cruise Control
buttons. The two control modes function differently.
Always confirm which mode is selected.
Adaptive Cruise Control (ACC) Operation
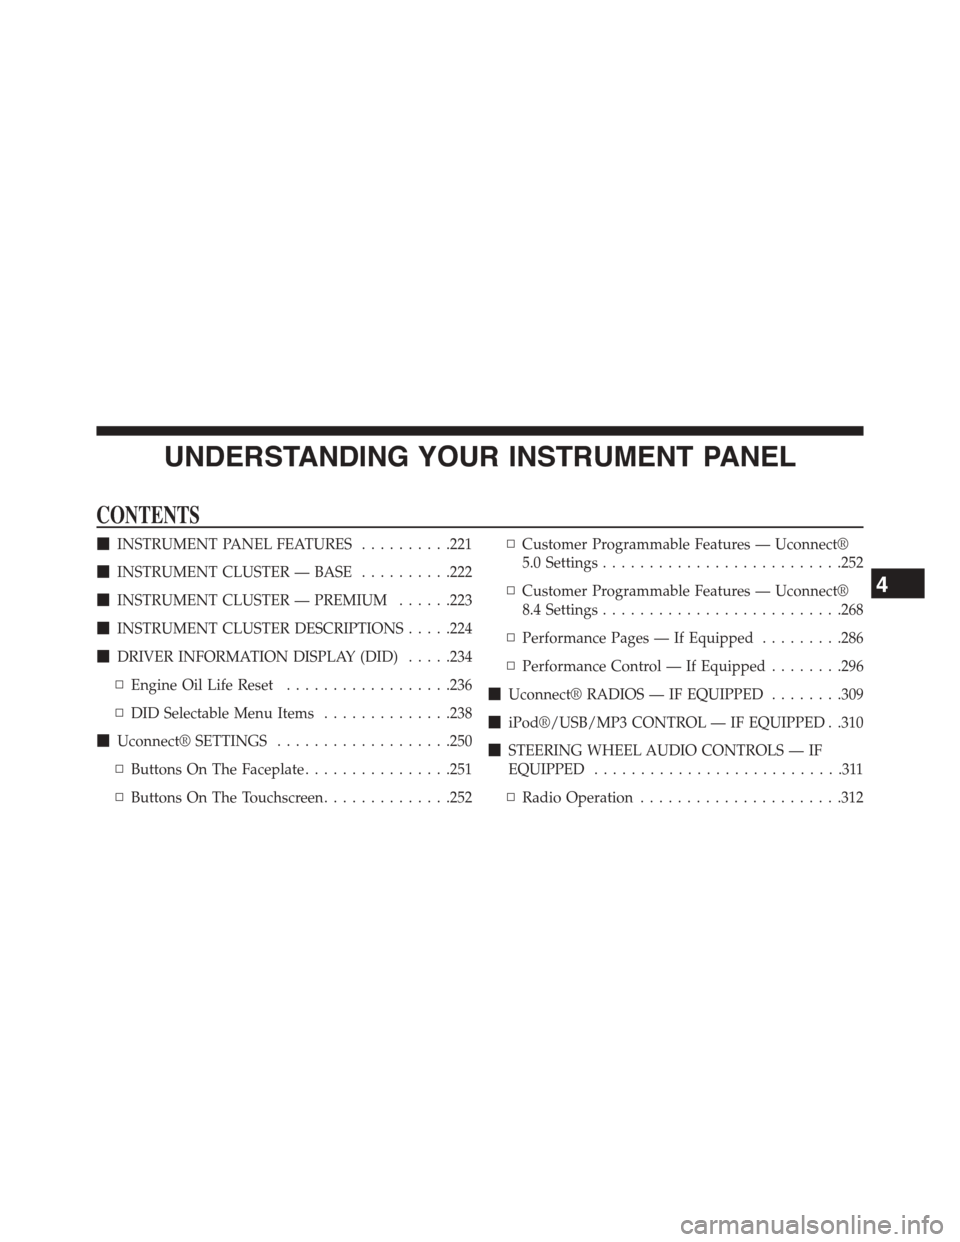
The speed control buttons (located on the right side of the
steering wheel) operates the ACC system.
Adaptive Cruise Control Buttons1—NORMAL(FIXEDSPEED)CRUISECONTROLON/OFF2—SET+/ACCEL3—RESUME4—SET-/DECEL5—DISTANCESETTING—INCREASE6—ADAPTIVECRUISECONTROL(ACC)ON/OFF7—DISTANCESETTING—DECREASE8—CANCEL
3
UNDERSTANDING THE FEATURES OF YOUR VEHICLE 161
Page 221 of 603

UNDERSTANDING YOUR INSTRUMENT PANEL
CONTENTS
!INSTRUMENT PANEL FEATURES..........221
!INSTRUMENT CLUSTER — BASE..........222
!INSTRUMENT CLUSTER — PREMIUM......223
!INSTRUMENT CLUSTER DESCRIPTIONS.....224
!DRIVER INFORMATION DISPLAY (DID).....234
▫Engine Oil Life Reset..................236
▫DID Selectable Menu Items..............238
!Uconnect® SETTINGS...................250
▫Buttons On The Faceplate................251
▫Buttons On The Touchscreen..............252
▫Customer Programmable Features — Uconnect®
5.0 Settings..........................252
▫Customer Programmable Features — Uconnect®
8.4 Settings..........................268
▫Performance Pages — If Equipped.........286
▫Performance Control — If Equipped........296
!Uconnect® RADIOS — IF EQUIPPED........309
!iPod®/USB/MP3 CONTROL — IF EQUIPPED . .310
!STEERING WHEEL AUDIO CONTROLS — IF
EQUIPPED...........................311
▫Radio Operation......................312
4
Page 228 of 603

If the ABS light is on, the brake system should be serviced
as soon as possible to restore the benefits of Anti-Lock
Brakes. If the ABS light does not turn on when the
ignition switch is placed in the ON/RUN position, have
the light inspected by an authorized dealer.
6. Driver Information Display (DID) Area
The odometer display shows the total distance the ve-
hicle has been driven. The trip odometer shows indi-
vidual trip mileage.
NOTE:U.S. Federal regulations require that upon trans-
fer of vehicle ownership, the seller certify to the pur-
chaser the correct mileage that the vehicle has been
driven. If your odometer needs to be repaired or serviced,
the repair technician should leave the odometer reading
the same as it was before the repair or service. If he/she
cannot do so, then the odometer must be set at zero, and
a sticker must be placed in the door jamb stating what the
mileage was before the repair or service. It is a good idea
for you to make a record of the odometer reading before
the repair/service, so that you can be sure that it is
properly reset, or that the door jamb sticker is accurate if
the odometer must be reset at zero.
The DID features an interactive display, for further
information refer to “Driver Information Display (DID) ”.
226 UNDERSTANDING YOUR INSTRUMENT PANEL
Page 238 of 603

NOTE:
•Holding the Up/Down or Left/Right arrow buttons
will loop the user through the currently selected menu
or options presented on the screen.
•Main menu and submenu’s wrap for continuous
scrolling.
•Upon returning to a main menu, the last submenu
screen viewed within that main menu will be dis-
played.
OK Button:
For Digital Speedometer
•Pushing the OK button changes units (MPH or km/h).
For Screen Setup and Vehicle Settings:
•OK button allows user to enter menu and submenus.
•Within each submenu layer, the up/down arrows will
allow the user to select the item of interest.
•Pushing the OK button makes the selection and a
confirmation screen will appear (returning the user to
the 1st page of the submenu).
•Pushing the left arrow button will exit each submenu
layer and return to the main menu.
For the Trip and Fuel Economy menus (and new Perfor-
mance Timers):
•Information is reset by pushing and holding the OK
button.
Engine Oil Life Reset
Oil Change Required
Your vehicle is equipped with an engine oil change
indicator system. The “Oil Change Required” message
will display in the DID for five seconds after a single
236 UNDERSTANDING YOUR INSTRUMENT PANEL
Page 239 of 603

chime has sounded, to indicate the next scheduled oil
change interval. The engine oil change indicator system
is duty cycle based, which means the engine oil change
interval may fluctuate, dependent upon your personal
driving style.
Unless reset, this message will continue to display each
time you turn the ignition switch to the ON/RUN
position or cycle the ignition to the ON/RUN position if
equipped with Keyless Enter-N-Go™. To turn off the
message temporarily, push and release the OK button. To
reset the oil change indicator system (after performing
the scheduled maintenance) refer to the following proce-
dure.
Vehicles Equipped With Keyless Enter-N-Go™
1. Without pushing the brake pedal, push the ENGINE
START/STOP button and place the ignition to the
ON/RUN position (do not start the engine.)
2. Fully push the accelerator pedal, slowly, three times
within 10 seconds.
3. Without pushing the brake pedal, push the ENGINE
START/STOP button once to return the ignition to the
OFF/LOCK position.
NOTE:If the indicator message illuminates when you
start the vehicle, the oil change indicator system did not
reset. If necessary, repeat this procedure.
Secondary Method Of Navigating To The Oil Life
Screen In The DID And Holding Ok
Your vehicle is equipped with an engine oil change
indicator system. The “Oil Change Required” message
will flash in the DID display for approximately 10
seconds after a single chime has sounded, to indicate the
next scheduled oil change interval. The engine oil change
indicator system is duty cycle based, which means the
engine oil change interval may fluctuate, dependent
upon your personal driving style.
4
UNDERSTANDING YOUR INSTRUMENT PANEL 237