Page 285 of 603

•Balance/Fade
This feature allows you to adjust the Balance and Fade
settings. Press and drag the speaker icon, use the arrows
to adjust, or tap the ‘C’ icon to readjust to the center. Press
the back arrow button on the touchscreen to return to the
previous menu.
•Equalizer
This feature allows you to adjust the Bass, Mid and Treble
settings. Adjust the settings with the “+” and “–” setting
buttons on the touchscreen or by selecting any point on
the scale between the “+” and “–” buttons on the
touchscreen. Press the back arrow button on the touch-
screen to return to the previous menu.
NOTE:Bass/Mid/Treble allow you to simply slide your
finger up or down to change the setting as well as press
directly on the desired setting.
•Speed Adjusted Volume
This feature increases or decreases volume relative to
vehicle speed. To change the Speed Adjusted Volume
press the “Off,” “1,” “2” or “3” button on the touchscreen.
Press the back arrow button on the touchscreen to return
to the previous menu.
•Surround Sound — If Equipped
This feature provides simulated surround sound mode.
To make your selection, press the “Surround Sound”
button on the touchscreen, select “On” or “Off.” Press the
back arrow button on the touchscreen to return to the
previous menu.
•AUX Volume Offset — If Equipped
This feature provides the ability to tune the audio level
for portable devices connected through the AUX input.
To make your selection, press the AUX Volume Match
4
UNDERSTANDING YOUR INSTRUMENT PANEL 283
Page 304 of 603
Launch Control will abort before launch completion and
display “Launch Aborted” in the DID for any the follow-
ing conditions:
•The brake is applied during launch.
•The ESC system detects that the vehicle is no longer
moving in a straight line.
•The “ESC OFF” button is pressed to change the ESC
system to another mode if Launch Control is enabled.
NOTE:Launch mode is not available within the first 500
miles of engine break-in.
NOTE:Do not attempt to shift when the drive wheels
are spinning and do not have traction. Damage to the
transmission may occur.
Drive Mode Set-Up
Pressing the “Drive Mode Set-Up” button on the touch-
screen within the Performance Control screen indicates
the real-time status of the various systems. Pressing the
“Sport Mode Set-Up” or “Default Mode Set-Up” buttons
Drive Mode Set-Up
302 UNDERSTANDING YOUR INSTRUMENT PANEL
Page 306 of 603
Default Mode
The vehicle will always start in Default Mode. This mode
is for typical driving conditions. While in Default Mode,
the Engine, Transmission and Traction will operate in
their Normal settings and cannot be changed. The Steer-
ing assist may be configured to Normal, Sport, or Com-
fort by pressing the corresponding buttons on the touch-
screen. The Paddle Shifters may be enabled or disabled
while in this mode.
Default Mode
Default Mode Set-Up
304 UNDERSTANDING YOUR INSTRUMENT PANEL
Page 307 of 603
Sport Mode
Sport Mode is a configuration set-up for typical enthusi-
ast driving. The Transmission and Steering are both set to
their Sport settings. The steering wheel paddle switches
are enabled. The Traction Control defaults to Normal.
Any of these four settings may be changed to the driver ’s
preferences by pressing the buttons on the touchscreen.
Push the Sport button on the instrument panel switch
bank to put the vehicle in Sport Mode and activate these
settings. The customized settings will only be active
when the Sport button is active.
Sport Mode
Sport Mode Set-Up
4
UNDERSTANDING YOUR INSTRUMENT PANEL 305
Page 317 of 603
General Overview
Buttons On The Faceplate
The buttons on the faceplate are located below the
Uconnect® screen.
Buttons On The Touchscreen
Buttons on the touchscreen are accessible on the
Uconnect® system screen.
Automatic Climate Controls — Buttons On The
Faceplate
Uconnect® 5.0 Automatic Temperature Controls —
Buttons On The Touchscreen
4
UNDERSTANDING YOUR INSTRUMENT PANEL 315
Page 318 of 603

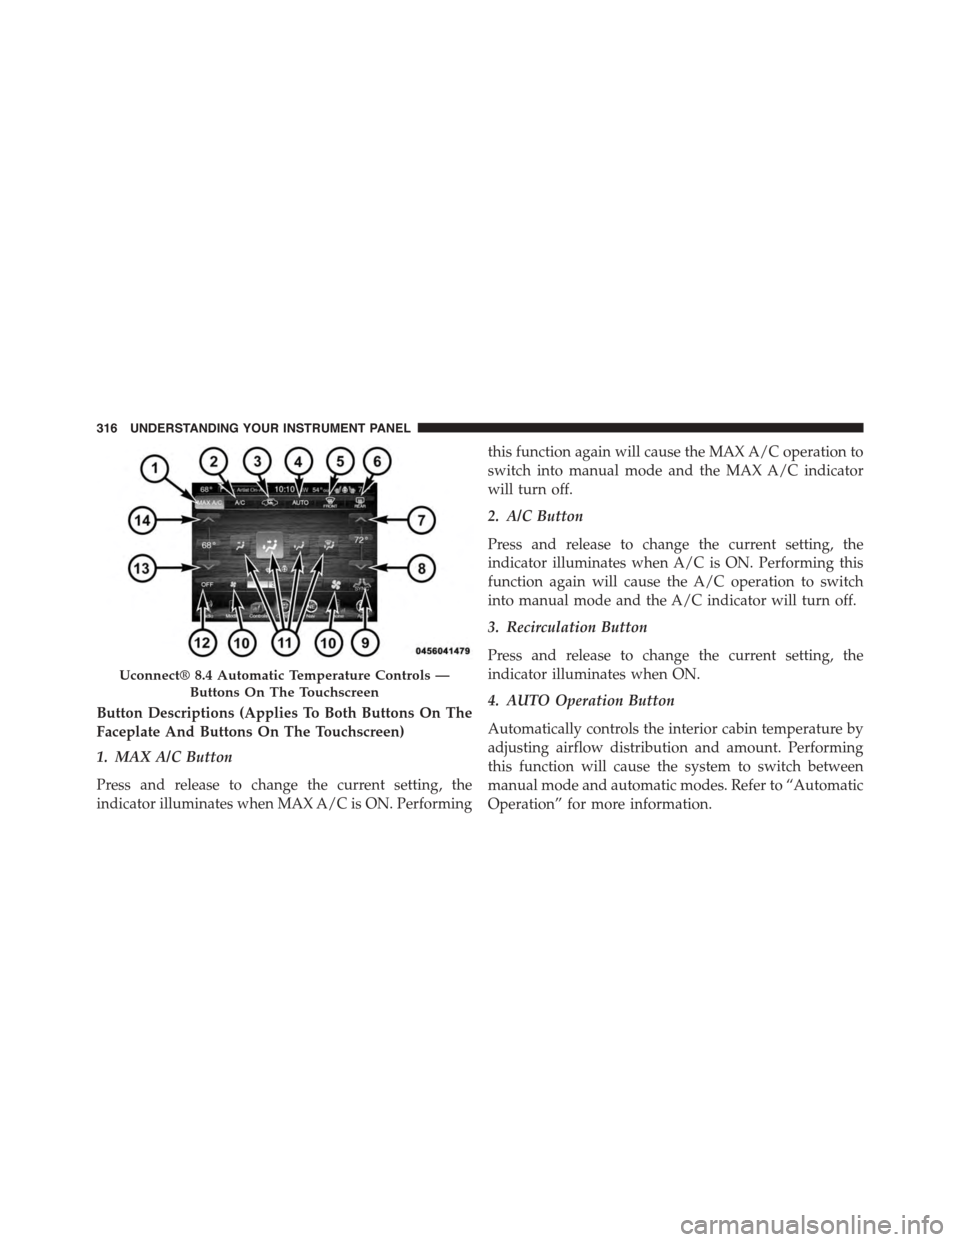
Button Descriptions (Applies To Both Buttons On The
Faceplate And Buttons On The Touchscreen)
1. MAX A/C Button
Press and release to change the current setting, the
indicator illuminates when MAX A/C is ON. Performing
this function again will cause the MAX A/C operation to
switch into manual mode and the MAX A/C indicator
will turn off.
2. A/C Button
Press and release to change the current setting, the
indicator illuminates when A/C is ON. Performing this
function again will cause the A/C operation to switch
into manual mode and the A/C indicator will turn off.
3. Recirculation Button
Press and release to change the current setting, the
indicator illuminates when ON.
4. AUTO Operation Button
Automatically controls the interior cabin temperature by
adjusting airflow distribution and amount. Performing
this function will cause the system to switch between
manual mode and automatic modes. Refer to “Automatic
Operation” for more information.
Uconnect® 8.4 Automatic Temperature Controls —
Buttons On The Touchscreen
316 UNDERSTANDING YOUR INSTRUMENT PANEL
Page 320 of 603

temperature settings or on the touchscreen, press and
slide the temperature bar button towards the red arrow
for warmer temperature settings.
NOTE:Pressing this button while in Sync mode will
automatically exit Sync.
8. Passenger Temperature Control Down Button
(Uconnect® 8.4 Radio Only)
Provides the passenger with independent temperature
control. Push the button on the faceplate for cooler
temperature settings or on the touchscreen, press and
slide the temperature bar button towards the blue arrow
for cooler temperature settings.
NOTE:Pressing this button while in Sync mode will
automatically exit Sync.
9. SYNC
Press the Sync button on the touchscreen to toggle the
Sync feature On/Off. The Sync indicator is illuminated
when this feature is enabled. Sync is used to synchronize
the passenger temperature setting with the driver tem-
perature setting. Changing the passenger temperature
setting while in Sync will automatically exit this feature.
10. Blower Control
Blower control is used to regulate the amount of air
forced through the climate system. There are seven
blower speeds available. Adjusting the blower will cause
automatic mode to switch to manual operation. The
speeds can be selected using either the blower control
knob on the faceplate or the buttons on the touchscreen
as follows:
Blower Control Knob On The Faceplate
The blower speed increases as you turn the blower
control knob clockwise from the lowest blower setting.
The blower speed decreases as you turn the blower
control knob counterclockwise.
318 UNDERSTANDING YOUR INSTRUMENT PANEL
Page 325 of 603

2. Next, adjust the temperature you would like the
system to maintain by adjusting the driver and pas-
senger temperature buttons on the faceplate or but-
tons on the touchscreen. Once the desired temperature
is displayed, the system will achieve and automati-
cally maintain that comfort level.
3. When the system is set up for your comfort level, it is
not necessary to change the temperature. You will
experience the greatest efficiency by simply allowing
the system to function automatically.
NOTE:
•It is not necessary to move the temperature settings.
The system automatically adjusts the temperature,
mode, and blower speed to provide comfort as quickly
as possible.
•The temperature can be displayed in U.S. or Metric
units by selecting the Uconnect® customer-
programmable feature. Refer to the “Uconnect® Sys-
tem Settings” in this section of the manual.
To provide you with maximum comfort in the Automatic
mode, during cold start-ups the blower fan will remain
on low until the engine warms up. The blower will
increase in speed and transition into Auto mode.
Manual Operation Override
The system allows for manual selection of blower speed,
air distribution mode, A/C status and recirculation con-
trol.
The blower fan speed can be set to any fixed speed by
adjusting the blower control. The fan will now operate at
a fixed speed until additional speeds are selected. This
allows the front occupants to control the volume of air
circulated in the vehicle and cancel the Auto mode.
4
UNDERSTANDING YOUR INSTRUMENT PANEL 323