2015 DODGE CHALLENGER change time
[x] Cancel search: change timePage 279 of 603

Assistance” button on the touchscreen. Press the
“Parkview Backup camera Delay” button on the touch-
screen to turn the ParkView® Delay ON or OFF.
•Rain Sensing Auto Wipers
When this feature is selected, the system will automati-
cally activate the windshield wipers if it senses moisture
on the windshield. To make your selection, press the
“Rain Sensing” button on the touchscreen, until a check-
mark appears next to setting, indicating that the setting
had been selected. Press the back arrow button on the
touchscreen to return to the previous menu.
•Hill Start Assist — If Equipped
When this feature is selected, the Hill Start Assist (HSA)
system is active. Refer to “Electronic Brake Control
System” in “Starting And Operating” for system function
and operating information. To make your selection, press
the “Hill Start Assist” button on the touchscreen, until a
check-mark appears next to setting, indicating that the
setting had been selected. Press the back arrow button on
the touchscreen to return to the previous menu.
Lights
After pressing the “Lights” button on the touchscreen the
following settings will be available.
•Headlight Off Delay
When this feature is selected, it allows adjustment of the
amount of time the headlights remain on after the engine
is shut off. To change the Headlights Off Delay setting,
press the “+” or “-” button on the touchscreen to select
your desired time interval, and choose either 0 sec, 30 sec,
60 sec or 90 seconds. Press the back arrow button on the
touchscreen to return to the previous menu, or push the
back button on the faceplate.
•Headlight Illumination On Approach
When this feature is selected, the headlights will activate
and remain on for 0, 30, 60, or 90 seconds when the doors
4
UNDERSTANDING YOUR INSTRUMENT PANEL 277
Page 280 of 603

are unlocked with the Remote Keyless Entry (RKE)
transmitter. To change the Illuminated Approach status,
press the “+” or “-” button on the touchscreen to select
your desired time interval. Press the back arrow button
on the touchscreen to return to the previous menu, or
push the back button on the faceplate.
•Headlights With Wipers — If Equipped
When this feature is selected, and the headlight switch is
in the AUTO position, the headlights will turn on ap-
proximately 10 seconds after the wipers are turned on.
The headlights will also turn off when the wipers are
turned off if they were turned on by this feature. To make
your selection, press the “Headlights With Wipers” but-
ton on the touchscreen, until a check-mark appears next
to setting, indicating that the setting has been selected.
Press the back arrow button on the touchscreen to return
to the previous menu, or push the back button on the
faceplate.
•Auto Dim High Beams — If Equipped
When this feature is selected, the high beam headlights
will activate/deactivate automatically under certain con-
ditions. To make your selection, press the “Auto High
Beams” button on the touchscreen, until a check-mark
appears next to setting, indicating that the setting has
been selected. Press the back arrow button on the touch-
screen to return to the previous menu, or push the back
button on the faceplate. Refer to “Lights — If Equipped”
in “Understanding The Features Of Your Vehicle” for
further information.
•Daytime Running Lights — If Equipped
When this feature is selected, the headlights will turn on
whenever the engine is running. To make your selection,
press the “Daytime Running Lights” button on the touch-
screen, until a check-mark appears next to setting, indi-
cating that the setting has been selected. Press the back
278 UNDERSTANDING YOUR INSTRUMENT PANEL
Page 284 of 603

“Remote Start” or “All Starts” until a check-mark ap-
pears next to setting, showing that setting has been
selected. Press the back arrow button on the touchscreen
to return to the previous menu.
Engine Off Options
After pressing the “Engine Off Options” button on the
touchscreen the following settings will be available:
•Easy Exit Seats — If Equipped
When this feature is selected, the Driver ’s seat will
automatically move rearward once the engine is shut off.
To make your selection, press the “Easy Exit Seats”
button on the touchscreen, until a check-mark appears
next to setting, showing that setting has been selected.
Press the back arrow button on the touchscreen to return
to the previous menu.
•Engine Off Power Delay
When this feature is selected, the power window
switches, radio, Uconnect® Phone system (if equipped),
DVD video system (if equipped), power sunroof (if
equipped), and power outlets will remain active for up to
10 minutes after the ignition is cycled to OFF. Opening
either front door will cancel this feature. To change the
Engine Off Power Delay setting, press the “+” or “-”
button on the touchscreen to select your desired time
interval, and choose from “0 seconds,” “45 seconds,” “5
minutes” or “10 minutes.” Press the back arrow button
on the touchscreen to return to the previous menu.
Audio
After pressing the “Audio” button on the touchscreen the
following settings will be available.
282 UNDERSTANDING YOUR INSTRUMENT PANEL
Page 304 of 603

Launch Control will abort before launch completion and
display “Launch Aborted” in the DID for any the follow-
ing conditions:
•The brake is applied during launch.
•The ESC system detects that the vehicle is no longer
moving in a straight line.
•The “ESC OFF” button is pressed to change the ESC
system to another mode if Launch Control is enabled.
NOTE:Launch mode is not available within the first 500
miles of engine break-in.
NOTE:Do not attempt to shift when the drive wheels
are spinning and do not have traction. Damage to the
transmission may occur.
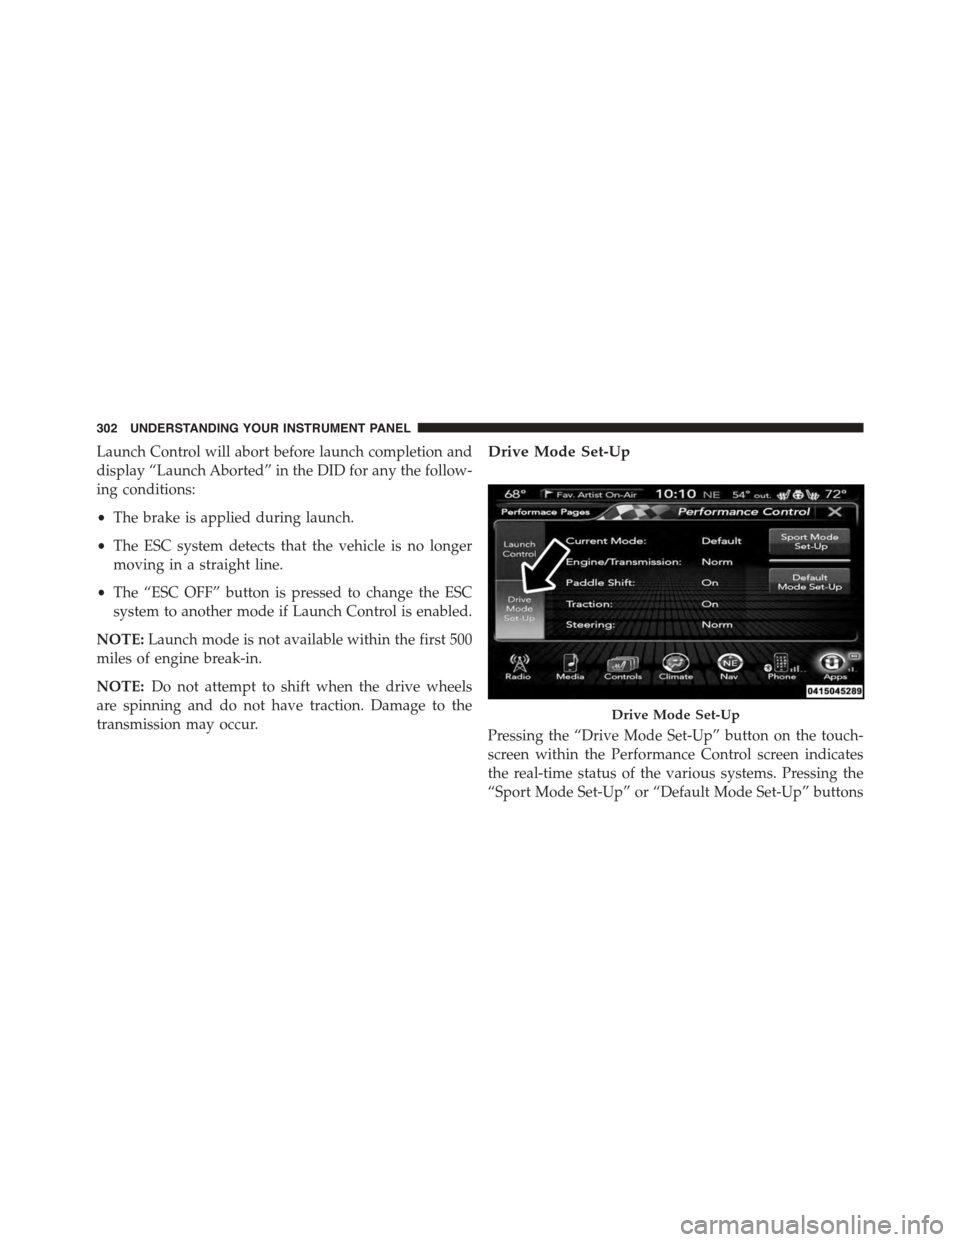
Drive Mode Set-Up
Pressing the “Drive Mode Set-Up” button on the touch-
screen within the Performance Control screen indicates
the real-time status of the various systems. Pressing the
“Sport Mode Set-Up” or “Default Mode Set-Up” buttons
Drive Mode Set-Up
302 UNDERSTANDING YOUR INSTRUMENT PANEL
Page 354 of 603

switch position will remain in the ACC position until
the vehicle is stopped and the button is pressed twice
to the OFF position.
Keyless Enter-N-Go™ Functions — With Driver ’s
Foot OFF The Brake Pedal/Clutch Pedal (In PARK
Or NEUTRAL Position)
The Keyless Enter-N-Go™ feature operates similar to an
ignition switch. It has three positions, OFF, ACC and
RUN. To change the ignition switch positions without
starting the vehicle and use the accessories follow these
steps starting with the ignition switch in the OFF posi-
tion:
1. Press the ENGINE START/STOP button once to
change the ignition switch to the ACC position,
2. Press the ENGINE START/STOP button a second time
to change the ignition switch to the RUN position,
3. Press the ENGINE START/STOP button a third time
to return the ignition switch to the OFF position.
Extreme Cold Weather (Below –20°F Or−29°C)
To ensure reliable starting at these temperatures, use of
an externally powered electric engine block heater (avail-
able from your authorized dealer) is recommended.
If Engine Fails To Start
WARNING!
•Never pour fuel or other flammable liquids into
the throttle body air inlet opening in an attempt to
start the vehicle. This could result in a flash fire
causing serious personal injury.
(Continued)
352 STARTING AND OPERATING
Page 499 of 603

regular intervals, such as every fuel stop. The best time to
check the engine oil level is about five minutes after a
fully warmed engine is shut off.
Checking the oil while the vehicle is on level ground will
improve the accuracy of the oil level readings. Maintain
the oil level in the “SAFE” range. Adding 1.0 qt (1.0 L) of
oil when the reading is at the bottom of the “SAFE” range
will result in an oil level at the top of the “SAFE” range
on these engines.
CAUTION!
Overfilling or underfilling will cause oil aeration or
loss of oil pressure. This could damage your engine.
Change Engine Oil — 3.6L and 5.7L Engine
The oil change indicator system will remind you that it is
time to take your vehicle in for scheduled maintenance.
Refer to the “Maintenance Schedule” for further informa-
tion.
NOTE: Under no circumstances should oil change in-
tervals exceed 10,000 miles (16,000 km) or twelve
months, whichever occurs first.
Change Engine Oil — 6.4L Engine
The oil change indicator system will remind you that it is
time to take your vehicle in for scheduled maintenance.
Refer to “Maintenance Schedule” for further information.
NOTE: Under no circumstances should oil change in-
tervals exceed 6,000 miles (10 000 km) or six months,
whichever occurs first.
7
MAINTAINING YOUR VEHICLE 497
Page 511 of 603

have an authorized technician inspect the complete ex-
haust system and adjacent body areas for broken, dam-
aged, deteriorated, or mispositioned parts. Open seams
or loose connections could permit exhaust fumes to seep
into the passenger compartment. In addition, have the
exhaust system inspected each time the vehicle is raised
for lubrication or oil change. Replace as required.
WARNING!
•Exhaust gases can injure or kill. They contain
carbon monoxide (CO), which is colorless and
odorless. Breathing it can make you unconscious
and can eventually poison you. To avoid breathing
CO, refer to “Safety Tips/Exhaust Gas” in “Things
To Know Before Starting Your Vehicle” for further
information.
(Continued)
WARNING!(Continued)
•A hot exhaust system can start a fire if you park
over materials that can burn. Such materials might
be grass or leaves coming into contact with your
exhaust system. Do not park or operate your ve-
hicle in areas where your exhaust system can con-
tact anything that can burn.
CAUTION!
•The catalytic converter requires the use of un-
leaded fuel only. Leaded gasoline will destroy the
effectiveness of the catalyst as an emissions control
device and may seriously reduce engine perfor-
mance and cause serious damage to the engine.
(Continued)
7
MAINTAINING YOUR VEHICLE 509
Page 556 of 603

MAINTENANCE SCHEDULE — 3.6L AND 5.7L
Your vehicle is equipped with an automatic oil change
indicator system. The oil change indicator system will
remind you that it is time to take your vehicle in for
scheduled maintenance.
Based on engine operation conditions, the oil change
indicator message will illuminate. This means that ser-
vice is required for your vehicle. Operating conditions
such as frequent short-trips, trailer tow, extremely hot or
cold ambient temperatures, and E85 fuel usage will
influence when the “Change Oil” or “Oil Change Re-
quired” message is displayed. Severe Operating Condi-
tions can cause the change oil message to illuminate as
early as 3,500 miles (5,600 km) since last reset. Have your
vehicle serviced as soon as possible, within the next 500
miles (805 km).
The message “Oil Change Required” will be displayed in
the DID and a single chime will sound, indicating that an
oil change is necessary.
Your authorized dealer will reset the oil change indicator
message after completing the scheduled oil change. If a
scheduled oil change is performed by someone other
than your authorized dealer, the message can be reset by
referring to the steps described under “Driver Informa-
tion Display (DID)” in “Understanding Your Instrument
Panel” for further information.
NOTE:Under no circumstances should oil change inter-
vals exceed 10,000 miles (16,000 km) or twelve months,
whichever comes first.
Severe Duty All Models
Change Engine Oil at 4000 miles (6,500 km) if the vehicle
is operated in a dusty and off road environment. This
type of vehicle use is considered Severe Duty
8
MAINTENANCE
SCHEDULES
554 MAINTENANCE SCHEDULES