Page 472 of 603
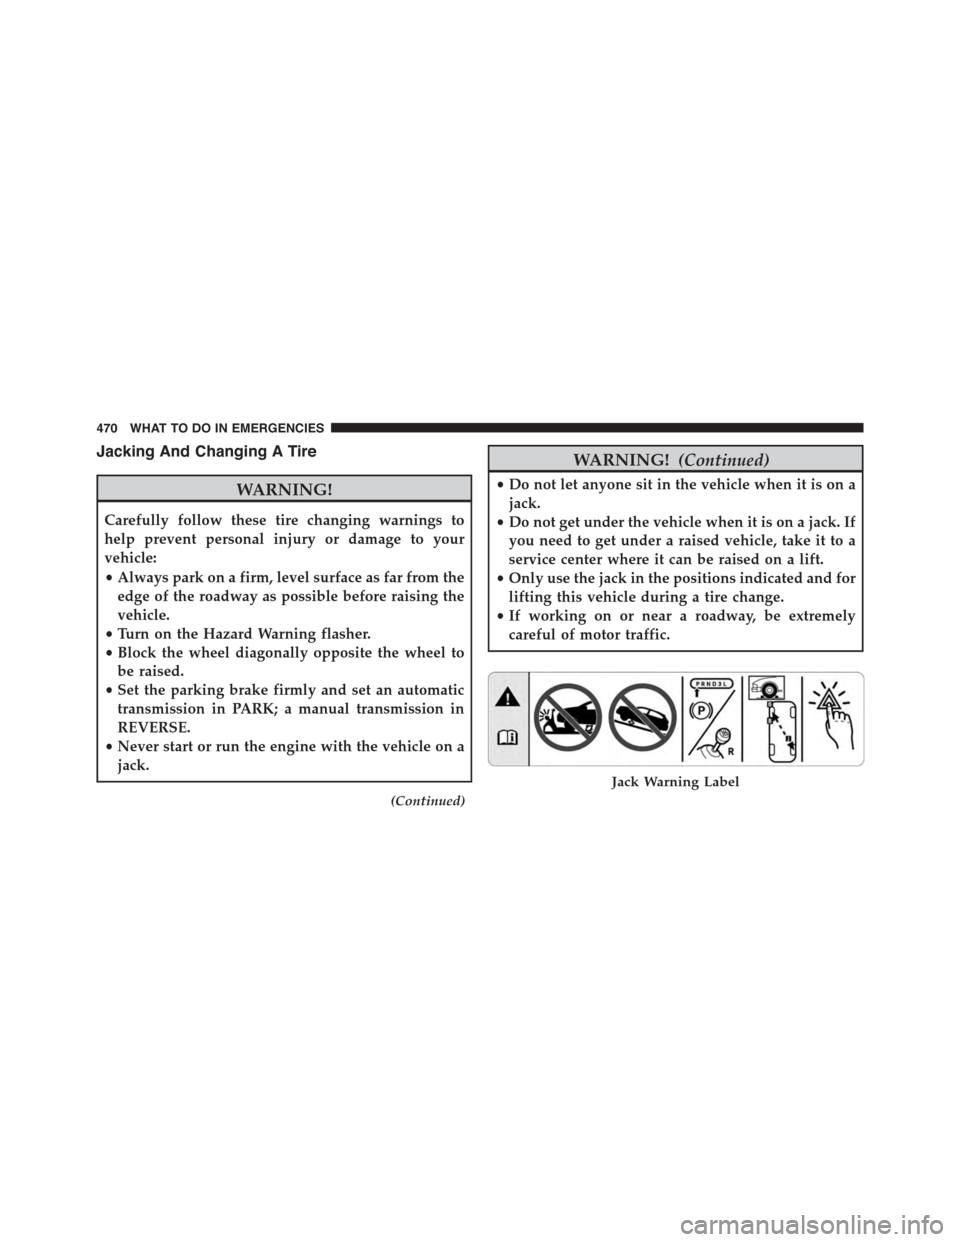
Jacking And Changing A Tire
WARNING!
Carefully follow these tire changing warnings to
help prevent personal injury or damage to your
vehicle:
•Always park on a firm, level surface as far from the
edge of the roadway as possible before raising the
vehicle.
•Turn on the Hazard Warning flasher.
•Block the wheel diagonally opposite the wheel to
be raised.
•Set the parking brake firmly and set an automatic
transmission in PARK; a manual transmission in
REVERSE.
•Never start or run the engine with the vehicle on a
jack.
(Continued)
WARNING!(Continued)
•Do not let anyone sit in the vehicle when it is on a
jack.
•Do not get under the vehicle when it is on a jack. If
you need to get under a raised vehicle, take it to a
service center where it can be raised on a lift.
•Only use the jack in the positions indicated and for
lifting this vehicle during a tire change.
•If working on or near a roadway, be extremely
careful of motor traffic.
Jack Warning Label
470 WHAT TO DO IN EMERGENCIES
Page 473 of 603
CAUTION!
Do not attempt to raise the vehicle by jacking on
locations other than those indicated in the Jacking
Instructions for this vehicle.
1. Remove the spare tire, jack, and lug wrench.
2. If equipped with aluminum wheels where the center
cap covers the lug nuts, use the lug wrench to pry the
center cap off carefully before raising the vehicle.
3. Before raising the vehicle, use the lug wrench to
loosen, but not remove, the lug nuts on the wheel with
the flat tire. Turn the lug nuts counterclockwise one
turn while the wheel is still on the ground.
Jack Engagement Locations
6
WHAT TO DO IN EMERGENCIES 471
Page 476 of 603

NOTE:
•For vehicles so equipped, do not attempt to install a
center cap or wheel cover on the compact spare.
•Refer to “Compact Spare Tire” and to “Limited-Use
Spare” under “Tires—General Information” in
“Starting And Operating” for additional warnings,
cautions, and information about the spare tire, its
use, and operation.
8. Install the lug nuts with the cone shaped end of the lug
nut toward the wheel. Lightly tighten the lug nuts.
WARNING!
To avoid the risk of forcing the vehicle off the jack,
do not tighten the lug nuts fully until the vehicle has
been lowered. Failure to follow this warning may
result in personal injury.
9. Lower the vehicle to the ground by turning the jack
handle counterclockwise.
10. Refer to “Torque Specifications” in this section for
proper lug nut torque.
11. Stow the jack, tools and flat tire. Make sure the base
of the jack faces the front of the vehicle before
tightening down the fastener.
WARNING!
A loose tire or jack thrown forward in a collision or
hard stop could endanger the occupants of the ve-
hicle. Always stow the jack parts and the spare tire in
the places provided. Have the deflated (flat) tire
repaired or replaced immediately.
Road Tire Installation
1. Mount the road tire on the axle.
474 WHAT TO DO IN EMERGENCIES
Page 477 of 603
2. Install the remaining lug nuts with the cone shaped
end of the nut toward the wheel. Lightly tighten the
lug nuts.
WARNING!
To avoid the risk of forcing the vehicle off the jack,
do not tighten the lug nuts fully until the vehicle has
been lowered. Failure to follow this warning may
result in personal injury.
3. Lower the vehicle to the ground by turning the jack
handle counterclockwise.
4. Refer to Torque Table for proper lug nut torque.
5. After 25 miles (40 km) check the lug nut torque with a
torque wrench to ensure that all lug nuts are properly
seated against the wheel.
JUMP-STARTING PROCEDURES
If your vehicle has a discharged battery it can be jump-
started using a set of jumper cables and a battery in
another vehicle or by using a portable battery booster
pack. Jump-starting can be dangerous if done improperly
so please follow the procedures in this section carefully.
NOTE:When using a portable battery booster pack
follow the manufacturer ’s operating instructions and
precautions.
CAUTION!
Do not use a portable battery booster pack or any
other booster source with a system voltage greater
than 12 Volts or damage to the battery, starter motor,
alternator or electrical system may occur.
6
WHAT TO DO IN EMERGENCIES 475
Page 481 of 603
6. Once the engine is started, remove the jumper cables
in the reverse sequence:
Disconnecting The Jumper Cables
1. Disconnect the negative(-)end of the jumper cable
from the remote negative(-)post of the vehicle with
the discharged battery.
2. Disconnect the opposite end of the negative(-)jumper
cable from the negative(-)post of the booster battery.
3. Disconnect the positive(+)end of the jumper cable
from the positive(+)post of the booster battery.
4. Disconnect the opposite end of the positive(+)jumper
cable from the remote positive(+)post of the vehicle
with the discharged battery.
If frequent jump-starting is required to start your vehicle
you should have the battery and charging system in-
spected at your authorized dealer.
CAUTION!
Accessories plugged into the vehicle power outlets
draw power from the vehicle’s battery, even when not
in use (i.e., cellular phones, etc.). Eventually, if
plugged in long enough without engine operation,
the vehicle’s battery will discharge sufficiently to
degrade battery life and/or prevent the engine from
starting.
FREEING A STUCK VEHICLE
If your vehicle becomes stuck in mud, sand, or snow, it
can often be moved using a rocking motion. Turn the
steering wheel right and left to clear the area around the
front wheels. For vehicles with automatic transmission,
press and hold the lock button on the shift lever. Then
shift back and forth between DRIVE and REVERSE (with
automatic transmission) or FIRST GEAR and REVERSE
(with manual transmission), while gently pressing the
6
WHAT TO DO IN EMERGENCIES 479
Page 482 of 603
accelerator. Use the least amount of accelerator pedal
pressure that will maintain the rocking motion, without
spinning the wheels or racing the engine.
CAUTION!
Racing the engine or spinning the wheels may lead to
transmission overheating and failure. Allow the en-
gine to idle with the transmission in NEUTRAL for at
least one minute after every five rocking-motion
cycles. This will minimize overheating and reduce
the risk of clutch or transmission failure during
prolonged efforts to free a stuck vehicle.
NOTE:Press the#ESC Off#switch to place the Electronic
Stability Control (ESC) system in#Partial Off#mode
before rocking the vehicle. Refer to “Electronic Brake
Control” in “Starting And Operating” for further infor-
mation. Once the vehicle has been freed, press the#ESC
Off#switch again to restore#ESC On#mode.
CAUTION!
•When “rocking” a stuck vehicle by shifting be-
tween DRIVE / 1ST GEAR and REVERSE, do not
spin the wheels faster than 15 mph (24 km/h), or
drivetrain damage may result.
•Revving the engine or spinning the wheels too fast
may lead to transmission overheating and failure.
It can also damage the tires. Do not spin the wheels
above 30 mph (48 km/h) while in gear (no trans-
mission shifting occurring).
480 WHAT TO DO IN EMERGENCIES
Page 483 of 603
WARNING!
Fast spinning tires can be dangerous. Forces gener-
ated by excessive wheel speeds may cause damage, or
even failure, of the axle and tires. A tire could
explode and injure someone. Do not spin your vehi-
cle’s wheels faster than 30 mph (48 km/h) or for
longer than 30 seconds continuously without stop-
ping when you are stuck and do not let anyone near
a spinning wheel, no matter what the speed.
MANUAL PARK RELEASE — 8 SPEED
TRANSMISSION
WARNING!
Always secure your vehicle by fully applying the
parking brake, before activating the Manual Park
(Continued)
WARNING!(Continued)
Release. Activating the Manual Park Release will
allow your vehicle to roll away if it is not secured by
the parking brake or by proper connection to a tow
vehicle. Activating the Manual Park Release on an
unsecured vehicle could lead to serious injury or
death for those in or around the vehicle.
In order to push or tow the vehicle in cases where the
transmission will not shift out of PARK (such as a dead
battery), a Manual Park Release is available.
Follow these steps to use the Manual Park Release:
1. Firmly apply the parking brake.
2. Remove the console storage bin to access the Manual
Park Release lever.
6
WHAT TO DO IN EMERGENCIES 481
Page 486 of 603
TOWING A DISABLED VEHICLE
This section describes procedures for towing a disabled
vehicle using a commercial wrecker service.
Towing Condition Wheels OFF The
Ground
AUTOMATIC TRANSMISSION MANUAL TRANSMISSION
Flat Tow NONEIf transmission is operable:
•Transmission inNEUTRAL
•30 mph (48 km/h)maxspeed
•30 miles (48 km)maxdistance
If transmission is operable:
•Transmission inNEUTRAL
•65 mph (105 km/h)max
speed
Wheel Lift or Dolly
To w
FrontNOT ALLOWEDNOT RECOMMENDED
RearNOT RECOMMENDEDNOT RECOMMENDED
FlatbedALLBEST METHODBEST METHOD
484 WHAT TO DO IN EMERGENCIES