2015 CITROEN RELAY Language
[x] Cancel search: LanguagePage 2 of 248

On-line owner's handbook
Referring to the owner's handbook on-line also gives you
access to the latest information available, easily identifi ed by
the bookmark, associated with this symbol:
If the "MyCITROËN" function is not available on the CITROËN
public website for your country, you can fi nd your handbook at the
following address:
http://service.citroen.com Select:
You can fi nd your handbook on the CITROËN website, under
"MyCITROËN".
The Vehicle documentation link in the home page (no registration is
needed),
the language,
the vehicle, its body style,
the print edition of your handbook appropriate for the date of registrat\
ion
of your vehicle.
You have access to your handbook on line, together with the latest
information, identifi ed by the symbol:
This personal and customisable space allows you to establish direct
and special contact with
CITROËN.
Page 86 of 248

84
Vehicle configuration
PERSONALISATION - CONFIGURATION
Using the MODE control panel
This control panel located alongside the
steering wheel provides access to menus for
the personalisation of some of the vehicle
systems.
The corresponding information appears in
the instrument panel screen.
Eleven languages are offered: Brazilian,
Dutch, English, French, German, Italian,
Polish, Portuguese, Russian, Spanish and
Turkish. You have access to all the menus if your
vehicle is fitted with an audio system.
If your vehicle is fitted with a touch screen
audio system, certain menus are only
accessible using the audio system control
panel.
- scroll down through a menu,
- decrease a value. This MODE button enables you to:
- access the menus and sub-menus,
- confirm your selections, within a menu,
- exit from the menus.
A long press enables you to return to
the welcome screen.
This button enables you to:
This button enables you to:
- scroll up through a menu,
- increase a value.
As a safety precaution, some menus
can only be accessed when the ignition
is off.
Page 88 of 248

86
Vehicle configuration
Menu… Press... Sub-menu… Press... Select… Confirm
and exit
Enables you to...
7
Measurement
unit (Unit)
Distance Km
Select the distance display unit.
Miles
Fuel
consumption km/l
Select the fuel consumption
display unit.
l/100 km
Temperature °C
Select the temperature display
unit.
°F
8 Languages List of
languages
available
Select the display language.
9
Volume of
announcements
(Buzz) Increase
Increase/decrease the volume
of the announcements or of the
audible warning.
Decrease
10
Daytime
running lamps ON
Activate/deactivate daytime
running lamps.
OFF
11 Service Service
(Miles/km
before service)
Display the miles/kilometres
remaining before the next
service.
Oil
(Miles/Km before
oil change) Display the miles/kilometres to
the next oil change
12 Passenger airbag
(BAG P)
ON Ye s
Activate the passenger airbag.
No
OFF Ye s
Deactivate the passenger
airbag.
No
13 Exit from menu
Exit from the menu. Press the
arrow at the bottom to go to the
first menu.
Page 89 of 248

87
4
TECHNOLOGY on BOARD
Vehicle configuration
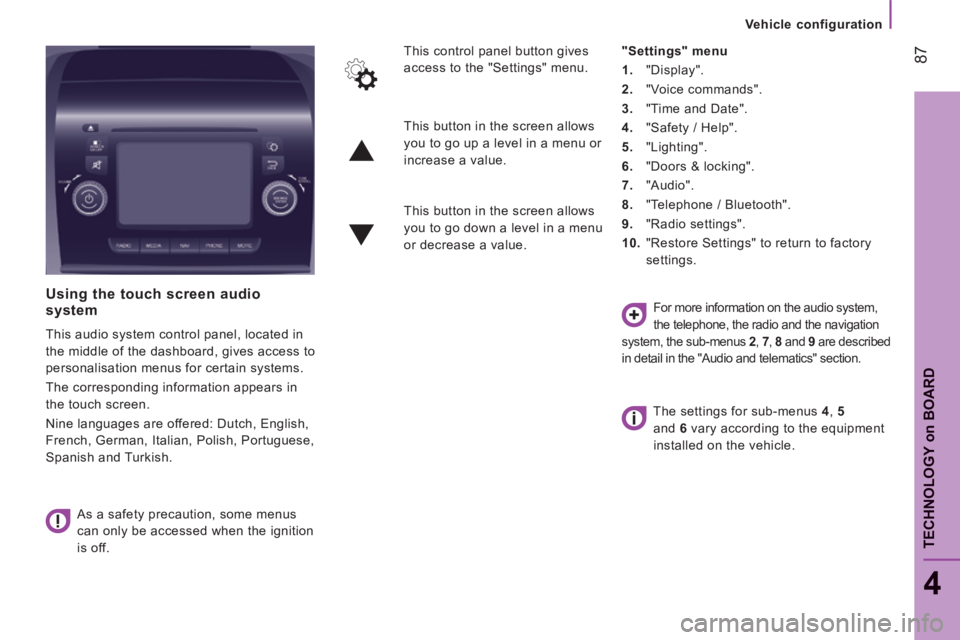
Using the touch screen audio system
This audio system control panel, located in
the middle of the dashboard, gives access to
personalisation menus for certain systems.
The corresponding information appears in
the touch screen.
Nine languages are offered: Dutch, English,
French, German, Italian, Polish, Portuguese,
Spanish and Turkish. As a safety precaution, some menus
can only be accessed when the ignition
is off. This control panel button gives
access to the "Settings" menu.
"Settings" menu
1. "Display".
2. "Voice commands".
3. "Time and Date".
4. "Safety / Help".
5. "Lighting".
6. "Doors & locking".
7. "Audio".
8. "Telephone / Bluetooth".
9. "Radio settings".
10. "Restore Settings" to return to factory
settings.
This button in the screen allows
you to go up a level in a menu or
increase a value.
This button in the screen allows
you to go down a level in a menu
or decrease a value.
For more information on the audio system,
the telephone, the radio and the navigation
system, the sub-menus 2 , 7 , 8 and 9 are described
in detail in the "Audio and telematics" section.
The settings for sub-menus 4 , 5
and 6 vary according to the equipment
installed on the vehicle.
Page 90 of 248

88
Vehicle configuration
From the "Safety / Help" sub menu, you can:
- select "Reversing camera" to activate or deactivate its use (On, Off),
- select "Passenger airbag" to activate or deactivate its use (On, Off).
From the "Lighting" sub-menu, you can:
- select "Day lamps" to activate or deactivate their use (On, Off),
- select "Headlamp sensor" to adjust its sensitivity (1, 2, 3).
From the "Doors & locking", you can:
- select "Autoclose" to activate or deactivate its use (On, Off).
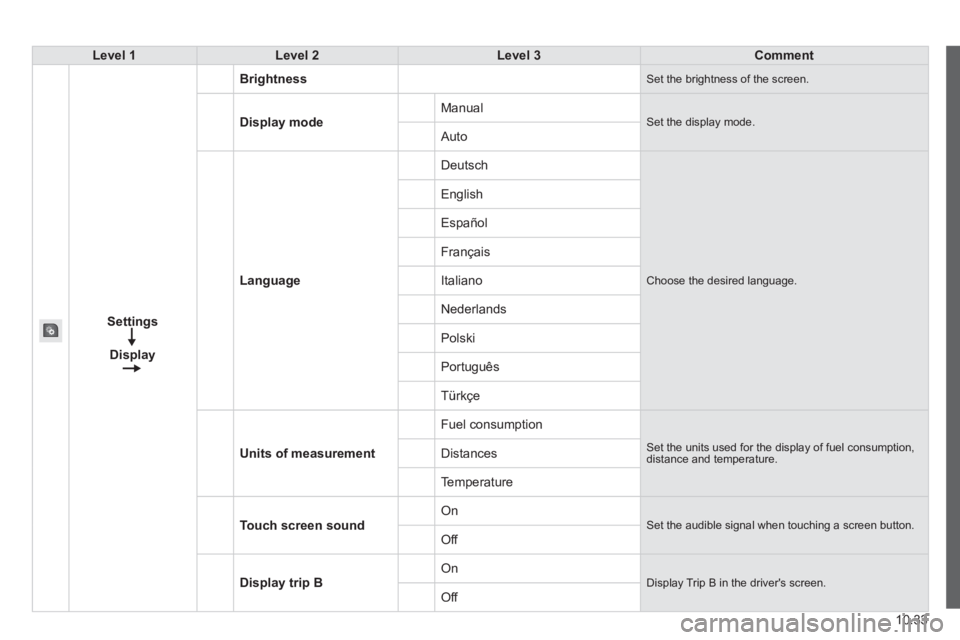
From the "Display" sub-menu, you can:
- select "Languages" and choose one of
the languages listed above,
- select "Units of measurement" to choose the units for fuel consumption
(l/100 km, mpg), distance (miles, km)
and temperature (°C, °F),
- select "Display Trip B" to switch trip B On or Off in the trip computer.
From the "Time and Date" sub-menu, you
can:
- select "Adjust time and format" to set the hour, minutes and seconds and choose
the format (24 h, 12 h with am or pm),
- select "Adjust Date" to set the day, month and year.
To set the time manually, "Synch Time"
must be Off.
Page 111 of 248

109
5
SAFETY
Child safety
DEACTIVATING THE PASSENGER'S FRONT AIRBAG
The rules for carrying children are
specific to each country. Consult the
current legislation in your country.
Please consult the list of seats approved
in your country. The Isofix mountings, the
rear seats, the passenger airbag and the
deactivation of this airbag depend on the
version sold.
Installation of a child seat at the rear
"Rearward facing"
When a "rearward facing" child
seat is installed on a rear
passenger seat , move the
vehicle's front seat forwards and straighten
the backrest so that the "rearward facing"
child seat does not touch the vehicle's front
seat.
"Forward facing"
When a "forward facing" child
seat is installed on a rear
passenger seat , move the
vehicle's front seat forwards and straighten
the backrest so that the legs of the child in
the "forward facing" child seat do not touch
the vehicle's front seat.
Ensure that the seat belt is correctly
tensioned.
For child seats with a support leg, ensure
that this is in firm contact with the floor.
If necessary, adjust the front seat of
the vehicle. Refer to the "Safety - Airbags" section.
Never install a "rearward facing" child
restraint system on a seat protected by
an active front airbag. This could cause the
death of the child or serious injury to them.
The warning label on both sides of the
passenger's sun visor repeats this warning.
As required by current legislation, the
following tables present the warning in all of
the languages needed. If your vehicle is fitted with this function, the
passenger's front airbag setting must be
adjusted using the
MODE button.
Passenger airbag OFF
Page 135 of 248

133
Discharged battery
QUICK HELP
8
The presence of this label, in particular
with the Stop & Start system, indicates
the use of a 12 V lead-acid battery with
special technology and specification;
the involvement of a CITROËN dealer or
a qualified workshop is essential when
replacing or disconnecting the battery.
Failure to observe this recommendation may
cause premature wear of the battery.
After refi tting the battery by a CITROËN
dealer or a qualifi ed workshop, the
Stop & Start system will only be active after
a continuous period of immobilisation of
the vehicle, a period which depends on the
climatic conditions and the state of charge of
the battery (up to about 8 hours).
Do not disconnect the battery to
charge it.
It is advisable to disconnect the
negative (-) terminal of the battery
if the vehicle is not to be used for a
period of more than one month.
The description of the battery charging
procedure is given as an indication only.
If the battery has been disconnected
for some time, it may be necessary to
reinitialise the following functions:
- the display parameters (date, time, language, distance unit and temperature
unit),
- the radio stations,
- the central locking.
Some settings are cleared and must be
reprogrammed, consult a CITROËN.
If your vehicle is fitted with a tachograph or
an alarm, disconnection of the negative (-)
terminal of the battery (located under the
floor on the left-hand side, in the cab) is
recommended if the vehicle is not to be used
for a period of more than 5 days.
Page 199 of 248

10.33
Level 1Level 2Level 3Comment
Settings
Display
Brightness Set the brightness of the screen.
Display mode Manual Set the display mode. Auto
Language
Deutsch
Choose the desired language.
English
Español
Français
Italiano
Nederlands
Polski
Português
Türkçe
Units of measurement
Fuel consumption
Set the units used for the display of fuel consumption, distance and temperature. Distances
Temperature
Touch screen sound On Set the audible signal when touching a screen button. Off
Display trip B On Display Trip B in the driver's screen. Off