Page 125 of 248
123
7
Under the bonnet
CHECKS
1. Windscreen/headlamp wash fluid reservoir.
2. Fusebox.
3. Coolant reservoir.
4. Brake and clutch fluid reservoir.
5. Air filter. 6. Dipstick.
2.2 Iitre HDi engine
7. Engine oil filler cap.
2.2 Iitre HDi engine
8. Power steering fluid reservoir.
Battery connections :
+ Positive terminal.
- Negative terminal (earth).
UNDER THE BONNET - DIESEL ENGINES
Page 127 of 248

125
7
CHECKS
Levels and checks
Cooling system
Only use the fluid recommended by the
manufacturer. Otherwise, you risk seriously
damaging your engine. When the engine
is warm, the temperature of the coolant is
controlled by the engine fan. As this fan can
operate with the ignition key removed and
because the cooling system is pressurised,
wait for at least one hour after the engine
has stopped before carrying out any work.
Slacken the cap by 1/4 of a turn to release
the pressure to prevent any risk of scalding.
When the pressure has dropped, remove the
cap and top up the level with coolant.
Power steering fluid level
The vehicle must be parked on level ground
with the engine cold. Unscrew the cap
integrated with the gauge and check the
level which must be between the MIN and
MAX marks.
For access to the reservoir filler cap, remove
the protective cover by removing its three
fixing screws, then remove the second cover
fitted to the cap. Topping up
The level must be between the MIN and
MAX marks on the expansion bottle. If
more than 1 litre of fluid is required to top
up the level, have the system checked by a
CITROËN dealer or a qualified workshop.
Windscreen wash and headlamp wash level
Capacity of the reservoir: approximately
5.5 litres.
For access to the reservoir filler cap, pull on
the telescopic filler pipe and unscrew the
cap a quarter of a turn.
For best quality cleaning and to prevent
freezing, this fluid must not be topped up or
replaced with plain water.
In wintry conditions, the use of an alcohol or
methanol based fluid is recommended.
For access to the header tank filler cap,
remove the protective cover by removing its
three fixing screws.
If fluid has to be added frequently, this
indicates a failure which must be checked by
a CITROËN dealer or a qualified workshop
as soon as possible.
Page 132 of 248
130
Fuel
FUEL SYSTEM CUT-OFF
After the collision and before restore
these supplies, check that there is no
fuel leak or sparks, to avoid the risk of fire. In the event of a collision, a device
automatically cuts off the fuel supply
from the engine and cuts off the vehicle's
electrical supply .
It triggers operation of the hazard warning
lamps and courtesy lamps, and unlocking of
the doors. To restore the fuel supply, press the first
button, located below the steering wheel.
Then to restore the electrical power
supply, press the second button, located
in the battery compartment under the front
passenger's floor (Minibus).
On other versions, the second button is
replaced by a fuse; contact a CITROËN
dealer or a qualified workshop.
Page 142 of 248

140
Failed bulb or lamp
Halogen bulbs must be changed after
the headlamp has been off for several
minutes (risk of serious burns). Do not touch
the bulb directly with your fingers, use lint-
free cloths.
When each operation has been completed,
check the operation of the lamps.
5 - Foglamps
Type E , H1 - 55 W
- Turn the steering fully to the left.
- Remove the screw located in the wheel arch then open the flap.
- Remove the cover.
- Disconnect the electrical connector.
- Release the retaining spring by pressing on the two clips.
- Change the bulb taking care to align the metal part with the grooves on the lamp.
LED daytime running lamps
These light-emitting diode (LED) lamps
serve as both daytime running lamps and
sidelamps.
If your vehicle is fitted with LED daytime
running lamps, contact a CITROËN dealer. 4 - Sidelamps / daytime running lamps
Type A , W21/5W - 21W and 5W
- Remove the cover by pulling on the rubber tongue.
- Turn the bulb holder a quarter of a turn anti-clockwise.
- Change the bulb.
Page 152 of 248

150
Being towed or towing
TOWING
Towing the vehicle
The removable towing eye is located in the
tool box under the front passenger seat.
Unclip the cover using a flat tool.
Screw the removable towing eye in fully.
Attach the approved towing bar to to the
removable towing eye.
Place the gear lever in neutral.
Towing another vehicle
The fixed towing eye is located on the right
below the bumper.
Attach the approved towing bar onto the
fixed eye.
Failure to observe this requirement
may result in damage to certain
braking components and the lack of some
braking assistance systems when the engine
is re-started.
General recommendations
Observe the legislation in force in your
country.
Ensure that the weight of the towing vehicle
is higher than that of the towed vehicle.
The driver must remain at the wheel of the
towed vehicle and must have a valid driving
licence.
When towing a vehicle with all four wheels
on the ground, always use an approved
towing bar; rope and straps are prohibited.
The towing vehicle must move off gently.
When towing a vehicle with the engine off,
there is no longer any power assistance for
braking or steering.
In the following cases, you must always call
on a professional recovery service:
- vehicle broken down on a motorway or fast road,
- four-wheel drive vehicle,
- when it is not possible to put the gearbox into neutral, unlock the
steering, or release the parking brake,
- towing with only two wheels on the ground,
- where there is no approved towing bar available...
Page 167 of 248
10.1
The system is protected in such a way that it will only operate in your vehicle.
TOUCH SCREEN AUDIO-TELEMATIC
system
For safety reasons, the driver must carry out operations which require prolonged attention while the vehicle is stationary.
When the engine is switched off and to prevent discharging of the battery, the system switches off following the activation of the energy economy mode.
CONTENTS
MULTIMEDIA AUDIO SYSTEM - BLUETOOTH
TELEPHONE - GPS NAVIGATION
p.
p.
p.
p.
p.
p.
p.
p.
p.
01 General operation
02 First steps - Control panel
05 Media
04 Radio
06 Telephone
07 Navigation
08 Vehicle information
09 Settings
10 Voice commands
03 Steering mounted controls p.
10.2
10.4
10.12
10.6
10.20
10.26
10.30
10.32
10.42
10.5
Page 171 of 248

03
10.5
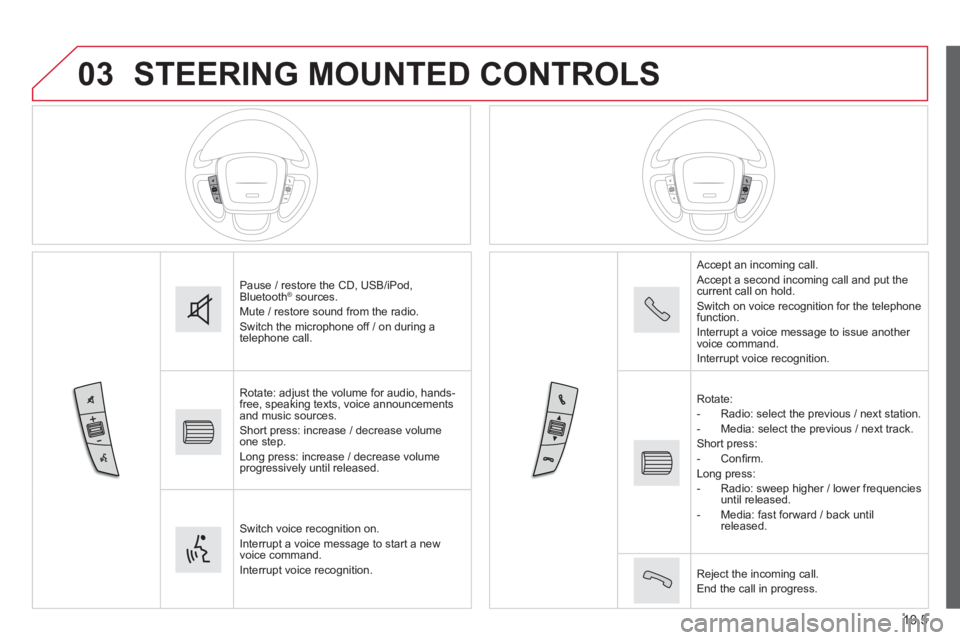
STEERING MOUNTED CONTROLS
Pause / restore the CD, USB/iPod, Bluetooth ® sources. ® sources. ®
Mute / restore sound from the radio. Switch the microphone off / on during a telephone call.
Rotate: adjust the volume for audio, hands-free, speaking texts, voice announcements and music sources. Short press: increase / decrease volume one step. Long press: increase / decrease volume progressively until released.
Switch voice recognition on. Interrupt a voice message to start a new voice command. Interrupt voice recognition.
Accept an incoming call. Accept a second incoming call and put the current call on hold. Switch on voice recognition for the telephone function. Interrupt a voice message to issue another voice command. Interrupt voice recognition.
Rotate: - Radio: select the previous / next station. - Media: select the previous / next track. Short press: - C o n fi r m . Long press: - Radio: sweep higher / lower frequencies until released. - Media: fast forward / back until released.
Reject the incoming call. End the call in progress.
Page 182 of 248

05
10.16
USB player
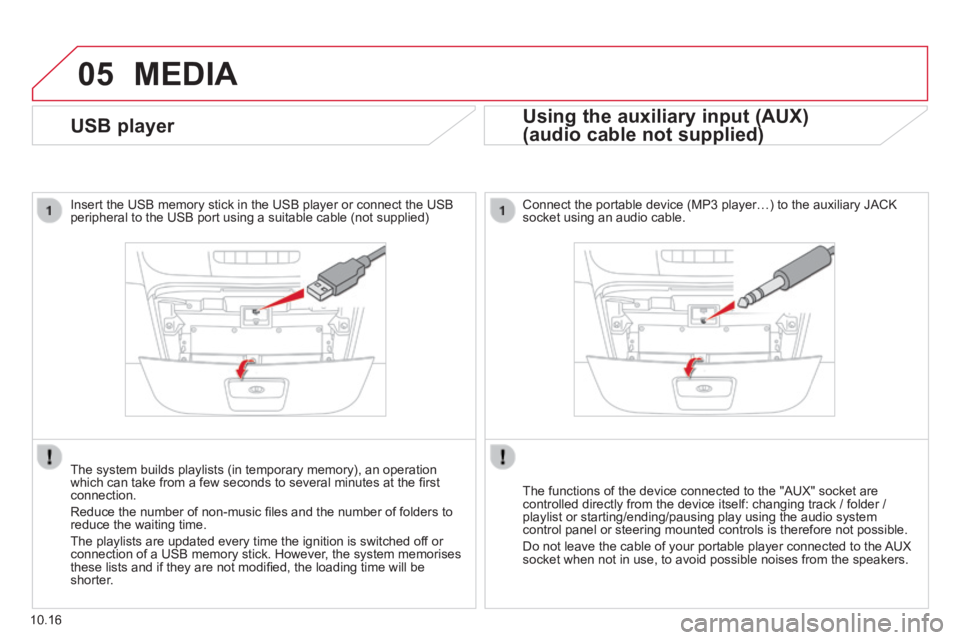
Insert the USB memory stick in the USB player or connect the USB peripheral to the USB port using a suitable cable (not supplied)
The system builds playlists (in temporary memory), an operation which can take from a few seconds to several minutes at the fi rst connection.
Reduce the number of non-music fi les and the number of folders to reduce the waiting time.
The playlists are updated every time the ignition is switched off or connection of a USB memory stick. However, the system memorises these lists and if they are not modifi ed, the loading time will be shorter.
MEDIA
Using the auxiliary input (AUX)
(audio cable not supplied) (audio cable not supplied)
Connect the portable device (MP3 player…) to the auxiliary JACK socket using an audio cable.
The functions of the device connected to the "AUX" socket are controlled directly from the device itself: changing track / folder / playlist or starting/ending/pausing play using the audio system control panel or steering mounted controls is therefore not possible.
Do not leave the cable of your portable player connected to the AUX socket when not in use, to avoid possible noises from the speakers.