Page 131 of 362

129
Parking space sensors
System which measures the parking space
available between two vehicles or obstacles. It
measures the size of the space and gives you
information on:
- the possibility of fitting into a free space,
depending on the dimensions of your
vehicle and the distances necessary for
your manoeuvres,
- the level of difficulty of the manoeuvre to
be performed.
The system does not measure spaces which
are clearly much smaller or larger than the size
of the vehicle. The parking space sensor system warning
lamp can have three different states:
-
off: the system is not selected,
- on fixed: the system is selected but the
conditions for measuring are not yet met
(direction indicator not operating, speed too
high) or the measurement is terminated.
- flashing: measurement is in progress or
the message is being displayed. You can select the "parking space sensor"
system by pressing button A
. The fixed
illumination of the warning lamp indicates that
the system is selected.
During the measurement, the message
"Measurement in progress - Vmax 20 km/h
(12 mph)" is displayed in the instrument panel
screen.Displays in the instrument panel
4
Driving
Page 132 of 362

130
Operation
You have identified a parking space:
F Press button A to select the system.
F Activate the direction indicator on the side
where the space is to be measured.
F During measurement, go for ward the
length of the space, at a speed less than
12 mph (approx. 20 km/h), to prepare for
your manoeuvre.
The system then measures the size of the space.
F The system informs you of the level
of difficulty of the manoeuvre via a
message in the instrument panel screen
accompanied by an audible signal.
F Depending on the message issued by the
system, you may or may not be able to
per form the manoeuvre.The system displays the following types of message:
Parking YES
Parking DIFFICULT
Parking NO The system is deselected automatically:
-
when you engage reverse gear,
- when you switch off the ignition,
- if measurement is not requested,
- within five minutes of selection of the
system,
- if the vehicle speed exceeds the
threshold of 45 mph (approx. 70 km/h) for
one minute.
If the lateral distance between your vehicle and
the parking space is too large, the system may
not be able to measure the space.
The system remains available after each
measurement and thus can measure more than
one space during your search.
In bad weather conditions or in winter, make
sure that the sensors are not covered by dirt, or
by ice or snow.
The parking space sensor system deactivates
the front parking sensors during space
measurement when you are in for ward gear.
If there is a fault, have the system
checked by a CITROËN dealer or a
qualified workshop.
Driving
Page 135 of 362

133
Reversing camera (Tourer)
A reversing camera is activated automatically
when reverse gear is engaged.
The image is displayed in the navigation
screen.The space between the blue lines represents
the width of your vehicle except for the door
mirrors.
The blue lines represent the general direction
of the vehicle.
The red lines represent a distance of about
30 cm beyond the edge of your vehicle's rear
b u m p e r.
The green lines represent distances of
about 1 and 2 metres beyond the edge of your
vehicle's rear bumper.
The projected lines displayed in the
screen do not allow the vehicle to
be placed relative to tall obstacles
(vehicles that are close for example).
Deformation of the image is normal.
Clean the reversing camera regularly
using a sponge and a soft cloth.
When cleaning the vehicle with a high
pressure jet wash, keep the lance
at least 30 cm from the lens of the
camera.
This system is a driving aid that does
not replace the need for vigilance on
the part of the driver, who must retain
control of their vehicle at all times.
4
driving
Page 172 of 362
170
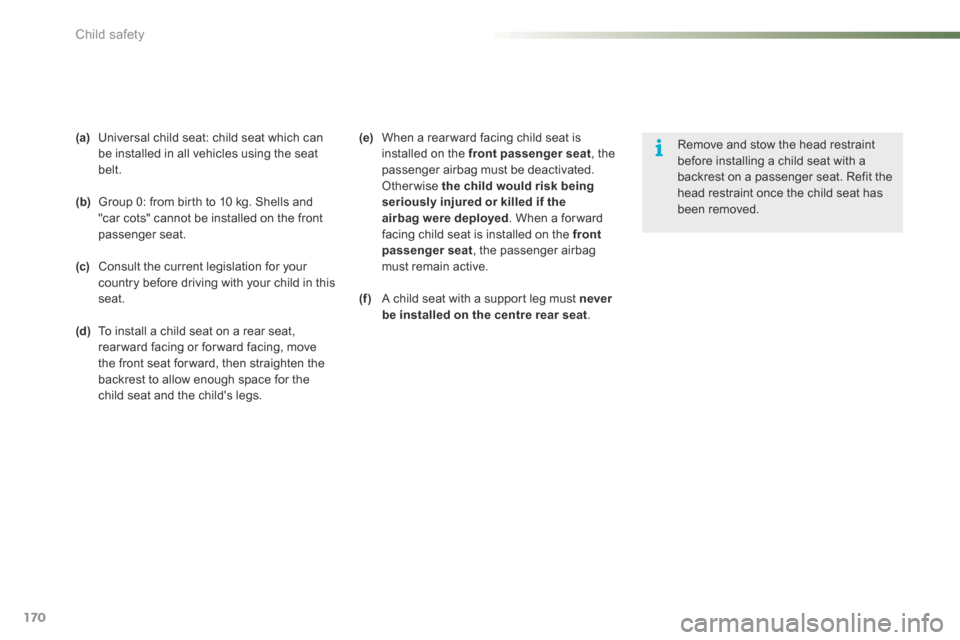
(a) Universal child seat: child seat which can
be installed in all vehicles using the seat
belt.
( b ) Group 0: from birth to 10 kg. Shells and
"car cots" cannot be installed on the front
passenger seat.
( c ) Consult the current legislation for your
country before driving with your child in this
seat.
(d) To install a child seat on a rear seat,
rear ward facing or for ward facing, move
the front seat for ward, then straighten the
backrest to allow enough space for the
child seat and the child's legs. Remove and stow the head restraint
before installing a child seat with a
backrest on a passenger seat. Refit the
head restraint once the child seat has
been removed.
(e)
When a rear ward facing child seat is
installed on the front passenger seat , the
passenger airbag must be deactivated.
o therwise the child would risk being
seriously injured or killed if the
airbag were deployed . When a for ward
facing child seat is installed on the front
passenger seat , the passenger airbag
must remain active.
(f ) A child seat with a support leg must never
be installed on the centre rear seat .
Child safety
Page 173 of 362

171
Advice
Children at the front
The legislation on carrying children on the
front passenger seat is specific to each
country. Refer to the legislation in force in
your country.
Deactivate the passenger's front airbag
when a rear ward facing child seat is installed
on the front passenger seat.
Otherwise, the child risks being seriously
injured or killed if the airbag is deployed.
Installing a booster seat
The chest part of the seat belt must be
positioned on the child's shoulder without
touching the neck.
Ensure that the lap part of the seat belt
passes correctly over the child's thighs.
CITROËN recommends the use of a booster
seat which has a back, fitted with a seat belt
guide at shoulder level.
The incorrect installation of a child seat in a
vehicle compromises the child's protection in
the event of an accident.
Ensure that there is no seat belt or seat belt
buckle under the child seat, as this could
destabilise it.
Remember to fasten the seat belts or the
child seat harnesses keeping the slack
relative to the child's body to a minimum,
even for short journeys.
When installing a child seat using the seat
belt, ensure that the seat belt is tightened
correctly on the child seat and that it secures
the child seat firmly on the seat of your
vehicle. If your passenger seat is adjustable,
move it for wards if necessary.
At rear seating positions, always leave
sufficient space between the front seat and:
-
a rear ward facing child seat,
- the child's feet for a child seat fitted
forward facing.
To do this, move the front seat for wards
and, if necessary, move its backrest into the
upright position. For optimum installation of the forward facing
child seat, ensure that the back of the child
seat is as close as possible to the backrest
of the vehicle's seat, in contact if possible.
You mst remove the head restraint before
installing a child seat with backrest to a
passenger seat.
Ensure that the head restraint is stored or
attached securely to prevent it from being
thrown around the vehicle in the event of
sharp braking. Refit the head restraint when
the child seat is removed.
As a safety precaution, do not leave:
- a child or children alone and
unsupervised in a vehicle,
- a child or an animal in a vehicle which
is exposed to the sun, with the windows
closed,
- the keys within reach of children inside
the vehicle.
To prevent accidental opening of the doors
and rear windows, use the child lock.
Take care not to open the rear windows by
more than one third.
To protect young children from the rays of
the sun, fit side blinds on the rear windows.
7
Child safety
Page 187 of 362
185
Changing a wheel
Access to the tools
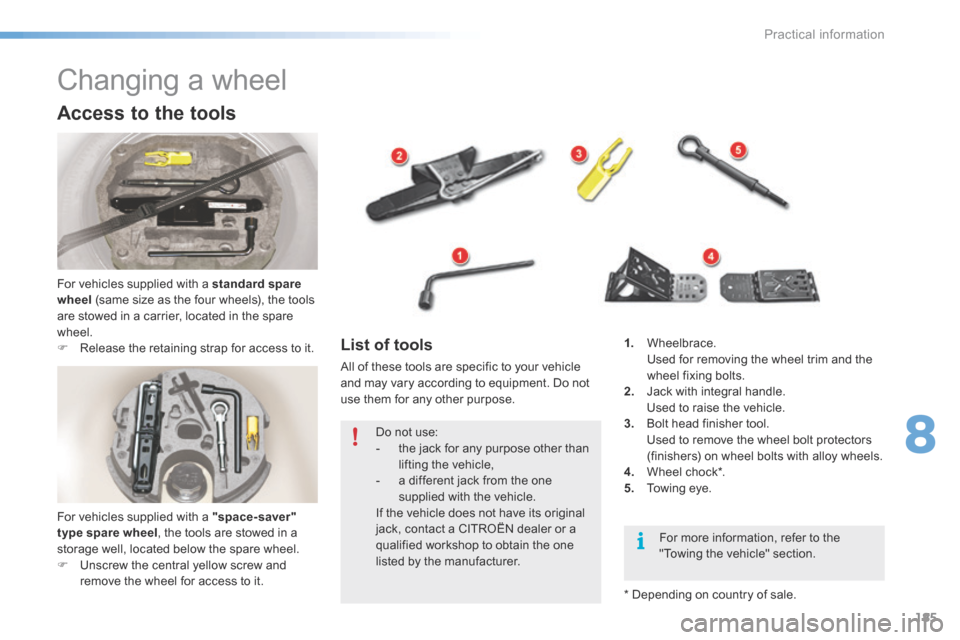
For vehicles supplied with a standard spare
wheel (same size as the four wheels), the tools
are stowed in a carrier, located in the spare
wheel.
F Release the retaining strap for access to it.
List of tools
all of these tools are specific to your vehicle
and may vary according to equipment. Do not
use them for any other purpose. 1.
Wheelbrace.
Used for removing the wheel trim and the
wheel fixing bolts.
2. Jack with integral handle.
Used to raise the vehicle.
3. Bolt head finisher tool.
Used to remove the wheel bolt protectors
(finishers) on wheel bolts with alloy wheels.
4. Wheel chock*.
5. Towing eye.
Do not use:
-
the jack for any purpose other than
lifting the vehicle,
- a different jack from the one
supplied with the vehicle.
If the vehicle does not have its original
jack, contact a CITROËN dealer or a
qualified workshop to obtain the one
listed by the manufacturer. For more information, refer to the
"Towing the vehicle" section.
* Depending on country of sale.
For vehicles supplied with a "space-saver"
type spare wheel
, the tools are stowed in a
storage well, located below the spare wheel.
F Unscrew the central yellow screw and
remove the wheel for access to it.
8
Practical information
Page 188 of 362
186
Access to the spare wheel
Removing the boot floor
F Saloon: raise the boot floor and fold in two.
F Tourer : raise the boot floor and hook it
using the retractable handle. Secure the
hook to the top part of the boot.
Removing the standard spare
wheel
F d etach the strap then push the wheel
for wards so as to be able to lift it.
Repositioning the standard spare
wheel
F Position the spare wheel flat in the boot,
then pull it towards you.
F Next place the toolbox inside the wheel,
then secure the assembly using the strap.
Removing the "space-saver"
spare wheel
F Unscrew the central yellow screw.
F Take the spare wheel from the rear and lift
it towards you.
F Remove the wheel from the boot.
Practical information
Page 189 of 362
187
The tyre pressures are indicated on the
label located on the left hand centre
door pillar.
Tyre pressures are given on this label
for different vehicle loading conditions.Repositioning the "space-saver"
spare wheel
F Return the spare wheel to its housing
above the toolbox.
F Unscrew the central yellow screw by a few
turns, then put it in place in the middle of
the wheel.
F Tighten the central yellow screw until it
clicks so that it is secured in its housing.
Repositioning the boot floor
F Release the boot floor to return it to its
initial position.
8
Practical information

