2015 Citroen C4 AIRCROSS RHD bonnet
[x] Cancel search: bonnetPage 190 of 389

188
Changing a fuse
The extraction tweezer and spare fuses are
fitted in the engine compartment fusebox.
To gain access to them:
F
O
pen the bonnet (refer to the "Checks"
section).
F
U
nclip the and remove the cover.
F
R
emove the tweezer.
F
C
arefully close the cover to ensure correct
sealing of the fusebox.
Access to the tools
Before changing a fuse, the cause of the failure
must be identified and rectified.
F
C
heck that the switch is in the " LOCK"
position or that the vehicle mode is " OFF".
F
I
dentify the failed fuse by checking the
condition of its filament.
F
U
se the special tweezer to extract the fuse
from its location.
F
a
l
ways replace the faulty fuse with a fuse
of the same rating.
F
C
heck that the number etched on the box,
the rating etched on the top and the tables
below all agree.
Changing a fuse
Good Failed
CITR
oËn
will not accept responsibility
for the cost incurred in repairing your
vehicle or for rectifying the malfunctions
resulting from the installation of
accessories not supplied and not
recommended by CITROËN and
not installed in accordance with its
instructions, in particular when the
consumption of all of the additional
equipment connected exceeds
10
mil
liamperes.
Your vehicle's electrical system is
designed to operate with standard or
optional equipment.
Before installing other electrical
equipment or accessories in your
vehicle, contact a CITROËN dealer or a
qualified workshop. The replacement of a fuse not
mentioned in the following tables may
cause a serious fault on your vehicle.
Contact a CITROËN dealer or a
qualified workshop.
Practical information
Page 196 of 389

194
12 V battery
The battery is located under the bonnet.
To gain access to it:
F
o
pen the bonnet using the interior release
lever, then the exterior safety catch,
F
s
ecure the bonnet stay,
Access to the battery
Procedure for charging your battery when it is flat or for starting the engine using another battery and jump leads.
F
r
emove the retaining pins A,
F
r
emove the protective cover B,F
r
emove the retaining pins C,
F
r
emove the air duct D.
Practical information
Page 209 of 389

207
bonnet
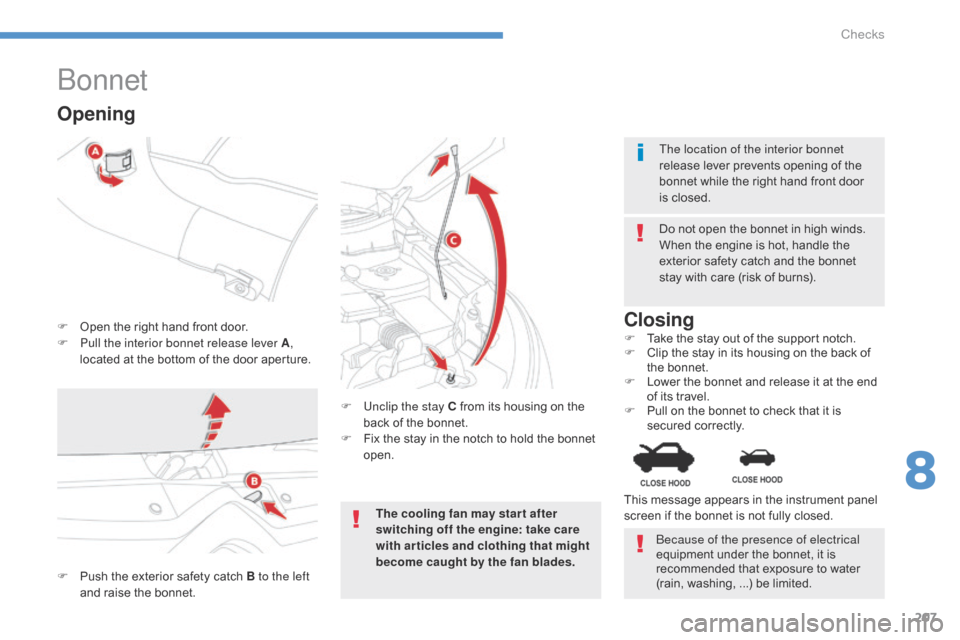
F Open the right hand front door.
F P ull the interior bonnet release lever A ,
located at the bottom of the door aperture. Do not open the bonnet in high winds.
When the engine is hot, handle the
exterior safety catch and the bonnet
stay with care (risk of burns).
F
U
nclip the stay C from its housing on the
back of the bonnet.
F
F
ix the stay in the notch to hold the bonnet
open.ClosingF Take the stay out of the support notch.
F C lip the stay in its housing on the back of
the bonnet.
F
L
ower the bonnet and release it at the end
of its travel.
F
P
ull on the bonnet to check that it is
secured correctly. The location of the interior bonnet
release lever prevents opening of the
bonnet while the right hand front door
is closed.
Opening
F Push the exterior safety catch B to the left
and raise the bonnet. This message appears in the instrument panel
screen if the bonnet is not fully closed.
The cooling fan may star t after
switching off the engine: take care
with articles and clothing that might
become caught by the fan blades.
be
cause of the presence of electrical
equipment under the bonnet, it is
recommended that exposure to water
(rain, washing, ...) be limited.
8
Checks
Page 214 of 389

212
Running out of fuel (Diesel)
On vehicles fitted with the 1.6 litre HDi 110
engine, the fuel system must be manually
primed if you run out of fuel; refer to the
corresponding Diesel engine compartment
view.
1.6 litre HDi engine
F Fill the fuel tank with at least five litres of diesel.
F
O
pen the bonnet.
F
I
f necessary, unclip the styling cover for
access to the priming pump.
F
S
queeze and release the priming pump
repeatedly until resistance is felt (there
may be resistance at the first press).
F
O
perate the starter until the engine starts
(if the engine does not start at the first
attempt, wait around 15 seconds before
trying again).
F
I
f the engine does not start after a few
attempts, operate the priming pump again
then start the engine.
F
C
lip the styling cover back in place.
F
C
lose the bonnet.
Checks
Page 215 of 389

213
Checking levels
Take care when working under the bonnet, as certain areas of the engine may be extremely hot (risk of burns) and the cooling fan could start at
any time (even with the ignition off).
Oil level
The check of the the level is done
out with the dipstick, located under
the bonnet. Refer to the description
of your engine compartment for the
position of the dipstick.Engine oil change
Refer to the maintenance and warranty guide
for details of the interval for this operation.
In order to maintain the reliability of the engine
and emission control system, never use
additives in the engine oil.
Oil specification
The oil must be the correct grade for your
engine and conform to the manufacturer's
recommendations.
Check all of these levels regularly, in line with the maintenance and warranty guide. Top them up if necessary, unless other wise indicated.
If a level drops significantly, have the corresponding system checked by a CITROËN dealer or a qualified workshop.
Dipstick
There are two marks on the dipstick:
A = maximum
If the level is above this
mark, contact a CITROËN
dealer or a qualified
workshop.
B = minimum
Top up the level through the
oil filler orifice, using the
correct grade of oil for your
engine. The level must never
be below this mark.
This check will only be correct if the vehicle is
on level ground and the engine has been off for
more than 30 minutes.
It is normal to top up the oil level between
two services (or oil changes). CITROËN
recommends that you check the level, and top
up if necessary, every 3 000 miles (5 000 km).
After topping up the oil, the check when
switching on the ignition with the oil level
indicator in the instrument panel is not valid
during the 30 minutes after topping up.
8
Checks
Page 217 of 389

215
Avoid prolonged contact of used oil or
fluids with the skin.
Most of these fluids are harmful to
health or indeed very corrosive.
Do not discard used oil or fluids into
sewers or onto the ground.
Take used oil to a CITROËN dealer or
a qualified workshop (France) or to an
authorised waste disposal site.
Used products
To p p i n g u p
The reservoir must be topped up without delay
by a CITROËN dealer or a qualified workshop.
Additive level (1.6 HDi
110 Diesel versions with
particle filter)
The additive reservoir low level is indicated by
the display of this message.
Fluid specification
For optimum cleaning, this fluid must not be
topped up with or replaced with plain water.
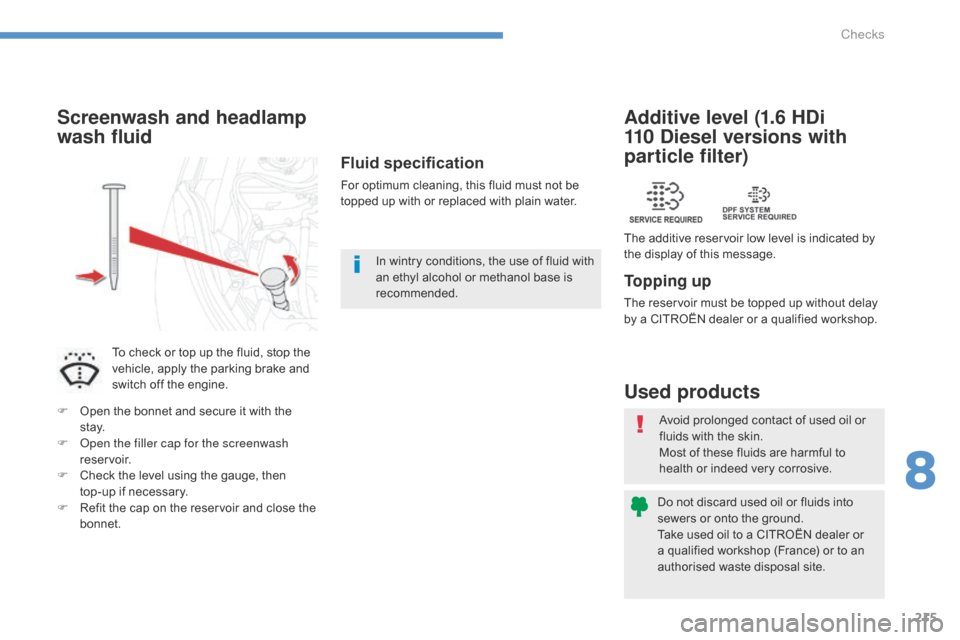
Screenwash and headlamp
wash fluid
To check or top up the fluid, stop the
vehicle, apply the parking brake and
switch off the engine.
F
O
pen the bonnet and secure it with the
st ay.
F
o
p
en the filler cap for the screenwash
reservoir.
F
C
heck the level using the gauge, then
top-up if necessary.
F
R
efit the cap on the reservoir and close the
bonnet. In wintry conditions, the use of fluid with
an ethyl alcohol or methanol base is
recommended.
8
Checks
Page 237 of 389

235
Identification markingsVarious visible markings for the identification and tracing of your vehicle.
A.
M
anufacturer's plate.
I
t is riveted to the middle pillar, right hand
side and carries the following information:
-
t
he name of the manufacturer,
-
t
he European whole vehicle type
approval number,
-
t
he vehicle identification number (VIN),
-
t
he maximum authorised vehicle weight
(gross vehicle weight),
-
t
he maximum authorised weight of
vehicle + trailer (gross train weight),
-
t
he maximum front axle weight,
-
t
he maximum rear axle weight. The tyre pressures must be checked
when the tyres are cold, at least once
a month.
If the tyre pressures are too low, this
increases fuel consumption.
B.
T
yre label.
I
t is fixed to the middle pillar, driver's side
and carries the following information:
-
t
he tyre sizes,
-
t
he tyre pressures.C.
V
ehicle identification number (VIN)
under the bonnet.
T
his number is engraved on the body near
the damper support.
D.
V
ehicle identification number (VIN) at
the bottom of the windscreen aper ture.
I
t is marked on a label visible through the
windscreen, left hand side.
9
Technical data
Page 339 of 389

337
Jack ...............................................................175
Keeping children safe
............ 1
49, 151, 155 -170
key .......
..................................................... 52- 61
ke
y, electronic
........................................... 5
6 - 61
Key in ignition warning
....................................98
K
eyless Entry and Starting
................. 5
6 - 61, 99
Key with remote control
.................... 5
2-55, 102
Labels, identification
..................................... 23
5
Lamps, front
.................................................. 18
2
Lamps, rear
...............................
....................18 6
Lamps, warning and indicator
...................1
3 -18
LED daytime running lamps
.........................18
4
Level, brake fluid
........................................... 2
14
Level, headlamp wash
..................................2
15
Levels and checks
................ 2
08, 209, 213 -218
Lighting bulbs (replacement)
.................18
2-187
Lighting control stalk
..................................... 12
7
J
K
L
Lighting dimmer ..............................................51
Lighting, guide-me home ..............................13
1
Lighting, interior
............................................ 14
0
Lighting on reminder
..................................... 12
9
Loading
..............................
.............................10
Long objects, transporting
..............................76
L
ow fuel level
..............................
..................210
Luggage retaining strap
..................................96
M
ain beam
..............................
..............182, 18 4
Maintenance
..............................
.....................10
Map (colour screen)
...................................... 26
6
Map reading lamps
....................................... 13
8
Markings,
identification
............................................... 23
5
Mat
.......
........................................................... 91
Menu
.................................................... 2
53, 294
Mirror, rear view
.............................................. 79
M
irrors, door.................................................... 77
Mountings for ISOFIX seats
...............
............................164, 165, 168
MP3 CD
................
........................ 276, 303, 325
M
N
oil filter .......................................................... 216oi
l level .......................................................... 213
Opening the bonnet
...................................... 2
07
Opening the boot
..............................
..52, 56, 63
Opening the doors
..............................5
2, 56, 62
Opening the fuel filler flap
.............................2
10
Operation indicator lamps
.........................1
3 -18
O
Navigation .............................................254-267
Navigation data ............................... ..............265
Number plate lamps
.............................. 1
86, 187
Pair telephone
...................................... 2
88, 308
Panoramic glass sunroof
................................70
P
arcel shelf, rear
............................................. 97
P
arking brake
........................................ 1
02, 218
Parking sensors, front
...................................12
5
Parking sensors, rear............................ 123, 124
Particle filter
.......................................... 21
5, 217
P
.
alphabetical index