Page 51 of 292

49
Scented air freshenerSystem permitting the diffusion of a fragrance in the passenger compartment in accordance with
your requirements, by means of the adjustment dial and the various fragrance cartridges available.
Fitting the cartridge
F Remove the cartridge from the sealing case.
F
I
nstall the cartridge (flower at top right).
F
P
ress the dial and turn it a quarter of a turn
clockwise.
This dial is located on the dashboard.
It allows you to adjust the intensity of diffusion
of the fragrance.
F
T
urn the dial to the right to permit diffusion
of the fragrance.
F
T
urn the dial to the left to stop diffusion of
the fragrance.
Fragrance cartridge
Removing the cartridge
F Press the dial and turn it a quarter of a turn anti-clockwise.
F
R
emove the cartridge.
F
R
efit its sealing case.
As a safety precaution, do not carry
out any action on the cartridge while
driving.
Do not dismantle the cartridges.
Do not attempt to refill the fragrance
diffuser or the cartridges.
Avoid all contact with the skin and eyes.
Keep out of reach of children and
animals. Do not discard the original cartridge as
this serves as a plug when no fragrance
cartridge is in use.
In order to preserve the service life of
the cartridge, turn the dial to the left
when you no longer wish to diffuse the
fragrance in the passenger compartment.
Leave the central vents open.
The intensity of diffusion of the
fragrance may depend on the
ventilation or air conditioning settings.
Adjustment dial
This cartridge can be removed easily.
You can change it at any time and store it in the
sealed case which keeps it closed once it has
been opened.
You can obtain different fragrance cartridges
from a CITROËN dealer or a qualified
workshop.
3
Comfort
Page 169 of 292

167
Never store bottles of AdBlue® in your
vehicle.
AdBlue
® freezes at about -11°C and
deteriorates above 25°C. It is recommended
that bottles be stored in a cool area and
protected from direct sunlight.
Under these conditions, the additive can be
kept for at least a year.
If the additive has frozen, it can be used once it
has completely thawed out.
Recommendations on storage
Before topping-up, ensure that the vehicle is
parked on a flat and level sur face.
In wintry conditions, ensure that the
temperature of the vehicle is above -11°C.
Otherwise the AdBlue
® may be frozen and
so cannot be poured into its tank. Park your
vehicle in a warmer area for a few hours to
allow the top-up to be carried out.
Procedure
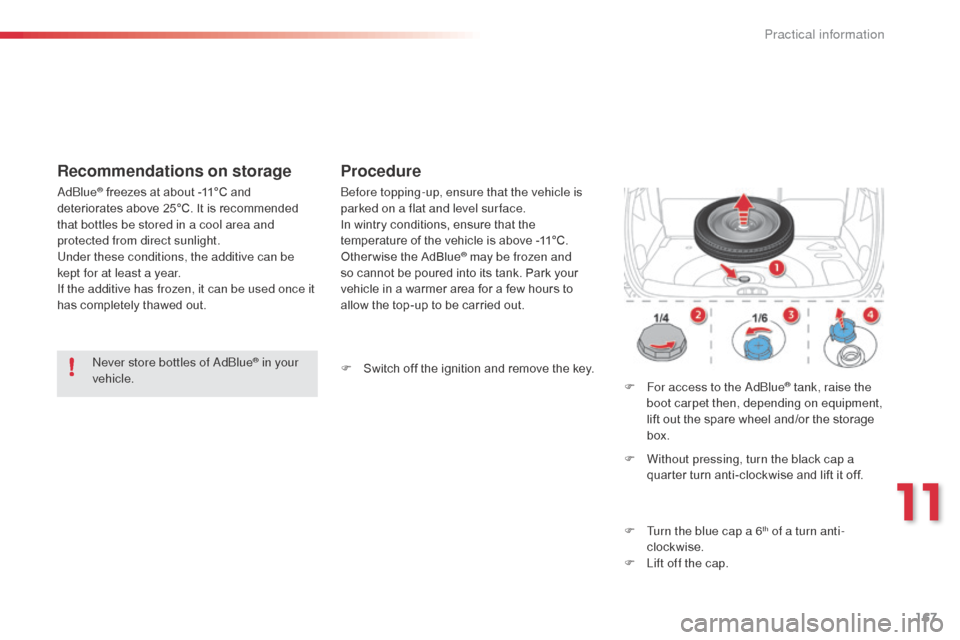
F For access to the AdBlue® tank, raise the
boot carpet then, depending on equipment,
lift out the spare wheel and/or the storage
box.
F
W
ithout pressing, turn the black cap a
quarter turn anti-clockwise and lift it off.
F
T
urn the blue cap a 6
th of a turn anti-
clockwise.
F
L
ift off the cap.
F
S
witch off the ignition and remove the key.
11
Practical information
Page 170 of 292

168
F Obtain a bottle of AdBlue®. After first
checking the use-by date, read carefully
the instructions on use on the label before
pouring the contents of the bottle into your
vehicle's AdBlue
® tank.
Important : if your vehicle's
AdBlue
® tank is completely empty -
w
hich is confirmed by the alert
messages and the impossibility of
starting the engine, you must add at
least 3.8 litres (so two 1.89 litre bottles). If any additive is split or splashed, wash
immediately with cold water or wipe with
a damp cloth.
If the additive has crystallised, clean it
off using a sponge and hot water.
Important:
in the event of a top-up after
a breakdown because of a lack of
additive , you must wait around 5 minutes
before switching on the ignition, without
opening the driver's door, locking the
vehicle or introducing the key into the
ignition switch .
Switch on the ignition, then, after
10 seconds, start the engine.
Never dispose of AdBlue
® additive
bottles in the household waste. Place
them in a special container provided
this purpose or take them to your dealer.
F
A
fter emptying the bottle, wipe away any
spillage around the tank filler using a damp
cloth.
F
R
efit the blue cap to the tank and turn it a
6th of a turn clockwise, to its stop.
F
R
efit the black cap and turn it a quarter of
a turn clockwise without pressing. Ensure
that the indicator on the cap lines up with
the indicator on the support.
F
D
epending on equipment, return the spare
wheel and/or the storage box to the bottom
of the boot.
F
R
efit the boot carpet and close the tailgate.
Practical information
Page 280 of 292
278
Instrument panels 10
Warning lamps 1 1-21
Indicators
2
2-25
Adjustment buttons
2
6
-
t
rip distance recorder /clock
-
l
ighting dimmer/ black panel
Instruments and controls
Lighting controls 7 1-74
Headlamp adjustment 7 7
Speed limiter
1
32-133
Cruise control
1
34-135
Dashboard fuses
1
77-179
Opening the bonnet
1
40Rear view mirror
5
6
Sun visor
8
3 - 84
Wiper controls
7
8 - 80
Trip computer
3
8 - 40
Ventilation / Heating
4
1- 45
Manual air conditioning
4
4- 45
Digital air conditioning
4
6- 48
Demisting - Defrosting the rear screen
4
3 Audio system
2
55 -275
Setting the date/time
2
8, 37
eMyWay
2
01-254
Setting the date/time
3
2
Electronic gearbox
1
26-129
Gear efficiency indicator
1
30
Hill start assist
1
31
Parking brake
1
25Steering wheel adjustment
5
6
Horn
10
8
Multifunction screens
2
7-37
Door mirrors
5
5
Electric windows
6
1- 62
Hazard warning lamps
1
07
Visual search