Page 329 of 401

2
Multifunction screens1
C3-additif_en_Chap02_Ecrans-multifonction_ed01-2015
Touch screen tablet
This system gives access to: - menus for adjusting settings for vehicle functions and systems, - audio and display configuration menus, - audio system and telephone controls and the display of associated information, - the display of alert messages, - the display of ambient temperature (a blue snow flake appears when there is a risk of ice), - the display of the trip computer.
And, depending on equipment, it allows: - the display of visual parking sensors information, - access to the controls for the navigation system and Internet services, and the display of associated information.
Recommendations
It is necessary to press firmly, particularly for "flick" gestures (scrolling through lists, moving the map...). A light wipe is not enough.
The screen does not recognise pressing with more than one finger. This technology allows use at all temperatures and when wearing gloves. Do not use pointed objects on the touch screen tablet. Do not touch the touch screen tablet with wet hands. Uses a soft clean cloth to clean it.
General operation
As a safety measure, some functions can only be viewed with the vehicle stationary. When the vehicle moves off, their display is interrupted.
After a few moments with no action on the secondary page, the primary page is displayed automatically.
Principles
Press the " MENU " button for access to the different menus, then press the virtual buttons. Each menu is displayed over one or two pages (primary page and secondary page).
Use this button to go to the secondary page.
Use this button to return to the primary page.
Use this button for access to additional information and to the settings for certain functions.
Use this button to confirm.
Use this button to quit.
Page 330 of 401
Multifunction screens
2
C3-additif_en_Chap02_Ecrans-multifonction_ed01-2015
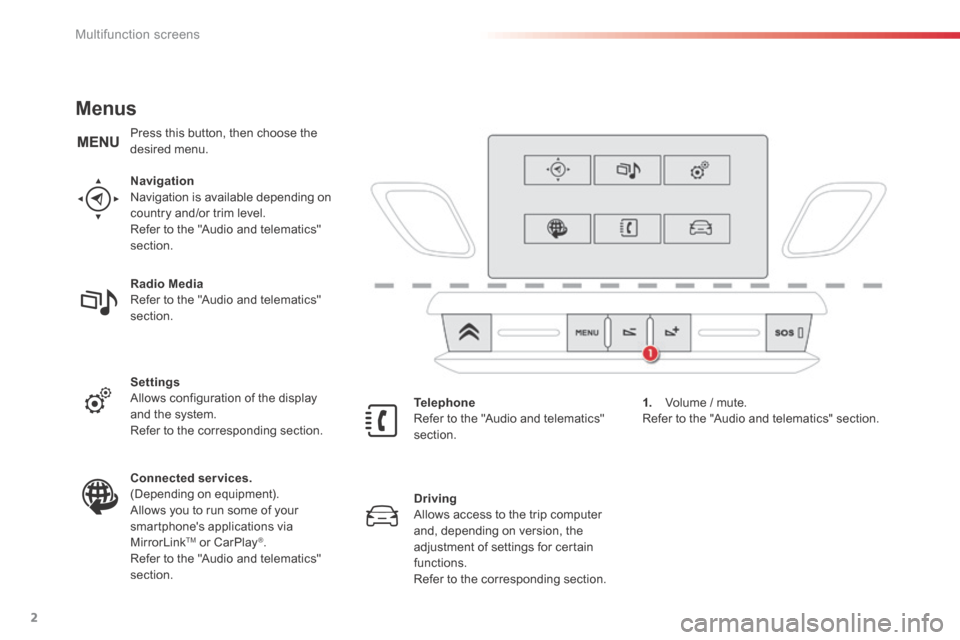
Menus
Navigation Navigation is available depending on country and/or trim level. Refer to the "Audio and telematics" section.
Telephone Refer to the "Audio and telematics"
section.
1. Volume / mute. Refer to the "Audio and telematics" section.
Radio Media Refer to the "Audio and telematics" section.
Settings Allows configuration of the display and the system.
Refer to the corresponding section.
Connected services. (Depending on equipment). Allows you to run some of your smartphone's applications via
MirrorLinkTM or CarPlay®. Refer to the "Audio and telematics" section.
Driving Allows access to the trip computer and, depending on version, the
adjustment of settings for certain functions. Refer to the corresponding section.
Press this button, then choose the desired menu.
Page 331 of 401

11
Practical information3
C3-additif_en_Chap11_Info-pratiques_ed01-2015
Compatibility of
fuels
Fuel used for petrol
engines
The petrol engines are compatible with bio-fuels that conform to current and future European standards and can be obtained from filling stations.
The use of any other type of (bio)fuel (vegetable or animal oils, pure or diluted, domestic fuel...) is strictly prohibited (risk of damage to the engine and fuel system).
The only Diesel additives authorised for use are those that meet the B715000 standard.
Travelling abroad
Cer tain fuels could damage the engine of your vehicle. In cer tain countries, the use of a par ticular fuel may be required (specific octane rating, specific sales name…) to ensure correct operation of the engine. For any additional information, contact your dealer.
The only petrol additives authorised for use are those that meet the B715001 standard.
Fuel used for Diesel
engines
The Diesel engines are compatible with biofuels that conform to current and future European standards and can be obtained from filling stations.
Diesel fuel that meets standard EN590 mixed with a biofuel that meets standard EN14214 (possibly containing up to 7% Fatty Acid Methyl Ester).
Paraffinic Diesel fuel that meets standard EN15940 mixed with a biofuel that meets standard EN14214 (possibly containing up to 7% Fatty Acid Methyl Ester).
Diesel fuel that meets standard EN16734 mixed with a biofuel that meets standard EN14214 (possibly containing up to 10% Fatty Acid Methyl Ester).
The use of B20 or B30 fuel meeting standard EN16709 is possible in your Diesel engine. However, this use, even occasional, requires strict application of the special servicing conditions referred to as "Arduous conditions".
Petrol that meets the EN228 standard, mixed with a bio-fuel meeting the EN15376 standard.
For more information, contact a CITROËN dealer or a qualified workshop.
Diesel fuel at low temperature
In temperatures below 0°C (+32°F), the formation of paraffins in the summer diesel fuels may result in abnormal operation of the fuel supply system. To avoid this, the use of winter diesel fuels is recommended, keeping the tank topped up to more than 50% of its capacity. If in spite of this you experience difficulties starting the engine in temperatures below -15°C (+5°F), simply leave the vehicle in a garage or a heated workshop for a while.
Page 332 of 401

Practical information
4
C3-additif_en_Chap11_Info-pratiques_ed01-2015
Rear lamps
1. Brake / sidelamps (P21/5W).2. Direction indicators (PY21W amber).3. Foglamp, right-hand side (PR21W red) Reversing lamp, left-hand side (P21W).
Changing bulbs
spread the four tabs and remove the bulb holder, turn the bulb a quarter of a turn and change it. To refit, carry out these operations in reverse o r d e r. Take care to engage the lamp unit in its guides,
while keeping it in line with the vehicle.
Open the boot, remove the access flap from the corresponding side trim panel, unscrew the butter fly nut securing the lamp unit, unclip the lamp unit connector, from the outside, extract the lamp unit
carefully pulling it in the centreline of the vehicle,
The location of the reversing lamp or foglamp may vary depending on the side on which the rear lamp is positioned (left or right). Amber or red bulbs, such as those for the direction indicators and rear foglamp, must be replaced by bulbs of the same rating and colour. The lamps on the tailgate are dummy units. They are there for aesthetic purposes only.
Page 333 of 401
11
Practical information5
C3-additif_en_Chap11_Info-pratiques_ed01-2015
Refi tting the access fl ap
Tilt the flap upwards and position the hooks Bunder the boot trim. Raise the flap.
Slide the flap to position it correctly. Position the three hooks A of the flap at the bottom.
Changing the number plate lamp bulbs (W5W)
Insert a thin screwdriver into one of the outer holes of the lens. Push it outwards to unclip. Remove the lens. Pull the bulb out and change it.
Page 334 of 401

Technical data
6
C3-additif_en_Chap12_Caracteristiques_ed01-2015
I d e n t i fi c a t i o n m a r k i n g s
B. Vehicle identification number on the bottom edge of the windscreen aper ture. This number is indicated on a self-adhesive label which is visible through the windscreen.
C. Manufacturer's label. The self-destroying label on the left-hand or right-hand centre pillar carries the following information. - the name of the manufacturer, - the European type approval number, - the vehicle identification number (VIN), - the gross vehicle weight, - the gross train weight, - the maximum front axle weight, - the maximum rear axle weight.
- the tyre pressures, for unladen and laden conditions, - the tyre sizes (including the load index and speed rating of the tyre), - the spare tyre inflation pressure, - the paint colour code.
The tyre pressures must be checked when the tyres are cold, at least once a month.
Low tyre pressures increase fuel consumption.
A. Vehicle identification number (VIN) under the bonnet. This number is engraved on the bodywork near the passenger compartment filter.
Various visible markings for the identification of your vehicle.
D. Tyre/paint label. This label on the left centre pillar, driver's side, carries the following information:
Page 335 of 401

.
Audio and Telematics 7
C3-additif_en_Chap13a_BTA-2_ed01-2015
Emergency or assistance call
Localised Emergency Call
In an emergency, press this button for more than 2 seconds. Flashing of the green indicator lamp and a voice message confirm that the call has
been made to the "Localised Emergency Call" * centre.
Pressing this button again immediately cancels the call. The green indicator lamp goes off.
The green indicator lamp remains on (without flashing) when communication is established. It goes off at the end of the call.
Localised Emergency Call immediately locates your vehicle, makes contact with you in your language ** and - if necessary - organises sending of the appropriate emergency services ** . In countries where the service is not operational, or if the locating service has been expressly declined, the call is directed straight to the emergency services (112) without location.
** Depending on the geographic cover for "Localised Emergency Call", "Localised Assistance Call" and the official national language selected by the owner of the vehicle. The list of countries covered by Telematic services is available at dealers or on the
website in your country.
* Depending on the terms and conditions for the service, available from dealers, and technological and technical limits.
If an impact is detected by the airbag control unit, and independently of the deployment of any airbags, an emergency call is made automatically.
If you benefit from the CITROËNConnect Box offer with the SOS and assistance pack included, there are additional services available to you in your personal space, via the Internet website for your country.
Page 336 of 401

Audio and Telematics
8
C3-additif_en_Chap13a_BTA-2_ed01-2015
Localised Assistance Call
The fault with the system does not prevent the vehicle being driven.
Press this button for more than 2 seconds to request assistance if the vehicle breaks down. A voice message confirms that the call has been made ** .
Pressing this button again immediately cancels the request. The cancellation is confirmed by a voice message.
Geo-location
You can deactivate geo-location by simultaneously pressing the "Localised Emergency Call" and "Localised Assistance Call" buttons, followed by a press on "Localised Assistance Call" to confirm.
To reactivate geo-location, simultaneously press the "Localised Emergency Call" and "Localised Assistance Call" buttons again, followed by a press on "Localised Assistance Call" to confirm.
If the orange indicator lamp is on fixed: the back-up battery should be replaced. In both cases, the emergency and assistance calls service may not work. Contact a qualified repairer as soon as possible.
Operation of the system
When the ignition is switched on, the green indicator lamp comes on for 3 seconds indicating that the system is operating correctly.
If the orange indicator lamp flashes then goes off: the system has a fault.
If you purchased your vehicle outside the Brand's dealer network, we suggest that you have a dealer check and, if desired, modify the configuration of these services. In a multi-lingual country, configuration is possible in the official national language of your choice.
For technical reasons, particularly to improve the quality of Telematic services to customers, the manufacturer reserves the right to carry out updates to the vehicle's on-board telematic system.
** Depending on the geographic cover for "Localised Emergency Call", "Localised Assistance Call" and the official national language selected by the owner of the vehicle. The list of countries covered by Telematic services is available at dealers or on the
website in your country.