2015 Citroen C3 key
[x] Cancel search: keyPage 201 of 401

199
Towing your vehicle
F on the front bumper, unclip the cover by pressing at the bottom.
F
S
crew the towing eye in fully.
F
I
nstall the towing arm.
F
P
lace the gear lever in neutral (position N
for an electronic or automatic gearbox). F
on t he rear bumper, unclip the cover by
pressing at the bottom.
F
S
crew the towing eye in fully.
F
I
nstall the towing arm.
F
S
witch on the hazard warning lamps on
both vehicles.
F
M
ove off gently and drive for a short
distance only.
Towing another vehicle
Failure to observe this special condition
could result in damage to certain
components (braking, transmission..)
and the absence of braking assistance
the next time the engine is started. F
U
nlock the steering by turning the key one
notch in the ignition switch and release the
parking brake.
F
S
witch on the hazard warning lamps on
both vehicles.
F
M
ove off gently and drive for a short
distance only.
11
Practical information
Page 245 of 401

243
Select a radio station or frequency (refer to the
corresponding section).Press on Radio Media
to display the
primary page.
Press on the secondary page.
Select " Settings ".
Select " Radio".
ac
tivate/deactivate "RDS
options ".
Press on Radio Media
to display the
primary page.
Press on the secondary page. Press on "
Preset".
Select a number in the list to preset the
previously chosen radio station.
A long press on a number presets (memorises)
the station.
Press on Frequency
.
Enter the frequency in full (e.g.:
92.10 MHz) using the keypad then
" Confirm ".
Changing radio station
Pressing the name of the current radio station
brings up a list.
To change radio station press the name of the
desired station.
o
r Press on Radio Media to display the
primary page.
Select " Save".
Preset a station Activate/ Deactivate RDS
OR
THEN
a
press on this button presets all of
the stations one after the other.
Recall pre-set stations
RDS, if activated, allows you to continue
listening to the same station by automatic
retuning to alternative frequencies.
However, in certain conditions, coverage
of an R
dS s
tation may not be assured
throughout the entire country as radio
stations do not cover 100 % of the
territory. This explains the loss of
reception of the station during a journey.
.
audio and Telematics
Page 272 of 401

270
Managing paired
telephones
This function allows the connection or
disconnection of a peripheral device as
well as the deletion of a pairing.Using the telephone is not
recommended while driving.
Park the vehicle.
Make the call using the steering
mounted controls.
Press on Telephone
to display the
primary page.
Press on the secondary page.
Select " Bluetooth " to display the list
of paired peripheral devices.
Select the peripheral in the list. Select "Search for devices "
o
r "Connect / Disconnect " to start or
end the Bluetooth connection with
the selected device.
o
r "Delete " to delete the pairing.
Receiving a call
an incoming call is announced by a ring and a
superimposed display in the screen.
Make a short press on the steering
mounted TEL button to accept an
incoming call.
Make a long press
on the steering mounted TEL button
to reject the call.
o
r Select "End call".
Making a call
Calling a new number
Press on Telephone to display the
primary page.
Enter the phone number using the
digital keypad.
Press " Call" to start the call.
Calling a contact
Press on Telephone to display the
primary page.
or m
ake a long press
on the steering mounted TEL button.
Audio and Telematics
Page 289 of 401

287
C3_en_Chap13c_RD45_ed01-2015
Use only USB memory sticks formatted FAT32
(File Allocation Table).It is recommended that you use
genuine
a
pple® USb cables for correct
operation.
*
I
n certain cases, play of the audio files must
be initiated from the keypad.
** If the telephone supports the function.
Bluetooth® audio streaming
Streaming allows music files on the telephone
to be played via the audio system.
Connect the telephone: see the " Telephone"
section.
Select in the " Bluetooth: Telephone - Audio "
menu the telephone to be connected.
The audio system connects to a newly paired
telephone automatically.
Control of tracks to be played is via the buttons
on the audio system control panel and the
steering mounted controls**. The contextual
information can be displayed in the screen.
ac
tivate the streaming source by
pressing the SOURCE but to n*.
Connecting Apple® players
Connect the apple® player to the USb port
using a suitable cable (not supplied).
Play starts automatically.
Control is via the audio system.
The classifications available are those of the
portable device connected (artists / albums /
genres / playlists / audiobooks / podcasts).
The version of software in the audio system
may not be compatible with the generation of
your
a
pple® p l aye r.
.
audio and Telematics
Page 290 of 401

288
C3_en_Chap13c_RD45_ed01-2015
Telephone
Pairing a Bluetooth® telephone
Screen C
(Available according to model and version)
as a safety measure and because they
require prolonged attention on the part
of the driver, the operations for pairing
of the Bluetooth mobile telephone with
the b
l
uetooth hands-free system of
your audio equipment must be carried
out with the vehicle stationary and the
ignition on.
Go to www.citroen.co.uk for more information
(compatibility, more help, ...).
ac
tivate the telephone's b
l
uetooth function
and ensure that it is "visible to all" (telephone
configuration).
Press the MENU button. In the menu, select:
-
"Bluetooth : Telephone - Audio "
-
"Bluetooth configuration "
-
"Perform a Bluetooth search "
A window is displayed with a message that a
search is in progress. The services available depend on
the network, the SIM card and the
compatibility of the
b
l
uetooth device
used.
Consult your telephone's manual and
your operator to find out which services
are available to you.
* If your telephone is fully compatible. The first 4 telephones recognised are displayed
in this window.
The "Telephone"
menu permits access to the
following functions in particular: " Directory" *,
" Calls list , "Consult the paired equipment ".Select the telephone to be connected from the
list.
on ly one telephone can be connected at
a time.
a
virtual keypad is displayed in the screen:
enter a code with at least 4 digits.
Confirm by pressing OK.
a
message in the screen indicates the telephone
chosen. To accept the pairing, enter the same
code on the telephone, then confirm with OK.
If pairing fails, the number of attempts is not
limited.
a
message that the pairing has been
successful appears in the screen.
The automatic connection authorised is only
active after the telephone has been configured.
The directory and the call list can be accessed
after the necessary synchronisation period.
audio and Telematics
Page 291 of 401

289
C3_en_Chap13c_RD45_ed01-2015
Receiving a call
an incoming call is announced by a ring and a
superimposed display in the screen.Select the YES tab on the display
using the buttons.
Confirm by pressing OK.
Press this button at the steering
mounted controls to accept the call.
Making a call
From the " Bluetooth : Telephone - Audio "
menu.
Select " Manage the telephone call".
Select " Call".
o
r
Select " Calls list ".
o
r
Select " Directory ".
Press this button for more than two
seconds for access to your directory,
then navigate using the thumb wheel.
o
r
To dial a number, use your telephone's keypad,
with the vehicle stationary.
Ending a call
during a call, press this button for
more than 2 seconds.
Confirm with OK to end the call.
The system accesses the telephone's
contacts directory, depending on its
compatibility, and while it is connected
by
b luetooth.
With certain telephones connected by
bl
uetooth you can send a contact to the
directory of the audio system.
Contacts imported in this way are
saved in a permanent directory
visible to all, whatever the telephone
connected.
The menu for the directory is not
accessible if it is empty.
.
Audio and Telematics
Page 300 of 401

298
C3_en_Chap14_Recherche-visuel-Index-Alpha_ed01-2015
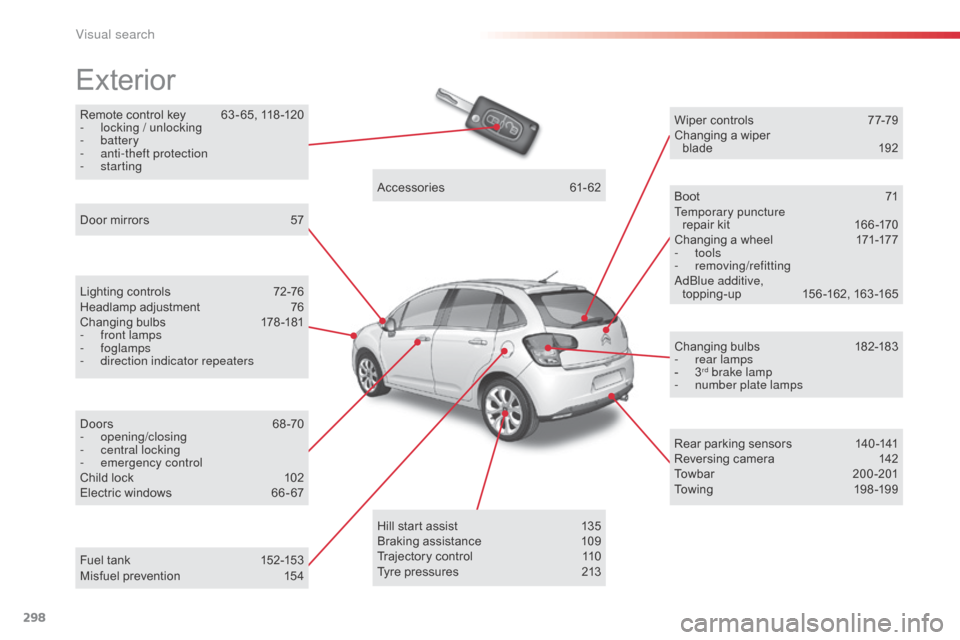
Remote control key 63 - 65, 118 -120
- l ocking / unlocking
-
battery
-
a
nti-theft protection
-
starting
Exterior
Lighting controls 7 2-76
Headlamp adjustment 7 6
Changing bulbs
1
78-181
-
f
ront lamps
-
foglamps
-
d
irection indicator repeaters
Door mirrors
5
7
Doors
6
8 -70
-
opening/closing
-
c
entral locking
-
em
ergency control
Child lock
1
02
Electric windows
6
6 - 67Accessories
6
1-62
Wiper controls
7
7-79
Changing a wiper blade
19
2
Boot
7
1
Temporary puncture repair kit
1
66 -170
Changing a wheel
1
71-177
- tools
-
removing/refittinga
dblu e additive,
topping-up 1 56 -162, 163 -165
Changing bulbs
1
82-183
-
r
ear lamps
-
3rd brake lamp
-
n
umber plate lamps
Rear parking sensors
1
40 -141
Reversing camera
1
42
Towbar
20
0-201
Towing
19
8 -19 9
Hill start assist
1
35
Braking assistance
1
09
Trajectory control
1
10
Tyre pressures
2
13
Fuel tank
1
52-153
Misfuel prevention
1
54
Visual search
Page 306 of 401

304
C3_en_Chap14_Recherche-visuel-Index-Alpha_ed01-2015
Labels, identification .....................................2 13
Lamps, front .................................................. 178
Lamps, rear
................................................... 182
Lamps, warning and indicator
...................12-23
LE
d da
ytime running lamps
...........................76
Level,
a d
blu
e
® additive ................................. 15 6
Level, brake fluid ........................................... 14
8
Levels and checks
................................. 145 -149
Lighting bulbs (replacement)
.................17
8 -18 4
Lighting control stalk
....................................... 72
Lighting dimmer
..............................
................29
Lighting, guide-me home
.......................... 74, 75
Lighting, interior
................................ 80, 81, 184
Loading
............................................................. 8
Load reduction mode
.................................... 19 6
Localised
a
s
sistance Call
............................. 2
15
Locating your vehicle
...................................... 64
L
ocking from the inside
................................... 69
L
ow fuel level
................................................ 152
LPG
.......
........................................................ 206
Jack
........
....................................................... 171
Jack cable
............................................. 246, 285
JACK socket
.................................... 85, 246, 285
Jukebox
......................................................... 249
ke
eping children safe
...................... 8
9 -102, 114
Key in ignition warning
.................................. 120
Key with remote control
..................... 63 - 65, 118
LI
J
K
M
Main beam .............................................. 72, 180
Maintenance ....................................... 8, 147-151
Markings, identification
.................................213
Mat
.................................................................. 86
Menu
........................... 222, 224, 228, 236, 238,
240, 250, 252, 254, 264, 266
Menu, main
................................................... 282
Menus (audio)
............................... 236, 238, 240Menus (Touch screen tablet)
.................
217, 221
Mirrorlink connection
....................................
263
Mirror, rear view ..............................................
58
Mirrors, door .................................................... 57
Misfuel prevention
...............................
..........
15 4
Mountings for IS
oF
IX seats
...................
98, 100
MP3 CD .........................................................
286
N
O
navigation .............................................. 222-235nu
mber plate lamps ...................................... 18
2
oi
l change
..................................................... 147
oi
l consumption
............................................ 147
oil
filter
...............
........................................... 150
oi
l level ..................................................... 27, 147
op
ening the bonnet
...................................... 14
4
op
ening the boot
..............................
........63, 71
op
ening the doors
...............................
.....63, 68
op
ening the fuel filler flap
.............................15
2
op
eration indicator lamps
.........................12-23
Indicators, direction
......................................
103
Inflating accessories (using the kit)
..............
169
Inflating tyres
............................................
8, 212
Installing speakers
..........................................
59
Instrument panel lighting
................................ 29
In
strument panels
.....................................
10, 11
Instrument panel screen
.................... 1
0, 11, 131
Interior fittings
............................................
82- 86
Interior lamp
............................................
80, 184
Interior mood lighting
......................................
81
Internet
..................................................
258, 259
Internet browser
....................................
258, 259
ISoFI
X
.....................................................
9 8 -10 0
ISoF
IX mountings ................................... 98, 100
alphabetical index