2015 CHRYSLER TOWN AND COUNTRY navigation
[x] Cancel search: navigationPage 2 of 164

WARNING!
Driving after drinking can lead to a collision. Your perceptions are less sharp, your
reflexes are slower, and your judgment is impaired when you have been drinking.
Never drink and then drive.
IF YOU ARE TH E FIR S T REG IS TERED RETAIL OWN ER OF YOU R VEHICLE,
YOU M AY OBTAIN A COM PLIM ENTARY PRINTED COPY OF TH E OWN ER ’ S
M AN UAL , NAVIGATION/ UCON N EC T ® M AN UAL S OR WARR ANT Y BOOK LET
BY CALLING 1-800-247-9753 (U.S.) OR 1-800-387-1143 (C ANADA) OR BY
CONTAC TING YOUR DEALER .
The driver’s primary responsibility is the safe operation of the vehicle. Driving while distracted can
result in loss of vehicle control, resulting in a collision and personal injury. Chrysler Group LLC
strongly recommends that the driver use extreme caution when using any device or feature that
may take their attention o! the road. Use of any electrical devices, such as cellular telephones,
computers, portable radios, vehicle navigation or other devices, by the driver while the vehicle is
moving is dangerous and could lead to a serious collision. Texting while driving is also dangerous
and should never be done while the vehicle is moving. If you find yourself unable to devote your
full attention to vehicle operation, pull o! the road to a safe location and stop your vehicle. Some
states or provinces prohibit the use of cellular telephones or texting while driving. It is always the
driver’s responsibility to comply with all local laws.
IMPORTANT: This User Guide is intended to familiarize you with the important
features of your vehicle. The DVD enclosed contains your Owner’s Manual, Navigation/
Uconnect® Manuals, Warranty Booklets, Tire Warranty and Roadside Assistance
(new vehicles purchased in the U.S.) or Roadside Assistance (new vehicles purchased
in Canada) in electronic format. We hope you find it useful. Replacement DVD kits
may be purchased by visiting www.techauthority.com. Chrysler and Town & Country are
registered trademarks of Chrysler Group LLC. Copyright 2014 Chrysler Group LLC.
This guide has been prepared to help you get quickly acquainted with your new Chrysler
and to provide a convenient reference source for common questions. However, it is not a
substitute for your Owner’s Manual. For complete operational instructions, maintenance
procedures and important safety messages, please consult your Owner’s Manual,
Navigation/ Uconnect® Manuals and other Warning Labels in your vehicle. Not all
features shown in this guide may apply to your vehicle. For additional information on
accessories to help personalize your vehicle, visit mopar.com (U.S.), mopar.ca (Canada)
or your local Chrysler dealer.
DRIVING AND ALCOHOL: Drunken driving is one of the most frequent
causes of collisions. Your driving ability can be seriously impaired with blood alcohol levels
far below the legal minimum. If you are drinking, don’t drive. Ride with a designated
non-drinking driver, call a cab, a friend, or use public transportation.
1601456_15b_Town_Country_UG_073114.indd 27/31/14 4:15 PM
Page 66 of 164

Clock Setting
1. Turn the radio on, then press the screen where the time is displayed.
2. Press the “User Clock” button on the touchscreen or the time display (Navigation radio only).
3.To adjust the hours, press either the “Hour Forward” or “Hour Backward” button on the touch-
screen.
4. To adjust the minutes, press either the “Minute Forward” or “Minute Backward” button on the
touchscreen.
5. To save the new time setting, press the screen where the word “Save” is displayed.
Menu
•PushtheMENUbuttononthefaceplatetoaccesstheSystemSetupmenuandtheMyFiles
menu.
•PushtheMENUbuttononthefaceplateinanactivemode(SAT,CD,AUX,etc.)tochange
mode specific settings.
Equalizer, Balance And Fade
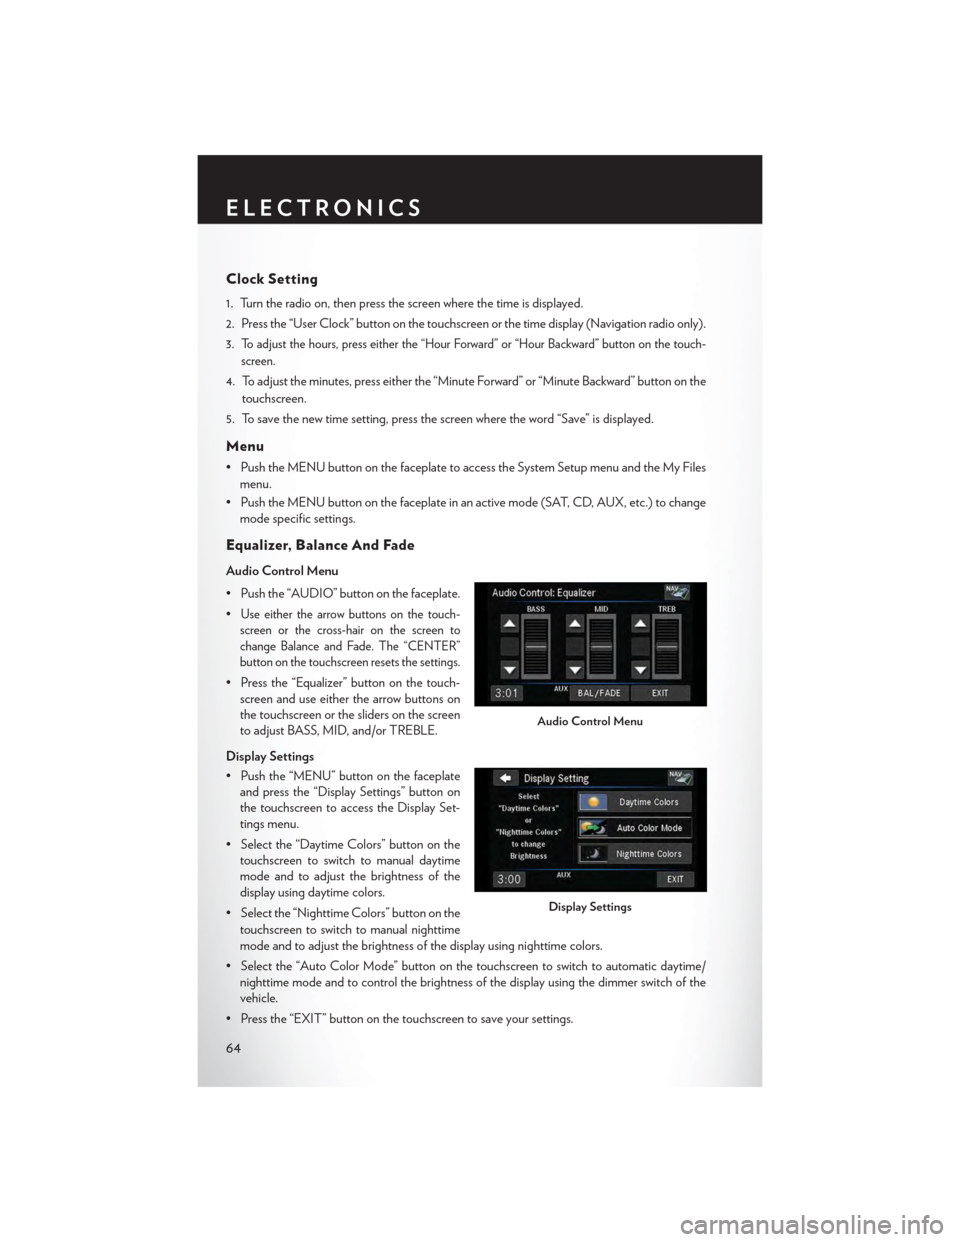
Audio Control Menu
• Push the “AUDIO” button on the faceplate.
•Use either the arrow buttons on the touch-
screen or the cross-hair on the screen to
change Balance and Fade. The “CENTER”
button on the touchscreen resets the settings.
• Press the “Equalizer” button on the touch-
screen and use either the arrow buttons on
the touchscreen or the sliders on the screen
to adjust BASS, MID, and/or TREBLE.
Display Settings
• Push the “MENU” button on the faceplate
and press the “Display Settings” button on
the touchscreen to access the Display Set-
tings menu.
• Select the “Daytime Colors” button on the
touchscreen to switch to manual daytime
mode and to adjust the brightness of the
display using daytime colors.
• Select the “Nighttime Colors” button on the
touchscreen to switch to manual nighttime
mode and to adjust the brightness of the display using nighttime colors.
•Selectthe“AutoColorMode”buttononthetouchscreentoswitchtoautomaticdaytime/
nighttime mode and to control the brightness of the display using the dimmer switch of the
vehicle.
•Pressthe“EXIT”buttononthetouchscreentosaveyoursettings.
Audio Control Menu
Display Settings
ELECTRONICS
64
Page 72 of 164

Cleaning Your Touchscreen Radio
• Do not spray any liquid or caustic chemicals directly on the screen. Use a clean and dry micro
fiber lens cleaning cloth to clean the touchscreen.
• If necessary, use a lint-free cloth dampened with a cleaning solution such as isopropyl alcohol
or an isopropyl alcohol and water solution ratio of 50:50. Always follow the solvent manufac-
turer's precautions and directions.
Garmin® Navigation
•Uconnect®430NintegratesGarmin’sconsumer-friendlynavigationintoyourvehicle.
Garmin® Navigation includes a database with over 6 million points of interest.
•Pressthe“NAV”buttononthetouchscreentoaccesstheNavigationsystem.
Changing The Navigation Voice
Prompt Volume
1. Program a destination.
2. While traveling on your route, press the up-
per left area of the map screen where your
next turn is displayed.
3. The Navigation system will then repeat the
distance to your next turn.
4. While the Navigation system is speaking, use the ON/OFF VOLUME rotary knob to adjust
the volume to a comfortable level. Please note the volume setting for Navigation Voice
Prompt is different than the audio system.
NOTE:
For your own safety and the safety of others, it is not possible to use certain features while the
vehicle is in motion.
Main Navigation Menu
Finding Points Of Interest
• From the main Navigation menu, press the “Where To?” button on the touchscreen, then press
the “Points of Interest” button on the touchscreen.
• Select a Category, then a subcategory, if
necessary.
•Selectyourdestinationandpressthe“Go”
button on the touchscreen.
Garmin® Navigation
Main Navigation Menu
ELECTRONICS
70
Page 73 of 164

Finding A Place By Spelling The Name
•FromtheMainNavigationMenupressthe“WhereTo?”buttononthetouchscreen.Next,
press the “Points of Interest” button on the touchscreen then press the “Spell Name” button on
the touchscreen.
•Enterthenameofyourdestination.
• Press the “Done” button on the touchscreen.
•Selectyourdestinationandpressthe“Go”buttononthetouchscreen.
Entering A Destination Address
• From the main Navigation menu press the “Where To?” button on the touchscreen, then press
the “Address” button on the touchscreen.
• Follow the on-screen prompts to enter the address then press the “Go” button on the
touchscreen.
Setting Your Home Location
• From the main Navigation menu press the "Tools" icon. Next select the "My Data" folder
icon. Then select "Set Home Location."
•Youmayenteryouraddressdirectly,useyourcurrentlocationasyourhomeaddress,orchoose
from recently found locations.
Edit Home Location
• From the main Navigation menu press the “Where To?” button on the touchscreen, then press
the "Tools" icon. Next, press the "My Data" folder.
•Youmayenteranewaddressdirectly,useyourcurrentlocationorchoosefromrecentlyfound
locations.
Go Home
•AHomelocationmustbesavedinthesystem.FromtheMainNavigationmenu,pressthe
“Where To?” button on the touchscreen, then press the “Go Home” button on the touchscreen.
ELECTRONICS
71
Page 74 of 164

Following Your Route
Yo u r r o u t e i s m a r k e d w i t h a m a g e n t a l i n e o n t h e m a p . I f y o u d e p a r t f r o m t h e o r i g i n a l r o u t e , y o u r
route is recalculated. A speed limit icon could appear as you travel on major roadways.
Adding A Via Point
To a d d a s t o p b e t w e e n t h e c u r r e n t l o c a t i o n a n d t h e e n d d e s t i n a t i o n ( V i a P o i n t ) y o u m u s t b e
navigating a route.
•Pressthe“backarrow”iconmultipletimestoreturntotheMainNavigationmenu.
• Press the “Where To?” button on the touchscreen, then search for the additional stop. Select
the destination you wish to add from the given search results.
•Pressthe“Go”buttononthetouchscreen,thenpress"AddasaViaPoint"buttononthe
touchscreen and press the "Done" button on the touchscreen.
Following Your Route
1 — Distance To Next Turn2 — Current Location3—ZoomIn4—ZoomOut5 — Current Speed
6 — Drag Map For Different View7—YourLocationOnTheMap8 — Estimated Time Of Arrival9—NavigationMainMenu
ELECTRONICS
72
Page 75 of 164

Taking A Detour
To t a k e a d e t o u r y o u m u s t b e n a v i g a t i n g a r o u t e .
•Pressthe“backarrow”iconbuttononthetouchscreenmultipletimestoreturntotheMain
Navigation menu.
• Press the “Detour” button on the touchscreen.
NOTE:
If the route you are currently taking is the only reasonable option, the device might not calculate
a detour.
Acquiring Satellites
The GPS Satellite strength bars indicate the strength of your satellite reception.
•Acquiringsatellitesignalscantakeafewminutes.Whenatleastoneofthebarsisgreen,your
device has acquired satellite signals.
•Youmayexperiencedelaysreceivingsatellitesignalswheninareaswithanobstructedviewto
the sky, such as garages, tunnels, or large cities with tall buildings.
SiriusXM SATELLITE RADIO/TRAVEL LINK
•SiriusXMTravelLinkrequiresasubscription,soldseparatelyafterthefive(5)yeartrial
subscription included with your vehicle purchase.
•SiriusXMTravelLinkisonlyavailableintheUnitedStates.
•ThefollowingdescribesfeaturesthatareavailablewheninSiriusXMSatelliteRadiomode.
•ToaccessSiriusXMSatelliteRadio,pushtheRADIO/MEDIAorRADIObuttononthe
faceplate, then press the “SAT” button on the touchscreen.
Info
• Press the “i” button on the touchscreen to view detailed information about the current Sirius
XM Satellite channel.
SiriusXM Parental Controls
• SiriusXM offers the option to permanently block selected channels. Call 1-888-539-7474 and
request the Family Package.
•Uconnect® 430/430N and 730N:Push the “MENU” button on the faceplate while in
SiriusXM™ Satellite Radio Mode, then press the “Channel Lock” to enable and/or disable
desired channels. The SEEK and SCAN function will then only display channels without
Channel lock.
ELECTRONICS
73
Page 148 of 164

CHRYSLER GROUP LLC CUSTOMER CENTER
P.O. Box 21–8004 Auburn Hills, MI 48321–8004 Phone: 1–800–247–9753
CHRYSLER CANADA INC. CUSTOMER CENTER
P.O. Box 1621 Windsor, Ontario N9A 4H6 Phone: 1–800–465–2001 (English)
Phone: 1–800–387–9983 (French)
ASSISTANCE FOR THE HEARING IMPAIRED
To a s s i s t c u s t o m e r s w h o h a v e h e a r i n g d i f f i c u l t i e s , t h e m a n u f a c t u r e r h a s i n s t a l l e d s p e c i a l T D D
(Telecommunication Devices for the Deaf ) equipment at its customer center. Any hearing or
speech impaired customer, who has access to a TDD or a conventional teletypewriter (TTY) in
the United States, can communicate with the manufacturer by dialing 1–800–380–CHRY.
Canadian residents with hearing difficulties that require assistance can use the special needs relay
service offered by Bell Canada. For TTY teletypewriter users, dial 711 and for Voice callers, dial
1–800–855–0511 to connect with a Bell Relay Service operator.
WARNING!
Engine exhaust, some of its constituents, and certain vehicle components contain, or emit,
chemicals known to the State of California to cause cancer and birth defects, or other
reproductive harm. In addition, certain fluids contained in vehicles and certain products of
component wear contain, or emit, chemicals known to the State of California to cause cancer
and birth defects, or other reproductive harm.
PUBLICATIONS ORDERING
•Ifyouarethefirstregisteredretailownerofyourvehicle,youmayobtainacomplimentary
printed copy of the Owner's Manual, Navigation/Uconnect® Manuals or Warranty Booklet.
United States customers may visit the Chrysler Contact Us page at www.chrysler.com scroll to
the bottom of the page and select the “Contact Us” link, then select the “Owner’s Manual and
Glove Box Material” from the left menu. You may also obtain a complimentary copy by calling
1–800–247–9753 (U.S.) or 1–800–387–1143 (Canada).
• Replacement User Guide kits or DVDs or, if you prefer, additional printed copies of the
Owner's Manual, Warranty Booklet or Radio Manuals may be purchased by visiting
www.techauthority.com or by calling 1–800–890–4038 (U.S.) or 1–800–387–1143 (Canada).
Visa, Master Card, American Express and Discover orders are accepted. If you prefer mailing
your order, please call the above numbers for an order form.
CONSUMER ASSISTANCE
146
Page 151 of 164

FREQUENTLY ASKED QUESTIONS
GETTING STARTED
How do I install my LATCH Equipped Child Seat? pg. 21
How do I program my Front Seat Memory? pg. 28
OPERATING YOUR VEHICLE
How does the Electronic Range Select (ERS) operate? pg. 43
ELECTRONICS
Which radio is in my vehicle?
• Uconnect® 130 pg. 58
• Uconnect® 130 WITH Sirius XM™ SATELLITE RADIO pg. 60
• Uconnect® 430/430N pg. 63
How do I activate the Audio Jack?
• Uconnect® 130 pg. 62
• Uconnect® 130 WITH SiriusXM™ pg. 62
• Uconnect® 430/430N pg. 67
How do I set the clock on my radio?
• Uconnect® 130 pg. 61
• Uconnect® 130 WITH SiriusXM™ pg. 61
• Uconnect® 430/430N pg. 64
How do I use the Navigation feature?
• Uconnect® 430/430N pg. 70
How do I pair my cell phone via Bluetooth® with the Uconnect® Hands-Free Voice Activation
System? pg. 80
How do I use my USB port to listen to audio through my touch-screen radio? pg. 79
What does the ECO message mean on the EVIC display? pg. 44
How do I configure my Universal Garage Door Opener (HomeLink®)? pg. 89
UTILITY
How do I know how much I can tow with my Chrysler Town & Country? pg. 96
FREQUENTLY ASKED QUESTIONS
149