Page 190 of 726
To hear the first available Menu, push the Voice Com-
mandbutton and say “Help” or “Main Menu.”
Commands
The Voice Command system understands two types of
commands, Universal commands and Local commands.
Universal commands are available at all times. Local com-
mands are available if the supported radio mode is active.
Changing The Volume
1. Start a dialogue by pushing the Voice Command
button.
2. Say a command (e.g., “Help”).
3. Use the ON/OFF VOLUME rotary knob to adjust the
volume to a comfortable level while the Voice Com-
mand system is speaking. Please note the volume
setting for Voice Command is different than the audio
system.
Main Menu
Start a dialogue by pushing the Voice Command
button. You may say “Main Menu” to switch to
the main menu.
In this mode, you can say the following commands:
•“Radio AM” (to switch to the radio AM mode)
•“Radio FM” (to switch to radio FM mode)
•“Sat” (to switch to Satellite radio mode)
•“Disc” (to switch to the disc mode)
•“USB” (to switch to USB mode)
•“Bluetooth Streaming” (to switch to Bluetooth®
Streaming mode)
•“Memo” (to switch to the memo recorder)
•“System Setup” (to switch to system setup)
188 UNDERSTANDING THE FEATURES OF YOUR VEHICLE
Page 192 of 726
Disc Mode
To switch to the disc mode, say “Disc.” In this mode, you
may say the following commands:
•“Track” (#) (to change the track)
•“Next Track” (to play the next track)
•“Previous Track” (to play the previous track)
•“Main Menu” (to switch to the main menu)
USB Mode
To switch to USB mode, say “USB.” In this mode, you
may say the following commands:
•“Next Track” (to play the next track)
•“Previous Track” (to play the previous track)
•“Play” (to play an Artist Name, Playlist Name, Album
Name, Track Name, etc.)
Bluetooth® Streaming (BT) Mode
To switch to Bluetooth® Streaming (BT) mode, say
“Bluetooth Streaming.” In this mode, you may say the
following commands:
•“Play” (to play the current track)
•“Pause” (to pause the current track)
•“Next Track” (to play the next track)
•“Previous Track” (to play the previous track)
Memo Mode
To switch to the voice recorder mode, say “Memo.” In
this mode, you may say the following commands:
•“New Memo” (to record a new memo) — During the
recording, you may push the Voice Command
button to stop recording. You proceed by say-
ing one of the following commands:
190 UNDERSTANDING THE FEATURES OF YOUR VEHICLE
Page 193 of 726
– “Save” (to save the memo)
– “Continue” (to continue recording)
– “Delete” (to delete the recording)
•“Play Memos” (to play previously recorded memos) —
During the playback you may push the Voice Com-
mandbutton to stop playing memos. You pro-
ceed by saying one of the following commands:
– “Repeat” (to repeat a memo)
– “Next” (to play the next memo)
– “Previous” (to play the previous memo)
– “Delete” (to delete a memo)
– “Delete All” (to delete all memos)
Setup
To switch to system setup, you may say one of the
following:
•“Change to setup”
•“Switch to system setup”
•“Main menu setup”
•“Switch to setup”
In this mode, you may say the following commands:
•“Language English”
•“Language French”
•“Language Spanish”
•“Tutorial”
•“Voice Training”
NOTE:Keep in mind that you have to push the Voice
Commandbutton first and wait for the beep
before speaking the “Barge In” commands.
3
UNDERSTANDING THE FEATURES OF YOUR VEHICLE 191
Page 198 of 726
CAUTION!
Do not place any article under a power seat or
impede its ability to move as it may cause damage to
the seat controls. Seat travel may become limited if
movement is stopped by an obstruction in the seat’s
path.
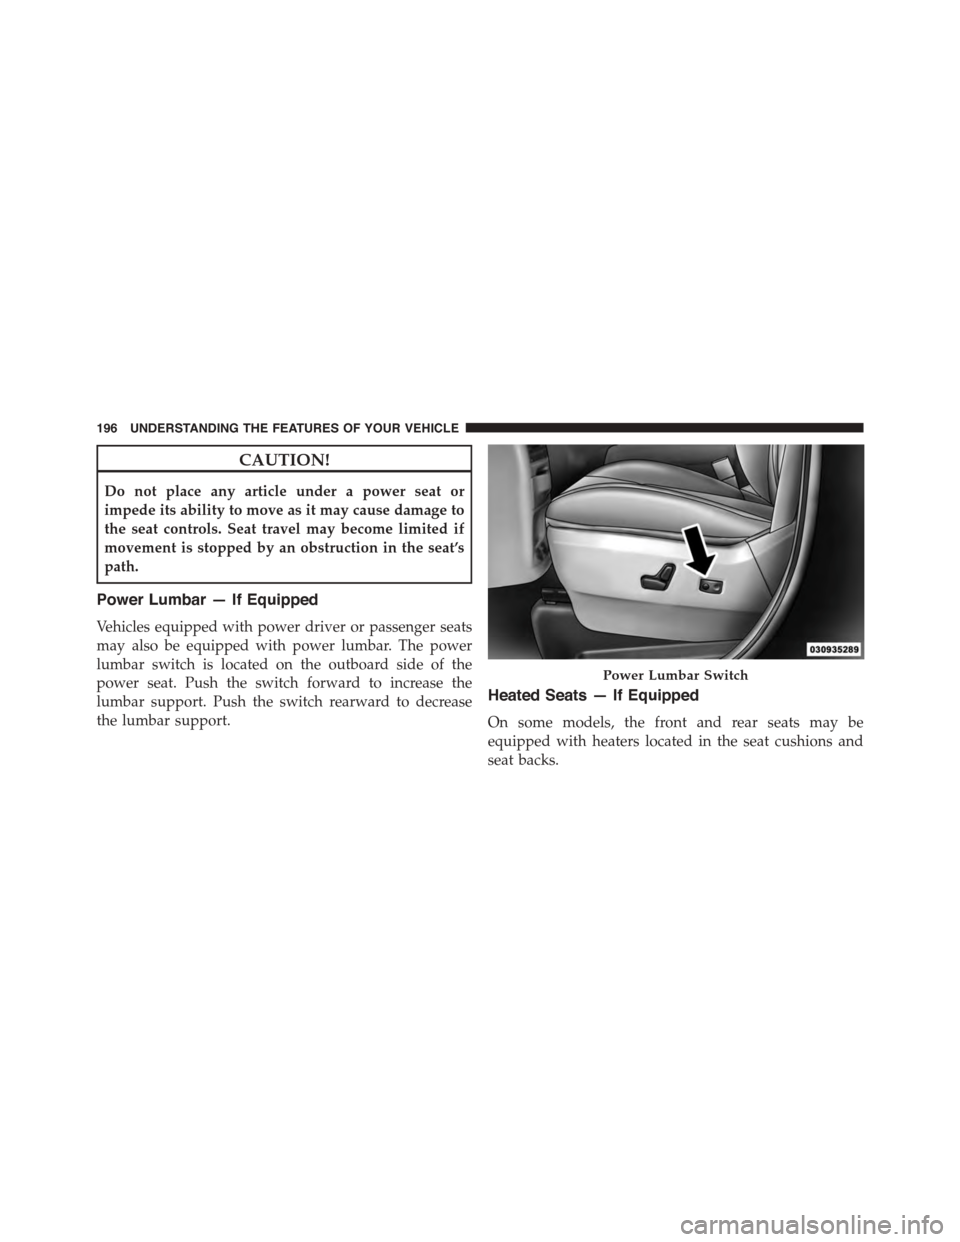
Power Lumbar — If Equipped
Vehicles equipped with power driver or passenger seats
may also be equipped with power lumbar. The power
lumbar switch is located on the outboard side of the
power seat. Push the switch forward to increase the
lumbar support. Push the switch rearward to decrease
the lumbar support.
Heated Seats — If Equipped
On some models, the front and rear seats may be
equipped with heaters located in the seat cushions and
seat backs.
Power Lumbar Switch
196 UNDERSTANDING THE FEATURES OF YOUR VEHICLE
Page 199 of 726
WARNING!
•Persons who are unable to feel pain to the skin
because of advanced age, chronic illness, diabetes,
spinal cord injury, medication, alcohol use, exhaus-
tion or other physical condition must exercise care
when using the seat heater. It may cause burns
even at low temperatures, especially if used for
long periods of time.
•Do not place anything on the seat or seatback that
insulates against heat, such as a blanket or cushion.
This may cause the seat heater to overheat. Sitting
in a seat that has been overheated could cause
serious burns due to the increased surface tempera-
ture of the seat.
Vehicles Equipped With Remote Start
On models that are equipped with remote start, the
driver ’s heated seat can be programmed through the
Electronic Vehicle Information Center (EVIC) to come on
during a remote start. Refer to “Electronic Vehicle Infor-
mation Center (EVIC)” in “Understanding Your Instru-
ment Panel” for further information.
Front Heated Seats
There are two heated seat switches that allow the driver
and passenger to operate the seats independently. The
controls for each heater are located on the switch bank
below the climate controls.
You can choose from HIGH, LOW or OFF heat settings.
Amber indicator lights in each switch indicate the level of
heat in use. Two indicator lights will illuminate for
HIGH, one for LOW and none for OFF.
Press the switch once to select HIGH-level
heating. Press the switch a second time to select
LOW-level heating. Press the switch a third
time to shut the heating elements OFF.
3
UNDERSTANDING THE FEATURES OF YOUR VEHICLE 197
Page 200 of 726
NOTE:Once a heat setting is selected, heat will be felt
within two to five minutes.
If the HIGH-level setting is selected, the system will
automatically switch to LOW-level after approximately
60 minutes of continuous operation. At that time, the
display will change from HIGH to LOW, indicating the
change. The LOW-level setting will turn OFF automati-
cally after approximately 45 minutes.
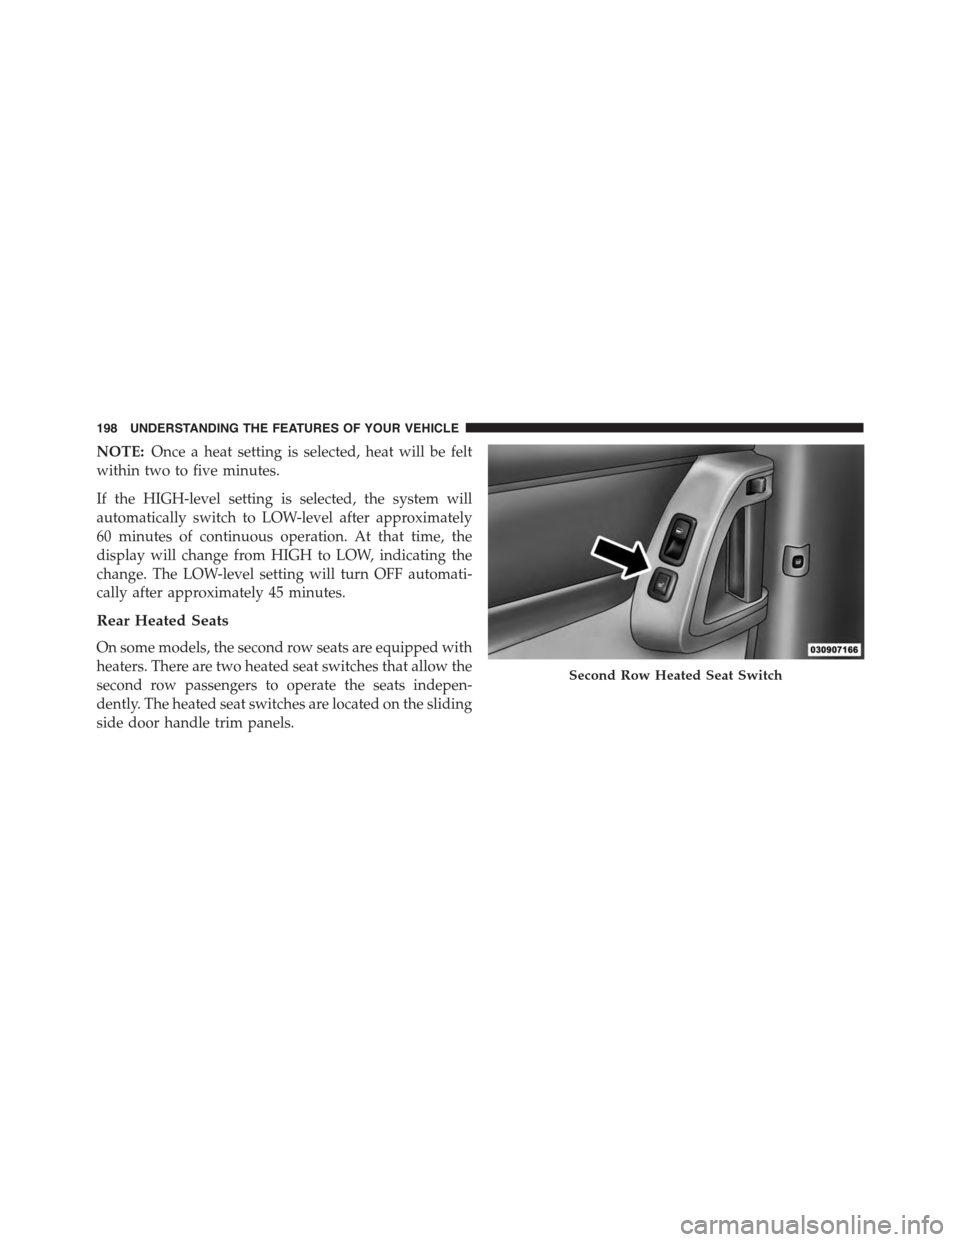
Rear Heated Seats
On some models, the second row seats are equipped with
heaters. There are two heated seat switches that allow the
second row passengers to operate the seats indepen-
dently. The heated seat switches are located on the sliding
side door handle trim panels.
Second Row Heated Seat Switch
198 UNDERSTANDING THE FEATURES OF YOUR VEHICLE
Page 233 of 726
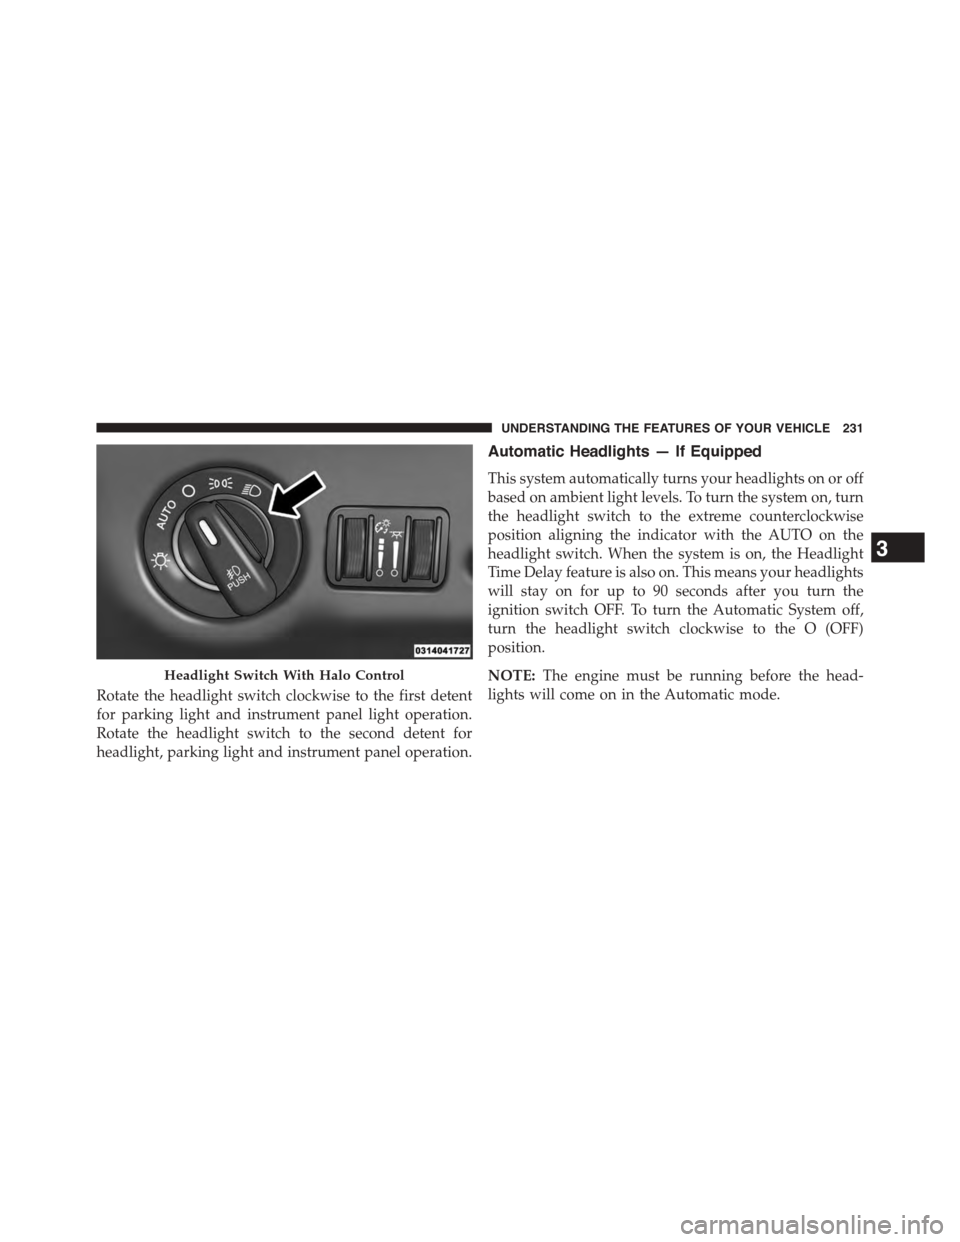
Rotate the headlight switch clockwise to the first detent
for parking light and instrument panel light operation.
Rotate the headlight switch to the second detent for
headlight, parking light and instrument panel operation.
Automatic Headlights — If Equipped
This system automatically turns your headlights on or off
based on ambient light levels. To turn the system on, turn
the headlight switch to the extreme counterclockwise
position aligning the indicator with the AUTO on the
headlight switch. When the system is on, the Headlight
Time Delay feature is also on. This means your headlights
will stay on for up to 90 seconds after you turn the
ignition switch OFF. To turn the Automatic System off,
turn the headlight switch clockwise to the O (OFF)
position.
NOTE:The engine must be running before the head-
lights will come on in the Automatic mode.
Headlight Switch With Halo Control
3
UNDERSTANDING THE FEATURES OF YOUR VEHICLE 231
Page 234 of 726
Headlights On With Wipers — If Equipped
When your headlights are in the AUTO mode and the
engine is running, the headlights will automatically turn
on when the wiper system is also turned on. Headlights
on when windshield wipers are on may be found on
vehicles equipped with an automatic headlight system.
NOTE:The Headlights with Wipers feature can be
turned on or off through the Electronic Vehicle Informa-
tion Center (EVIC) — if equipped. Refer to “Electronic
Vehicle Information Center (EVIC)/Customer Program-
mable Features” in “Understanding Your Instrument
Panel” for further information.
Headlight Delay — If Equipped
This feature provides the safety of headlight illumination
for up to 90 seconds after exiting your vehicle.
To activate the delay feature, turn OFF the ignition switch
while the headlights are still on. Then turn off the
headlights within 45 seconds. The 90 second delay inter-
val begins when headlight switch is turned off. If the
headlights or parking lights are turned back on or the
ignition switch is turned ON, the delay will be cancelled.
When exiting the vehicle the driver can choose to have
the headlights remain on for 30, 60 or 90 seconds or not
remain on. To change the timer setting, see your autho-
rized dealer.
The headlight delay time is programmable on vehicles
equipped with an EVIC. Refer to “Electronic Vehicle
Information Center (EVIC)/Customer-Programmable
Features” in “Understanding Your Instrument Panel” for
further information.
If the headlights are turned off before the ignition, they
will turn off in the normal manner.
NOTE:The headlights must be turned off within 45
seconds of turning the ignition OFF to activate this
feature.
232 UNDERSTANDING THE FEATURES OF YOUR VEHICLE