Page 29 of 180

REAR SEAT
Folding Rear Seatback
•Pullontheloops,locatedneartheoutertopoftheseatbacks,tofolddowneitherorboth
seatbacks. These loops can be tucked away when not in use.
•Whentheseatbackisraisedtotheupright
position, make sure it is latched by strongly
pulling on the top of the seatback above the
seat loop.
WARNING!
•Be certain that the seatback is securely locked into position. If the seatback is not securely locked
into position, the seat will not provide the proper stability for child seats and/or passengers. An
improperly latched seat could cause you and others to severely injured or killed.
•Thecargoareaintherearofthevehicle(withtherearseatbacksinthelocked-upor
folded-down position) should not be used as a play area by children when the vehicle is in
motion. They could be severely injured or killed in a collision. Children should be seated
and using the proper restraint system.
HEATED SEATS
Front Heated Seats
The front heated seats control buttons are located within the climate or controls screen of the
touchscreen.
• Press the heated seat buttononce to turn the HI setting On.
• Press the heated seat buttona second time to turn the LO setting On.
• Press the heated seat buttona third time to turn the heating elements Off.
If the HI-level setting is selected, the system will automatically switch to LO-level after approximately
60 minutes. The LO-level setting will turn Off automatically after approximately 45 minutes.
NOTE:
On models that are equipped with remote start, this feature can be programmed to come on
during a remote start through the Uconnect® system. Refer to “Uconnect® Settings” in “Under-
standing Your Instrument Panel” in the Owner's Manual on the DVD.
Rear Seat Loop
GETTING STARTED
27
Page 49 of 180
Automatic Operation
The climate system will automatically adjust settings to achieve and maintain comfort.
• Press the AUTO button.
•SelectthedesiredtemperaturebypushingtheTemperatureControlsforthedriverand/or
passenger.
Air Conditioning (A/C)
If the air conditioning button is pressed while in AUTO mode, the system will exit AUTO mode
and stay in A/C. The mode and blower will be set at the closest mode and blower position that the
system was operating in AUTO.
Automatic Climate Control Knobs
1 — FRONT Defroster Button2—DriverTemperatureUp3 — Blower Control Knob4 — Passenger Temperature Up5 — A/C Button6 — Air Recirculation Button
7 — Passenger Temperature Down8 — Off Button9 — AUTO Button10 — Driver Temperature Down11 — REAR Defroster Button
OPERATING YOUR VEHICLE
47
Page 73 of 180

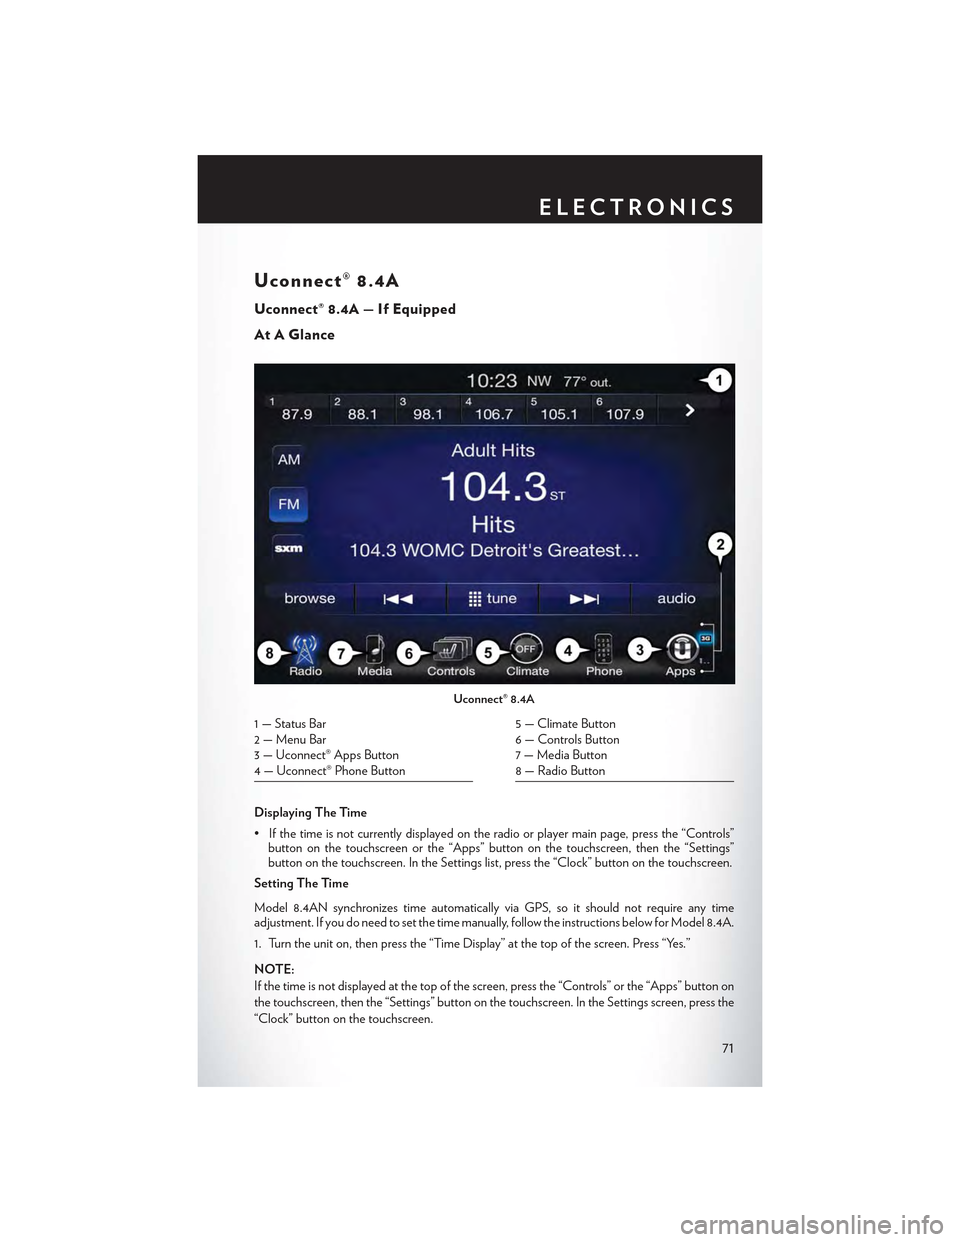
Uconnect® 8.4A
Uconnect® 8.4A — If Equipped
At A Glance
Displaying The Time
•Ifthetimeisnotcurrentlydisplayedontheradioorplayermainpage,pressthe“Controls”button on the touchscreen or the “Apps” button on the touchscreen, then the “Settings”button on the touchscreen. In the Settings list, press the “Clock” button on the touchscreen.
Setting The Time
Model 8.4AN synchronizes time automatically via GPS, so it should not require any timeadjustment. If you do need to set the time manually, follow the instructions below for Model 8.4A.
1. Turn the unit on, then press the “Time Display” at the top of the screen. Press “Yes.”
NOTE:
If the time is not displayed at the top of the screen, press the “Controls” or the “Apps” button on
the touchscreen, then the “Settings” button on the touchscreen. In the Settings screen, press the
“Clock” button on the touchscreen.
Uconnect® 8.4A
1 — Status Bar2 — Menu Bar3 — Uconnect® Apps Button4 — Uconnect® Phone Button
5 — Climate Button6 — Controls Button7 — Media Button8 — Radio Button
ELECTRONICS
71
Page 96 of 180
Uconnect® 8.4AN
Uconnect® 8.4AN — If Equipped
At A Glance
Displaying The Time
If the time is not currently displayed on the radio or player main page:
1. Press the “Controls” button on the touchscreen or the “Apps” button on the touchscreen, then
the “Settings” button on the touchscreen.
2. In the Settings list, press the “Clock” button on the touchscreen.
Uconnect® 8.4AN
1 — Status Bar2—ViewSmallNavigationMap3 — HD Radio Available4 — Uconnect® Apps Button5 — Uconnect® Phone Button
6 — Uconnect® Navigation Button7 — Climate Button8 — Controls Button9 — Media Button10 — Radio Button
ELECTRONICS
94