2015 CHEVROLET TRAVERSE Storage
[x] Cancel search: StoragePage 114 of 434

Black plate (2,1)Chevrolet Traverse Owner Manual (GMNA-Localizing-U.S./Canada/Mexico-
7576032) - 2015 - CRC - 8/19/14
4-2 Storage
Glove Box
Lift the glove box handle to open it.
Use the key to lock and unlock the
glove box.
Cupholders
There are two cupholders, with
removable liners, in front of the
center console. There may be
cupholders in the second row seat
armrest. To access, pull the armrest
down. There are additional
cupholders on each side of the third
row seat and in each door.
Armrest Storage
If equipped, the rear seat armrest
may have two cupholders. Pull the
armrest down to access the
cupholders.
Center Console Storage
Pull up the lever on the front of the
center console armrest to slide it
forward and backward. To open the
armrest storage area, press the
button on the front of the armrest.
Page 115 of 434

Black plate (3,1)Chevrolet Traverse Owner Manual (GMNA-Localizing-U.S./Canada/Mexico-
7576032) - 2015 - CRC - 8/19/14
Storage 4-3
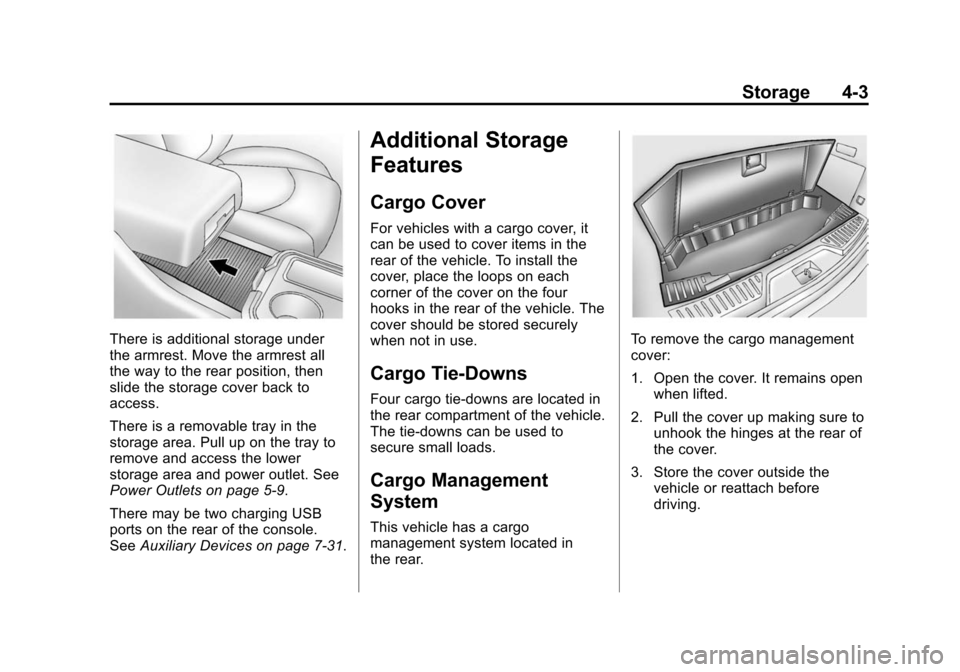
There is additional storage under
the armrest. Move the armrest all
the way to the rear position, then
slide the storage cover back to
access.
There is a removable tray in the
storage area. Pull up on the tray to
remove and access the lower
storage area and power outlet. See
Power Outlets on page 5-9.
There may be two charging USB
ports on the rear of the console.
SeeAuxiliary Devices on page 7-31.
Additional Storage
Features
Cargo Cover
For vehicles with a cargo cover, it
can be used to cover items in the
rear of the vehicle. To install the
cover, place the loops on each
corner of the cover on the four
hooks in the rear of the vehicle. The
cover should be stored securely
when not in use.
Cargo Tie-Downs
Four cargo tie‐downs are located in
the rear compartment of the vehicle.
The tie-downs can be used to
secure small loads.
Cargo Management
System
This vehicle has a cargo
management system located in
the rear.
To remove the cargo management
cover:
1. Open the cover. It remains open
when lifted.
2. Pull the cover up making sure to unhook the hinges at the rear of
the cover.
3. Store the cover outside the vehicle or reattach before
driving.
Page 116 of 434

Black plate (4,1)Chevrolet Traverse Owner Manual (GMNA-Localizing-U.S./Canada/Mexico-
7576032) - 2015 - CRC - 8/19/14
4-4 Storage
{Warning
An improperly latched and closed
cargo cover, or cargo cover left in
the open position, could be
thrown about the vehicle during a
crash or sudden maneuver.
Someone could be injured. Be
sure to return the cover to the
closed position and latch before
driving. If the cover is removed,
always store it outside of the
vehicle. When it is replaced,
always be sure that it is securely
reattached.
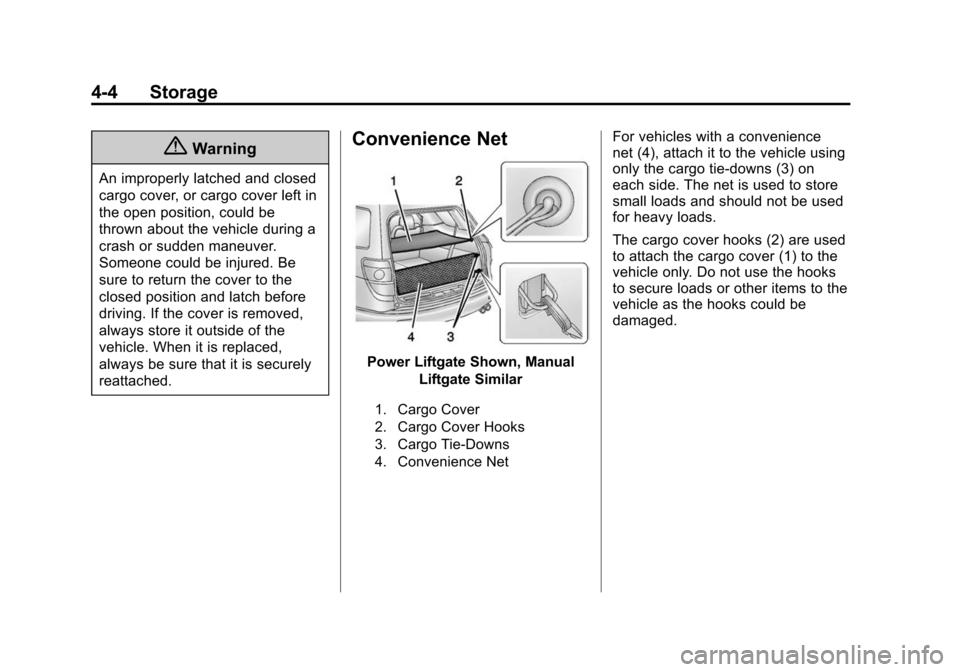
Convenience Net
Power Liftgate Shown, ManualLiftgate Similar
1. Cargo Cover
2. Cargo Cover Hooks
3. Cargo Tie-Downs
4. Convenience Net
For vehicles with a convenience
net (4), attach it to the vehicle using
only the cargo tie-downs (3) on
each side. The net is used to store
small loads and should not be used
for heavy loads.
The cargo cover hooks (2) are used
to attach the cargo cover (1) to the
vehicle only. Do not use the hooks
to secure loads or other items to the
vehicle as the hooks could be
damaged.
Page 117 of 434

Black plate (5,1)Chevrolet Traverse Owner Manual (GMNA-Localizing-U.S./Canada/Mexico-
7576032) - 2015 - CRC - 8/19/14
Storage 4-5
Roof Rack System
{Warning
If something is carried on top of
the vehicle that is longer or wider
than the roof rack—like paneling,
plywood, or a mattress —the
wind can catch it while the vehicle
is being driven. The item being
carried could be violently torn off,
and this could cause a collision
and damage the vehicle. Never
carry something longer or wider
than the roof rack on top of the
vehicle unless using a GM
certified accessory carrier. For vehicles with a roof rack, the
rack can be used to load items. For
roof racks that do not have
crossrails included, GM Certified
crossrails can be purchased as an
accessory. See your dealer for
additional information.
{Caution
Loading cargo on the roof rack
that weighs more than 91 kg
(200 lb) or hangs over the rear or
sides of the vehicle may damage
the vehicle. Load cargo so that it
rests evenly between the
crossrails and fasten cargo
securely.To prevent damage or loss of cargo
when driving, check to make sure
crossrails and cargo are securely
fastened. Loading cargo on the roof
rack will make the vehicle’
s center
of gravity higher. Avoid high speeds,
sudden starts, sharp turns, sudden
braking, or abrupt maneuvers;
otherwise it may result in loss of
control. If driving for a long distance,
on rough roads, or at high speeds,
occasionally stop the vehicle to
make sure the cargo remains in its
place. Do not exceed the maximum
vehicle capacity when loading the
vehicle.
See Vehicle Load Limits on
page 9-9.
Page 118 of 434

Black plate (6,1)Chevrolet Traverse Owner Manual (GMNA-Localizing-U.S./Canada/Mexico-
7576032) - 2015 - CRC - 8/19/14
4-6 Storage
2NOTES
Page 208 of 434

Black plate (24,1)Chevrolet Traverse Owner Manual (GMNA-Localizing-U.S./Canada/Mexico-
7576032) - 2015 - CRC - 8/19/14
7-24 Infotainment System
MP3 (Radio without
Touchscreen)
Format
Radios that have the capability of
playing MP3s can play .mp3 or .wma
files that were recorded onto a
CD-R or CD-RW disc. The files can
be recorded with the following fixed
bit rates: 32 kbps, 40 kbps, 56 kbps,
64 kbps, 80 kbps, 96 kbps,
112 kbps, 128 kbps, 160 kbps,
192 kbps, 224 kbps, 256 kbps, and
320 kbps or a variable bit rate.
Radios that have a USB port can
play .mp3 and .wma files stored on a
USB storage device as well as AAC
files that are stored on an iPod.
Compressed Audio or Mixed Mode
Discs
The radio can play discs that
contain both uncompressed CD
audio and MP3/WMA files. If both
formats are on the disc, the radioplays both file formats in the order in
which they were recorded to
the disc.
CD-R or CD-RW Supported File
and Folder Structure
The radio supports:
.Up to 50 folders.
.Up to eight folders in depth.
.Up to 15 playlists.
.Up to 512 files and folders.
.Playlists with an .m3u or .wpl
extension.
.Files with an .mp3, .wma, or .cda
file extension.
USB Supported File and Folder
Structure
The radio supports:
.Up to 700 folders.
.Up to eight folders in depth.
.Up to 65,535 files.
.Folder and file names up to
64 bytes.
.Files with an .mp3 or .wma file
extension.
.AAC files stored on an iPod.
.FAT16
.FAT32
Root Directory
The root directory of the disc is
treated as a folder. If the root
directory has compressed audio
files, the directory displays on the
radio as the CD label.
If a disc contains both
uncompressed CD audio and MP3/
WMA files, a folder under the root
directory called CD accesses all of
the CD audio tracks on the disc.
Empty Folder
Folders that do not contain files are
skipped, and the player advances to
the next folder that contains files.
Page 210 of 434

Black plate (26,1)Chevrolet Traverse Owner Manual (GMNA-Localizing-U.S./Canada/Mexico-
7576032) - 2015 - CRC - 8/19/14
7-26 Infotainment System
\FWD (Fast Forward):Press
and hold to advance playback
quickly. Sound is heard at a reduced
volume and the elapsed time of the
file displays. Release
\FWD to
resume playing. The elapsed time of
the file displays.
S c(Previous Folder): Press
the softkey below
S cto go to the
first track in the previous folder.
cT (Next Folder): Press the
softkey below
cT to go to the first
track in the next folder.
RDM (Random): Files on the disc
can be listened to in random, rather
than sequential order. To use
random, press the softkey under the
RDM tab until Random Current Disc
displays to play songs in random
order. Press the same softkey again
to turn off random play.
h(Music Navigator): Press the
softkey below
hto play files in
order by artist or album. The player scans the disc to sort the
files by artist and album ID3 tag
information. It can take several
minutes to scan the disc depending
on the number of files on the disc.
The radio may begin playing while it
is scanning in the background.
When the scan is finished, the disc
begins playing files in order by
artist. The current artist playing is
shown on the second line of the
display. Once all songs by that artist
are played, the player moves to the
next artist in alphabetical order and
begins playing files by that artist.
To listen to files by another artist,
press the softkey below either arrow
tab. The disc goes to the next or
previous artist in alphabetical order.
Continue pressing either softkey
below the arrow tab until the artist
displays.
To change from playback by artist to
playback by album:
1. Press the softkey below the
Sort tab. 2. Press the softkeys below the By
Album tab.
3. Press the softkey below the Back tab to return to the main
music navigator screen.
The album name displays on the
second line between the arrows and
songs from the current album
begins to play. Once all songs from
that album have played, the player
moves to the next album in
alphabetical order on the CD and
begins playing MP3 files from that
album.
To exit music navigator mode, press
the softkey below the Back tab to
return to normal MP3 playback.
Connecting a USB Storage
Device or iPod®
To connect a USB storage device,
connect the device to the USB port
on the center stack.
The USB port can be used to
control an iPod or a USB storage
device.
Page 211 of 434

Black plate (27,1)Chevrolet Traverse Owner Manual (GMNA-Localizing-U.S./Canada/Mexico-
7576032) - 2015 - CRC - 8/19/14
Infotainment System 7-27
To connect an iPod, connect one
end of the USB cable that came
with the iPod to the iPod’s dock
connector and connect the other
end to the USB port located in the
instrument panel storage area. If the
vehicle is on and the USB
connection works,“OK to
disconnect” and a GM logo may
appear on the iPod, and iPod
appears on the radio's display. The
iPod music appears on the radio’s
display and begins playing.
The iPod charges while it is
connected to the vehicle if the
vehicle is in the ACC/ACCESSORY
or ON/RUN position. When the
vehicle is turned off, the iPod
automatically powers off and will not
charge or draw power from the
vehicle's battery. If you have an older iPod model that
is not supported, it can still be used
by connecting it to the auxiliary
input jack using a standard 3.5 mm
(1/8 in) stereo cable. See
Clock
(Radio without Touchscreen) on
page 5-8 orClock (Radio with
Touchscreen) on page 5-8.
Using the Radio to Control a
USB Storage Device or iPod
The radio can control a USB
storage device or an iPod using the
radio buttons and knobs and display
song information on the radio’s
display.
f(Tune): Turn to select files.
©SEEK:Press to go to the start of
the current track, if more than
10 seconds on the track have
played, otherwise goes to the
previous track. Press and hold or
press multiple times to continue
moving backward through tracks.
¨SEEK: Press to go to the next
track. Press and hold or press
multiple times to continue moving
forward through tracks.
sREV (Reverse): Press and hold
to reverse playback quickly. Sound
is heard at a reduced volume.
Release
sREV to resume playing.
The elapsed time of the file
displays.
\FWD (Fast Forward): Press
and hold to advance playback
quickly. Sound is heard at a reduced
volume. Release
\FWD to
resume playing. The elapsed time of
the file displays.
4(Information): Press to display
additional information about the
selected track.
Using Softkeys to Control a
USB Storage Device or iPod
The five softkeys below the radio
display are used to control the
functions listed below.