2015 CHEVROLET ORLANDO seats
[x] Cancel search: seatsPage 94 of 372
Black plate (48,1)Chevrolet Orlando Owner Manual - 2013 - CRC - 6/5/12
3-48 Seats and Restraints
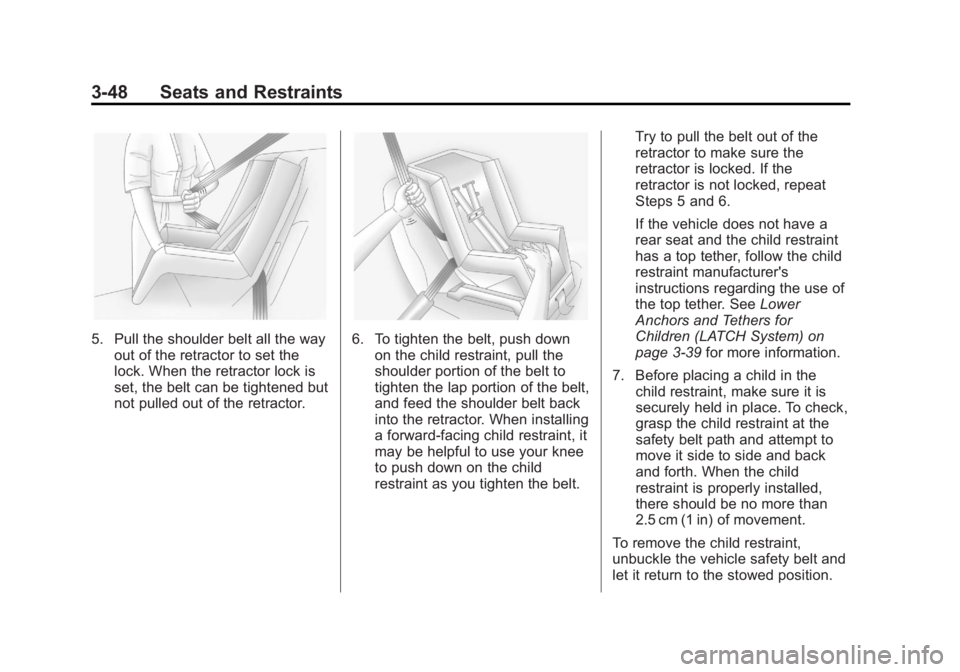
5. Pull the shoulder belt all the wayout of the retractor to set the
lock. When the retractor lock is
set, the belt can be tightened but
not pulled out of the retractor.6. To tighten the belt, push downon the child restraint, pull the
shoulder portion of the belt to
tighten the lap portion of the belt,
and feed the shoulder belt back
into the retractor. When installing
a forward-facing child restraint, it
may be helpful to use your knee
to push down on the child
restraint as you tighten the belt. Try to pull the belt out of the
retractor to make sure the
retractor is locked. If the
retractor is not locked, repeat
Steps 5 and 6.
If the vehicle does not have a
rear seat and the child restraint
has a top tether, follow the child
restraint manufacturer's
instructions regarding the use of
the top tether. See
Lower
Anchors and Tethers for
Children (LATCH System) on
page 3‑39 for more information.
7. Before placing a child in the child restraint, make sure it is
securely held in place. To check,
grasp the child restraint at the
safety belt path and attempt to
move it side to side and back
and forth. When the child
restraint is properly installed,
there should be no more than
2.5 cm (1 in) of movement.
To remove the child restraint,
unbuckle the vehicle safety belt and
let it return to the stowed position.
Page 131 of 372
Black plate (31,1)Chevrolet Orlando Owner Manual - 2013 - CRC - 6/5/12
Instruments and Controls 5-31
Climate and Air Quality
If equipped, select the Climate and
Air Quality menu and the following
will be displayed:
.Auto Fan Speed
.Air Quality Sensor
.Remote Start Auto Heat Seats
.Auto Defog
.Auto Rear Defog
Auto Fan Speed
This will allow you to select the
automatic fan speed. This feature
sets the climate control fan speed to
maintain the interior temperature.
Press the MENU knob when Auto
Fan Speed is highlighted to open
the menu. Turn the knob to highlight
High, Medium, or Low. Press the
BACK button to confirm the
selection and move back to the
last menu. Air Quality Sensor
This will allow you to select whether
the system will operate at high or
low sensitivity. Only vehicles with
the automatic climate control will
have this option.
Press the MENU knob when Air
Quality Sensor is highlighted to
open the menu. Turn the knob to
highlight High Sensitivity or Low
Sensitivity. Press the BACK button
to confirm the selection and move
back to the last menu.
Remote Start Auto Heat Seats
On vehicles with remote start and
heated seats, the heated seats can
be set to on or off.
Press the MENU knob when
Remote Start Auto Heat Seats is
highlighted to open the menu. Turn
the knob to highlight On or Off.
Press the BACK button to confirm
the selection and move back to the
last menu.Auto Defog
When turned on and high humidity
is detected, the climate control
system may adjust to outside air
supply and turn on the air
conditioner or the heater. The fan
speed may slightly increase to help
prevent fogging. When high
humidity is no longer detected, the
system will return to its prior
operation.
Press the MENU knob when Auto
Defog is highlighted to open the
menu. Turn the knob to highlight On
or Off. Press the BACK button to
confirm the selection and move
back to the last menu.
Auto Rear Defog
When on, this feature turns on the
rear defogger at vehicle start when
the interior temperature is cold and
fog is likely. The Auto Rear Defog
function can be disabled by
pressing
1. When off, the feature
can be turned on by pressing
1.
Page 175 of 372
Black plate (1,1)Chevrolet Orlando Owner Manual - 2013 - CRC - 6/5/12
Climate Controls 8-1
Climate Controls
Climate Control Systems
Climate Control Systems . . . . . . 8-1
Automatic Climate ControlSystem . . . . . . . . . . . . . . . . . . . . . . 8-3
Air Vents
Air Vents . . . . . . . . . . . . . . . . . . . . . . 8-6
Climate Control
Systems
The heating, cooling, defrosting, and
ventilation for the vehicle can be
controlled with these systems.
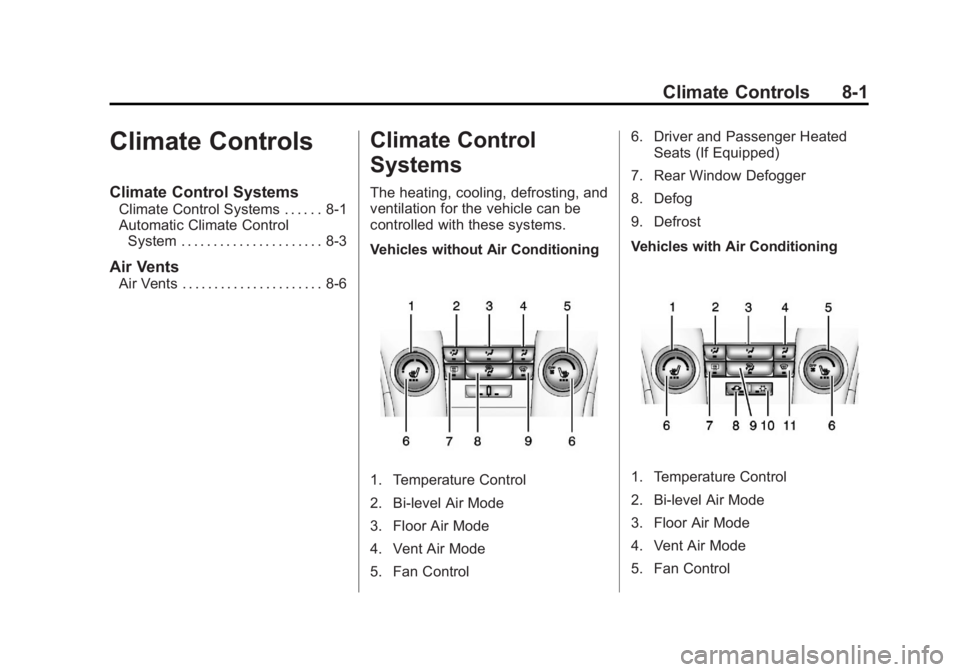
Vehicles without Air Conditioning
1. Temperature Control
2. Bi-level Air Mode
3. Floor Air Mode
4. Vent Air Mode
5. Fan Control 6. Driver and Passenger Heated
Seats (If Equipped)
7. Rear Window Defogger
8. Defog
9. Defrost
Vehicles with Air Conditioning1. Temperature Control
2. Bi-level Air Mode
3. Floor Air Mode
4. Vent Air Mode
5. Fan Control
Page 176 of 372
Black plate (2,1)Chevrolet Orlando Owner Manual - 2013 - CRC - 6/5/12
8-2 Climate Controls
6. Driver and Passenger HeatedSeats (If Equipped)
7. Rear Window Defogger
8. Recirculation
9. Defog
10. Air Conditioning
11. Defrost
Fan Control: Turn to increase or
decrease the fan speed.
Temperature Control: Turn to
increase or decrease the
temperature.
Air Delivery Mode Control: To
change the current mode, press one
of the following:
F (Vent): Air is directed to the
instrument panel outlets.
* (Bi-level): Air is directed to the
instrument panel outlets and the
floor outlets.
7 (Floor): Air is directed to the
floor outlets.W(Defog): Clears the windows of
fog or moisture. Air is directed to the
windshield and floor outlets.
0(Defrost): Clears the
windshield of fog or frost more
quickly. Air is directed to the
windshield and side window outlets.
For best results, clear all snow and
ice from the windshield before
defrosting.
Do not drive the vehicle until all the
windows are clear.
Air Conditioning
#(Air Conditioning, If
Equipped): Press to turn the air
conditioning on or off. If the fan is
turned off or the outside
temperature falls below freezing, the
air conditioning compressor will
not work.
h(Recirculation, If Equipped):
Press to turn on the recirculation.
An indicator light comes on. Air is
recirculated inside the vehicle. It helps to quickly cool the air inside
the vehicle or prevent outside air
and odors from entering.
Rear Window Defogger
1(Rear Defogger):
Press to turn
the rear window defogger on or off.
The rear window defogger turns off
after about 10 minutes. It can also
be turned off by turning the ignition
to ACC/ACCESSORY or LOCK/
OFF. If turned on again it runs for
about five minutes before
turning off.
Do not drive the vehicle until all the
windows are clear.
Notice: Do not use a razor blade
or sharp object to clear the inside
rear window. Do not adhere
anything to the defogger grid
lines in the rear glass. These
actions may damage the rear
defogger. Repairs would not be
covered by your warranty.
Page 177 of 372
Black plate (3,1)Chevrolet Orlando Owner Manual - 2013 - CRC - 6/5/12
Climate Controls 8-3
Heated Seats (If Equipped):Press
to turn the heated seats on or off.
See Heated Front Seats on
page 3‑6
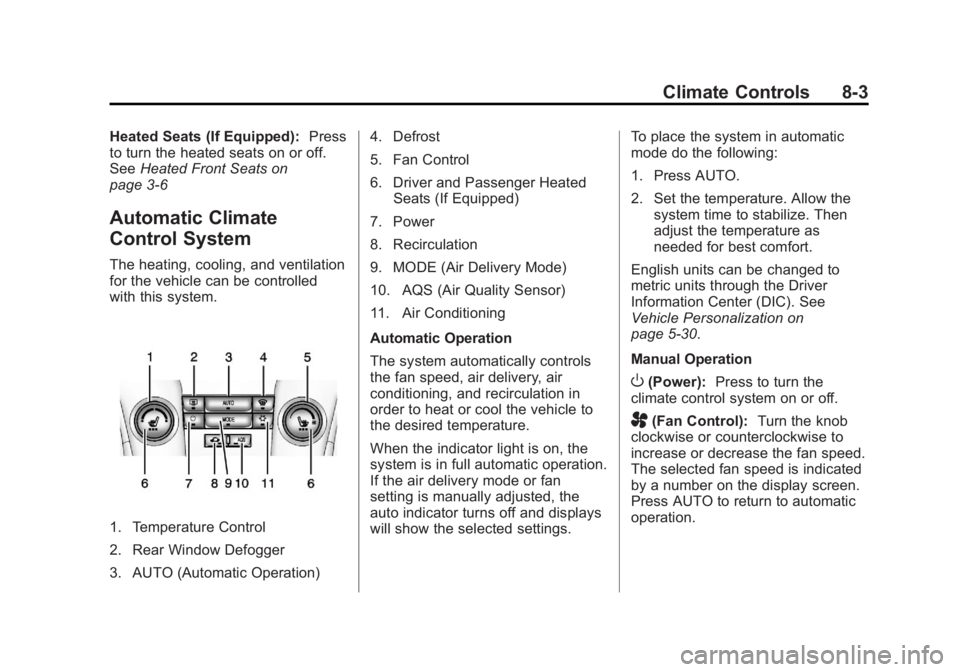
Automatic Climate
Control System
The heating, cooling, and ventilation
for the vehicle can be controlled
with this system.
1. Temperature Control
2. Rear Window Defogger
3. AUTO (Automatic Operation) 4. Defrost
5. Fan Control
6. Driver and Passenger Heated
Seats (If Equipped)
7. Power
8. Recirculation
9. MODE (Air Delivery Mode)
10. AQS (Air Quality Sensor)
11. Air Conditioning
Automatic Operation
The system automatically controls
the fan speed, air delivery, air
conditioning, and recirculation in
order to heat or cool the vehicle to
the desired temperature.
When the indicator light is on, the
system is in full automatic operation.
If the air delivery mode or fan
setting is manually adjusted, the
auto indicator turns off and displays
will show the selected settings. To place the system in automatic
mode do the following:
1. Press AUTO.
2. Set the temperature. Allow the
system time to stabilize. Then
adjust the temperature as
needed for best comfort.
English units can be changed to
metric units through the Driver
Information Center (DIC). See
Vehicle Personalization on
page 5‑30.
Manual Operation
O(Power): Press to turn the
climate control system on or off.
A(Fan Control): Turn the knob
clockwise or counterclockwise to
increase or decrease the fan speed.
The selected fan speed is indicated
by a number on the display screen.
Press AUTO to return to automatic
operation.
Page 179 of 372
Black plate (5,1)Chevrolet Orlando Owner Manual - 2013 - CRC - 6/5/12
Climate Controls 8-5
on, see“Climate and Air Quality”
under Vehicle Personalization on
page 5‑30.
Rear Window Defogger
=(Rear Window Defogger):
Press to turn the rear window
defogger on or off.
The rear window defogger turns off
automatically after about
10 minutes. If turned on again it
runs for about five minutes before
turning off.
The rear window defogger can be
set to automatic operation; see
“Climate and Air Quality” under
Vehicle Personalization on
page 5‑30. When auto rear defog is
selected, the rear window defogger
turns on automatically when the
interior temperature is cold and the
outside temperature is about 4°C
(40°F) and below. The auto rear
defogger turns off automatically
after about 10 minutes. At higher
speeds, the rear window defogger
may stay on continuously. For vehicles with heated outside
rearview mirrors, they turn on when
the rear window defogger button is
on and help to clear fog or frost from
the surface of the mirrors. See
Heated Mirrors on page 2‑12.
Notice:
Do not try to clear frost
or other material from the inside
of the front windshield and rear
window with a razor blade or
anything else that is sharp. This
may damage the rear window
defogger grid and affect the
radio's ability to pick up stations
clearly. The repairs would not be
covered by the vehicle warranty.
Heated Seats (If Equipped): Press
to turn the heated seats on or off.
See Heated Front Seats on
page 3‑6.
Remote Start Climate Control
Operation: For vehicles with the
remote vehicle start feature, the
climate control system may run
when the vehicle is started remotely.
The system uses the driver ’s
previous settings to heat or cool the inside of the vehicle. The rear defog
may come on during remote start
based on cold ambient conditions.
The rear defog indicator light does
not come on during a remote start.
If the vehicle has front heated seats,
they may come on during a remote
start. The heated seat indicator
lights do not come on during a
remote start. See
Remote Vehicle
Start on page 2‑5 andHeated Front
Seats on page 3‑6.
Sensors
The solar sensor, located on top of
the instrument panel near the
windshield, monitors the solar heat.
The climate control system uses
the sensor information to adjust
the temperature, fan speed,
recirculation, and air delivery mode
for best comfort.
If the sensor is covered, the
automatic climate control system
may not work properly.
Page 180 of 372
Black plate (6,1)Chevrolet Orlando Owner Manual - 2013 - CRC - 6/5/12
8-6 Climate Controls
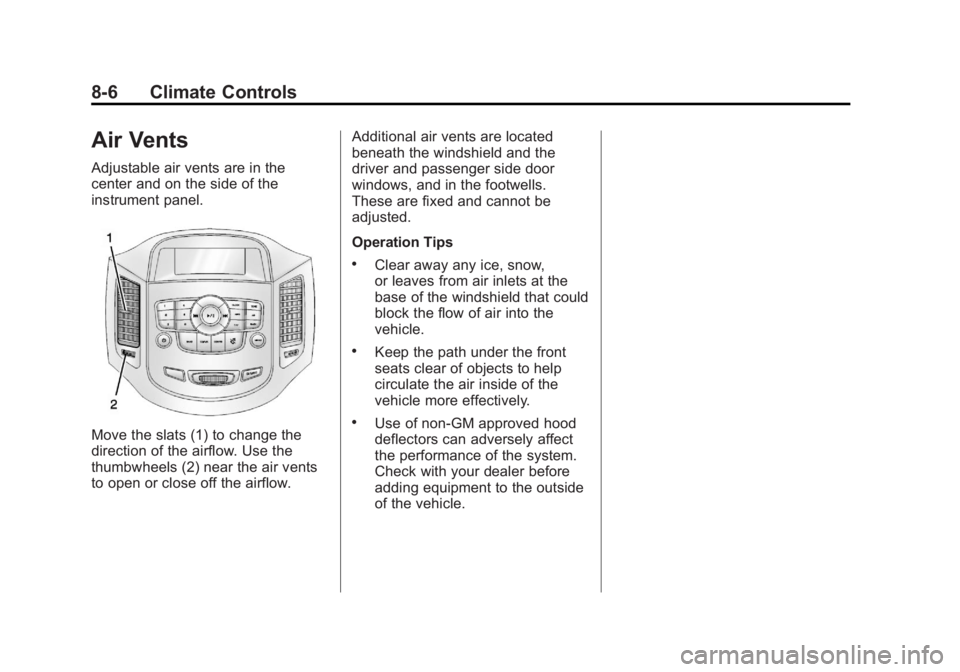
Air Vents
Adjustable air vents are in the
center and on the side of the
instrument panel.
Move the slats (1) to change the
direction of the airflow. Use the
thumbwheels (2) near the air vents
to open or close off the airflow.Additional air vents are located
beneath the windshield and the
driver and passenger side door
windows, and in the footwells.
These are fixed and cannot be
adjusted.
Operation Tips
.Clear away any ice, snow,
or leaves from air inlets at the
base of the windshield that could
block the flow of air into the
vehicle.
.Keep the path under the front
seats clear of objects to help
circulate the air inside of the
vehicle more effectively.
.Use of non-GM approved hood
deflectors can adversely affect
the performance of the system.
Check with your dealer before
adding equipment to the outside
of the vehicle.
Page 193 of 372
Black plate (13,1)Chevrolet Orlando Owner Manual - 2013 - CRC - 6/5/12
Driving and Operating 9-13
If you put things inside the
vehicle—like suitcases, tools,
packages, or anything else —
they will go as fast as the
vehicle goes. If you have to stop
or turn quickly, or if there is a
crash, they will keep going.
{WARNING
Things inside the vehicle can
strike and injure people in a
sudden stop or turn, or in a
crash.
.Put things in the cargo
area of the vehicle. In the
cargo area, put them as
far forward as possible.
Try to spread the weight
evenly.
(Continued)
WARNING (Continued)
.Never stack heavier
things, like suitcases,
inside the vehicle so that
some of them are above
the tops of the seats.
.Do not leave an
unsecured child restraint
in the vehicle.
.Secure loose items in the
vehicle.
.Do not leave a seat folded
down unless needed.
Starting and
Operating
New Vehicle Break-In
Notice: The vehicle does not
need an elaborate break-in. But it
will perform better in the long run
if you follow these guidelines:
.Do not drive at any one
constant speed, fast or slow,
for the first 805 km (500 mi).
Do not make full-throttle
starts. Avoid downshifting to
brake or slow the vehicle.
.During the first 1 000 km
(600 mi), avoid using more
than moderate acceleration
in lower gears and avoid
vehicle speeds above
110 km/h (68 mph).