2015 CHEVROLET ORLANDO brake
[x] Cancel search: brakePage 302 of 372
Black plate (74,1)Chevrolet Orlando Owner Manual - 2013 - CRC - 6/5/12
10-74 Vehicle Care
3. Set the parking brake firmly andput the shift lever in P (Park)
with an automatic transmission,
or neutral with a manual
transmission. See Shifting Into
Park on page 9‑18 with an
automatic transmission,
or Parking on page 9‑20 with a
manual transmission.
Notice: If any accessories are left
on or plugged in during the jump
starting procedure, they could be
damaged. The repairs would not
be covered by the vehicle
warranty. Whenever possible,
turn off or unplug all accessories
on either vehicle when jump
starting the vehicle.
4. Turn the ignition to LOCK/OFF. Turn off all lights and
accessories in both vehicles,
except the hazard warning
flashers if needed.{WARNING
An electric fan can start up even
when the engine is not running
and can injure you. Keep hands,
clothing and tools away from any
underhood electric fan.
{WARNING
Using a match near a battery can
cause battery gas to explode.
People have been hurt doing this,
and some have been blinded.
Use a flashlight if you need more
light.
Be sure the battery has enough
water. You do not need to add
water to the battery installed in
your new vehicle. But if a battery
has filler caps, be sure the right
amount of fluid is there. If it is low,
(Continued)
WARNING (Continued)
add water to take care of that
first. If you do not, explosive gas
could be present.
Battery fluid contains acid that
can burn you. Do not get it on
you. If you accidentally get it in
your eyes or on your skin, flush
the place with water and get
medical help immediately.
{WARNING
Fans or other moving engine
parts can injure you badly. Keep
your hands away from moving
parts once the engine is running.
5. Connect one end of the red positive (+) cable to the jump
start positive (+) post.
Page 306 of 372
Black plate (78,1)Chevrolet Orlando Owner Manual - 2013 - CRC - 6/5/12
10-78 Vehicle Care
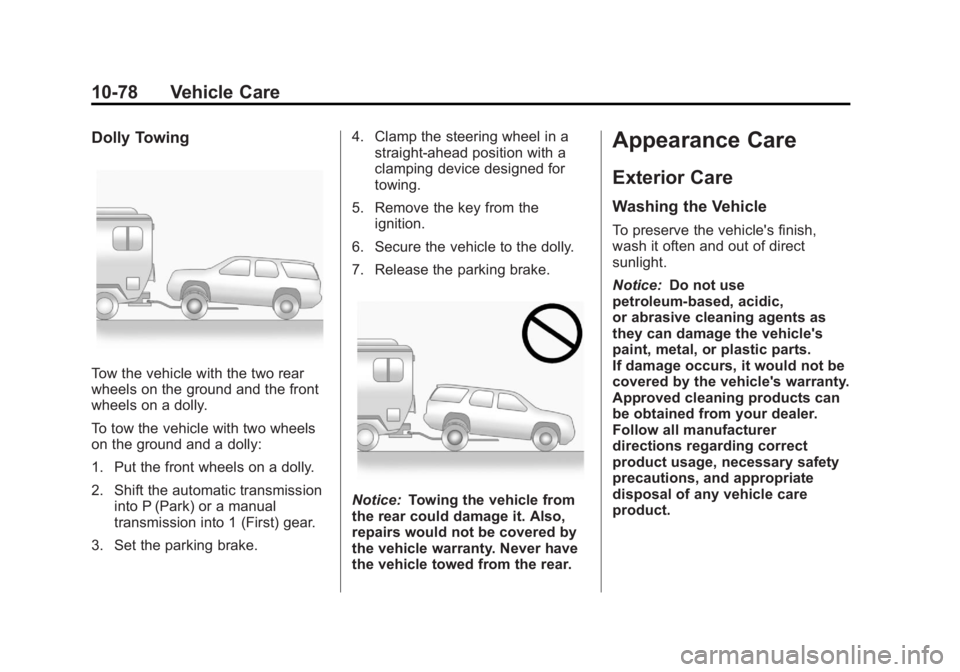
Dolly Towing
Tow the vehicle with the two rear
wheels on the ground and the front
wheels on a dolly.
To tow the vehicle with two wheels
on the ground and a dolly:
1. Put the front wheels on a dolly.
2. Shift the automatic transmissioninto P (Park) or a manual
transmission into 1 (First) gear.
3. Set the parking brake. 4. Clamp the steering wheel in a
straight-ahead position with a
clamping device designed for
towing.
5. Remove the key from the ignition.
6. Secure the vehicle to the dolly.
7. Release the parking brake.
Notice: Towing the vehicle from
the rear could damage it. Also,
repairs would not be covered by
the vehicle warranty. Never have
the vehicle towed from the rear.
Appearance Care
Exterior Care
Washing the Vehicle
To preserve the vehicle's finish,
wash it often and out of direct
sunlight.
Notice: Do not use
petroleum-based, acidic,
or abrasive cleaning agents as
they can damage the vehicle's
paint, metal, or plastic parts.
If damage occurs, it would not be
covered by the vehicle's warranty.
Approved cleaning products can
be obtained from your dealer.
Follow all manufacturer
directions regarding correct
product usage, necessary safety
precautions, and appropriate
disposal of any vehicle care
product.
Page 313 of 372
Black plate (85,1)Chevrolet Orlando Owner Manual - 2013 - CRC - 6/5/12
Vehicle Care 10-85
Care of Safety Belts
Keep belts clean and dry.
{WARNING
Do not bleach or dye safety belts.
It may severely weaken them. In
a crash, they might not be able to
provide adequate protection.
Clean safety belts only with mild
soap and lukewarm water.
Floor Mats
{WARNING
If a floor mat is the wrong size or
is not properly installed, it can
interfere with the pedals.
Interference with the pedals can
cause unintended acceleration
and/or increased stopping
distance which can cause a crash
and injury. Make sure the floor
mat does not interfere with the
pedals.Use the following guidelines for
proper floor mat usage.
.The original equipment floor
mats were designed for your
vehicle. If the floor mats need
replacing, it is recommended
that GM certified floor mats be
purchased. Non-GM floor mats
may not fit properly and may
interfere with the accelerator or
brake pedal. Always check that
the floor mats do not interfere
with the pedals.
.Use the floor mat with the
correct side up. Do not turn
it over.
.Do not place anything on top of
the driver side floor mat.
.Use only a single floor mat on
the driver side.
.Do not place one floor mat on
top of another.
The driver side floor mat is held in
place by a button-type retainer.
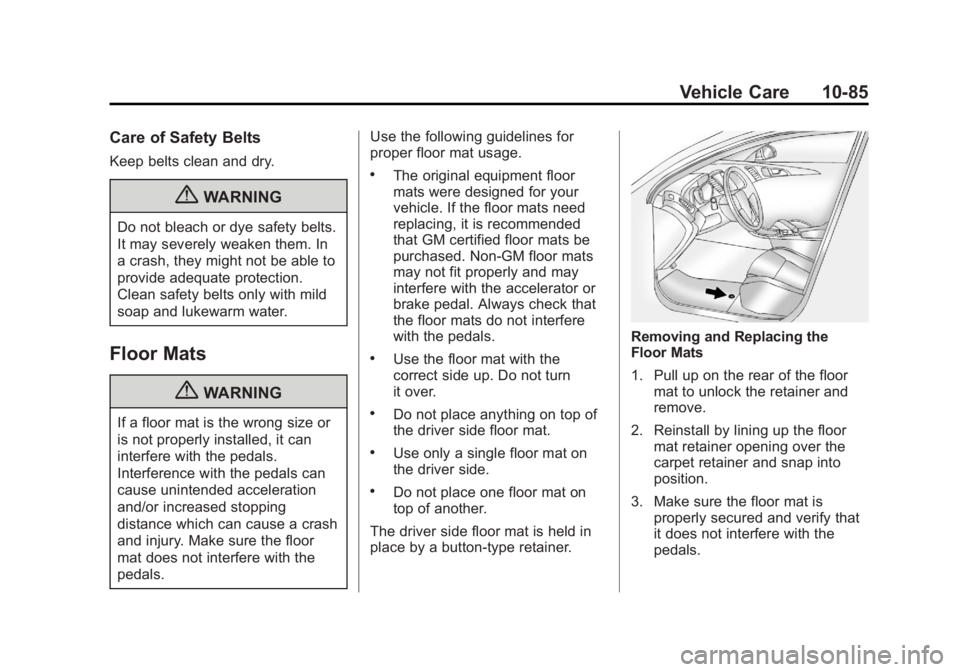
Removing and Replacing the
Floor Mats
1. Pull up on the rear of the floor mat to unlock the retainer and
remove.
2. Reinstall by lining up the floor mat retainer opening over the
carpet retainer and snap into
position.
3. Make sure the floor mat is properly secured and verify that
it does not interfere with the
pedals.
Page 315 of 372
Black plate (1,1)Chevrolet Orlando Owner Manual - 2013 - CRC - 6/5/12
Service and Maintenance 11-1
Service and
Maintenance
General Information
General Information . . . . . . . . . . 11-1
Maintenance Schedule
Maintenance Schedule . . . . . . . 11-2
Special Application Services
Special ApplicationServices . . . . . . . . . . . . . . . . . . . . 11-8
Additional Maintenance
and Care
Additional Maintenanceand Care . . . . . . . . . . . . . . . . . . . 11-8
Recommended Fluids,
Lubricants, and Parts
Recommended Fluids andLubricants . . . . . . . . . . . . . . . . . 11-12
Maintenance Replacement Parts . . . . . . . . . . . . . . . . . . . . . . 11-13
Maintenance Records
Maintenance Records . . . . . . 11-14
General Information
Your vehicle is an important
investment. This section describes
the required maintenance for the
vehicle. Follow this schedule to help
protect against major repair
expenses resulting from neglect or
inadequate maintenance. It may
also help to maintain the value of
the vehicle if it is sold. It is the
responsibility of the owner to have
all required maintenance performed.
Your dealer has trained technicians
who can perform required
maintenance using genuine
replacement parts. They have
up‐to‐date tools and equipment
for fast and accurate diagnostics.
Many dealers have extended
evening and Saturday hours,
courtesy transportation, and online
scheduling to assist with service
needs. Your dealer recognizes the
importance of providing
competitively priced maintenance
and repair services. With trained
technicians, the dealer is the place
for routine maintenance such as oil
changes and tire rotations and
additional maintenance items like
tires, brakes, batteries, and wiper
blades.
Notice:
Damage caused by
improper maintenance can lead to
costly repairs and may not be
covered by the vehicle warranty.
Maintenance intervals, checks,
inspections, recommended fluids,
and lubricants are important to
keep the vehicle in good working
condition.
The Tire Rotation and Required
Services are the responsibility of the
vehicle owner. It is recommended to
have your dealer perform these
services every 12 000 km/7,500 mi.
Proper vehicle maintenance helps to
keep the vehicle in good working
condition, improves fuel economy,
and reduces vehicle emissions.
Page 317 of 372

Black plate (3,1)Chevrolet Orlando Owner Manual - 2013 - CRC - 6/5/12
Service and Maintenance 11-3
indicate the need for vehicle service
for more than a year. The engine oil
and filter must be changed at least
once a year and the oil life system
must be reset. Your trained dealer
technician can perform this work.
If the engine oil life system is reset
accidentally, service the vehicle
within 5 000 km/3,000 mi since the
last service. Reset the oil life
system when the oil is changed.
SeeEngine Oil Life System on
page 10‑9.
Tire Rotation and Required
Services Every 12 000 km/
7,500 mi
Rotate the tires, if recommended for
the vehicle, and perform the
following services. See Tire
Rotation on page 10‑49.
.Check engine oil level and oil
life percentage. If needed,
change engine oil and filter, and
reset oil life system. See Engine
Oil on page 10‑7 andEngine Oil
Life System on page 10‑9.
.Check engine coolant level. See
Engine Coolant on page 10‑13.
.Check windshield washer fluid
level. See Washer Fluid on
page 10‑18.
.Visually inspect windshield wiper
blades for wear, cracking,
or contamination. See Exterior
Care on page 10‑78. Replace
worn or damaged wiper blades.
See Wiper Blade Replacement
on page 10‑23.
.Check tire inflation pressures.
See Tire Pressure on
page 10‑43.
.Inspect tire wear. See Tire
Inspection on page 10‑48.
.Visually check for fluid leaks.
.Inspect engine air cleaner filter.
See Engine Air Cleaner/Filter on
page 10‑11.
.Inspect brake system.
.Visually inspect steering,
suspension, and chassis
components for damaged, loose,
or missing parts or signs of
wear. See Exterior Care on
page 10‑78.
.Check restraint system
components. See Safety System
Check on page 3‑23.
.Visually inspect fuel system for
damage or leaks.
.Visually inspect exhaust system
and nearby heat shields for
loose or damaged parts.
.Lubricate body components. See
Exterior Care on page 10‑78.
.Check starter switch. See Starter
Switch Check on page 10‑22.
.Check automatic transmission
shift lock control function. See
Automatic Transmission Shift
Lock Control Function Check on
page 10‑22.
Page 318 of 372
Black plate (4,1)Chevrolet Orlando Owner Manual - 2013 - CRC - 6/5/12
11-4 Service and Maintenance
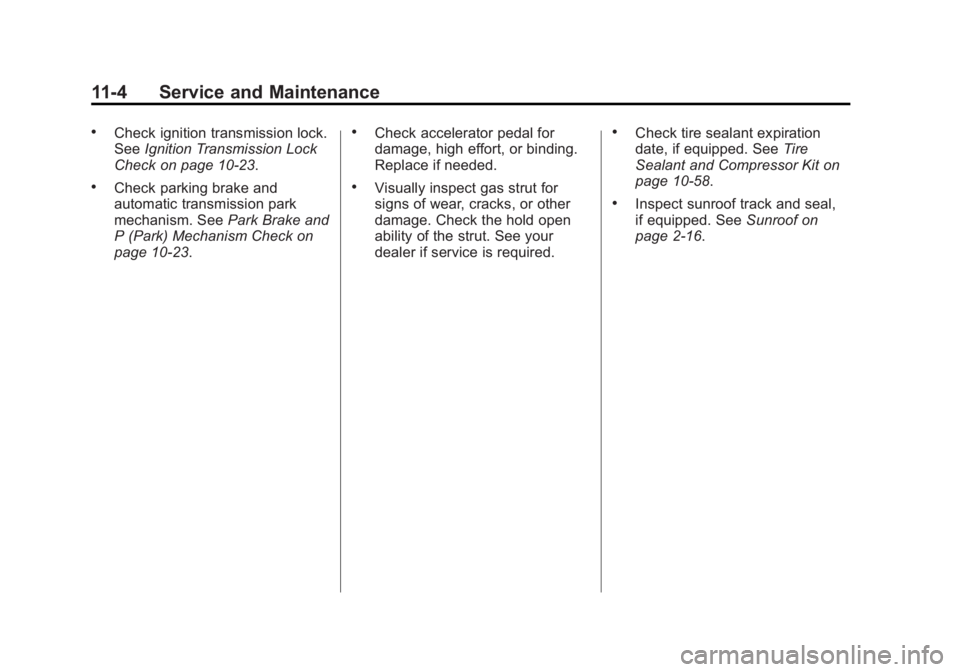
.Check ignition transmission lock.
SeeIgnition Transmission Lock
Check on page 10‑23.
.Check parking brake and
automatic transmission park
mechanism. See Park Brake and
P (Park) Mechanism Check on
page 10‑23.
.Check accelerator pedal for
damage, high effort, or binding.
Replace if needed.
.Visually inspect gas strut for
signs of wear, cracks, or other
damage. Check the hold open
ability of the strut. See your
dealer if service is required.
.Check tire sealant expiration
date, if equipped. See Tire
Sealant and Compressor Kit on
page 10‑58.
.Inspect sunroof track and seal,
if equipped. See Sunroof on
page 2‑16.
Page 323 of 372
Black plate (9,1)Chevrolet Orlando Owner Manual - 2013 - CRC - 6/5/12
Service and Maintenance 11-9
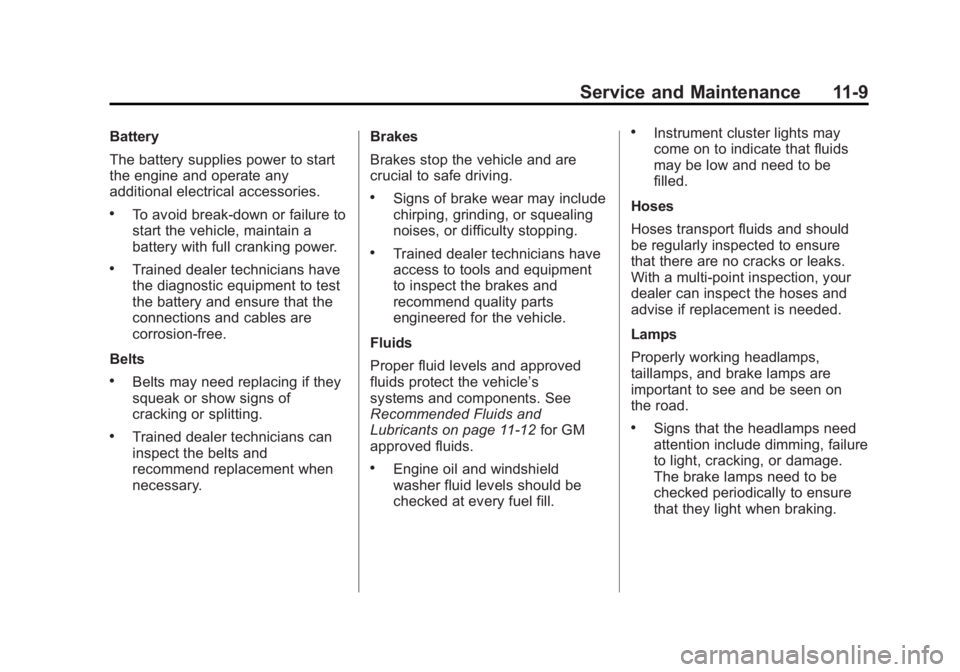
Battery
The battery supplies power to start
the engine and operate any
additional electrical accessories.
.To avoid break‐down or failure to
start the vehicle, maintain a
battery with full cranking power.
.Trained dealer technicians have
the diagnostic equipment to test
the battery and ensure that the
connections and cables are
corrosion‐free.
Belts
.Belts may need replacing if they
squeak or show signs of
cracking or splitting.
.Trained dealer technicians can
inspect the belts and
recommend replacement when
necessary. Brakes
Brakes stop the vehicle and are
crucial to safe driving.
.Signs of brake wear may include
chirping, grinding, or squealing
noises, or difficulty stopping.
.Trained dealer technicians have
access to tools and equipment
to inspect the brakes and
recommend quality parts
engineered for the vehicle.
Fluids
Proper fluid levels and approved
fluids protect the vehicle’s
systems and components. See
Recommended Fluids and
Lubricants on page 11‑12 for GM
approved fluids.
.Engine oil and windshield
washer fluid levels should be
checked at every fuel fill.
.Instrument cluster lights may
come on to indicate that fluids
may be low and need to be
filled.
Hoses
Hoses transport fluids and should
be regularly inspected to ensure
that there are no cracks or leaks.
With a multi‐point inspection, your
dealer can inspect the hoses and
advise if replacement is needed.
Lamps
Properly working headlamps,
taillamps, and brake lamps are
important to see and be seen on
the road.
.Signs that the headlamps need
attention include dimming, failure
to light, cracking, or damage.
The brake lamps need to be
checked periodically to ensure
that they light when braking.
Page 326 of 372
Black plate (12,1)Chevrolet Orlando Owner Manual - 2013 - CRC - 6/5/12
11-12 Service and Maintenance
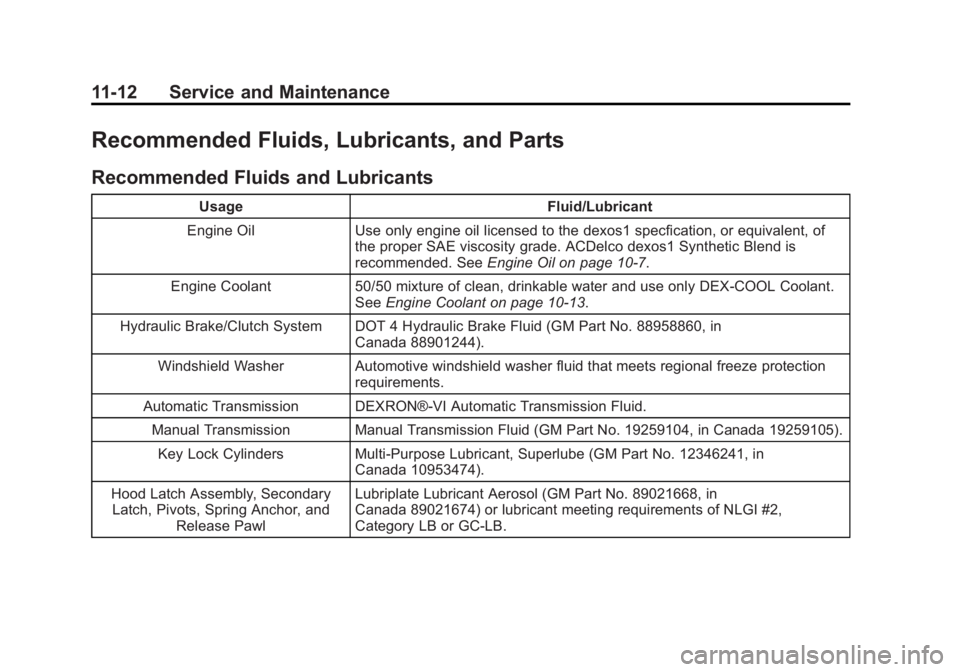
Recommended Fluids, Lubricants, and Parts
Recommended Fluids and Lubricants
UsageFluid/Lubricant
Engine Oil Use only engine oil licensed to the dexos1 specfication, or equivalent, of
the proper SAE viscosity grade. ACDelco dexos1 Synthetic Blend is
recommended. See Engine Oil on page 10‑7.
Engine Coolant 50/50 mixture of clean, drinkable water and use only DEX-COOL Coolant.
See Engine Coolant on page 10‑13.
Hydraulic Brake/Clutch System DOT 4 Hydraulic Brake Fluid (GM Part No. 88958860, in Canada 88901244).
Windshield Washer Automotive windshield washer fluid that meets regional freeze protection requirements.
Automatic Transmission DEXRON®-VI Automatic Transmission Fluid. Manual Transmission Manual Transmission Fluid (GM Part No. 19259104, in Canada 19259105).
Key Lock Cylinders Multi-Purpose Lubricant, Superlube (GM Part No. 12346241, in Canada 10953474).
Hood Latch Assembly, Secondary Latch, Pivots, Spring Anchor, and
Release Pawl Lubriplate Lubricant Aerosol (GM Part No. 89021668, in
Canada 89021674) or lubricant meeting requirements of NLGI #2,
Category LB or GC-LB.