2015 CHEVROLET ORLANDO oil level
[x] Cancel search: oil levelPage 241 of 372
Black plate (13,1)Chevrolet Orlando Owner Manual - 2013 - CRC - 6/5/12
Vehicle Care 10-13
Cooling System
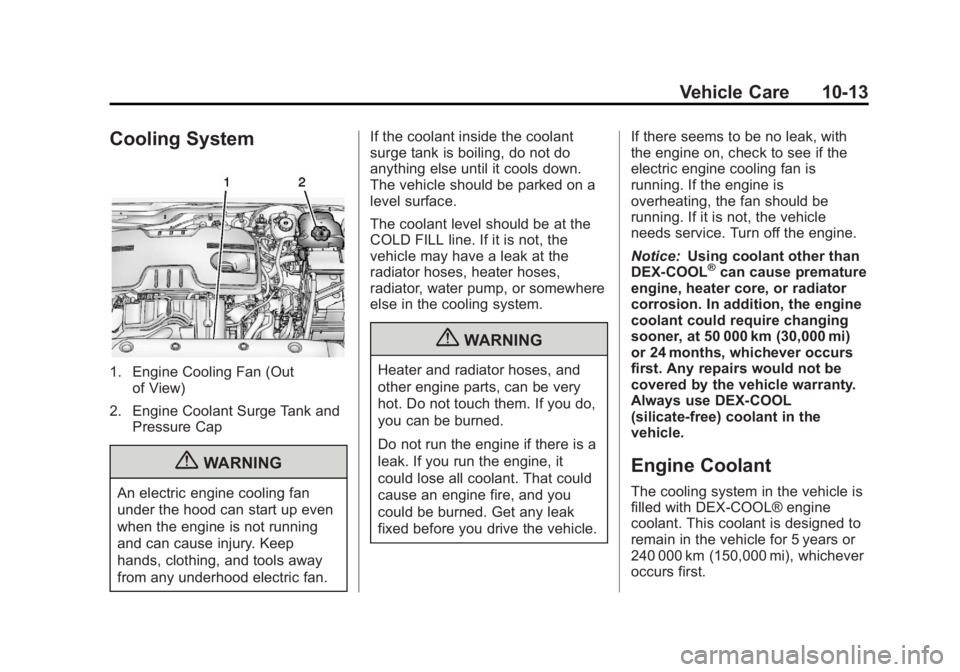
1. Engine Cooling Fan (Outof View)
2. Engine Coolant Surge Tank and Pressure Cap
{WARNING
An electric engine cooling fan
under the hood can start up even
when the engine is not running
and can cause injury. Keep
hands, clothing, and tools away
from any underhood electric fan. If the coolant inside the coolant
surge tank is boiling, do not do
anything else until it cools down.
The vehicle should be parked on a
level surface.
The coolant level should be at the
COLD FILL line. If it is not, the
vehicle may have a leak at the
radiator hoses, heater hoses,
radiator, water pump, or somewhere
else in the cooling system.
{WARNING
Heater and radiator hoses, and
other engine parts, can be very
hot. Do not touch them. If you do,
you can be burned.
Do not run the engine if there is a
leak. If you run the engine, it
could lose all coolant. That could
cause an engine fire, and you
could be burned. Get any leak
fixed before you drive the vehicle.
If there seems to be no leak, with
the engine on, check to see if the
electric engine cooling fan is
running. If the engine is
overheating, the fan should be
running. If it is not, the vehicle
needs service. Turn off the engine.
Notice:
Using coolant other than
DEX-COOL
®can cause premature
engine, heater core, or radiator
corrosion. In addition, the engine
coolant could require changing
sooner, at 50 000 km (30,000 mi)
or 24 months, whichever occurs
first. Any repairs would not be
covered by the vehicle warranty.
Always use DEX-COOL
(silicate-free) coolant in the
vehicle.
Engine Coolant
The cooling system in the vehicle is
filled with DEX-COOL® engine
coolant. This coolant is designed to
remain in the vehicle for 5 years or
240 000 km (150,000 mi), whichever
occurs first.
Page 242 of 372
Black plate (14,1)Chevrolet Orlando Owner Manual - 2013 - CRC - 6/5/12
10-14 Vehicle Care
The following explains the cooling
system and how to check and add
coolant when it is low. If there is a
problem with engine overheating,
seeEngine Overheating on
page 10‑17.
What to Use
{WARNING
Adding only plain water or some
other liquid to the cooling system
can be dangerous. Plain water
and other liquids, can boil before
the proper coolant mixture will.
The coolant warning system is set
for the proper coolant mixture.
With plain water or the wrong
mixture, the engine could get too
hot but you would not get the
overheat warning. The engine
could catch fire and you or
others could be burned. Use a
50/50 mixture of clean, drinkable
water and DEX-COOL coolant. Use a 50/50 mixture of clean,
drinkable water and DEX-COOL
coolant. If using this mixture,
nothing else needs to be added.
This mixture:
.Gives freezing protection down
to
−37°C (−34°F), outside
temperature.
.Gives boiling protection up to
129°C (265°F), engine
temperature.
.Protects against rust and
corrosion.
.Will not damage aluminum parts.
.Helps keep the proper engine
temperature.
Notice: If an improper coolant
mixture is used, the engine could
overheat and be badly damaged.
The repair cost would not be
covered by the vehicle warranty.
Too much water in the mixture
can freeze and crack the engine,
radiator, heater core, and other
parts. Never dispose of engine coolant by
putting it in the trash, pouring it on
the ground, or into sewers, streams,
or bodies of water. Have the coolant
changed by an authorized service
center, familiar with legal
requirements regarding used
coolant disposal. This will help
protect the environment and your
health.
Checking Coolant
The vehicle must be on a level
surface when checking the coolant
level.
Check to see if coolant is visible in
the coolant surge tank. If the coolant
inside the coolant surge tank is
boiling, do not do anything else until
it cools down. If coolant is visible
but the coolant level is not at or
above the COLD FILL line, add a
50/50 mixture of clean, drinkable
water and DEX-COOL coolant at the
coolant surge tank, but be sure the
cooling system is cool before this is
done. See
Cooling System on
page 10‑13.
Page 243 of 372
Black plate (15,1)Chevrolet Orlando Owner Manual - 2013 - CRC - 6/5/12
Vehicle Care 10-15
The coolant surge tank is in the
engine compartment on the driver
side of the vehicle. SeeEngine
Compartment Overview on
page 10‑6.
How to Add Coolant to the
Coolant Surge Tank
Notice: This vehicle has a
specific coolant fill procedure.
Failure to follow this procedure
could cause the engine to
overheat and be severely
damaged.
If you have not found a problem
yet, check to see if coolant is visible
in the coolant surge tank. If coolant
is visible but the coolant level is
not at the COLD FILL line, add a
50/50 mixture of clean, drinkable
water and DEX-COOL coolant at the
coolant surge tank, but be sure the
cooling system, including the
coolant surge tank pressure cap, is
cool before you do it. See Engine
Overheating on page 10‑17.
{WARNING
Steam and scalding liquids from a
hot cooling system can blow out
and burn you badly. They are
under pressure, and if you turn
the coolant surge tank pressure
cap —even a little —they can
come out at high speed. Never
turn the cap when the cooling
system, including the coolant
surge tank pressure cap, is hot.
Wait for the cooling system and
coolant surge tank pressure cap
to cool if you ever have to turn
the pressure cap.
{WARNING
Adding only plain water or some
other liquid to the cooling system
can be dangerous. Plain water
and other liquids, can boil before
the proper coolant mixture will.
(Continued)
WARNING (Continued)
The coolant warning system is set
for the proper coolant mixture.
With plain water or the wrong
mixture, the engine could get too
hot but you would not get the
overheat warning. The engine
could catch fire and you or others
could be burned. Use a 50/
50 mixture of clean, drinkable
water and DEX-COOL coolant.
{WARNING
You can be burned if you spill
coolant on hot engine parts.
Coolant contains ethylene glycol
and it will burn if the engine parts
are hot enough. Do not spill
coolant on a hot engine.
Page 316 of 372
Black plate (2,1)Chevrolet Orlando Owner Manual - 2013 - CRC - 6/5/12
11-2 Service and Maintenance
Because of the way people use
vehicles, maintenance needs vary.
There may need to be more
frequent checks and services. The
Additional Required Services‐
Normal are for vehicles that:
.Carry passengers and cargo
within recommended limits on
the Tire and Loading Information
label. See Vehicle Load Limits
on page 9‑9.
.Are driven on reasonable road
surfaces within legal driving
limits.
.Use the recommended fuel. See
Recommended Fuel on
page 9‑38.
Refer to the information in the
Maintenance Schedule Additional
Required Services ‐Normal chart.
The Additional Required Services ‐
Severe are for vehicles that are:
.Mainly driven in heavy city traffic
in hot weather.
.Mainly driven in hilly or
mountainous terrain.
.Frequently towing a trailer.
.Used for high speed or
competitive driving.
.Used for taxi, police, or delivery
service.
Refer to the information in the
Maintenance Schedule Additional
Required Services ‐Severe chart.
{WARNING
Performing maintenance work can
be dangerous and can cause
serious injury. Perform
maintenance work only if the
required information, proper tools,
and equipment are available.
If they are not, see your dealer to
have a trained technician do the
work. See Doing Your Own
Service Work on page 10‑4.
Maintenance
Schedule
Owner Checks and Services
At Each Fuel Stop
.Check the engine oil level. See
Engine Oil on page 10‑7.
Once a Month
.Check the tire inflation
pressures. See Tire Pressure on
page 10‑43.
.Inspect the tires for wear. See
Tire Inspection on page 10‑48.
.Check the windshield washer
fluid level. See Washer Fluid on
page 10‑18.
Engine Oil Change
When the CHANGE ENGINE OIL
SOON DIC message or Code 82
DIC message displays, have the
engine oil and filter changed within
the next 1 000 km/600 mi. If driven
under the best conditions, the
engine oil life system might not
Page 317 of 372

Black plate (3,1)Chevrolet Orlando Owner Manual - 2013 - CRC - 6/5/12
Service and Maintenance 11-3
indicate the need for vehicle service
for more than a year. The engine oil
and filter must be changed at least
once a year and the oil life system
must be reset. Your trained dealer
technician can perform this work.
If the engine oil life system is reset
accidentally, service the vehicle
within 5 000 km/3,000 mi since the
last service. Reset the oil life
system when the oil is changed.
SeeEngine Oil Life System on
page 10‑9.
Tire Rotation and Required
Services Every 12 000 km/
7,500 mi
Rotate the tires, if recommended for
the vehicle, and perform the
following services. See Tire
Rotation on page 10‑49.
.Check engine oil level and oil
life percentage. If needed,
change engine oil and filter, and
reset oil life system. See Engine
Oil on page 10‑7 andEngine Oil
Life System on page 10‑9.
.Check engine coolant level. See
Engine Coolant on page 10‑13.
.Check windshield washer fluid
level. See Washer Fluid on
page 10‑18.
.Visually inspect windshield wiper
blades for wear, cracking,
or contamination. See Exterior
Care on page 10‑78. Replace
worn or damaged wiper blades.
See Wiper Blade Replacement
on page 10‑23.
.Check tire inflation pressures.
See Tire Pressure on
page 10‑43.
.Inspect tire wear. See Tire
Inspection on page 10‑48.
.Visually check for fluid leaks.
.Inspect engine air cleaner filter.
See Engine Air Cleaner/Filter on
page 10‑11.
.Inspect brake system.
.Visually inspect steering,
suspension, and chassis
components for damaged, loose,
or missing parts or signs of
wear. See Exterior Care on
page 10‑78.
.Check restraint system
components. See Safety System
Check on page 3‑23.
.Visually inspect fuel system for
damage or leaks.
.Visually inspect exhaust system
and nearby heat shields for
loose or damaged parts.
.Lubricate body components. See
Exterior Care on page 10‑78.
.Check starter switch. See Starter
Switch Check on page 10‑22.
.Check automatic transmission
shift lock control function. See
Automatic Transmission Shift
Lock Control Function Check on
page 10‑22.
Page 323 of 372
Black plate (9,1)Chevrolet Orlando Owner Manual - 2013 - CRC - 6/5/12
Service and Maintenance 11-9
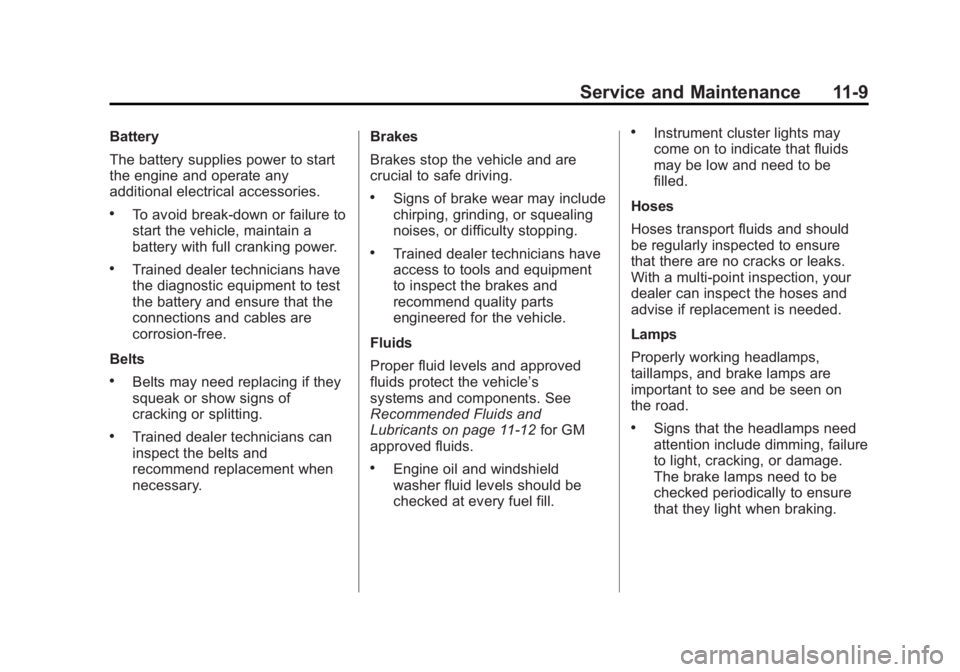
Battery
The battery supplies power to start
the engine and operate any
additional electrical accessories.
.To avoid break‐down or failure to
start the vehicle, maintain a
battery with full cranking power.
.Trained dealer technicians have
the diagnostic equipment to test
the battery and ensure that the
connections and cables are
corrosion‐free.
Belts
.Belts may need replacing if they
squeak or show signs of
cracking or splitting.
.Trained dealer technicians can
inspect the belts and
recommend replacement when
necessary. Brakes
Brakes stop the vehicle and are
crucial to safe driving.
.Signs of brake wear may include
chirping, grinding, or squealing
noises, or difficulty stopping.
.Trained dealer technicians have
access to tools and equipment
to inspect the brakes and
recommend quality parts
engineered for the vehicle.
Fluids
Proper fluid levels and approved
fluids protect the vehicle’s
systems and components. See
Recommended Fluids and
Lubricants on page 11‑12 for GM
approved fluids.
.Engine oil and windshield
washer fluid levels should be
checked at every fuel fill.
.Instrument cluster lights may
come on to indicate that fluids
may be low and need to be
filled.
Hoses
Hoses transport fluids and should
be regularly inspected to ensure
that there are no cracks or leaks.
With a multi‐point inspection, your
dealer can inspect the hoses and
advise if replacement is needed.
Lamps
Properly working headlamps,
taillamps, and brake lamps are
important to see and be seen on
the road.
.Signs that the headlamps need
attention include dimming, failure
to light, cracking, or damage.
The brake lamps need to be
checked periodically to ensure
that they light when braking.
Page 332 of 372
Black plate (2,1)Chevrolet Orlando Owner Manual - 2013 - CRC - 6/5/12
12-2 Technical Data
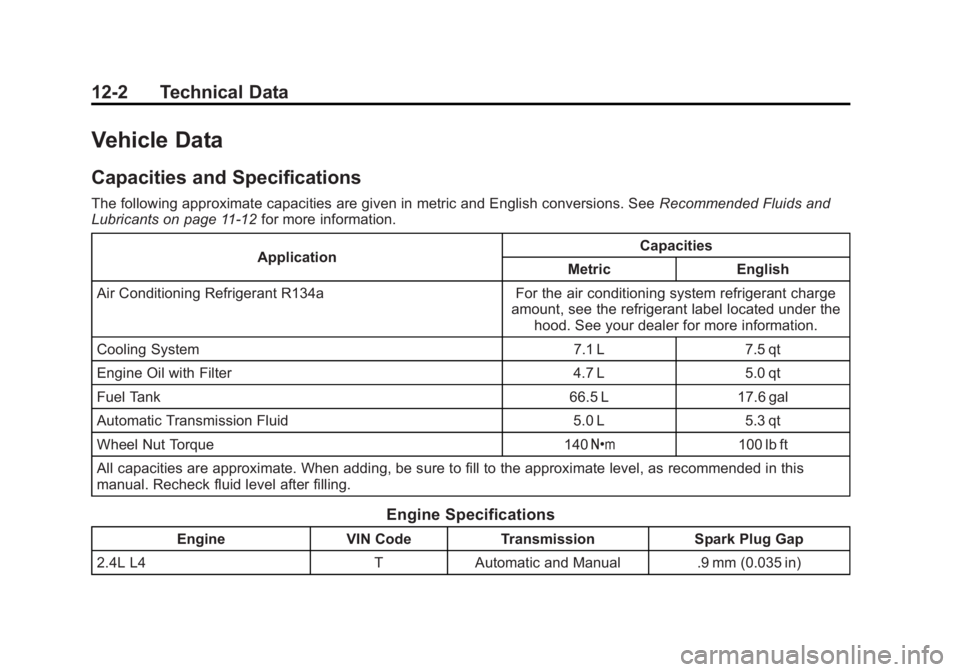
Vehicle Data
Capacities and Specifications
The following approximate capacities are given in metric and English conversions. SeeRecommended Fluids and
Lubricants on page 11‑12 for more information.
Application Capacities
Metric English
Air Conditioning Refrigerant R134a For the air conditioning system refrigerant charge amount, see the refrigerant label located under thehood. See your dealer for more information.
Cooling System 7.1 L 7.5 qt
Engine Oil with Filter 4.7 L 5.0 qt
Fuel Tank 66.5 L 17.6 gal
Automatic Transmission Fluid 5.0 L 5.3 qt
Wheel Nut Torque 140 Y100 lb ft
All capacities are approximate. When adding, be sure to fill to the approximate level, as recommended in this
manual. Recheck fluid level after filling.
Engine Specifications
Engine VIN CodeTransmission Spark Plug Gap
2.4L L4 TAutomatic and Manual .9 mm (0.035 in)
Page 354 of 372
Black plate (4,1)Chevrolet Orlando Owner Manual - 2013 - CRC - 6/5/12
14-4 OnStar
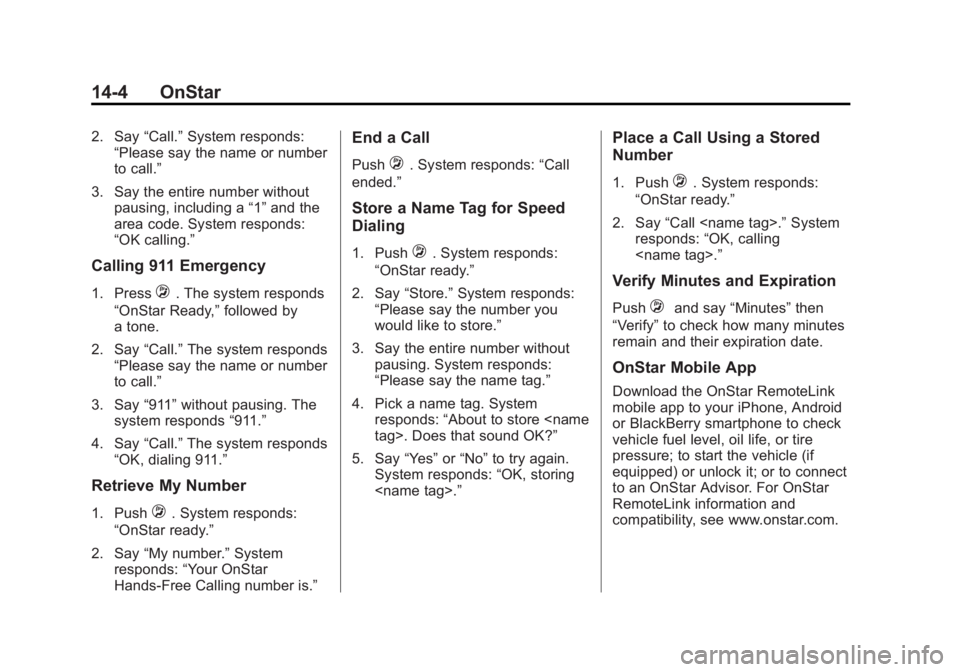
2. Say“Call.”System responds:
“Please say the name or number
to call.”
3. Say the entire number without pausing, including a “1”and the
area code. System responds:
“OK calling.”
Calling 911 Emergency
1. Press=. The system responds
“OnStar Ready,” followed by
a tone.
2. Say “Call.”The system responds
“Please say the name or number
to call.”
3. Say “911”without pausing. The
system responds “911.”
4. Say “Call.”The system responds
“OK, dialing 911.”
Retrieve My Number
1. Push=. System responds:
“OnStar ready.”
2. Say “My number.” System
responds: “Your OnStar
Hands-Free Calling number is.”
End a Call
Push=. System responds: “Call
ended.”
Store a Name Tag for Speed
Dialing
1. Push=. System responds:
“OnStar ready.”
2. Say “Store.” System responds:
“Please say the number you
would like to store.”
3. Say the entire number without pausing. System responds:
“Please say the name tag.”
4. Pick a name tag. System responds: “About to store
5. Say “Yes”or“No” to try again.
System responds: “OK, storing
Place a Call Using a Stored
Number
1. Push=. System responds:
“OnStar ready.”
2. Say “Call
responds: “OK, calling
Verify Minutes and Expiration
Push=and say “Minutes” then
“Verify” to check how many minutes
remain and their expiration date.
OnStar Mobile App
Download the OnStar RemoteLink
mobile app to your iPhone, Android
or BlackBerry smartphone to check
vehicle fuel level, oil life, or tire
pressure; to start the vehicle (if
equipped) or unlock it; or to connect
to an OnStar Advisor. For OnStar
RemoteLink information and
compatibility, see www.onstar.com.