2015 CHEVROLET MALIBU brake sensor
[x] Cancel search: brake sensorPage 10 of 399

Black plate (3,1)Chevrolet Malibu Owner Manual (GMNA-Localizing-U.S./Canada/Mexico-
7575972) - 2015 - crc - 4/1/14
In Brief 1-3
1.Air Vents on page 8-8.
2. Turn Signal Lever. See Turn and
Lane-Change Signals on
page 6-4.
Driver Information Center
Buttons. See Driver Information
Center (DIC) on page 5-21.
3. Instrument Cluster on page 5-8.
Driver Information Center (DIC)
on page 5-21.
4. Windshield Wiper/Washer on
page 5-3.
5. Storage Area (If Equipped). See Instrument Panel Storage on
page 4-1.
6. Light Sensor. See Automatic
Headlamp System on page 6-3.
7. Infotainment on page 7-1.
8. CD Player on page 7-13. 9.
Exterior Lamp Controls on
page 6-1.
Fog Lamps on page 6-4 (If
Equipped).
Instrument Panel Illumination
Control on page 6-5.
10. Storage Compartment. See Instrument Panel Storage on
page 4-1.
11. Data Link Connector (Out of View). See Malfunction
Indicator Lamp on page 5-13.
12. Hood Release. See Hood on
page 10-4.
13. Cruise Control on page 9-31.
Forward Collision Alert (FCA)
System on page 9-34 (If
Equipped).
14. Steering Wheel Adjustment on
page 5-2.
15. Horn on page 5-3.
16. Steering Wheel Controls on
page 5-2. 17.
Ignition Positions (Keyless
Access) on page 9-14 or
Ignition Positions (Key Access)
on page 9-16.
18. Heated Front Seats on
page 3-7 (If Equipped).
19. Hazard Warning Flashers on
page 6-3.
20. Shift Lever. See Automatic
Transmission on page 9-25.
21. Parking Brake on page 9-28.
22. Power Outlets on page 5-5.
23. Traction Control/Electronic
Stability Control on page 9-29.
Lane Departure Warning
(LDW) on page 9-42 (If
Equipped).
24. Climate Control Systems on
page 8-1.
Dual Automatic Climate Control
System on page 8-4.
Page 232 of 399
Black plate (35,1)Chevrolet Malibu Owner Manual (GMNA-Localizing-U.S./Canada/Mexico-
7575972) - 2015 - crc - 4/1/14
Driving and Operating 9-35
FCA warnings will not occur unless
the FCA system detects a vehicle
ahead. When a vehicle is detected,
the vehicle ahead indicator will
display green. Vehicles may not be
detected on curves, highway exit
ramps, or hills; or due to poor
visibility. FCA will not detect another
vehicle ahead until it is completely
in the driving lane.
{Warning
FCA does not provide a warning
to help avoid a crash, unless it
detects a vehicle. FCA may not
detect a vehicle ahead if the FCA
sensor is blocked by dirt, snow,
or ice, or if the windshield is
damaged. It may also not detect a
vehicle on winding or hilly roads,
or in conditions that can limit
visibility such as fog, rain,
or snow, or if the headlamps or
windshield are not cleaned or in(Continued)
Warning (Continued)
proper condition. Keep the
windshield, headlamps, and FCA
sensors clean and in good repair.
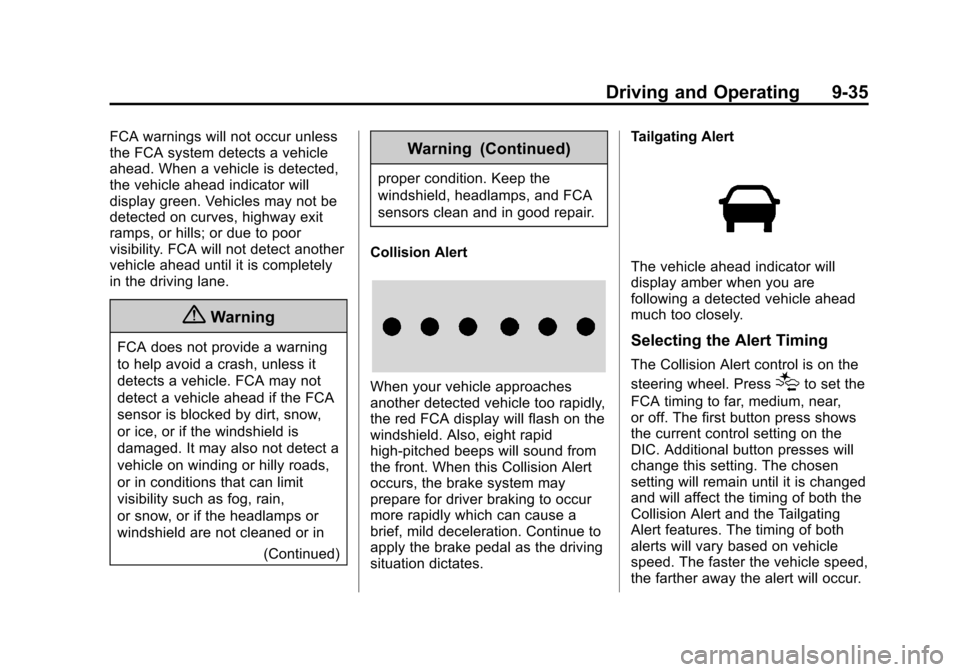
Collision Alert
When your vehicle approaches
another detected vehicle too rapidly,
the red FCA display will flash on the
windshield. Also, eight rapid
high-pitched beeps will sound from
the front. When this Collision Alert
occurs, the brake system may
prepare for driver braking to occur
more rapidly which can cause a
brief, mild deceleration. Continue to
apply the brake pedal as the driving
situation dictates. Tailgating Alert
The vehicle ahead indicator will
display amber when you are
following a detected vehicle ahead
much too closely.
Selecting the Alert Timing
The Collision Alert control is on the
steering wheel. Press
[to set the
FCA timing to far, medium, near,
or off. The first button press shows
the current control setting on the
DIC. Additional button presses will
change this setting. The chosen
setting will remain until it is changed
and will affect the timing of both the
Collision Alert and the Tailgating
Alert features. The timing of both
alerts will vary based on vehicle
speed. The faster the vehicle speed,
the farther away the alert will occur.
Page 234 of 399
Black plate (37,1)Chevrolet Malibu Owner Manual (GMNA-Localizing-U.S./Canada/Mexico-
7575972) - 2015 - crc - 4/1/14
Driving and Operating 9-37
When the System Does Not
Seem to Work Properly
The following messages may be
displayed on the DIC:
SERVICE PARKING ASSIST:If
this message occurs, check the
following conditions:
.The sensors are not clean. Keep
the vehicle's rear bumper free of
mud, dirt, snow, ice, and slush.
For cleaning instructions, see
Exterior Care on page 10-82.
.The park assist sensors are
covered by frost or ice. Frost or
ice can form around and behind
the sensors and may not always
be seen; this can occur after
washing the vehicle in cold
weather. The message may not
clear until the frost or ice has
melted.
If the above conditions do not exist,
take the vehicle to your dealer to
repair the system. PARK ASSIST OFF:
If the RPA
system does not activate due to a
temporary condition, the message
displays on the DIC. This can occur
under the following conditions:
.The driver has disabled the
system.
.An object was hanging out of the
trunk during the last drive cycle.
Once the object is removed,
RPA will return to normal
operation.
.The bumper is damaged. Take
the vehicle to your dealer to
repair the system.
.Other conditions, such as
vibrations from a jackhammer or
the compression of air brakes on
a very large truck, are affecting
system performance.
Side Blind Zone
Alert (SBZA)
If equipped, the SBZA system is a
lane-changing aid that assists
drivers with avoiding crashes that occur with vehicles in the side blind
zone (or spot) areas. The SBZA
warning display will light up in the
corresponding outside side mirror
and will flash if the turn signal is on.
{Warning
SBZA does not alert the driver to
vehicles rapidly approaching
outside of the side blind zones,
pedestrians, bicyclists,
or animals. It may not provide
alerts when changing lanes under
all driving conditions. Failure to
use proper care when changing
lanes may result in injury, death,
or vehicle damage. Before
making a lane change, always
check mirrors, glance over your
shoulder, and use the turn
signals.
Page 288 of 399
Black plate (37,1)Chevrolet Malibu Owner Manual (GMNA-Localizing-U.S./Canada/Mexico-
7575972) - 2015 - crc - 4/1/14
Vehicle Care 10-37
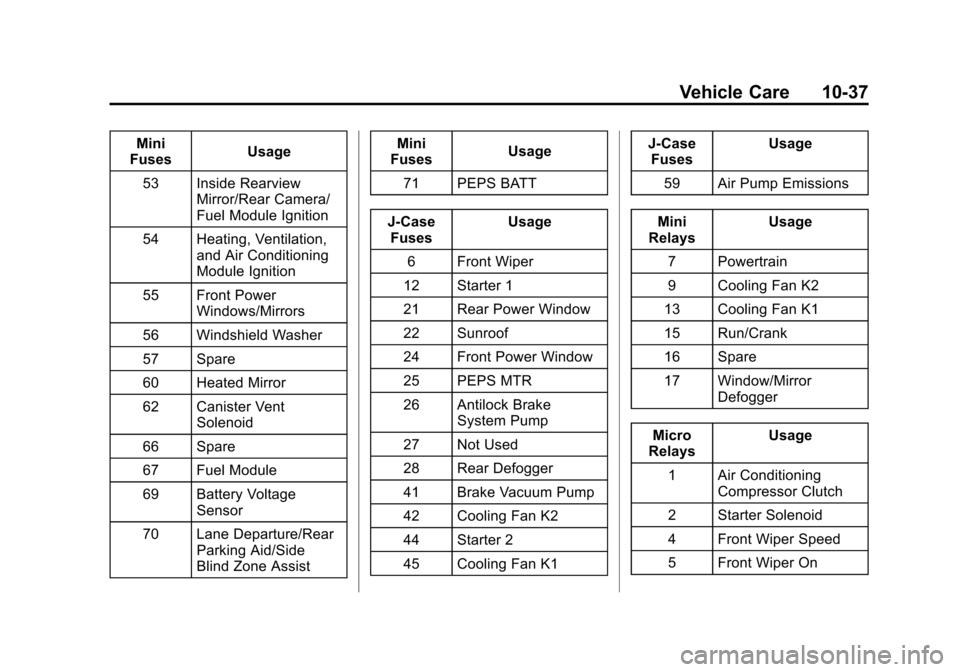
Mini
Fuses Usage
53 Inside Rearview Mirror/Rear Camera/
Fuel Module Ignition
54 Heating, Ventilation, and Air Conditioning
Module Ignition
55 Front Power Windows/Mirrors
56 Windshield Washer
57 Spare
60 Heated Mirror
62 Canister Vent Solenoid
66 Spare
67 Fuel Module
69 Battery Voltage Sensor
70 Lane Departure/Rear Parking Aid/Side
Blind Zone Assist Mini
Fuses Usage
71 PEPS BATT
J-Case Fuses Usage
6 Front Wiper
12 Starter 1
21 Rear Power Window
22 Sunroof
24 Front Power Window
25 PEPS MTR
26 Antilock Brake System Pump
27 Not Used
28 Rear Defogger
41 Brake Vacuum Pump
42 Cooling Fan K2
44 Starter 2
45 Cooling Fan K1 J-Case
Fuses Usage
59 Air Pump Emissions
Mini
Relays Usage
7 Powertrain
9 Cooling Fan K2
13 Cooling Fan K1
15 Run/Crank
16 Spare
17 Window/Mirror Defogger
Micro
Relays Usage
1 Air Conditioning Compressor Clutch
2 Starter Solenoid
4 Front Wiper Speed
5 Front Wiper On
Page 304 of 399
Black plate (53,1)Chevrolet Malibu Owner Manual (GMNA-Localizing-U.S./Canada/Mexico-
7575972) - 2015 - crc - 4/1/14
Vehicle Care 10-53
.Operating electronic devices or
being near facilities using radio
wave frequencies similar to the
TPMS could cause the TPMS
sensors to malfunction.
If the TPMS is not functioning
properly it cannot detect or signal a
low tire condition. See your dealer
for service if the TPMS malfunction
light and DIC message comes on
and stays on.
TPMS Sensor Matching
Process
Each TPMS sensor has a unique
identification code. The identification
code needs to be matched to a new
tire/wheel position after rotating the
vehicle’s tires or replacing one or
more of the TPMS sensors. The
TPMS sensor matching process
should also be performed after
replacing a spare tire with a road
tire containing the TPMS sensor.
The malfunction light and the DIC
message should go off at the next
ignition cycle. The sensors are
matched to the tire/wheel positions, using a TPMS relearn tool, in the
following order: driver side front tire,
passenger side front tire, passenger
side rear tire, and driver side rear.
See your dealer for service or to
purchase a relearn tool. A TPMS
relearn tool can also be purchased.
See Tire Pressure Monitor Sensor
Activation Tool at
www.gmtoolsandequipment.com or
call 1-800-GM TOOLS
(1-800-468-6657).
There are two minutes to match the
first tire/wheel position, and
five minutes overall to match all four
tire/wheel positions. If it takes
longer, the matching process stops
and must be restarted.
The TPMS sensor matching
process is:
1. Set the parking brake.
2. Turn the ignition to ON/RUN with
the engine off or place the
vehicle power mode in ON/RUN/
START. See Ignition Positions
(Keyless Access) on page 9-14
or Ignition Positions (Key
Access) on page 9-16.
3. Use the MENU button to select the Vehicle Information Menu in
the Driver Information
Center (DIC).
4. Use the thumbwheel to scroll to the Tire Pressure Menu Item
screen.
5. Press the SET/CLR button to begin the sensor matching
process.
A message asking if the process
should begin should appear.
6. Press the SET/CLR button again to confirm the selection.
The horn sounds twice to signal
the receiver is in relearn mode
and the TIRE LEARNING
ACTIVE message displays on
the DIC screen.
Page 311 of 399
Black plate (60,1)Chevrolet Malibu Owner Manual (GMNA-Localizing-U.S./Canada/Mexico-
7575972) - 2015 - crc - 4/1/14
10-60 Vehicle Care
performance on the laboratory
test wheel than the minimum
required by law. Warning: The
temperature grade for this tire is
established for a tire that is
properly inflated and not
overloaded. Excessive speed,
underinflation, or excessive
loading, either separately or in
combination, can cause heat
buildup and possible tire failure.
Wheel Alignment and Tire
Balance
The tires and wheels were aligned
and balanced at the factory to
provide the longest tire life and best
overall performance. Adjustments to
wheel alignment and tire balancing
are not necessary on a regular
basis. Consider an alignment check
if there is unusual tire wear or the
vehicle is significantly pulling to one
side or the other. Some slight pull to
the left or right, depending on the
crown of the road and/or other roadsurface variations such as troughs
or ruts, is normal. If the vehicle is
vibrating when driving on a smooth
road, the tires and wheels may need
to be rebalanced. See your dealer
for proper diagnosis.
Wheel Replacement
Replace any wheel that is bent,
cracked, or badly rusted or
corroded. If wheel nuts keep coming
loose, the wheel, wheel bolts, and
wheel nuts should be replaced.
If the wheel leaks air, replace it.
Some aluminum wheels can be
repaired. See your dealer if any of
these conditions exist.
Your dealer will know the kind of
wheel that is needed.
Each new wheel should have the
same load-carrying capacity,
diameter, width, offset, and be
mounted the same way as the one it
replaces.
Replace wheels, wheel bolts, wheel
nuts, or Tire Pressure Monitor
System (TPMS) sensors with new
GM original equipment parts.
{Warning
Using the wrong replacement
wheels, wheel bolts, or wheel
nuts can be dangerous. It could
affect the braking and handling of
the vehicle. Tires can lose air,
and cause loss of control, causing
a crash. Always use the correct
wheel, wheel bolts, and wheel
nuts for replacement.
{Caution
The wrong wheel can also cause
problems with bearing life, brake
cooling, speedometer or
odometer calibration, headlamp
aim, bumper height, vehicle
(Continued)