2015 CHEVROLET MALIBU ABS
[x] Cancel search: ABSPage 225 of 399
Black plate (28,1)Chevrolet Malibu Owner Manual (GMNA-Localizing-U.S./Canada/Mexico-
7575972) - 2015 - crc - 4/1/14
9-28 Driving and Operating
If driving safely on a wet road and it
becomes necessary to slam on the
brakes and continue braking to
avoid a sudden obstacle, a
computer senses the wheels are
slowing down. If one of the wheels
is about to stop rolling, the computer
will separately work the brakes at
each wheel.
ABS can change the brake pressure
to each wheel, as required, faster
than any driver could. This can help
you steer around the obstacle while
braking hard.
As the brakes are applied, the
computer keeps receiving updates
on wheel speed and controls
braking pressure accordingly.
Remember: ABS does not change
the time needed to get a foot up to
the brake pedal or always decrease
stopping distance. If you get too
close to the vehicle in front of you,
there will not be enough time to
apply the brakes if that vehiclesuddenly slows or stops. Always
leave enough room up ahead to
stop, even with ABS.
Using ABS
Do not pump the brakes. Just hold
the brake pedal down firmly and let
ABS work. You may hear the ABS
pump or motor operating and feel
the brake pedal pulsate. This is
normal.
Braking in Emergencies
ABS allows you to steer and brake
at the same time. In many
emergencies, steering can help
more than even the very best
braking.
Parking Brake
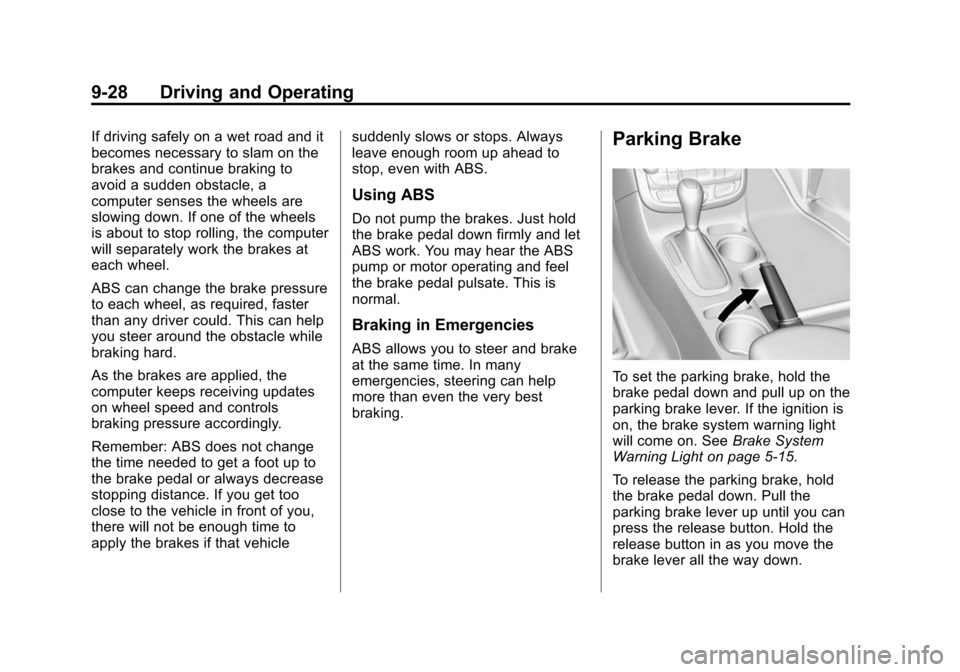
To set the parking brake, hold the
brake pedal down and pull up on the
parking brake lever. If the ignition is
on, the brake system warning light
will come on. See
Brake System
Warning Light on page 5-15.
To release the parking brake, hold
the brake pedal down. Pull the
parking brake lever up until you can
press the release button. Hold the
release button in as you move the
brake lever all the way down.
Page 226 of 399
Black plate (29,1)Chevrolet Malibu Owner Manual (GMNA-Localizing-U.S./Canada/Mexico-
7575972) - 2015 - crc - 4/1/14
Driving and Operating 9-29
{Caution
Driving with the parking brake on
can overheat the brake system
and cause premature wear or
damage to brake system parts.
Make sure that the parking brake
is fully released and the brake
warning light is off before driving.
Brake Assist
The Brake Assist feature is
designed to assist the driver in
stopping or decreasing vehicle
speed in emergency driving
conditions. This feature uses the
stability system hydraulic brake
control module to supplement the
power brake system under
conditions where the driver has
quickly and forcefully applied the
brake pedal in an attempt to quickly
stop or slow down the vehicle. The
stability system hydraulic brake
control module increases brake
pressure at each corner of thevehicle until the ABS activates.
Minor brake pedal pulsation or
pedal movement during this time is
normal and the driver should
continue to apply the brake pedal as
the driving situation dictates. The
Brake Assist feature will
automatically disengage when the
brake pedal is released or brake
pedal pressure is quickly
decreased.
Hill Start Assist (HSA)
If equipped, HSA may automatically
activate when the vehicle is stopped
on a grade. This feature is designed
to prevent the vehicle from rolling,
either forward or rearward, during
vehicle drive off. During the
transition from releasing the brake
pedal to accelerating to drive off on
a grade, HSA holds the braking
pressure to prevent rolling. HSA will
not activate if the vehicle is in a
drive gear and facing downhill or if
the vehicle is facing uphill and in
R (Reverse).
Ride Control Systems
Traction Control/
Electronic Stability
Control
System Operation
The vehicle has a Traction Control
System (TCS) and StabiliTrak®, an
electronic stability control system.
These systems help limit wheel slip
and assist the driver in maintaining
control, especially on slippery road
conditions.
TCS activates if it senses that any
of the drive wheels are spinning or
beginning to lose traction. When this
happens, TCS applies the brakes to
the spinning wheels and reduces
engine power to limit wheel spin.
StabiliTrak activates when the
vehicle senses a difference between
the intended path and the direction
the vehicle is actually traveling.
StabiliTrak selectively applies
braking pressure to any one of the
Page 248 of 399
Black plate (51,1)Chevrolet Malibu Owner Manual (GMNA-Localizing-U.S./Canada/Mexico-
7575972) - 2015 - crc - 4/1/14
Driving and Operating 9-51
If parking the rig on a hill:
1. Press the brake pedal, but donot shift into P (Park) yet. Turn
the wheels into the curb if facing
downhill or into traffic if facing
uphill.
2. Have someone place chocks under the trailer wheels.
3. When the wheel chocks are in place, release the brake pedal
until the chocks absorb the load.
4. Reapply the brake pedal. Then apply the parking brake and shift
into P (Park).
5. Release the brake pedal.
Leaving After Parking on a Hill
1. Apply and hold the brake pedal while you:
.Start the engine.
.Shift into a gear.
.Release the parking brake.
2. Let up on the brake pedal. 3. Drive slowly until the trailer is
clear of the chocks.
4. Stop and have someone pick up and store the chocks.
Maintenance When Trailer
Towing
The vehicle needs service more
often when pulling a trailer. See the
Maintenance Schedule on
page 11-2. Things that are
especially important in trailer
operation are automatic
transmission fluid, engine oil, axle
lubricant, belts, cooling system and
brake system. Inspect these before
and during the trip.
Check periodically to see that all
hitch nuts and bolts are tight.
Engine Cooling When Trailer
Towing
The cooling system may temporarily
overheat during severe operating
conditions. See Engine Overheating
on page 10-17.
Trailer Towing
Before pulling a trailer, three
important considerations have to do
with weight:
.Weight of the trailer.
.Weight of the trailer tongue.
.Total weight on your vehicle's
tires.
Weight of the Trailer
How heavy can a trailer safely be?
It should never weigh more than
454 kg (1,000 lb). But even that can
be too heavy.
It depends on how the rig is used.
For example, speed, altitude, road
grades, outside temperature, and
how much the vehicle is used to pull
a trailer are all important. It can
depend on any special equipment
on the vehicle, and the amount of
tongue weight the vehicle can carry.
See “Weight of the Trailer Tongue”
later in this section.
Page 272 of 399
Black plate (21,1)Chevrolet Malibu Owner Manual (GMNA-Localizing-U.S./Canada/Mexico-
7575972) - 2015 - crc - 4/1/14
Vehicle Care 10-21
{Warning
With the wrong kind of fluid in the
brake hydraulic system, the
brakes might not work well. This
could cause a crash. Always use
the proper brake fluid.
{Caution
.Using the wrong fluid can
badly damage brake
hydraulic system parts. For
example, just a few drops of
mineral-based oil, such as
engine oil, in the brake
hydraulic system can damage
brake hydraulic system parts
so badly that they will have to
be replaced. Do not let
someone put in the wrong
kind of fluid.(Continued)
Caution (Continued)
.If brake fluid is spilled on the
vehicle's painted surfaces,
the paint finish can be
damaged. Be careful not to
spill brake fluid on the
vehicle. If you do, wash it off
immediately.
Battery
This vehicle has a standard 12-volt
battery under the hood. See Engine
Compartment Overview on
page 10-5.
Refer to the replacement number
shown on the original battery label
when a new 12-volt battery is
needed. The vehicle has an
Absorbed Glass Mat (AGM) 12-volt
battery. Installation of a standard
12-volt battery will result in reduced
12-volt battery life.
When using a 12-volt battery
charger on the 12-volt AGM battery,
some chargers have an AGM battery setting on the charger.
If available, use the AGM setting on
the charger, to limit charge voltage
to 14.8 volts.
Stop/Start System
If equipped with the 2.5L L4 Engine,
the vehicle has a stop/start system
to shut off the engine to help
conserve fuel. See
Starting the
Engine on page 9-18.
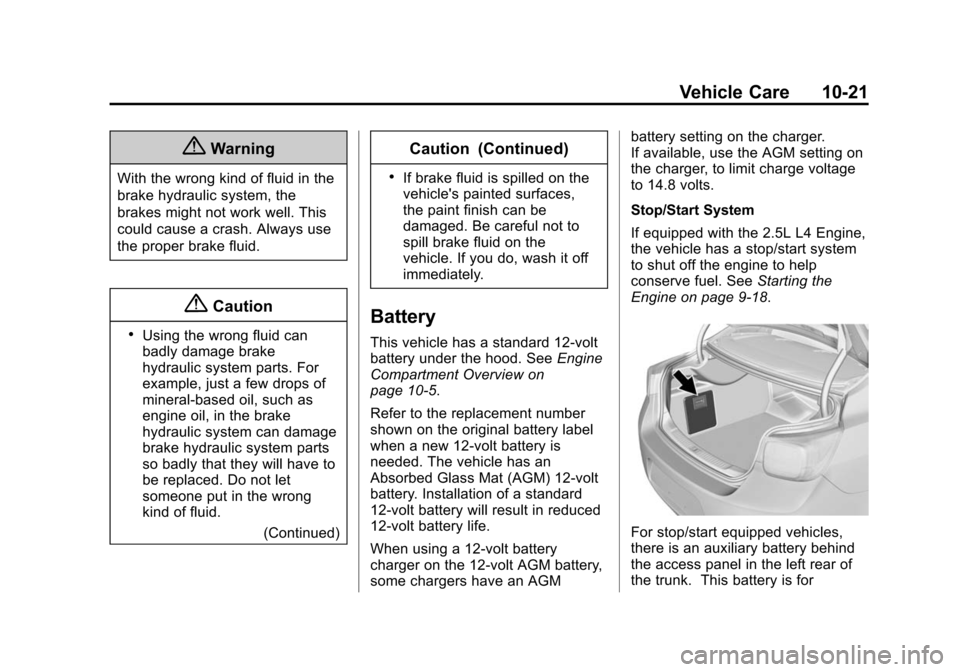
For stop/start equipped vehicles,
there is an auxiliary battery behind
the access panel in the left rear of
the trunk. This battery is for
Page 326 of 399
Black plate (75,1)Chevrolet Malibu Owner Manual (GMNA-Localizing-U.S./Canada/Mexico-
7575972) - 2015 - crc - 4/1/14
Vehicle Care 10-75
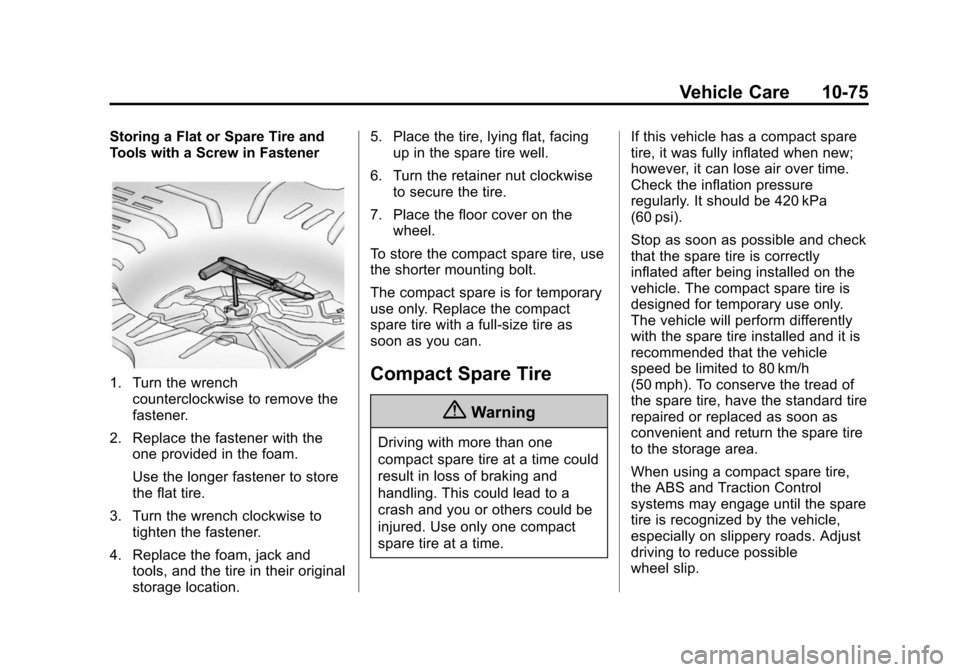
Storing a Flat or Spare Tire and
Tools with a Screw in Fastener
1. Turn the wrenchcounterclockwise to remove the
fastener.
2. Replace the fastener with the one provided in the foam.
Use the longer fastener to store
the flat tire.
3. Turn the wrench clockwise to tighten the fastener.
4. Replace the foam, jack and tools, and the tire in their original
storage location. 5. Place the tire, lying flat, facing
up in the spare tire well.
6. Turn the retainer nut clockwise to secure the tire.
7. Place the floor cover on the wheel.
To store the compact spare tire, use
the shorter mounting bolt.
The compact spare is for temporary
use only. Replace the compact
spare tire with a full-size tire as
soon as you can.Compact Spare Tire
{Warning
Driving with more than one
compact spare tire at a time could
result in loss of braking and
handling. This could lead to a
crash and you or others could be
injured. Use only one compact
spare tire at a time. If this vehicle has a compact spare
tire, it was fully inflated when new;
however, it can lose air over time.
Check the inflation pressure
regularly. It should be 420 kPa
(60 psi).
Stop as soon as possible and check
that the spare tire is correctly
inflated after being installed on the
vehicle. The compact spare tire is
designed for temporary use only.
The vehicle will perform differently
with the spare tire installed and it is
recommended that the vehicle
speed be limited to 80 km/h
(50 mph). To conserve the tread of
the spare tire, have the standard tire
repaired or replaced as soon as
convenient and return the spare tire
to the storage area.
When using a compact spare tire,
the ABS and Traction Control
systems may engage until the spare
tire is recognized by the vehicle,
especially on slippery roads. Adjust
driving to reduce possible
wheel slip.
Page 333 of 399
Black plate (82,1)Chevrolet Malibu Owner Manual (GMNA-Localizing-U.S./Canada/Mexico-
7575972) - 2015 - crc - 4/1/14
10-82 Vehicle Care
Appearance Care
Exterior Care
Locks
Locks are lubricated at the factory.
Use a de-icing agent only when
absolutely necessary, and have the
locks greased after using. See
Recommended Fluids and
Lubricants on page 11-11.
Washing the Vehicle
To preserve the vehicle's finish,
wash it often and out of direct
sunlight.
{Caution
Do not use petroleum-based,
acidic, or abrasive cleaning
agents as they can damage the
vehicle's paint, metal, or plastic
parts. If damage occurs, it would
not be covered by the vehicle
warranty. Approved cleaning(Continued)
Caution (Continued)
products can be obtained from
your dealer. Follow all
manufacturer directions regarding
correct product usage, necessary
safety precautions, and
appropriate disposal of any
vehicle care product.
{Caution
Avoid using high-pressure
washes closer than 30 cm (12 in)
to the surface of the vehicle. Use
of power washers exceeding
8,274 kPa (1,200 psi) can result
in damage or removal of paint
and decals.
The
esymbol is on any
underhood compartment electrical
center that should not be power washed. This could cause damage
that would not be covered by the
vehicle warranty.
If using an automatic car wash,
follow the car wash instructions. The
windshield wiper and rear window
wiper, if equipped, must be off.
Remove any accessories that may
be damaged or interfere with the car
wash equipment.
Rinse the vehicle well, before
washing and after, to remove all
cleaning agents completely. If they
are allowed to dry on the surface,
they could stain.
Dry the finish with a soft, clean
chamois or an all-cotton towel to
avoid surface scratches and water
spotting.
Finish Care
Application of aftermarket clearcoat
sealant/wax materials is not
recommended. If painted surfaces
are damaged, see your dealer to
have the damage assessed and
repaired. Foreign materials such as
Page 388 of 399

Black plate (1,1)Chevrolet Malibu Owner Manual (GMNA-Localizing-U.S./Canada/Mexico-
7575972) - 2015 - crc - 4/1/14
INDEX i-1
A
Accessories andModifications . . . . . . . . . . . . . . . . . 10-3
Accessory Power . . . . . . . . . . . . . . 9-21
Add-On Electrical Equipment . . . . . . . . . . . . . . . . . . . 9-53
Additional Information
OnStar
®. . . . . . . . . . . . . . . . . . . . . . 14-6
Additional Maintenance and Care . . . . . . . . . . . . . . . . . . . . . 11-8
Adjustments
Lumbar, Front Seats . . . . . . . . . . . 3-4
Air Cleaner/Filter, Engine . . . . . 10-11
Air Filter, Passenger Compartment . . . . . . . . . . . . . . . . . 8-9
Air Vents . . . . . . . . . . . . . . . . . . . . . . . 8-8
Airbag System
Check . . . . . . . . . . . . . . . . . . . . . . . . 3-30
How Does an AirbagRestrain? . . . . . . . . . . . . . . . . . . . 3-22
Passenger Sensing System . . . . . . . . . . . . . . . . . . . . . . 3-24
What Makes an Airbag Inflate? . . . . . . . . . . . . . . . . . . . . . . 3-22 Airbag System (cont'd)
What Will You See after an
Airbag Inflates? . . . . . . . . . . . . . 3-23
When Should an Airbag
Inflate? . . . . . . . . . . . . . . . . . . . . . . 3-21
Where Are the Airbags? . . . . . . 3-20
Airbags Adding Equipment to theVehicle . . . . . . . . . . . . . . . . . . . . . . 3-29
Passenger Status Indicator . . . 5-11
Readiness Light . . . . . . . . . . . . . . 5-11
Servicing Airbag-Equipped Vehicles . . . . . . . . . . . . . . . . . . . . . 3-29
System Check . . . . . . . . . . . . . . . . 3-18
Alarm Vehicle Security . . . . . . . . . . . . . . 2-15
Alert Side Blind Zone (SBZA) . . . . . . 9-37
All-Season Tires . . . . . . . . . . . . . . 10-41
AM-FM Radio . . . . . . . . . . . . . . . . . . . 7-8
Antenna Multi-band . . . . . . . . . . . . . . . . . . . . 7-12
Antilock Brake
System (ABS) . . . . . . . . . . . . . . . . 9-27
Warning Light . . . . . . . . . . . . . . . . . 5-16 Appearance Care
Exterior . . . . . . . . . . . . . . . . . . . . . 10-82
Interior . . . . . . . . . . . . . . . . . . . . . . 10-86
Armrest Rear Seat . . . . . . . . . . . . . . . . . . . . 3-10
Assistance Program, Roadside . . . . . . . . . . . . . . . . . . . . . 13-5
Audio Players . . . . . . . . . . . . . . . . . 7-13 CD . . . . . . . . . . . . . . . . . . . . . . . . . . . 7-13
Audio System Backglass Antenna . . . . . . . . . . . 7-12
Radio Reception . . . . . . . . . . . . . . 7-11
Theft-Deterrent Feature . . . . . . . . 7-2
Automatic Door Locks . . . . . . . . . . . . . . . . . . . 2-12
Headlamp System . . . . . . . . . . . . . 6-3
Transmission . . . . . . . . . . . . . . . . . 9-25
Transmission Fluid . . . . . . . . . .10-11
Automatic Transmission Manual Mode . . . . . . . . . . . . . . . . . 9-26
Shift Lock ControlFunction Check . . . . . . . . . . . 10-23
Auxiliary Devices . . . . . . . . . . . . . . . . . . . . . . . 7-14
Page 393 of 399

Black plate (6,1)Chevrolet Malibu Owner Manual (GMNA-Localizing-U.S./Canada/Mexico-
7575972) - 2015 - crc - 4/1/14
i-6 INDEX
High-Beam On Light . . . . . . . . . . . 5-20
High-Speed Operation . . . . . . . . 10-49
Hill and Mountain Roads . . . . . . . . 9-7
Hill Start Assist (HSA) . . . . . . . . . 9-29
Hood . . . . . . . . . . . . . . . . . . . . . . . . . . 10-4
Horn . . . . . . . . . . . . . . . . . . . . . . . . . . . . 5-3
How to Wear Safety BeltsProperly . . . . . . . . . . . . . . . . . . . . . . 3-12
I
Ignition Positions . . . . . . . . 9-14, 9-16
Ignition Transmission LockCheck . . . . . . . . . . . . . . . . . . . . . . . 10-23
Immobilizer . . . . . . . . . . . . . . . . . . . . 2-17
Indicator Vehicle Ahead . . . . . . . . . . . . . . . . 5-17
Infants and Young Children, Restraints . . . . . . . . . . . . . . . . . . . . 3-33
Infotainment . . . . . . . . . . . . . . . . . . . . 7-1
Infotainment System . . . . . . . . . . 13-15
Instrument Cluster . . . . . . . . . . . . . . 5-8
Instrument Panel Storage Area . . . . . . . . . . . . . . . . . . 4-1
Instrument Panel Overview . . . . . 1-2
Interior Rearview Mirrors . . . . . . . 2-19
Introduction . . . . . . . . . . . . . . . . . . . . . . . iii
J
Jump Starting . . . . . . . . . . . . . . . . . 10-76
K
Key and Lock Messages . . . . . . . 5-27
Keyless Entry Remote (RKE) System . . . . . . . . 2-3
Keys . . . . . . . . . . . . . . . . . . . . . . . . . . . . 2-1
L
Labeling, Tire Sidewall . . . . . . . . 10-42
Lamps Courtesy . . . . . . . . . . . . . . . . . . . . . . . 6-5
Daytime Running (DRL) . . . . . . . 6-2
Dome . . . . . . . . . . . . . . . . . . . . . . . . . . 6-5
Exterior Controls . . . . . . . . . . . . . . . 6-1
Exterior Lamps OffReminder . . . . . . . . . . . . . . . . . . . . 6-2
License Plate . . . . . . . . . . . . . . . 10-32
Malfunction Indicator . . . . . . . . . 5-13 Lamps (cont'd)
Messages . . . . . . . . . . . . . . . . . . . . 5-27
On Reminder . . . . . . . . . . . . . . . . . 5-20
Reading . . . . . . . . . . . . . . . . . . . . . . . 6-5
Lane Departure Warning (LDW) . . . . . . . . . . . . . . . 9-42
Lane Departure Warning Light . . . . . . . . . . . . . . . . . . . . . . . . . 5-16
Lap-Shoulder Belt . . . . . . . . . . . . . 3-13
LATCH System
Replacing Parts after aCrash . . . . . . . . . . . . . . . . . . . . . . . 3-46
LATCH, Lower Anchors and Tethers for Children . . . . . . . . . . 3-39
LED Lighting . . . . . . . . . . . . . . . . . . 10-25
Lighting Entry . . . . . . . . . . . . . . . . . . . . . . . . . . 6-6
Exit . . . . . . . . . . . . . . . . . . . . . . . . . . . . 6-6
Illumination Control . . . . . . . . . . . . 6-5
LED . . . . . . . . . . . . . . . . . . . . . . . . 10-25
Lights Airbag Readiness . . . . . . . . . . . . . 5-11
Antilock Brake System(ABS) Warning . . . . . . . . . . . . . . 5-16
Brake System Warning . . . . . . . 5-15
Charging System . . . . . . . . . . . . . 5-12
Cruise Control . . . . . . . . . . . . . . . . 5-20