2015 CHEVROLET IMPALA hood open
[x] Cancel search: hood openPage 50 of 413
Black plate (17,1)Chevrolet Impala Owner Manual (GMNA-Localizing-U.S./Canada-7576026) -
2015 - crc 2nd edition - 8/21/14
Keys, Doors, and Windows 2-17
Off:Alarm system is disarmed.
On Solid: Vehicle is secured
during the delay to arm the system.
Fast Flash: Vehicle is unsecured.
A door, the trunk, or the hood
is open.
Slow Flash: Alarm system is
armed.
Arming the Alarm System
1. Turn off the vehicle.
2. Lock the vehicle with one of the following:
.Use the Remote Keyless
Entry (RKE) transmitter.
.If the vehicle has Keyless
Access, use the door
handle lock/unlock button
with the RKE transmitter
within 1 m (3 ft) of the
vehicle.
.With a door open, press the
inside
Q. 3. After 30 seconds the alarm
system will arm, and the
indicator light will begin to slowly
flash indicating the alarm system
is operating. Pressing
Qon the
RKE transmitter a second time
will bypass the 30-second delay
and immediately arm the alarm
system.
The theft-deterrent alarm system will
not arm if the doors are locked with
the key.
If the driver door is opened without
first unlocking the RKE transmitter,
the horn will chirp and the lights will
flash to indicate pre-alarm. If the
vehicle is not started, or the door is
not unlocked by pressing
Kon the
RKE transmitter during the
10-second pre-alarm, the alarm will
be activated.
If a door, the trunk, or the hood is
opened without first disarming the
system, the turn signals will flash
and the horn will sound for about 30 seconds. The alarm system will
then re-arm to monitor for the next
unauthorized event.
Disarming the System
To disarm the system, do one of the
following:
.PressKon the RKE transmitter.
.If the vehicle has Keyless
Access, unlock the vehicle using
the door handle lock/unlock
button with the RKE transmitter
within 1 m (3 ft) of the vehicle.
.Start the vehicle.
To avoid setting off the alarm by
accident:
.Lock the vehicle after all
occupants have left the vehicle
and all doors are closed.
.Always unlock a door with the
RKE transmitter.
Unlocking the driver door with the
key will not disarm the system or
turn off the alarm.
Page 145 of 413
Black plate (30,1)Chevrolet Impala Owner Manual (GMNA-Localizing-U.S./Canada-7576026) -
2015 - crc 2nd edition - 8/21/14
5-30 Instruments and Controls
gas pedal. When this occurs, ACC
will not brake. SeeAdaptive Cruise
Control on page 9-35.
SERVICE ADAPTIVE CRUISE
CONTROL
This message displays when the
Adaptive Cruise Control (ACC)
needs service. Take the vehicle to
your dealer.
SHIFT TO PARK BEFORE
EXITING
This message may display if
Adaptive Cruise Control (ACC) is
engaged holding the vehicle at a
stop, and the driver attempts to exit
the vehicle. Put the vehicle in
P (Park) before exiting.
Door Ajar Messages
DOOR OPEN
A door open symbol will display on
the DIC showing which door is
open. If the vehicle has been shifted
out of P (Park), a DOOR OPEN
message will also be displayed. If the shift lever is in M (Manual
Mode), the DOOR OPEN message
will display if the vehicle starts to
move. Close the door completely.
HOOD OPEN
This message will display along with
a hood open symbol when the hood
is open. Close the hood completely.
TRUNK OPEN
This message will display along with
a symbol when the trunk is open.
Close the trunk completely.
Engine Cooling System
Messages
A/C OFF DUE TO HIGH
ENGINE TEMP
This message displays when the
engine coolant becomes hotter than
the normal operating temperature.
To avoid added strain on a hot
engine, the air conditioning
compressor automatically turns off.
When the coolant temperature
returns to normal, the airconditioning compressor turns back
on. The vehicle can continue to be
driven.
If this message continues to appear,
have the system repaired by your
dealer as soon as possible to avoid
damage to the engine.
ENGINE OVERHEATED
—
IDLE ENGINE
This message displays when the
engine coolant temperature is too
hot. Stop and allow the vehicle to
idle until it cools down.
ENGINE OVERHEATED —
STOP ENGINE
This message displays and a
continuous chime sounds if the
engine cooling system reaches
unsafe temperatures for operation.
Stop and turn off the vehicle as
soon as it is safe to do so to avoid
severe damage. This message
clears when the engine has cooled
to a safe operating temperature.
Page 211 of 413
Black plate (8,1)Chevrolet Impala Owner Manual (GMNA-Localizing-U.S./Canada-7576026) -
2015 - crc 2nd edition - 8/21/14
8-8 Climate Controls
Operation Tips
.Keep all outlets open whenever
possible for best system
performance.
.Keep the paths under all seats
clear of objects to help circulate
the air inside the vehicle more
effectively.
.Use of non-GM approved hood
deflectors can adversely affect
the performance of the system.
.Do not attach any devices to the
air vent louvers. This restricts
airflow and may cause damage
to the air vents.
Maintenance
Passenger Compartment
Air Filter
The passenger compartment air
filter reduces dust, pollen, and other
airborne irritants from outside air
that is pulled into the vehicle. The
filter will need to be replaced
periodically. SeeMaintenance
Schedule on page 11-2.
Using the climate control system
without an air filter installed is not
recommended. Water or other
debris could enter the system and
result in leaks or noises. Always
install a new filter when removing
the old filter.
For more information on filter
replacement, see your dealer.
Page 232 of 413
Black plate (21,1)Chevrolet Impala Owner Manual (GMNA-Localizing-U.S./Canada-7576026) -
2015 - crc 2nd edition - 8/21/14
Driving and Operating 9-21
To Use the Engine Coolant
Heater
1. Turn off the engine.
2. Open the hood and unwrap theelectrical cord. The electrical
cord is on the driver side of the
engine compartment, between
the fender and the engine
compartment fuse block.
Check the heater cord for
damage. If it is damaged, do not
use it. See your dealer for a
replacement. Inspect the cord for
damage yearly
3. Plug it into a normal, grounded 110-volt AC outlet.
{Warning
Improper use of the heater cord
or an extension cord can damage
the cord and may result in
overheating and fire.
.Plug the cord into a
three-prong electrical utility
receptacle that is protected
by a ground fault detection
function. An ungrounded
outlet could cause an electric
shock.
.Use a weatherproof,
heavy-duty, 15 amp-rated
extension cord if needed.
Failure to use the
recommended extension cord
in good operating condition,
or using a damaged heater or
extension cord, could make it
(Continued)
Warning (Continued)
overheat and cause a fire,
property damage, electric
shock, and injury.
.Do not operate the vehicle
with the heater cord
permanently attached to the
vehicle. Possible heater cord
and thermostat damage could
occur.
.While in use, do not let the
heater cord touch vehicle
parts or sharp edges. Never
close the hood on the
heater cord.
.Before starting the vehicle,
unplug the cord, reattach the
cover to the plug, and
securely fasten the cord.
Keep the cord away from any
moving parts.
Page 279 of 413
Black plate (4,1)Chevrolet Impala Owner Manual (GMNA-Localizing-U.S./Canada-7576026) -
2015 - crc 2nd edition - 8/21/14
10-4 Vehicle Care
This vehicle has an airbag system.
Before attempting to do your own
service work, seeAirbag System
Check on page 3-32.
Keep a record with all parts receipts
and list the mileage and the date of
any service work performed. See
Maintenance Records on
page 11-13.
{Caution
Even small amounts of
contamination can cause damage
to vehicle systems. Do not allow
contaminants to contact the fluids,
reservoir caps, or dipsticks.
Hood
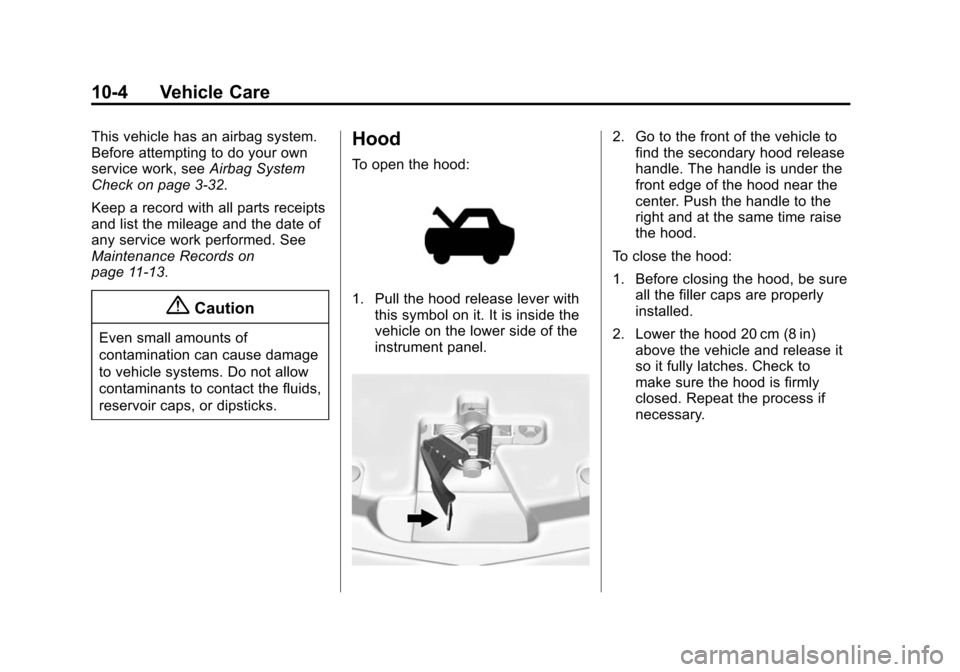
To open the hood:
1. Pull the hood release lever with this symbol on it. It is inside the
vehicle on the lower side of the
instrument panel.
2. Go to the front of the vehicle tofind the secondary hood release
handle. The handle is under the
front edge of the hood near the
center. Push the handle to the
right and at the same time raise
the hood.
To close the hood:
1. Before closing the hood, be sure all the filler caps are properly
installed.
2. Lower the hood 20 cm (8 in) above the vehicle and release it
so it fully latches. Check to
make sure the hood is firmly
closed. Repeat the process if
necessary.
Page 288 of 413
Black plate (13,1)Chevrolet Impala Owner Manual (GMNA-Localizing-U.S./Canada-7576026) -
2015 - crc 2nd edition - 8/21/14
Vehicle Care 10-13
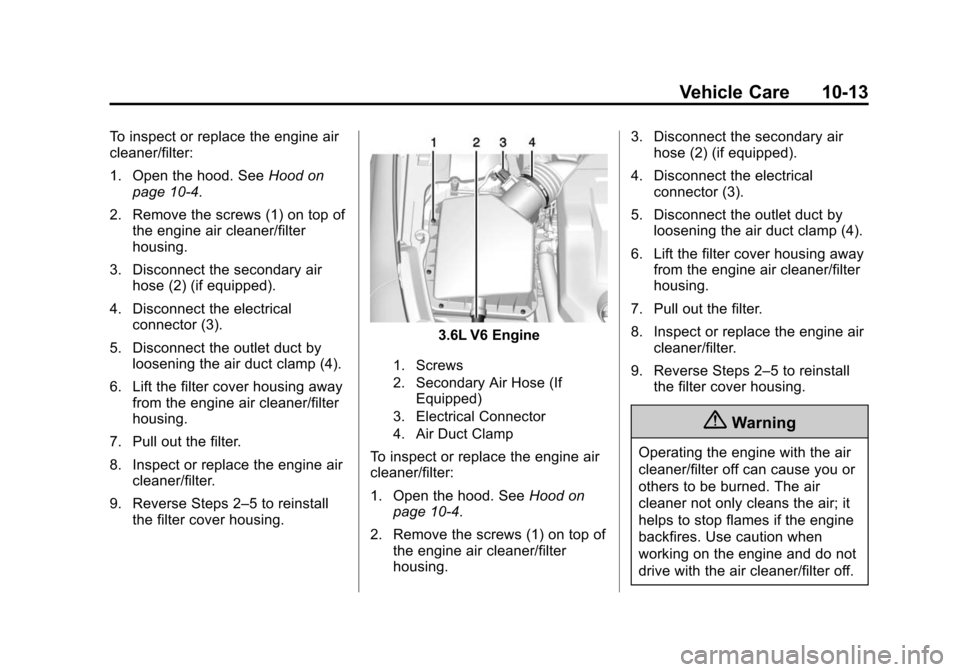
To inspect or replace the engine air
cleaner/filter:
1. Open the hood. SeeHood on
page 10-4.
2. Remove the screws (1) on top of the engine air cleaner/filter
housing.
3. Disconnect the secondary air hose (2) (if equipped).
4. Disconnect the electrical connector (3).
5. Disconnect the outlet duct by loosening the air duct clamp (4).
6. Lift the filter cover housing away from the engine air cleaner/filter
housing.
7. Pull out the filter.
8. Inspect or replace the engine air cleaner/filter.
9. Reverse Steps 2–5 to reinstall the filter cover housing.
3.6L V6 Engine
1. Screws
2. Secondary Air Hose (If
Equipped)
3. Electrical Connector
4. Air Duct Clamp
To inspect or replace the engine air
cleaner/filter:
1. Open the hood. See Hood on
page 10-4.
2. Remove the screws (1) on top of the engine air cleaner/filter
housing. 3. Disconnect the secondary air
hose (2) (if equipped).
4. Disconnect the electrical connector (3).
5. Disconnect the outlet duct by loosening the air duct clamp (4).
6. Lift the filter cover housing away from the engine air cleaner/filter
housing.
7. Pull out the filter.
8. Inspect or replace the engine air cleaner/filter.
9. Reverse Steps 2–5 to reinstall the filter cover housing.
{Warning
Operating the engine with the air
cleaner/filter off can cause you or
others to be burned. The air
cleaner not only cleans the air; it
helps to stop flames if the engine
backfires. Use caution when
working on the engine and do not
drive with the air cleaner/filter off.
Page 302 of 413
Black plate (27,1)Chevrolet Impala Owner Manual (GMNA-Localizing-U.S./Canada-7576026) -
2015 - crc 2nd edition - 8/21/14
Vehicle Care 10-27
To replace one of the headlamp
bulbs:
1. Open the hood. SeeHood on
page 10-4.
2. For the driver side bulb, remove the windshield washer bottle
filler neck by firmly pulling it
straight up and out of the bottle.
3. Remove the cap from the back of the headlamp assembly by
turning it counterclockwise.
4. Disconnect the electricalconnector.
5. Remove the bulb from the lamp assembly by turning
counterclockwise. 6. Install a new bulb in the lamp
assembly.
7. Connect the electrical connector.
8. Replace the cap on the back of the headlamp assembly by
turning it clockwise.
9. For the driver side, reinstall the windshield washer bottle filler
neck by firmly pushing it straight
into the bottle. Ensure that the
filler neck clip engages into the
underhood electrical center
retainer.
Uplevel Headlamp Assembly
The uplevel model vehicle has a
high intensity discharge (HID) high/
low beam headlamp, a parking/turn
signal lamp, and a sidemarker lamp
on the headlamp assembly.
For replacement of the headlamp on
an HID assembly, contact your
dealer. See High Intensity
Discharge (HID) Lighting on
page 10-26.
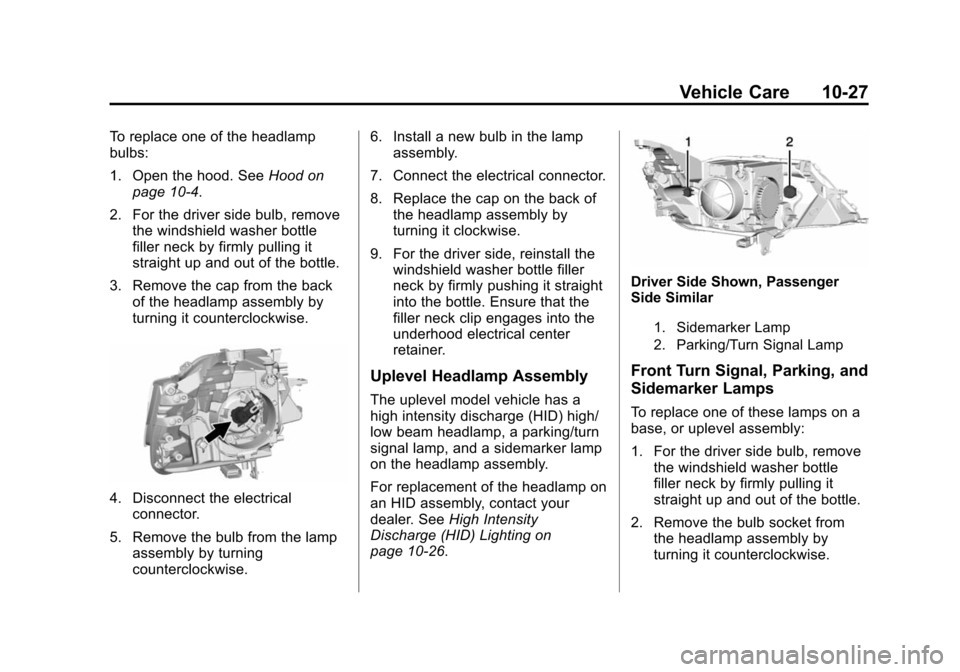
Driver Side Shown, Passenger
Side Similar
1. Sidemarker Lamp
2. Parking/Turn Signal Lamp
Front Turn Signal, Parking, and
Sidemarker Lamps
To replace one of these lamps on a
base, or uplevel assembly:
1. For the driver side bulb, remove
the windshield washer bottle
filler neck by firmly pulling it
straight up and out of the bottle.
2. Remove the bulb socket from the headlamp assembly by
turning it counterclockwise.
Page 303 of 413
Black plate (28,1)Chevrolet Impala Owner Manual (GMNA-Localizing-U.S./Canada-7576026) -
2015 - crc 2nd edition - 8/21/14
10-28 Vehicle Care
3. Remove the bulb from thesocket.
4. Replace the bulb in the bulb socket.
5. Install the bulb socket in the headlamp assembly by turning it
clockwise.
6. For the driver side, reinstall the windshield washer bottle filler
neck by firmly pushing it straight
into the bottle. Ensure that the
filler neck clip engages into the
underhood electrical center
retainer.
Taillamps, Turn Signal,
Stoplamps, and Back-Up
Lamps
Trunk Deck Inboard Taillamp
1. Open the trunk. See Trunk on
page 2-15.
2. Remove the push pins and pull back the trunk deck trim.
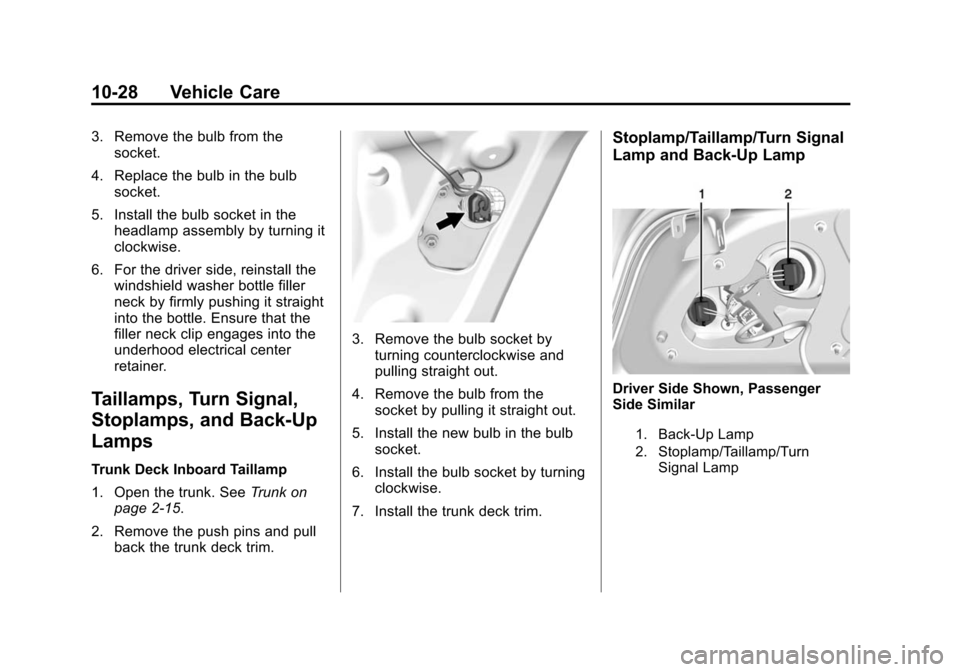
3. Remove the bulb socket by
turning counterclockwise and
pulling straight out.
4. Remove the bulb from the socket by pulling it straight out.
5. Install the new bulb in the bulb socket.
6. Install the bulb socket by turning clockwise.
7. Install the trunk deck trim.
Stoplamp/Taillamp/Turn Signal
Lamp and Back-Up Lamp
Driver Side Shown, Passenger
Side Similar
1. Back-Up Lamp
2. Stoplamp/Taillamp/Turn Signal Lamp