2015 CHEVROLET IMPALA clock
[x] Cancel search: clockPage 204 of 413
Black plate (1,1)Chevrolet Impala Owner Manual (GMNA-Localizing-U.S./Canada-7576026) -
2015 - crc 2nd edition - 8/21/14
Climate Controls 8-1
Climate Controls
Climate Control Systems
Climate Control Systems . . . . . . 8-1
Dual Automatic Climate ControlSystem . . . . . . . . . . . . . . . . . . . . . . 8-3
Air Vents
Air Vents . . . . . . . . . . . . . . . . . . . . . . 8-7
Maintenance
Passenger Compartment AirFilter . . . . . . . . . . . . . . . . . . . . . . . . . 8-8
Climate Control Systems
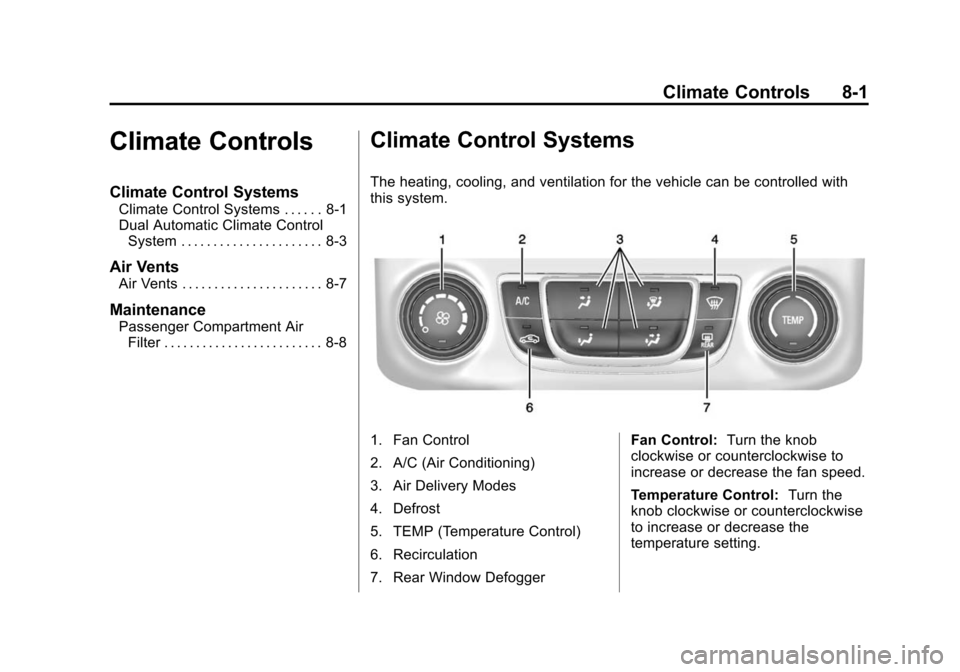
The heating, cooling, and ventilation for the vehicle can be controlled with
this system.
1. Fan Control
2. A/C (Air Conditioning)
3. Air Delivery Modes
4. Defrost
5. TEMP (Temperature Control)
6. Recirculation
7. Rear Window Defogger Fan Control:
Turn the knob
clockwise or counterclockwise to
increase or decrease the fan speed.
Temperature Control: Turn the
knob clockwise or counterclockwise
to increase or decrease the
temperature setting.
Page 207 of 413
Black plate (4,1)Chevrolet Impala Owner Manual (GMNA-Localizing-U.S./Canada-7576026) -
2015 - crc 2nd edition - 8/21/14
8-4 Climate Controls
.Select a temperature setting that
is higher in hot weather and
lower in cold weather.
.Turn off the air conditioning
when it is not needed.
.Only use defrost when needed
to clear the windows.
Automatic Operation
The system automatically controls
the fan speed, air delivery, air
conditioning, and recirculation in
order to heat or cool the vehicle to
the desired temperature.
When the indicator light is on, the
system is in full automatic operation.
If the air delivery mode or fan
setting is manually adjusted, the
auto indicator turns off and displays
will show the selected settings.
To place the system in
automatic mode:
1. Press AUTO. 2. Set the temperature. Allow the
system time to stabilize. Then
adjust the temperature as
needed for best comfort.
To improve fuel efficiency and to
cool the vehicle faster, recirculation
may be automatically selected in
warm weather.
The recirculation light will not come
on when automatically controlled.
Press
hto manually select
recirculation; press it again to select
outside air.
Manual Operation
Driver and Passenger
Temperature Control: The
temperature can be adjusted
separately for the driver and
passenger.
Turn the knob clockwise or
counterclockwise to increase or
decrease the driver or passenger
temperature setting.
SYNC: Press to link all climate
zone settings to the driver settings.
The SYNC indicator light will turn on. When the passenger settings
are adjusted, the SYNC indicator
light is off.
O(Fan On/Off):
Press the knob to
turn the fan on or off.
Fan Control: Turn the knob
clockwise or counterclockwise to
increase or decrease the fan speed.
Press AUTO to return to automatic
operation.
Air Delivery Modes: Press
Y,\,
[, or-to change the direction of
the airflow. An indicator light comes
on in the selected mode button.
Changing the mode cancels the
automatic operation and the system
goes into manual mode. Press
AUTO to return to automatic
operation.
Y(Vent): Air is directed to the
instrument panel outlets.
\(Bi-Level): Air is directed to the
instrument panel outlets and the
floor outlets.
Page 268 of 413
Black plate (57,1)Chevrolet Impala Owner Manual (GMNA-Localizing-U.S./Canada-7576026) -
2015 - crc 2nd edition - 8/21/14
Driving and Operating 9-57
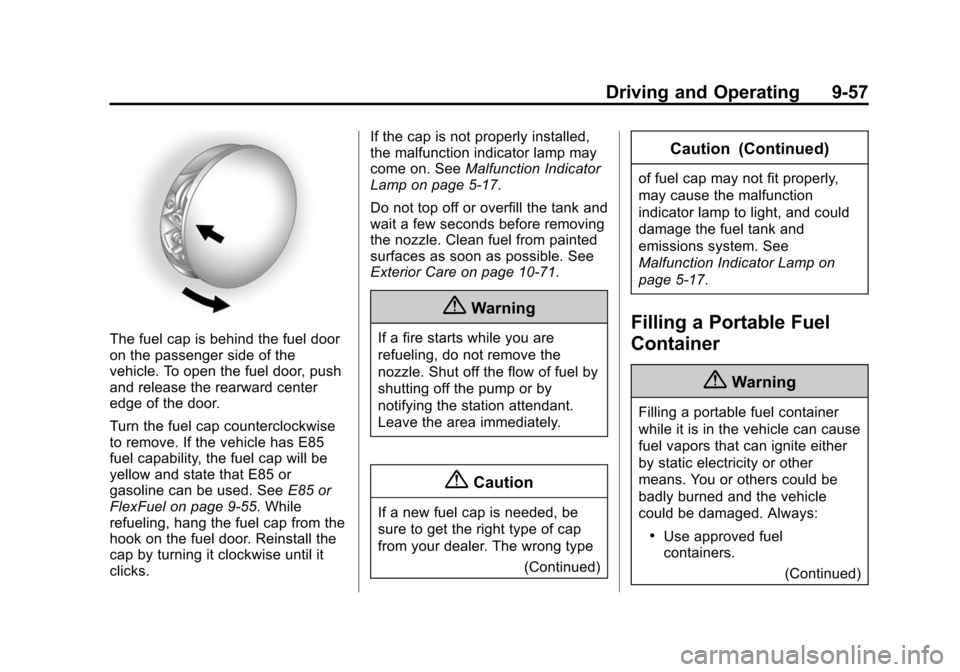
The fuel cap is behind the fuel door
on the passenger side of the
vehicle. To open the fuel door, push
and release the rearward center
edge of the door.
Turn the fuel cap counterclockwise
to remove. If the vehicle has E85
fuel capability, the fuel cap will be
yellow and state that E85 or
gasoline can be used. SeeE85 or
FlexFuel on page 9-55. While
refueling, hang the fuel cap from the
hook on the fuel door. Reinstall the
cap by turning it clockwise until it
clicks. If the cap is not properly installed,
the malfunction indicator lamp may
come on. See
Malfunction Indicator
Lamp on page 5-17.
Do not top off or overfill the tank and
wait a few seconds before removing
the nozzle. Clean fuel from painted
surfaces as soon as possible. See
Exterior Care on page 10-71.
{Warning
If a fire starts while you are
refueling, do not remove the
nozzle. Shut off the flow of fuel by
shutting off the pump or by
notifying the station attendant.
Leave the area immediately.
{Caution
If a new fuel cap is needed, be
sure to get the right type of cap
from your dealer. The wrong type
(Continued)
Caution (Continued)
of fuel cap may not fit properly,
may cause the malfunction
indicator lamp to light, and could
damage the fuel tank and
emissions system. See
Malfunction Indicator Lamp on
page 5-17.
Filling a Portable Fuel
Container
{Warning
Filling a portable fuel container
while it is in the vehicle can cause
fuel vapors that can ignite either
by static electricity or other
means. You or others could be
badly burned and the vehicle
could be damaged. Always:
.Use approved fuel
containers.(Continued)
Page 292 of 413
Black plate (17,1)Chevrolet Impala Owner Manual (GMNA-Localizing-U.S./Canada-7576026) -
2015 - crc 2nd edition - 8/21/14
Vehicle Care 10-17
water and DEX-COOL coolant at the
coolant surge tank, but be sure the
cooling system, including the
coolant surge tank pressure cap, is
cool before you do it.
{Warning
Steam and scalding liquids from a
hot cooling system can blow out
and burn you badly. Never turn
the cap when the cooling system,
including the surge tank pressure
cap, is hot. Wait for the cooling
system and surge tank pressure
cap to cool.
{Caution
In cold weather, water can freeze
and crack the engine, radiator,
heater core, and other parts. Use
the recommended coolant and
the proper coolant mixture.
{Warning
You can be burned if you spill
coolant on hot engine parts.
Coolant contains ethylene glycol
and it will burn if the engine parts
are hot enough. Do not spill
coolant on a hot engine.
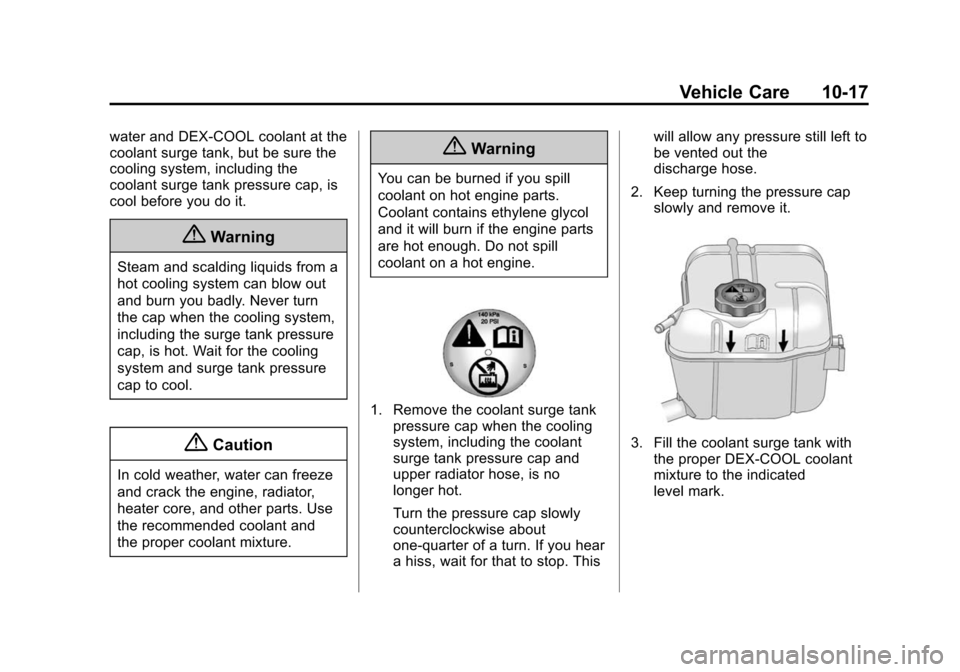
1. Remove the coolant surge tankpressure cap when the cooling
system, including the coolant
surge tank pressure cap and
upper radiator hose, is no
longer hot.
Turn the pressure cap slowly
counterclockwise about
one-quarter of a turn. If you hear
a hiss, wait for that to stop. This will allow any pressure still left to
be vented out the
discharge hose.
2. Keep turning the pressure cap slowly and remove it.
3. Fill the coolant surge tank withthe proper DEX-COOL coolant
mixture to the indicated
level mark.
Page 302 of 413
Black plate (27,1)Chevrolet Impala Owner Manual (GMNA-Localizing-U.S./Canada-7576026) -
2015 - crc 2nd edition - 8/21/14
Vehicle Care 10-27
To replace one of the headlamp
bulbs:
1. Open the hood. SeeHood on
page 10-4.
2. For the driver side bulb, remove the windshield washer bottle
filler neck by firmly pulling it
straight up and out of the bottle.
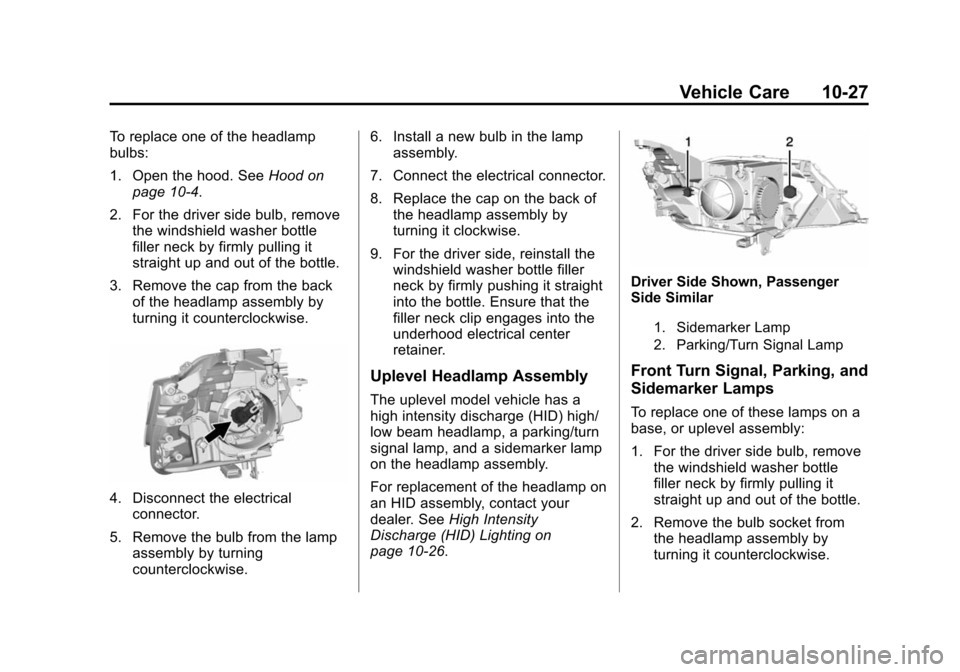
3. Remove the cap from the back of the headlamp assembly by
turning it counterclockwise.
4. Disconnect the electricalconnector.
5. Remove the bulb from the lamp assembly by turning
counterclockwise. 6. Install a new bulb in the lamp
assembly.
7. Connect the electrical connector.
8. Replace the cap on the back of the headlamp assembly by
turning it clockwise.
9. For the driver side, reinstall the windshield washer bottle filler
neck by firmly pushing it straight
into the bottle. Ensure that the
filler neck clip engages into the
underhood electrical center
retainer.
Uplevel Headlamp Assembly
The uplevel model vehicle has a
high intensity discharge (HID) high/
low beam headlamp, a parking/turn
signal lamp, and a sidemarker lamp
on the headlamp assembly.
For replacement of the headlamp on
an HID assembly, contact your
dealer. See High Intensity
Discharge (HID) Lighting on
page 10-26.
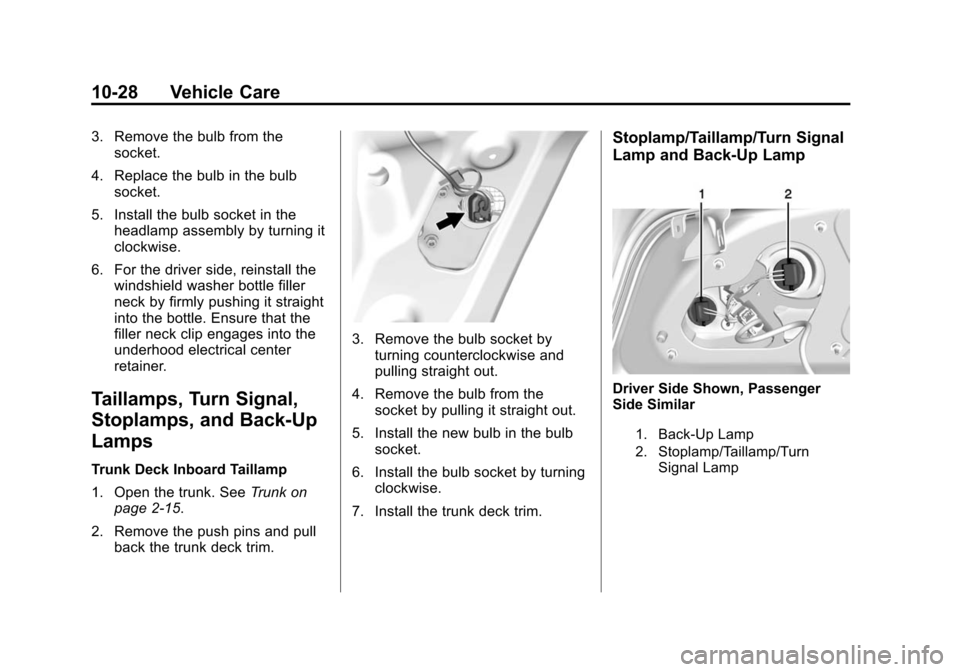
Driver Side Shown, Passenger
Side Similar
1. Sidemarker Lamp
2. Parking/Turn Signal Lamp
Front Turn Signal, Parking, and
Sidemarker Lamps
To replace one of these lamps on a
base, or uplevel assembly:
1. For the driver side bulb, remove
the windshield washer bottle
filler neck by firmly pulling it
straight up and out of the bottle.
2. Remove the bulb socket from the headlamp assembly by
turning it counterclockwise.
Page 303 of 413
Black plate (28,1)Chevrolet Impala Owner Manual (GMNA-Localizing-U.S./Canada-7576026) -
2015 - crc 2nd edition - 8/21/14
10-28 Vehicle Care
3. Remove the bulb from thesocket.
4. Replace the bulb in the bulb socket.
5. Install the bulb socket in the headlamp assembly by turning it
clockwise.
6. For the driver side, reinstall the windshield washer bottle filler
neck by firmly pushing it straight
into the bottle. Ensure that the
filler neck clip engages into the
underhood electrical center
retainer.
Taillamps, Turn Signal,
Stoplamps, and Back-Up
Lamps
Trunk Deck Inboard Taillamp
1. Open the trunk. See Trunk on
page 2-15.
2. Remove the push pins and pull back the trunk deck trim.
3. Remove the bulb socket by
turning counterclockwise and
pulling straight out.
4. Remove the bulb from the socket by pulling it straight out.
5. Install the new bulb in the bulb socket.
6. Install the bulb socket by turning clockwise.
7. Install the trunk deck trim.
Stoplamp/Taillamp/Turn Signal
Lamp and Back-Up Lamp
Driver Side Shown, Passenger
Side Similar
1. Back-Up Lamp
2. Stoplamp/Taillamp/Turn Signal Lamp
Page 304 of 413
Black plate (29,1)Chevrolet Impala Owner Manual (GMNA-Localizing-U.S./Canada-7576026) -
2015 - crc 2nd edition - 8/21/14
Vehicle Care 10-29
{Caution
Improper lamp assembly removal
and installation can cause leaks
and water intrusion which may
cause damage to the taillamp. Do
not remove the taillamp assembly
to replace a bulb. Use the trunk
opening to access the bulb.
To replace one of these bulbs:
1. Open the trunk. See Trunk on
page 2-15.
2. Remove the push pins and pull the trunk trim away from the
taillamp assembly.
3. Remove the bulb socket from the taillamp assembly by turning
it counterclockwise.
4. Remove the bulb from the socket by turning the bulb
counterclockwise one-quarter
turn and pulling it straight out.
5. Install a new bulb into the socket. 6. Install the bulb socket into the
taillamp assembly by turning it
clockwise.
7. Install the trunk trim and push pins.
License Plate Lamp
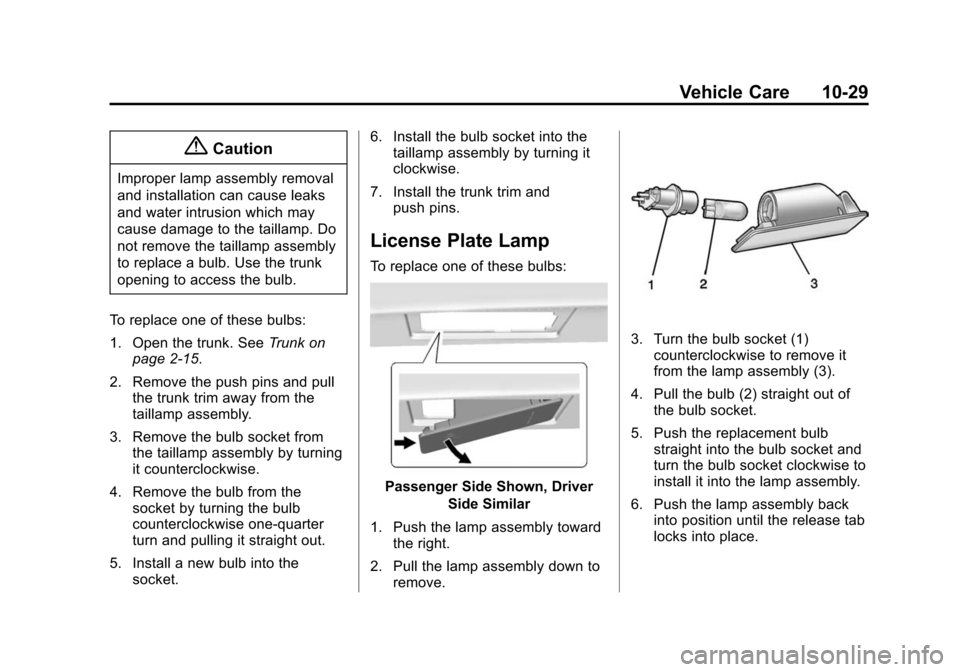
To replace one of these bulbs:
Passenger Side Shown, Driver
Side Similar
1. Push the lamp assembly toward the right.
2. Pull the lamp assembly down to remove.
3. Turn the bulb socket (1)counterclockwise to remove it
from the lamp assembly (3).
4. Pull the bulb (2) straight out of the bulb socket.
5. Push the replacement bulb straight into the bulb socket and
turn the bulb socket clockwise to
install it into the lamp assembly.
6. Push the lamp assembly back into position until the release tab
locks into place.
Page 335 of 413
Black plate (60,1)Chevrolet Impala Owner Manual (GMNA-Localizing-U.S./Canada-7576026) -
2015 - crc 2nd edition - 8/21/14
10-60 Vehicle Care
Tire Changing
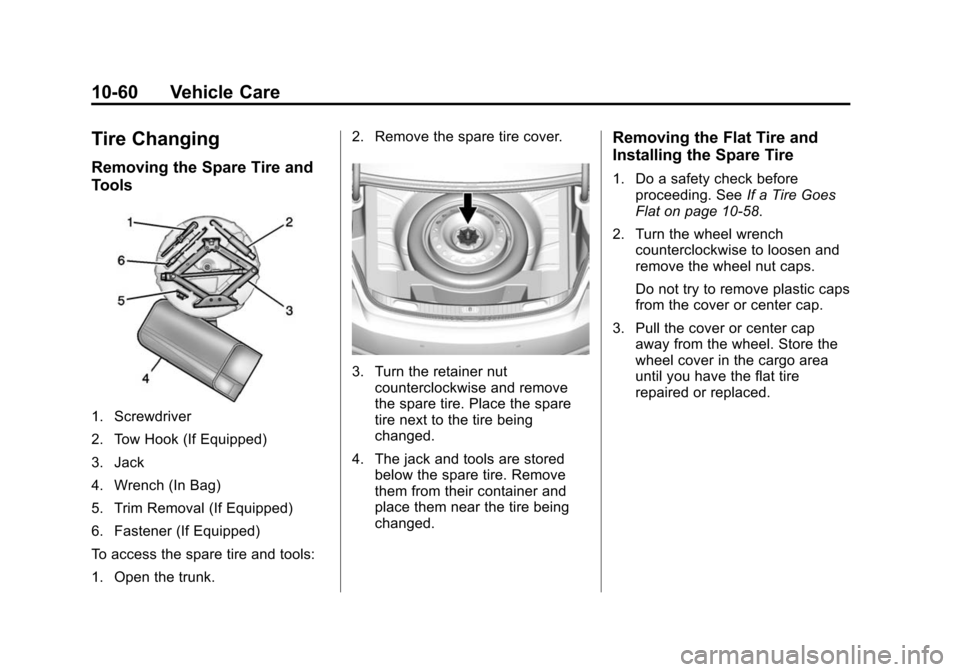
Removing the Spare Tire and
Tools
1. Screwdriver
2. Tow Hook (If Equipped)
3. Jack
4. Wrench (In Bag)
5. Trim Removal (If Equipped)
6. Fastener (If Equipped)
To access the spare tire and tools:
1. Open the trunk.2. Remove the spare tire cover.
3. Turn the retainer nut
counterclockwise and remove
the spare tire. Place the spare
tire next to the tire being
changed.
4. The jack and tools are stored below the spare tire. Remove
them from their container and
place them near the tire being
changed.
Removing the Flat Tire and
Installing the Spare Tire
1. Do a safety check before
proceeding. See If a Tire Goes
Flat on page 10-58.
2. Turn the wheel wrench counterclockwise to loosen and
remove the wheel nut caps.
Do not try to remove plastic caps
from the cover or center cap.
3. Pull the cover or center cap away from the wheel. Store the
wheel cover in the cargo area
until you have the flat tire
repaired or replaced.