2015 CHEVROLET EXPRESS wheel
[x] Cancel search: wheelPage 303 of 379
Black plate (70,1)Chevrolet Express Owner Manual (GMNA-Localizing-U.S./Canada/Mexico-
7707481) - 2015 - CRC - 4/30/14
10-70 Vehicle Care
in order to avoid any
interference with the exhaust
pipe (2).
{Warning
Getting under a vehicle when it is
jacked up is dangerous. If the
vehicle slips off the jack you could
be badly injured or killed. Never
get under a vehicle when it is
supported only by a jack.
{Warning
Raising the vehicle with the jack
improperly positioned can
damage the vehicle and even
make the vehicle fall. To help
avoid personal injury and vehicle
damage, be sure to fit the jack lift
head into the proper location
before raising the vehicle.5. Turn the wheel wrench
clockwise to raise the vehicle.
Raise the vehicle far enough off
the ground so there is enough
room for the spare tire to fit.
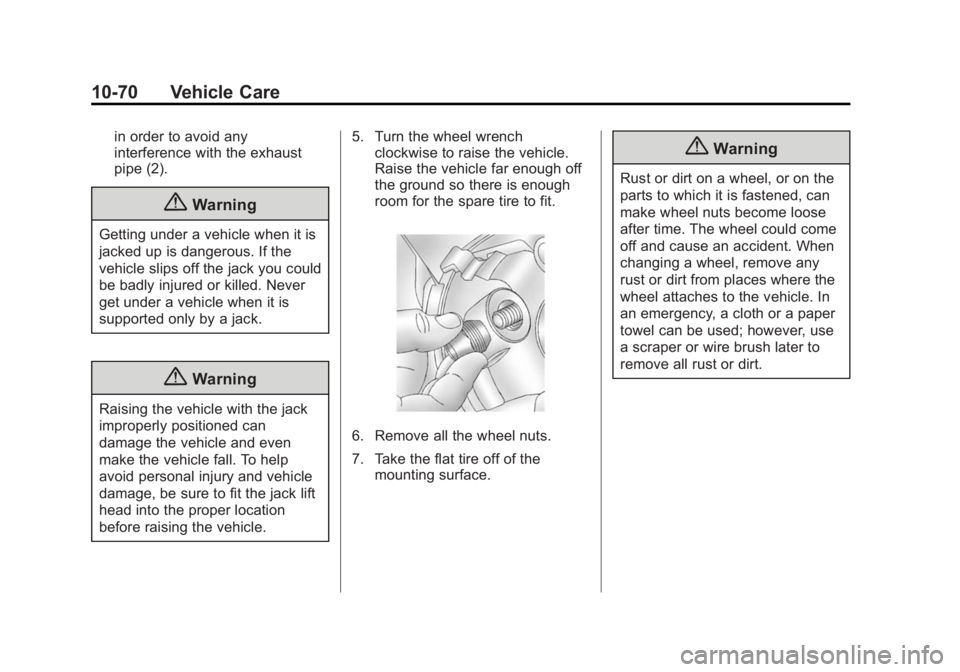
6. Remove all the wheel nuts.
7. Take the flat tire off of themounting surface.
{Warning
Rust or dirt on a wheel, or on the
parts to which it is fastened, can
make wheel nuts become loose
after time. The wheel could come
off and cause an accident. When
changing a wheel, remove any
rust or dirt from places where the
wheel attaches to the vehicle. In
an emergency, a cloth or a paper
towel can be used; however, use
a scraper or wire brush later to
remove all rust or dirt.
Page 304 of 379
Black plate (71,1)Chevrolet Express Owner Manual (GMNA-Localizing-U.S./Canada/Mexico-
7707481) - 2015 - CRC - 4/30/14
Vehicle Care 10-71
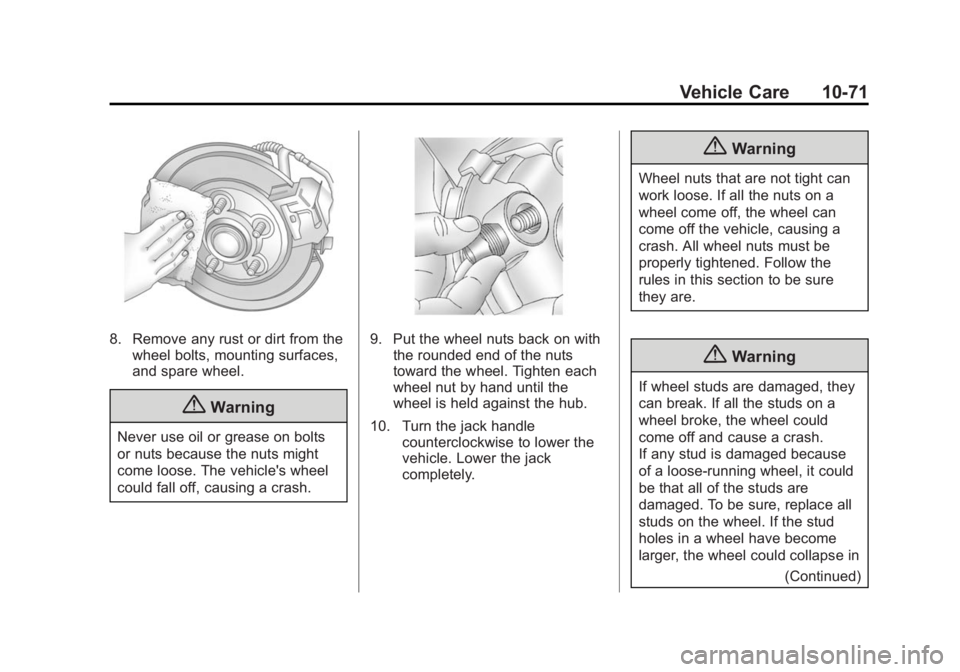
8. Remove any rust or dirt from thewheel bolts, mounting surfaces,
and spare wheel.
{Warning
Never use oil or grease on bolts
or nuts because the nuts might
come loose. The vehicle's wheel
could fall off, causing a crash.
9. Put the wheel nuts back on withthe rounded end of the nuts
toward the wheel. Tighten each
wheel nut by hand until the
wheel is held against the hub.
10. Turn the jack handle counterclockwise to lower the
vehicle. Lower the jack
completely.
{Warning
Wheel nuts that are not tight can
work loose. If all the nuts on a
wheel come off, the wheel can
come off the vehicle, causing a
crash. All wheel nuts must be
properly tightened. Follow the
rules in this section to be sure
they are.
{Warning
If wheel studs are damaged, they
can break. If all the studs on a
wheel broke, the wheel could
come off and cause a crash.
If any stud is damaged because
of a loose-running wheel, it could
be that all of the studs are
damaged. To be sure, replace all
studs on the wheel. If the stud
holes in a wheel have become
larger, the wheel could collapse in
(Continued)
Page 305 of 379
Black plate (72,1)Chevrolet Express Owner Manual (GMNA-Localizing-U.S./Canada/Mexico-
7707481) - 2015 - CRC - 4/30/14
10-72 Vehicle Care
Warning (Continued)
operation. Replace any wheel if
its stud holes have become larger
or distorted in any way. Inspect
hubs and hub‐piloted wheels for
damage. Because of loose
running wheels, piloting pad
damage may occur and require
replacement of the entire hub, for
proper centering of the wheels.
When replacing studs, hubs,
wheel nuts or wheels, be sure to
use GM original equipment parts.
{Warning
Wheel nuts that are improperly or
incorrectly tightened can cause
the wheels to become loose or
come off. The wheel nuts should
be tightened with a torque wrench
to the proper torque specification
after replacing. Follow the torque(Continued)
Warning (Continued)
specification supplied by the
aftermarket manufacturer when
using accessory locking wheel
nuts. SeeCapacities and
Specifications on page 12-2 for
original equipment wheel nut
torque specifications.
{Caution
Improperly tightened wheel nuts
can lead to brake pulsation and
rotor damage. To avoid expensive
brake repairs, evenly tighten the
wheel nuts in the proper
sequence and to the proper
torque specification. See
Capacities and Specifications on
page 12-2 for the wheel nut
torque specification.
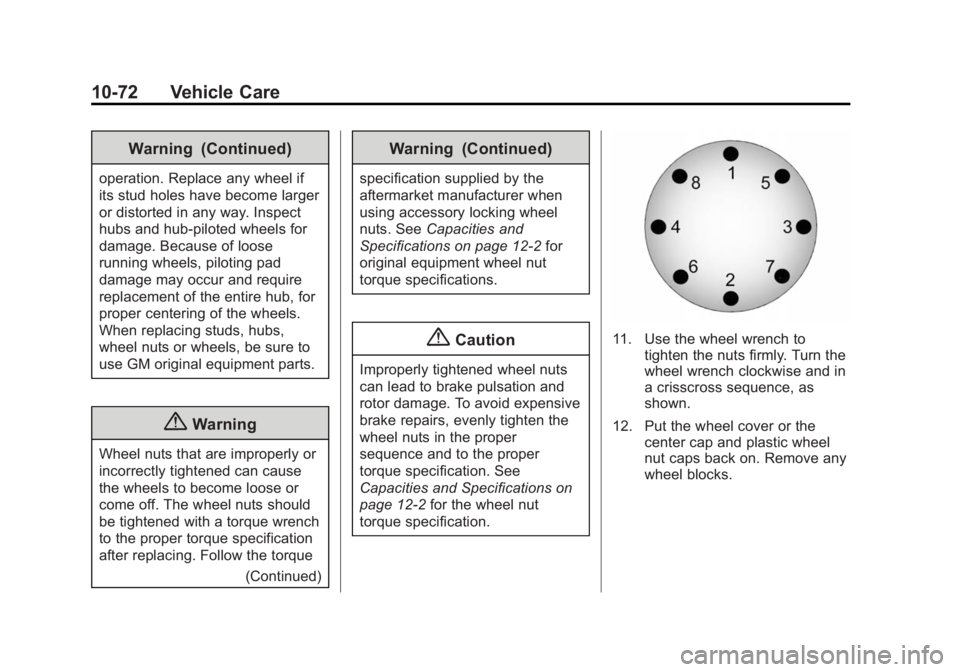
11. Use the wheel wrench to tighten the nuts firmly. Turn the
wheel wrench clockwise and in
a crisscross sequence, as
shown.
12. Put the wheel cover or the center cap and plastic wheel
nut caps back on. Remove any
wheel blocks.
Page 306 of 379

Black plate (73,1)Chevrolet Express Owner Manual (GMNA-Localizing-U.S./Canada/Mexico-
7707481) - 2015 - CRC - 4/30/14
Vehicle Care 10-73
Have a technician check the
wheel nut tightness of all
wheels with a torque wrench
after the first 160 km (100 mi)
and then 1 600 km (1,000 mi)
after that. Repeat this service
whenever a tire is removed or
serviced. SeeCapacities and
Specifications on page 12-2 for
more information.
Storing a Flat or Spare Tire
and Tools
{Warning
Storing a jack, a tire, or other
equipment in the passenger
compartment of the vehicle could
cause injury. In a sudden stop or
collision, loose equipment could
strike someone. Store all these in
the proper place.
1. Put the tire on the ground at the rear of the vehicle with the valve
stem pointed down.
2. Pull the retaining bar through thecenter of the wheel, making sure
it is properly attached.
3. Pull the wheel toward the rear of the vehicle, keeping the cable
tight.
4. Open the passenger side rear door.
5. Insert the chisel end of the hoist handle, on an angle, through the
hole in the rear floor panel
above the bumper.
6. Turn the wheel wrench clockwise to fully raise the tire
against the underside of the
vehicle. Continue turning the
wheel wrench until the tire is
secure and the cable is tight. Two clicks should occur. The
spare tire hoist cannot be
overtightened.
7. Make sure the tire is stored
securely. Push, pull (1), and then
try to turn (2) the tire. If the tire
moves, use the wheel wrench to
tighten the cable.
Two clicks mean the tire is up all
the way.
8. Return the jacking equipment to the proper location. Secure the
items and replace the jack cover.
Page 307 of 379

Black plate (74,1)Chevrolet Express Owner Manual (GMNA-Localizing-U.S./Canada/Mexico-
7707481) - 2015 - CRC - 4/30/14
10-74 Vehicle Care
Full-Size Spare Tire
If this vehicle came with a full-size
spare tire, it was fully inflated when
new, however, it can lose air over
time. Check the inflation pressure
regularly. SeeTire Pressure on
page 10-50 andVehicle Load Limits
on page 9-9. For instructions on
how to remove, install, or store a
spare tire, see Tire Changing on
page 10-66. After installing the spare tire on the
vehicle, stop as soon as possible
and check that the spare is correctly
inflated. The spare tire is made to
perform well at speeds up to
112 km/h (70 mph) at the
recommended inflation pressure, so
you can finish your trip.
Have the damaged or flat road tire
repaired or replaced back onto the
vehicle, as soon as possible, so the
spare tire will be available in case it
is needed again.
Do not mix tires and wheels of
different sizes, because they will not
fit. Keep the spare tire and its wheel
together.
Jump Starting
For more information about the
vehicle battery, see
Battery on
page 10-24.
If the vehicle battery has run down,
you may want to use another
vehicle and some jumper cables to
start your vehicle. Be sure to use
the following steps to do it safely.
{Warning
Batteries can hurt you. They can
be dangerous because:
.They contain acid that can
burn you.
.They contain gas that can
explode or ignite.
.They contain enough
electricity to burn you.
If you do not follow these steps
exactly, some or all of these
things can hurt you.
Page 311 of 379
Black plate (78,1)Chevrolet Express Owner Manual (GMNA-Localizing-U.S./Canada/Mexico-
7707481) - 2015 - CRC - 4/30/14
10-78 Vehicle Care
{Caution
If the jumper cables are
connected or removed in the
wrong order, electrical shorting
may occur and damage the
vehicle. The repairs would not be
covered by the vehicle warranty.
Always connect and remove the
jumper cables in the correct order,
making sure that the cables do
not touch each other or other
metal.
Jumper Cable Removal
Reverse the sequence exactly when
removing the jumper cables.
Towing the Vehicle
{Caution
Incorrectly towing a disabled
vehicle may cause damage. The
damage would not be covered by
the vehicle warranty.
Have the vehicle towed on a flatbed
car carrier or a wheel lift tow truck.
If a wheel lift tow truck is used, the
drive wheels cannot contact the
road while the vehicle is being
towed. A wheel dolly must be used
to lift all drive wheels off the ground.
Consult your dealer or a
professional towing service if the
disabled vehicle must be towed.
Recreational Vehicle
Towing
Recreational vehicle towing means
towing the vehicle behind another
vehicle, such as behind a motor
home. The two most common types of recreational vehicle towing are
known as dinghy towing and dolly
towing. Dinghy towing is towing the
vehicle with all four wheels on the
ground. Dolly towing is towing the
vehicle with two wheels on the
ground and two wheels up on a
device known as a dolly.
Here are some important things to
consider before recreational vehicle
towing:
.What is the towing capacity of
the towing vehicle? Be sure to
read the tow vehicle
manufacturer's
recommendations.
.What is the distance that will be
traveled? Some vehicles have
restrictions on how far and how
long they can tow.
.Is the proper towing equipment
going to be used? See your
dealer or trailering professional
for additional advice and
equipment recommendations.
Page 312 of 379
Black plate (79,1)Chevrolet Express Owner Manual (GMNA-Localizing-U.S./Canada/Mexico-
7707481) - 2015 - CRC - 4/30/14
Vehicle Care 10-79
.Is the vehicle ready to be
towed? Just as preparing the
vehicle for a long trip, make sure
the vehicle is prepared to be
towed.
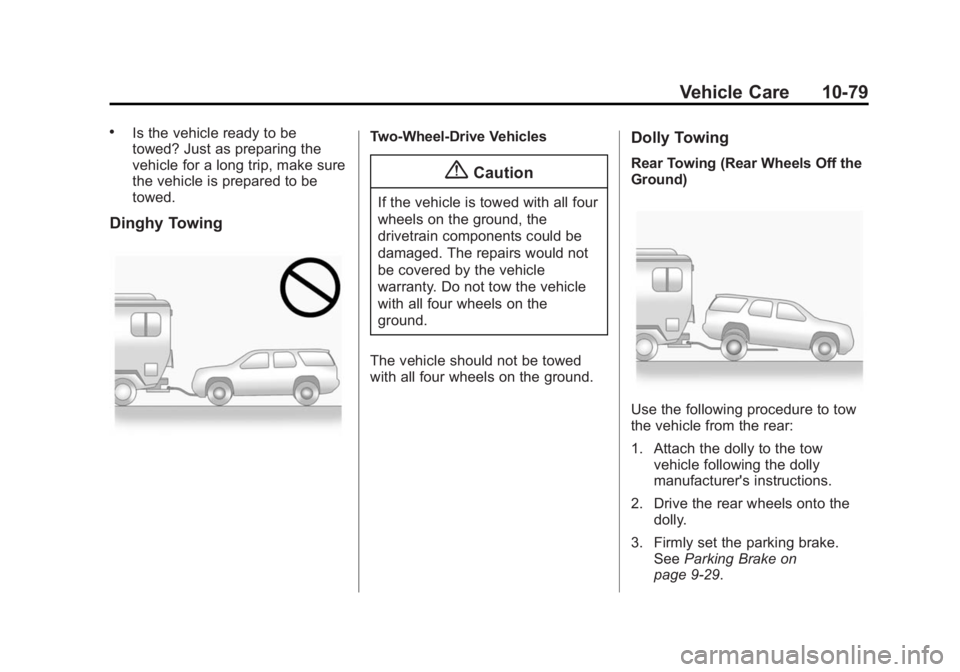
Dinghy Towing
Two-Wheel-Drive Vehicles
{Caution
If the vehicle is towed with all four
wheels on the ground, the
drivetrain components could be
damaged. The repairs would not
be covered by the vehicle
warranty. Do not tow the vehicle
with all four wheels on the
ground.
The vehicle should not be towed
with all four wheels on the ground.
Dolly Towing
Rear Towing (Rear Wheels Off the
Ground)
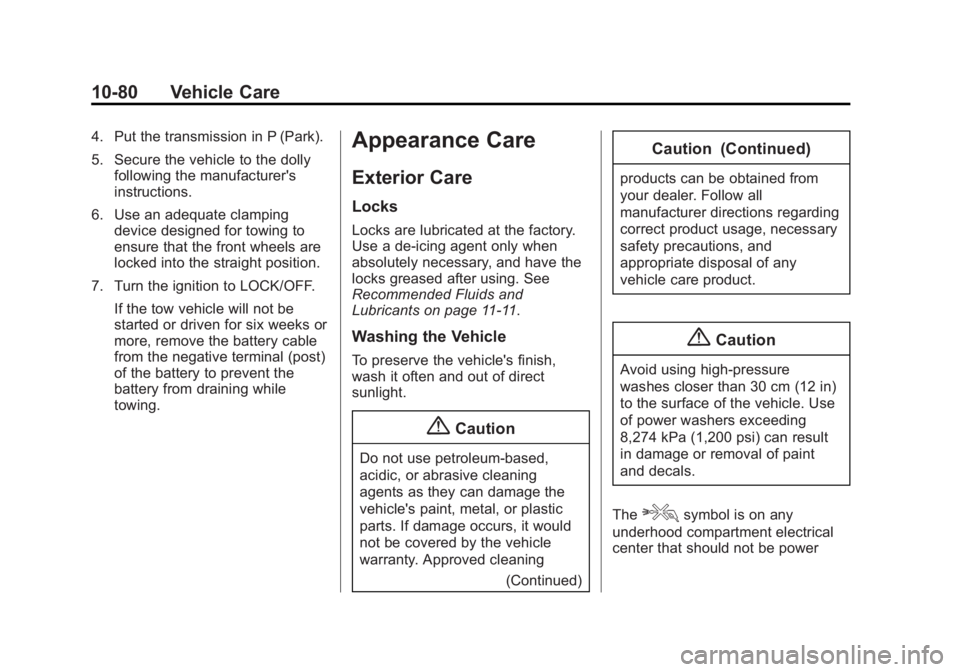
Use the following procedure to tow
the vehicle from the rear:
1. Attach the dolly to the tow vehicle following the dolly
manufacturer's instructions.
2. Drive the rear wheels onto the dolly.
3. Firmly set the parking brake. See Parking Brake on
page 9-29.
Page 313 of 379
Black plate (80,1)Chevrolet Express Owner Manual (GMNA-Localizing-U.S./Canada/Mexico-
7707481) - 2015 - CRC - 4/30/14
10-80 Vehicle Care
4. Put the transmission in P (Park).
5. Secure the vehicle to the dollyfollowing the manufacturer's
instructions.
6. Use an adequate clamping device designed for towing to
ensure that the front wheels are
locked into the straight position.
7. Turn the ignition to LOCK/OFF.
If the tow vehicle will not be
started or driven for six weeks or
more, remove the battery cable
from the negative terminal (post)
of the battery to prevent the
battery from draining while
towing.Appearance Care
Exterior Care
Locks
Locks are lubricated at the factory.
Use a de-icing agent only when
absolutely necessary, and have the
locks greased after using. See
Recommended Fluids and
Lubricants on page 11-11.
Washing the Vehicle
To preserve the vehicle's finish,
wash it often and out of direct
sunlight.
{Caution
Do not use petroleum-based,
acidic, or abrasive cleaning
agents as they can damage the
vehicle's paint, metal, or plastic
parts. If damage occurs, it would
not be covered by the vehicle
warranty. Approved cleaning (Continued)
Caution (Continued)
products can be obtained from
your dealer. Follow all
manufacturer directions regarding
correct product usage, necessary
safety precautions, and
appropriate disposal of any
vehicle care product.
{Caution
Avoid using high-pressure
washes closer than 30 cm (12 in)
to the surface of the vehicle. Use
of power washers exceeding
8,274 kPa (1,200 psi) can result
in damage or removal of paint
and decals.
The
esymbol is on any
underhood compartment electrical
center that should not be power