2015 CHEVROLET EXPRESS CARGO VAN ABS
[x] Cancel search: ABSPage 225 of 377
Black plate (46,1)Chevrolet Express Owner Manual (GMNA-Localizing-U.S./Canada/Mexico-
7707481) - 2015 - crc - 2/10/15
9-46 Driving and Operating
immediately after towing at high
altitude on steep uphill grades, the
vehicle may show signs similar to
engine overheating. To avoid this,
let the engine run while parked,
preferably on level ground, with the
transmission in P (Park) for a few
minutes before turning the engine
off. If the overheat warning comes
on, seeEngine Overheating on
page 10-19.
Parking on Hills
{Warning
Parking the vehicle on a hill with
the trailer attached can be
dangerous. If something goes
wrong, the rig could start to move.
People can be injured, and both
the vehicle and the trailer can be
damaged. When possible, always
park the rig on a flat surface. If parking the rig on a hill:
1. Press the brake pedal, but do
not shift into P (Park) yet. Turn
the wheels into the curb if facing
downhill or into traffic if facing
uphill.
2. Have someone place chocks under the trailer wheels.
3. When the wheel chocks are in place, release the regular brakes
until the chocks absorb the load.
4. Reapply the brake pedal. Then apply the parking brake and shift
into P (Park).
5. Release the brake pedal.
Leaving After Parking on a Hill
1. Apply and hold the brake pedal.
2. Start the engine.
3. Shift into a gear.
4. Release the parking brake.
5. Let up on the brake pedal.
6. Drive slowly until the trailer is clear of the chocks.
7. Stop and have someone pick up and store the chocks.
Page 264 of 377
Black plate (31,1)Chevrolet Express Owner Manual (GMNA-Localizing-U.S./Canada/Mexico-
7707481) - 2015 - crc - 2/10/15
Vehicle Care 10-31
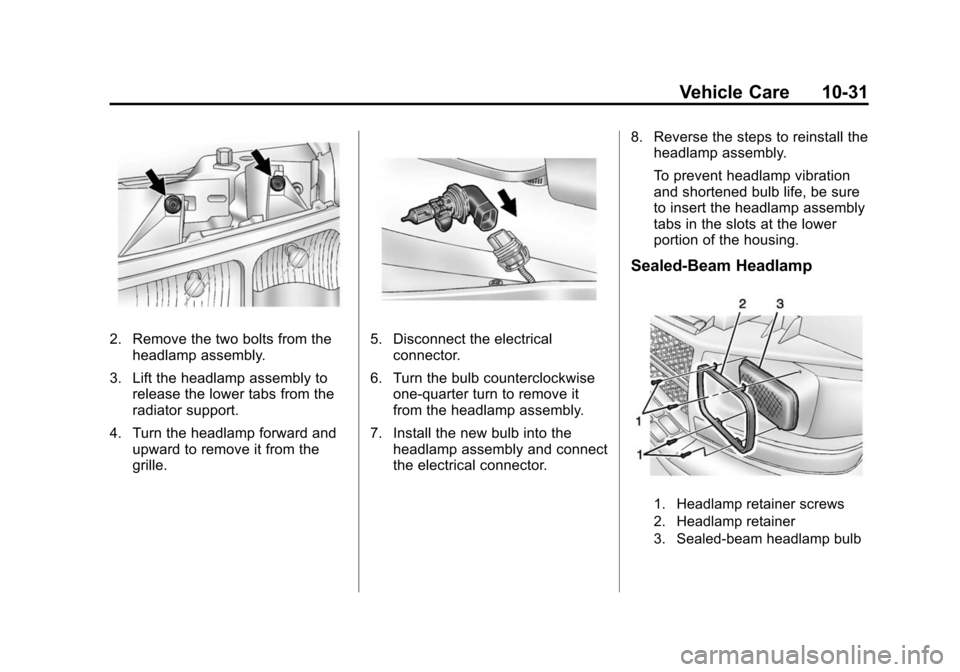
2. Remove the two bolts from theheadlamp assembly.
3. Lift the headlamp assembly to release the lower tabs from the
radiator support.
4. Turn the headlamp forward and upward to remove it from the
grille.5. Disconnect the electricalconnector.
6. Turn the bulb counterclockwise one-quarter turn to remove it
from the headlamp assembly.
7. Install the new bulb into the headlamp assembly and connect
the electrical connector. 8. Reverse the steps to reinstall the
headlamp assembly.
To prevent headlamp vibration
and shortened bulb life, be sure
to insert the headlamp assembly
tabs in the slots at the lower
portion of the housing.
Sealed-Beam Headlamp
1. Headlamp retainer screws
2. Headlamp retainer
3. Sealed-beam headlamp bulb
Page 272 of 377
Black plate (39,1)Chevrolet Express Owner Manual (GMNA-Localizing-U.S./Canada/Mexico-
7707481) - 2015 - crc - 2/10/15
Vehicle Care 10-39
Mini Fuse Usage66 Daytime Running Lamps 2
(LOLVL-V22) (If
Equipped)
67 Daytime Running Lamps 1 (UPLVL
+V22) (If
Equipped)
68 Auxiliary Stop Lamps
69 Trailer Stop Lamps
70 Spare
71 Fuel Heater/Flex Fuel Sensor
72 Body Control Module 6
73 Lighter/Data Link Connection
75 V6 Fuel Injectors
76 Spare
77 Oxygen Sensor 2 (Pre) Mini Fuse Usage
78 Engine Control Module Powertrain
79 Even Ignition/ Injectors
J-Case Fuse Usage 1 ABS Motor
2 ABS Module
41 Spare
42 Trailer Wiring
43 Fan High
44 Starter Solenoid
45 Engine Control Module/Powertrain
46 Spare
47 Fan Lo
74 Front Blower
Relay Usage
15 Run/Crank Relay
Usage
37 Spare
38 Fuel Pump
39 Crank
40 Air Conditioning Compressor
48 Fan High
49 Powertrain
50 Spare
57 Fan Low
60 Fan Control
Floor Console Fuse Block
The floor console fuse block is
under the driver seat.
Page 303 of 377
Black plate (70,1)Chevrolet Express Owner Manual (GMNA-Localizing-U.S./Canada/Mexico-
7707481) - 2015 - crc - 2/10/15
10-70 Vehicle Care
Front Position
Front Position
Rear Position
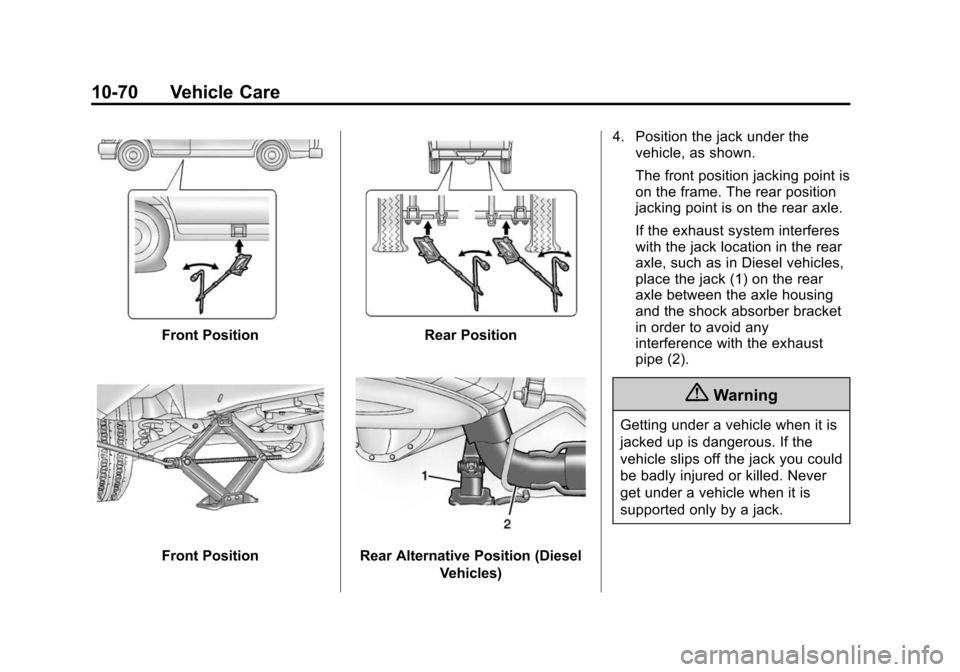
Rear Alternative Position (DieselVehicles) 4. Position the jack under the
vehicle, as shown.
The front position jacking point is
on the frame. The rear position
jacking point is on the rear axle.
If the exhaust system interferes
with the jack location in the rear
axle, such as in Diesel vehicles,
place the jack (1) on the rear
axle between the axle housing
and the shock absorber bracket
in order to avoid any
interference with the exhaust
pipe (2).
{Warning
Getting under a vehicle when it is
jacked up is dangerous. If the
vehicle slips off the jack you could
be badly injured or killed. Never
get under a vehicle when it is
supported only by a jack.
Page 314 of 377
Black plate (81,1)Chevrolet Express Owner Manual (GMNA-Localizing-U.S./Canada/Mexico-
7707481) - 2015 - crc - 2/10/15
Vehicle Care 10-81
3. Firmly set the parking brake.See Parking Brake on
page 9-29.
4. Put the transmission in P (Park).
5. Secure the vehicle to the dolly following the manufacturer's
instructions.
6. Use an adequate clamping device designed for towing to
ensure that the front wheels are
locked into the straight position.
7. Turn the ignition to LOCK/OFF. If the tow vehicle will not be
started or driven for six weeks or
more, remove the battery cable
from the negative terminal (post)
of the battery to prevent the
battery from draining while
towing.Appearance Care
Exterior Care
Locks
Locks are lubricated at the factory.
Use a de-icing agent only when
absolutely necessary, and have the
locks greased after using. See
Recommended Fluids and
Lubricants on page 11-10.
Washing the Vehicle
To preserve the vehicle's finish,
wash it often and out of direct
sunlight.
{Caution
Do not use petroleum-based,
acidic, or abrasive cleaning
agents as they can damage the
vehicle's paint, metal, or plastic
parts. If damage occurs, it would
not be covered by the vehicle
warranty. Approved cleaning (Continued)
Caution (Continued)
products can be obtained from
your dealer. Follow all
manufacturer directions regarding
correct product usage, necessary
safety precautions, and
appropriate disposal of any
vehicle care product.
{Caution
Avoid using high-pressure
washes closer than 30 cm (12 in)
to the surface of the vehicle. Use
of power washers exceeding
8,274 kPa (1,200 psi) can result
in damage or removal of paint
and decals.
The
esymbol is on any
underhood compartment electrical
center that should not be power
Page 366 of 377

Black plate (1,1)Chevrolet Express Owner Manual (GMNA-Localizing-U.S./Canada/Mexico-
7707481) - 2015 - crc - 2/12/15
INDEX i-1
A
Accessories andModifications . . . . . . . . . . . . . . . . . 10-3
Accessory Power . . . . . . . . . . . . . . 9-19
Add-On Electrical Equipment . . . . . . . . . . . . . . . . . . . 9-54
Additional Information
OnStar
®. . . . . . . . . . . . . . . . . . . . . . 14-6
Additional Maintenance and Care . . . . . . . . . . . . . . . . . . . . . 11-7
Air Cleaner/Filter, Engine . . . . . 10-13
Air Vents . . . . . . . . . . . . . . . . . . . . . . . 8-7
Airbag System
Check . . . . . . . . . . . . . . . . . . . . . . . . 3-27
How Does an AirbagRestrain? . . . . . . . . . . . . . . . . . . . 3-21
What Makes an Airbag Inflate? . . . . . . . . . . . . . . . . . . . . . . 3-21
What Will You See after an Airbag Inflates? . . . . . . . . . . . . . 3-22
When Should an Airbag Inflate? . . . . . . . . . . . . . . . . . . . . . . 3-20
Where Are the Airbags? . . . . . . 3-19 Airbags
Adding Equipment to the
Vehicle . . . . . . . . . . . . . . . . . . . . . . 3-26
Light On-Off . . . . . . . . . . . . . . . . . . 5-15
On-Off Light . . . . . . . . . . . . . . . . . . 5-15
On-Off Switch . . . . . . . . . . . . . . . . 3-23
Readiness Light . . . . . . . . . . . . . . 5-15
Servicing Airbag-Equipped Vehicles . . . . . . . . . . . . . . . . . . . . . 3-26
System Check . . . . . . . . . . . . . . . . 3-16
All-Season Tires . . . . . . . . . . . . . . 10-43
All-Terrain Tires . . . . . . . . . . . . . . . 10-44
AM-FM Radio . . . . . . . . . . . . . . . . . . . 7-7
Antilock Brake
System (ABS) . . . . . . . . . . . . . . . . 9-28
Warning Light . . . . . . . . . . . . . . . . . 5-20
Appearance Care Exterior . . . . . . . . . . . . . . . . . . . . . 10-81
Interior . . . . . . . . . . . . . . . . . . . . . . 10-86
Ashtrays . . . . . . . . . . . . . . . . . . . . . . . . 5-8
Assistance Program, Roadside . . . . . . . . . . . . . . . . . . . . . 13-5
Audio Players . . . . . . . . . . . . . . . . . 7-11 CD . . . . . . . . . . . . . . . . . . . . . . . . . . . 7-11 Audio System
Fixed Mast Antenna . . . . . . . . . . 7-10
Radio Reception . . . . . . . . . . . . . . . 7-9
Theft-Deterrent Feature . . . . . . . . 7-2
Automatic Door Locks . . . . . . . . . . . . . . . . . . . . 2-7
Headlamp System . . . . . . . . . . . . . 6-2
Transmission . . . . . . . . . . . . . . . . . 9-22
Transmission Fluid . . . . . . . . . 10-10
Automatic Transmission Manual Mode . . . . . . . . . . . . . . . . . 9-26
Shift Lock Control
Function Check . . . . . . . . . . . 10-28
Auxiliary Devices . . . . . . . . . . . . . . . . . . . . . . . 7-16
Axle, Rear . . . . . . . . . . . . . . . . . . . . 10-26
B
Battery
Load Management . . . . . . . . . . . . . 6-6
Power Protection . . . . . . . . . . . . . . 6-6
Voltage and ChargingMessages . . . . . . . . . . . . . . . . . . . 5-29
Battery - North America . . . . . . . . . . . . . .10-25, 10-75
Blade Replacement, Wiper . . . 10-29
Page 371 of 377

Black plate (6,1)Chevrolet Express Owner Manual (GMNA-Localizing-U.S./Canada/Mexico-
7707481) - 2015 - crc - 2/12/15
i-6 INDEX
K
Key and Lock Messages . . . . . . . 5-32
Keyless EntryRemote (RKE) System . . . . . . . . 2-2
Keys . . . . . . . . . . . . . . . . . . . . . . . . . . . . 2-1
L
Labeling, Tire Sidewall . . . . . . . . 10-44
Lamps Dome . . . . . . . . . . . . . . . . . . . . . . . . . . 6-5
Exterior Controls . . . . . . . . . . . . . . . 6-1
Exterior Lamps OffReminder . . . . . . . . . . . . . . . . . . . . 6-2
License Plate . . . . . . . . . . . . . . . 10-34
Malfunction Indicator . . . . . . . . . 5-17
Messages . . . . . . . . . . . . . . . . . . . . 5-32
Reading . . . . . . . . . . . . . . . . . . . . . . . 6-5
Taillamps . . . . . . . . . . . . . . . . . . . 10-33
Lamps, Bulb Replacement . . . . 10-32
Lap-Shoulder Belt . . . . . . . . . . . . . 3-10
LATCH System Replacing Parts after aCrash . . . . . . . . . . . . . . . . . . . . . . . 3-43
LATCH, Lower Anchors and Tethers for Children . . . . . . . . . . 3-36
Lighter, Cigarette . . . . . . . . . . . . . . . 5-8 Lighting
Entry/Exit . . . . . . . . . . . . . . . . . . . . . . 6-6
Illumination Control . . . . . . . . . . . . 6-4
Lights Airbag On-Off . . . . . . . . . . . . . . . . . 5-15
Airbag Readiness . . . . . . . . . . . . . 5-15
Antilock Brake System(ABS) Warning . . . . . . . . . . . . . . 5-20
Brake System Warning . . . . . . . 5-20
Charging System . . . . . . . . . . . . . 5-17
Cruise Control . . . . . . . . . . . . . . . . 5-23
Engine Oil Pressure . . . . . . . . . . 5-22
Flash-to-Pass . . . . . . . . . . . . . . . . . . 6-2
High-Beam On . . . . . . . . . . . . . . . . 5-23
High/Low Beam Changer . . . . . . 6-2
Low Fuel Warning . . . . . . . . . . . . 5-23
Safety Belt Reminders . . . . . . . . 5-14
Security . . . . . . . . . . . . . . . . . . . . . . 5-23
StabiliTrak
®OFF . . . . . . . . . . . . . 5-21
Tire Pressure . . . . . . . . . . . . . . . . . 5-22
Tow/Haul Mode . . . . . . . . . . . . . . . 5-21
Traction Control System (TCS)/StabiliTrak
®. . . . . . . . . . 5-21
Locking Rear Axle . . . . . . . . . . . . . 9-31 Locks
Automatic Door . . . . . . . . . . . . . . . . 2-7
Cargo Door Relocking . . . . . . . . . 2-7
Delayed Locking . . . . . . . . . . . . . . . 2-7
Door . . . . . . . . . . . . . . . . . . . . . . . . . . . 2-6
Lockout Protection . . . . . . . . . . . . . 2-7
Power Door . . . . . . . . . . . . . . . . . . . . 2-7
Safety . . . . . . . . . . . . . . . . . . . . . . . . . 2-8
Loss of Control . . . . . . . . . . . . . . . . . 9-4
Low Fuel Warning Light . . . . . . . . 5-23
Lower Anchors and Tethers for Children (LATCH
System) . . . . . . . . . . . . . . . . . . . . . . 3-36
M
MaintenanceRecords . . . . . . . . . . . . . . . . . . . . .11-12
Maintenance and Care
Additional . . . . . . . . . . . . . . . . . . . . . 11-7
Maintenance Schedule . . . . . . . . 11-3 Recommended Fluidsand Lubricants . . . . . . . . . . . . .11-10
Malfunction Indicator Lamp . . . . 5-17
Manual Mirrors . . . . . . . . . . . . . . . . 2-12
Manual Mode . . . . . . . . . . . . . . . . . . 9-26
Manual Windows . . . . . . . . . . . . . . 2-14