2015 CHEVROLET CRUZE remove seats
[x] Cancel search: remove seatsPage 38 of 417
Black plate (9,1)Chevrolet Cruze Owner Manual (GMNA-Localizing-U.S./Canada-7707493) -
2015 - crc - 11/24/14
Keys, Doors, and Windows 2-9
3. With the vehicle in P (Park) orN (Neutral), press the brake
pedal and the ENGINE START/
STOP button. See Starting the
Engine on page 9-18 for
additional information about the
vehicle's keyless ignition with
pushbutton start.
Replace the transmitter battery
as soon as possible.
Battery Replacement
Replace the battery if the REPLACE
BATTERY IN REMOTE KEY
message displays in the DIC. See
Key and Lock Messages on
page 5-30.
{Caution
When replacing the battery, do
not touch any of the circuitry on
the transmitter. Static from your
body could damage the
transmitter. The battery is not rechargeable. To
replace the battery:
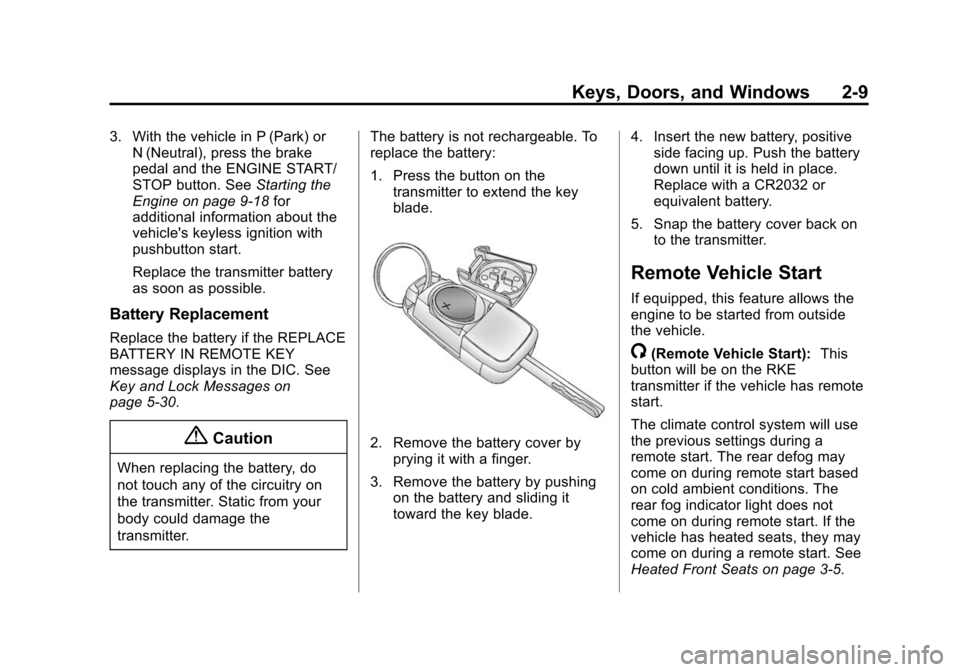
1. Press the button on the
transmitter to extend the key
blade.
2. Remove the battery cover byprying it with a finger.
3. Remove the battery by pushing on the battery and sliding it
toward the key blade. 4. Insert the new battery, positive
side facing up. Push the battery
down until it is held in place.
Replace with a CR2032 or
equivalent battery.
5. Snap the battery cover back on to the transmitter.
Remote Vehicle Start
If equipped, this feature allows the
engine to be started from outside
the vehicle.
/(Remote Vehicle Start): This
button will be on the RKE
transmitter if the vehicle has remote
start.
The climate control system will use
the previous settings during a
remote start. The rear defog may
come on during remote start based
on cold ambient conditions. The
rear fog indicator light does not
come on during remote start. If the
vehicle has heated seats, they may
come on during a remote start. See
Heated Front Seats on page 3-5.
Page 77 of 417
Black plate (24,1)Chevrolet Cruze Owner Manual (GMNA-Localizing-U.S./Canada-7707493) -
2015 - crc - 11/24/14
3-24 Seats and Restraints
frontal airbag and knee airbag,
depending upon the person's
seating posture and body build.
Everyone in the vehicle who has
outgrown child restraints should
wear a safety belt properly—
whether or not there is an airbag for
that person.
{Warning
If the airbag readiness light ever
comes on and stays on, it means
that something may be wrong
with the airbag system. To help
avoid injury to yourself or others,
have the vehicle serviced right
away. See Airbag Readiness
Light on page 5-12 for more
information, including important
safety information.
If the On Indicator Is Lit for a
Child Restraint
The passenger sensing system is
designed to turn off the front
outboard passenger frontal airbag
and knee airbag if the system
determines that an infant is present
in a child restraint. If a child restraint
has been installed and the on
indicator is lit:
1. Turn the vehicle off.
2. Remove the child restraint from the vehicle.
3. Remove any additional items from the seat such as blankets,
cushions, seat covers, seat
heaters, or seat massagers.
4. Reinstall the child restraint following the directions provided
by the child restraint
manufacturer and refer to
Securing Child Restraints (Rear
Seat) on page 3-43 orSecuring
Child Restraints (Front
Passenger Seat) on page 3-46. 5. If, after reinstalling the child
restraint and restarting the
vehicle, the on indicator is still lit,
turn the vehicle off. Then slightly
recline the vehicle seatback and
adjust the seat cushion,
if adjustable, to make sure that
the vehicle seatback is not
pushing the child restraint into
the seat cushion. Also make
sure the child restraint is not
trapped under the vehicle head
restraint. If this happens, adjust
the head restraint. See Head
Restraints on page 3-2.
6. Restart the vehicle.
The passenger sensing system may
or may not turn off the airbag(s) for
a child in a child restraint depending
upon the child's size. It is better to
secure the child restraint in a
rear seat.
Page 78 of 417
Black plate (25,1)Chevrolet Cruze Owner Manual (GMNA-Localizing-U.S./Canada-7707493) -
2015 - crc - 11/24/14
Seats and Restraints 3-25
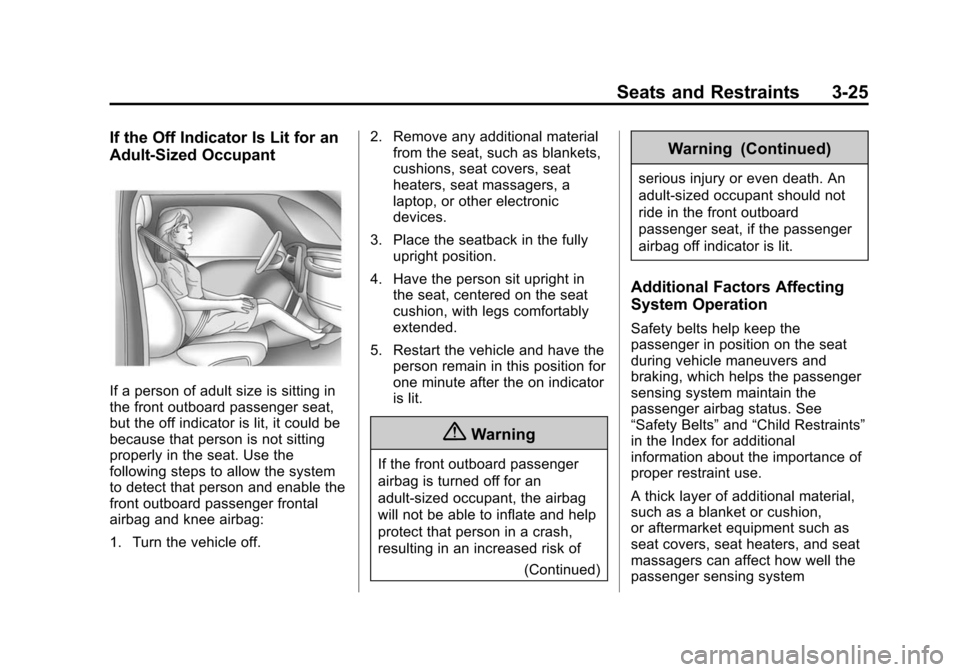
If the Off Indicator Is Lit for an
Adult-Sized Occupant
If a person of adult size is sitting in
the front outboard passenger seat,
but the off indicator is lit, it could be
because that person is not sitting
properly in the seat. Use the
following steps to allow the system
to detect that person and enable the
front outboard passenger frontal
airbag and knee airbag:
1. Turn the vehicle off.2. Remove any additional material
from the seat, such as blankets,
cushions, seat covers, seat
heaters, seat massagers, a
laptop, or other electronic
devices.
3. Place the seatback in the fully upright position.
4. Have the person sit upright in the seat, centered on the seat
cushion, with legs comfortably
extended.
5. Restart the vehicle and have the person remain in this position for
one minute after the on indicator
is lit.
{Warning
If the front outboard passenger
airbag is turned off for an
adult-sized occupant, the airbag
will not be able to inflate and help
protect that person in a crash,
resulting in an increased risk of
(Continued)
Warning (Continued)
serious injury or even death. An
adult-sized occupant should not
ride in the front outboard
passenger seat, if the passenger
airbag off indicator is lit.
Additional Factors Affecting
System Operation
Safety belts help keep the
passenger in position on the seat
during vehicle maneuvers and
braking, which helps the passenger
sensing system maintain the
passenger airbag status. See
“Safety Belts”and“Child Restraints”
in the Index for additional
information about the importance of
proper restraint use.
A thick layer of additional material,
such as a blanket or cushion,
or aftermarket equipment such as
seat covers, seat heaters, and seat
massagers can affect how well the
passenger sensing system
Page 79 of 417
Black plate (26,1)Chevrolet Cruze Owner Manual (GMNA-Localizing-U.S./Canada-7707493) -
2015 - crc - 11/24/14
3-26 Seats and Restraints
operates. We recommend that you
not use seat covers or other
aftermarket equipment except when
approved by GM for your specific
vehicle. SeeAdding Equipment to
the Airbag-Equipped Vehicle on
page 3-27 for more information
about modifications that can affect
how the system operates.
A wet seat can affect the
performance of the passenger
sensing system. Here is how:
.The passenger sensing system
may turn off the passenger
airbag when liquid is soaked into
the seat. If this happens, the off
indicator will be lit, and the
airbag readiness light on the
instrument panel will also be lit.
.Liquid pooled on the seat that
has not soaked in may make it
more likely that the passenger
sensing system will turn on the
passenger airbag while a child
restraint or child occupant is on the seat. If the passenger airbag
is turned on, the on indicator will
be lit.
If the passenger seat gets wet, dry
the seat immediately. If the airbag
readiness light is lit, do not install a
child restraint or allow anyone to
occupy the seat. See Airbag
Readiness Light on page 5-12 for
important safety information.
The on indicator may be lit if an
object, such as a briefcase,
handbag, grocery bag, laptop,
or other electronic device, is put on
an unoccupied seat. If this is not
desired, remove the object from
the seat.
{Warning
Stowing of articles under the
passenger seat or between the
passenger seat cushion and
seatback may interfere with the
proper operation of the passenger
sensing system.
Servicing the
Airbag-Equipped Vehicle
Airbags affect how the vehicle
should be serviced. There are parts
of the airbag system in several
places around the vehicle. Your
dealer and the service manual have
information about servicing the
vehicle and the airbag system. To
purchase a service manual, see
Service Publications Ordering
Information on page 13-11.
{Warning
For up to 10 seconds after the
vehicle is turned off and the
battery is disconnected, an airbag
can still inflate during improper
service. You can be injured if you
are close to an airbag when it
inflates. Avoid yellow connectors.
They are probably part of the
airbag system. Be sure to follow
(Continued)
Page 93 of 417
Black plate (40,1)Chevrolet Cruze Owner Manual (GMNA-Localizing-U.S./Canada-7707493) -
2015 - crc - 11/24/14
3-40 Seats and Restraints
Caution (Continued)
damage these parts. If necessary,
move buckled safety belts to
avoid rubbing the LATCH
attachments.
Do not fold the empty rear seat
with a safety belt buckled. This
could damage the safety belt or
the seat. Unbuckle and return the
safety belt to its stowed position,
before folding the seat.
If you need to secure more than one
child restraint in the rear seat, see
Where to Put the Restraint on
page 3-35 for additional information.
This system is designed to make
installation of child restraints easier.
When using lower anchors, do not
use the vehicle's safety belts.
Instead use the vehicle's anchors
and child restraint attachments to
secure the restraints. Some
restraints also use another vehicle
anchor to secure a top tether. 1. Attach and tighten the lower
attachments to the lower
anchors. If the child restraint
does not have lower
attachments or the desired
seating position does not have
lower anchors, secure the child
restraint with the top tether and
the safety belts. Refer to the
child restraint manufacturer
instructions and the instructions
in this manual.
1.1. Find the lower anchors for
the desired rear outboard
seating position.
1.2. Put the child restraint on the seat.
For outboard rear seating
positions, if the head
restraint interferes with the
proper installation of the
child restraint, the head
restraint may be removed.
See“Head Restraint
Removal and
Reinstallation” at the end of
this section. 1.3. Attach and tighten the lower
attachments on the child
restraint to the lower
anchors.
2. If the child restraint manufacturer recommends that the top tether
be attached, attach and tighten
the top tether to the top tether
anchor. Refer to the child
restraint instructions and the
following steps:
2.1. Find the top tether anchor.
Open the cover to expose
the anchor.
Page 95 of 417
Black plate (42,1)Chevrolet Cruze Owner Manual (GMNA-Localizing-U.S./Canada-7707493) -
2015 - crc - 11/24/14
3-42 Seats and Restraints
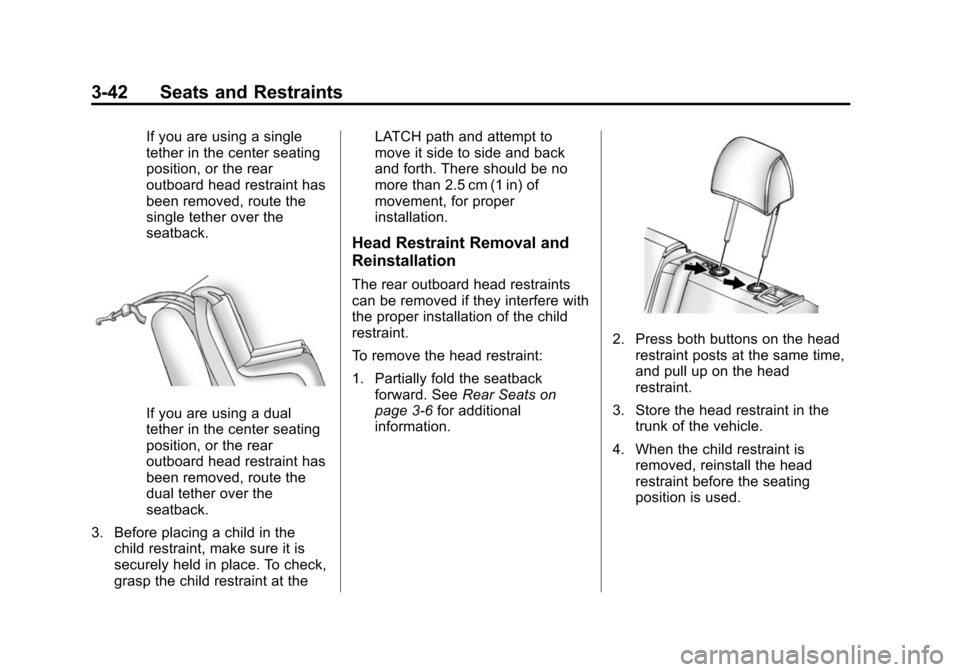
If you are using a single
tether in the center seating
position, or the rear
outboard head restraint has
been removed, route the
single tether over the
seatback.
If you are using a dual
tether in the center seating
position, or the rear
outboard head restraint has
been removed, route the
dual tether over the
seatback.
3. Before placing a child in the child restraint, make sure it is
securely held in place. To check,
grasp the child restraint at the LATCH path and attempt to
move it side to side and back
and forth. There should be no
more than 2.5 cm (1 in) of
movement, for proper
installation.
Head Restraint Removal and
Reinstallation
The rear outboard head restraints
can be removed if they interfere with
the proper installation of the child
restraint.
To remove the head restraint:
1. Partially fold the seatback
forward. See Rear Seats on
page 3-6 for additional
information.
2. Press both buttons on the head
restraint posts at the same time,
and pull up on the head
restraint.
3. Store the head restraint in the trunk of the vehicle.
4. When the child restraint is removed, reinstall the head
restraint before the seating
position is used.
Page 97 of 417
Black plate (44,1)Chevrolet Cruze Owner Manual (GMNA-Localizing-U.S./Canada-7707493) -
2015 - crc - 11/24/14
3-44 Seats and Restraints
If the child restraint has the LATCH
system, seeLower Anchors and
Tethers for Children (LATCH
System) on page 3-36 for how and
where to install the child restraint
using LATCH. If a child restraint is
secured in the vehicle using a
safety belt and it uses a top tether,
see Lower Anchors and Tethers for
Children (LATCH System) on
page 3-36 for top tether anchor
locations.
Do not secure a child seat in a
position without a top tether anchor
if a national or local law requires
that the top tether be anchored, or if
the instructions that come with the
child restraint say that the top strap
must be anchored.
In Canada, the law requires that
forward-facing child restraints have
a top tether, and that the tether be
attached.
If the child restraint or vehicle seat
position does not have the LATCH
system, you will be using the safety
belt to secure the child restraint in this position. Be sure to follow the
instructions that came with the child
restraint. Secure the child in the
child restraint when and as the
instructions say.
If more than one child restraint
needs to be installed in the rear
seat, be sure to read
Where to Put
the Restraint on page 3-35.
1. Put the child restraint on
the seat.
If the head restraint interferes
with the proper installation of the
child restraint, the head restraint
may be removed. See “Head
Restraint Removal and
Reinstallation” underLower
Anchors and Tethers for
Children (LATCH System) on
page 3-36.
2. Pick up the latch plate, and run the lap and shoulder portions of
the vehicle's safety belt through
or around the restraint. The child
restraint instructions will show
you how.
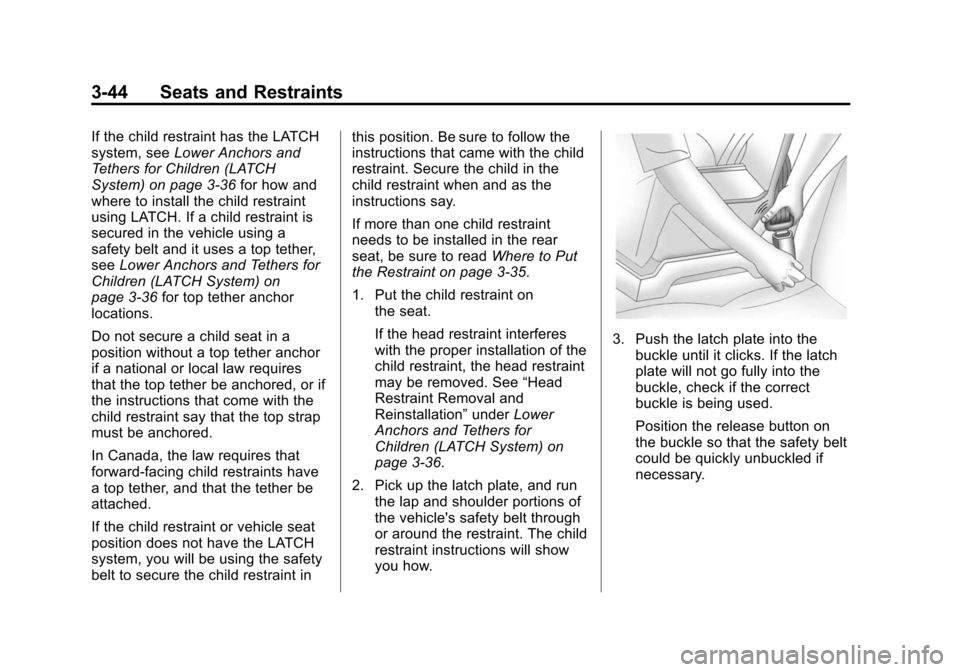
3. Push the latch plate into thebuckle until it clicks. If the latch
plate will not go fully into the
buckle, check if the correct
buckle is being used.
Position the release button on
the buckle so that the safety belt
could be quickly unbuckled if
necessary.
Page 98 of 417
Black plate (45,1)Chevrolet Cruze Owner Manual (GMNA-Localizing-U.S./Canada-7707493) -
2015 - crc - 11/24/14
Seats and Restraints 3-45
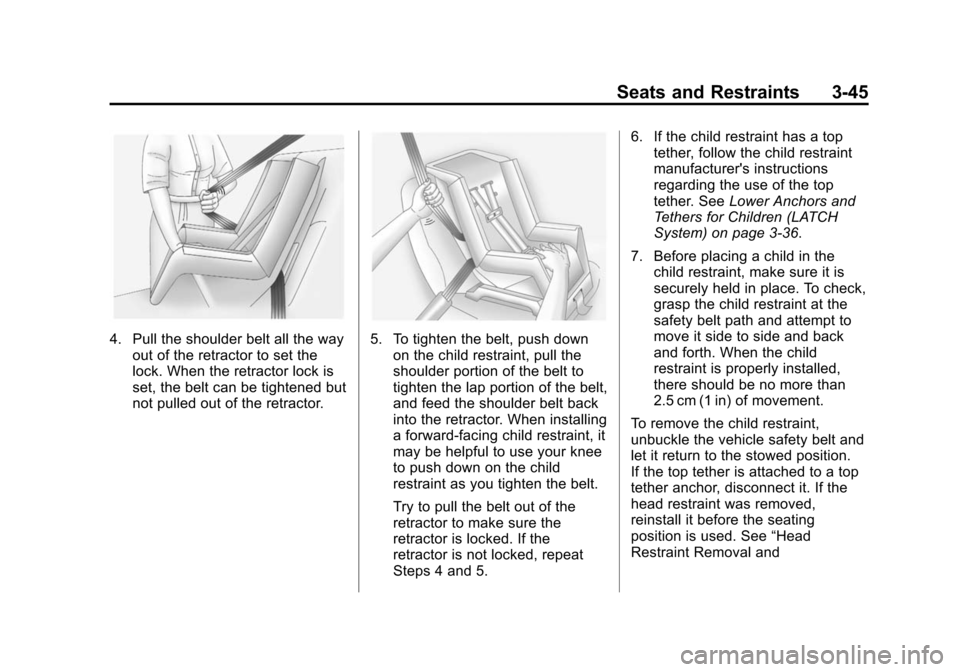
4. Pull the shoulder belt all the wayout of the retractor to set the
lock. When the retractor lock is
set, the belt can be tightened but
not pulled out of the retractor.5. To tighten the belt, push downon the child restraint, pull the
shoulder portion of the belt to
tighten the lap portion of the belt,
and feed the shoulder belt back
into the retractor. When installing
a forward-facing child restraint, it
may be helpful to use your knee
to push down on the child
restraint as you tighten the belt.
Try to pull the belt out of the
retractor to make sure the
retractor is locked. If the
retractor is not locked, repeat
Steps 4 and 5. 6. If the child restraint has a top
tether, follow the child restraint
manufacturer's instructions
regarding the use of the top
tether. See Lower Anchors and
Tethers for Children (LATCH
System) on page 3-36.
7. Before placing a child in the child restraint, make sure it is
securely held in place. To check,
grasp the child restraint at the
safety belt path and attempt to
move it side to side and back
and forth. When the child
restraint is properly installed,
there should be no more than
2.5 cm (1 in) of movement.
To remove the child restraint,
unbuckle the vehicle safety belt and
let it return to the stowed position.
If the top tether is attached to a top
tether anchor, disconnect it. If the
head restraint was removed,
reinstall it before the seating
position is used. See “Head
Restraint Removal and