2015 CHEVROLET CRUZE change wheel
[x] Cancel search: change wheelPage 304 of 417

Black plate (45,1)Chevrolet Cruze Owner Manual (GMNA-Localizing-U.S./Canada-7707493) -
2015 - crc - 11/24/14
Vehicle Care 10-45
Winter Tires
This vehicle was not originally
equipped with winter tires. Winter
tires are designed for increased
traction on snow and ice-covered
roads. Consider installing winter
tires on the vehicle if frequent
driving on ice or snow covered
roads is expected. See your dealer
for details regarding winter tire
availability and proper tire selection.
Also, seeBuying New Tires on
page 10-59.
With winter tires, there may be
decreased dry road traction,
increased road noise, and shorter
tread life. After changing to winter
tires, be alert for changes in vehicle
handling and braking.
If using winter tires:
.Use tires of the same brand and
tread type on all four wheel
positions.
.Use only radial ply tires of the
same size, load range, and
speed rating as the original
equipment tires.
Winter tires with the same speed
rating as the original equipment tires
may not be available for H, V, W, Y,
and ZR speed rated tires. If winter
tires with a lower speed rating are
chosen, never exceed the tire's
maximum speed capability.
Low-Profile Tires
If the vehicle has P225/45R18
size tires, they are classified as
low-profile tires.
{Caution
Low-profile tires are more
susceptible to damage from road
hazards or curb impact than
standard profile tires. Tire and/or
wheel assembly damage can
occur when coming into contact (Continued)
Caution (Continued)
with road hazards like potholes,
or sharp edged objects, or when
sliding into a curb. The warranty
does not cover this type of
damage. Keep tires set to the
correct inflation pressure and
when possible, avoid contact with
curbs, potholes, and other road
hazards.
Tire Sidewall Labeling
Useful information about a tire is
molded into its sidewall. The
examples show a typical
passenger vehicle tire and a
compact spare tire sidewall.
Page 317 of 417

Black plate (58,1)Chevrolet Cruze Owner Manual (GMNA-Localizing-U.S./Canada-7707493) -
2015 - crc - 11/24/14
10-58 Vehicle Care
the tires have been rotated. See
Tire Pressure on page 10-51
andVehicle Load Limits on
page 9-9.
Reset the Tire Pressure Monitor
System. See Tire Pressure
Monitor Operation on
page 10-53.
Check that all wheel nuts are
properly tightened. See “Wheel
Nut Torque” underCapacities
and Specifications on
page 12-2.
{Warning
Rust or dirt on a wheel, or on the
parts to which it is fastened, can
make wheel nuts become loose
after time. The wheel could come
off and cause an accident. When
changing a wheel, remove any
rust or dirt from places where the
wheel attaches to the vehicle. In
(Continued)
Warning (Continued)
an emergency, a cloth or a paper
towel can be used; however, use
a scraper or wire brush later to
remove all rust or dirt.
Lightly coat the center of the
wheel hub with wheel bearing
grease after a wheel change or
tire rotation to prevent corrosion
or rust build-up. Do not get
grease on the flat wheel
mounting surface or on the
wheel nuts or bolts.
When It Is Time for New
Tires
Factors such as maintenance,
temperatures, driving speeds,
vehicle loading, and road conditions
affect the wear rate of the tires.
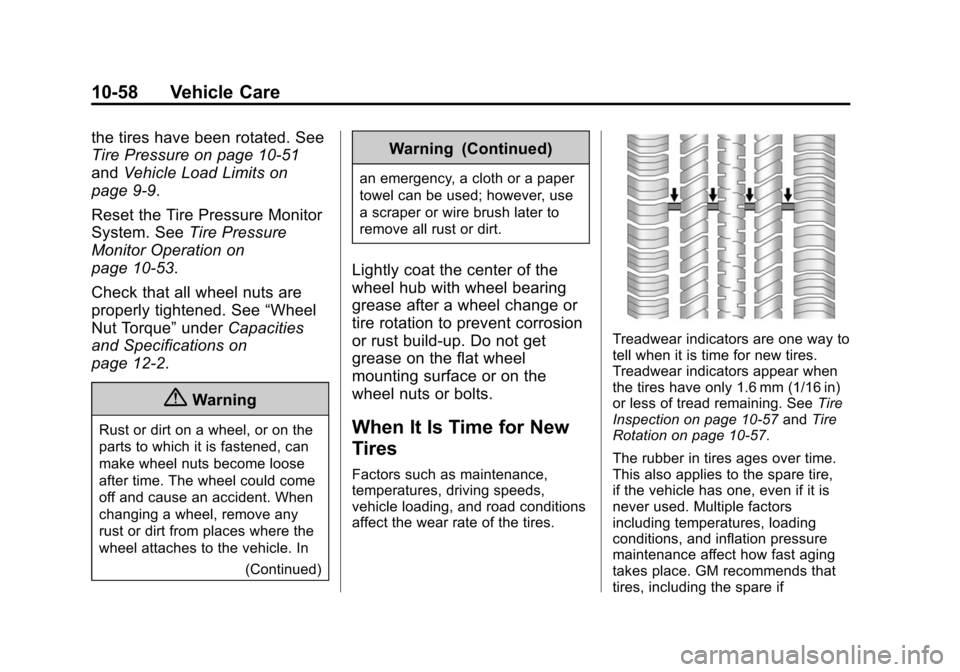
Treadwear indicators are one way to
tell when it is time for new tires.
Treadwear indicators appear when
the tires have only 1.6 mm (1/16 in)
or less of tread remaining. See Tire
Inspection on page 10-57 andTire
Rotation on page 10-57.
The rubber in tires ages over time.
This also applies to the spare tire,
if the vehicle has one, even if it is
never used. Multiple factors
including temperatures, loading
conditions, and inflation pressure
maintenance affect how fast aging
takes place. GM recommends that
tires, including the spare if
Page 324 of 417

Black plate (65,1)Chevrolet Cruze Owner Manual (GMNA-Localizing-U.S./Canada-7707493) -
2015 - crc - 11/24/14
Vehicle Care 10-65
Warning (Continued)
changing a flat tire. If it is used for
anything else, you or others could
be badly injured or killed if the
vehicle slips off the jack. If a jack
is provided with the vehicle, only
use it for changing a flat tire.
If a tire goes flat, avoid further tire
and wheel damage by driving slowly
to a level place, well off the road,
if possible. Turn on the hazard
warning flashers. See Hazard
Warning Flashers on page 6-3.
{Warning
Changing a tire can be
dangerous. The vehicle can slip
off the jack and roll over or fall
causing injury or death. Find a
level place to change the tire. To
help prevent the vehicle from
moving:
(Continued)
Warning (Continued)
1. Set the parking brake firmly.
2. Put an automatictransmission in P (Park) or a
manual transmission in
1 (First) or R (Reverse).
3. Turn off the engine and do not restart while the vehicle
is raised.
4. Do not allow passengers to remain in the vehicle.
5. Place wheel blocks, if equipped, on both sides of
the tire at the opposite
corner of the tire being
changed.
This vehicle may come with a jack,
spare tire, and wheel block(s) or a
tire sealant and compressor kit. To
use the jacking equipment to
change a spare tire safely, follow
the instructions below. Then see
Tire Changing on page 10-74. To use the tire sealant and
compressor kit, see
Tire Sealant
and Compressor Kit on page 10-66.
To use the wheel blocks,
if equipped, lift the wheel block and
lock it into place.
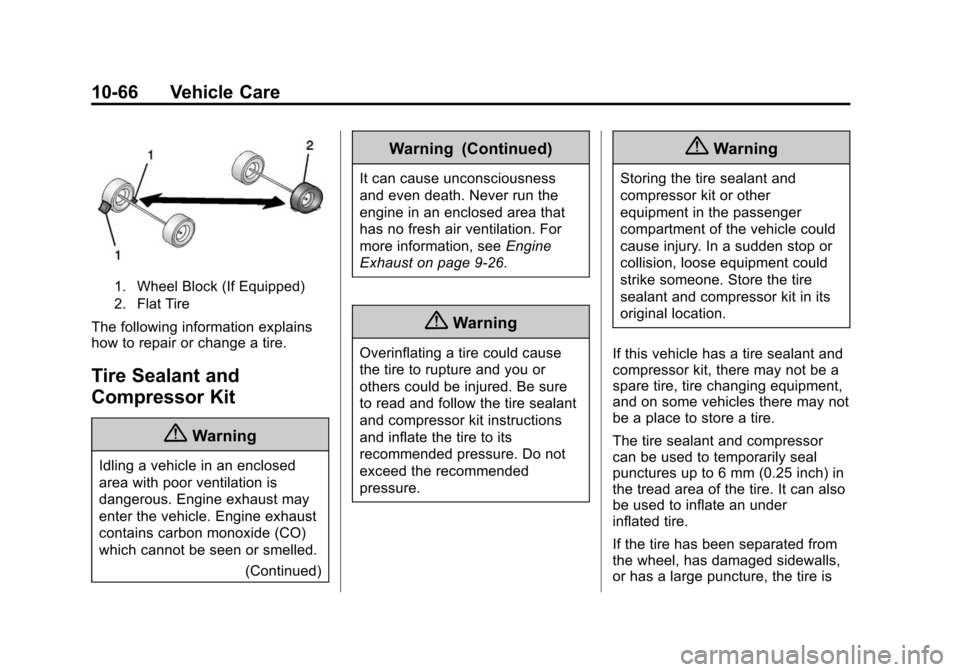
When the vehicle has a flat tire (2),
use the following example as a
guide to assist in the placement of
the wheel blocks (1), if equipped.
Page 325 of 417

Black plate (66,1)Chevrolet Cruze Owner Manual (GMNA-Localizing-U.S./Canada-7707493) -
2015 - crc - 11/24/14
10-66 Vehicle Care
1. Wheel Block (If Equipped)
2. Flat Tire
The following information explains
how to repair or change a tire.
Tire Sealant and
Compressor Kit
{Warning
Idling a vehicle in an enclosed
area with poor ventilation is
dangerous. Engine exhaust may
enter the vehicle. Engine exhaust
contains carbon monoxide (CO)
which cannot be seen or smelled.(Continued)
Warning (Continued)
It can cause unconsciousness
and even death. Never run the
engine in an enclosed area that
has no fresh air ventilation. For
more information, seeEngine
Exhaust on page 9-26.
{Warning
Overinflating a tire could cause
the tire to rupture and you or
others could be injured. Be sure
to read and follow the tire sealant
and compressor kit instructions
and inflate the tire to its
recommended pressure. Do not
exceed the recommended
pressure.
{Warning
Storing the tire sealant and
compressor kit or other
equipment in the passenger
compartment of the vehicle could
cause injury. In a sudden stop or
collision, loose equipment could
strike someone. Store the tire
sealant and compressor kit in its
original location.
If this vehicle has a tire sealant and
compressor kit, there may not be a
spare tire, tire changing equipment,
and on some vehicles there may not
be a place to store a tire.
The tire sealant and compressor
can be used to temporarily seal
punctures up to 6 mm (0.25 inch) in
the tread area of the tire. It can also
be used to inflate an under
inflated tire.
If the tire has been separated from
the wheel, has damaged sidewalls,
or has a large puncture, the tire is
Page 334 of 417

Black plate (75,1)Chevrolet Cruze Owner Manual (GMNA-Localizing-U.S./Canada-7707493) -
2015 - crc - 11/24/14
Vehicle Care 10-75
Removing the Flat Tire and
Installing the Spare Tire
This vehicle may have aluminum
wheels with exposed wheel nuts.
Use the wheel wrench to loosen all
the wheel nuts. Do not remove
them yet.
Or, this vehicle may have steel
wheels with plastic covers.
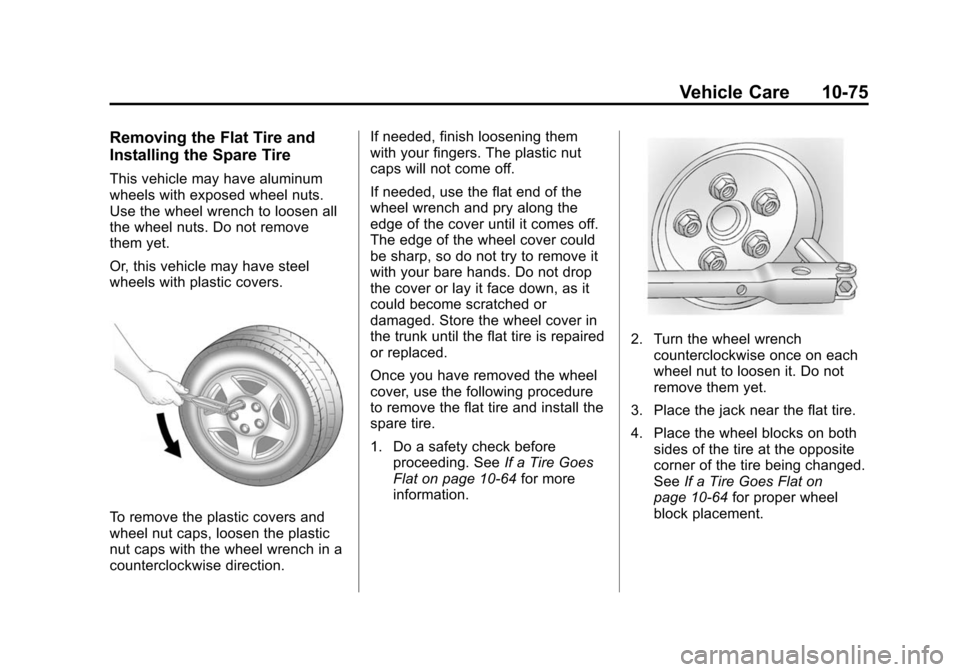
To remove the plastic covers and
wheel nut caps, loosen the plastic
nut caps with the wheel wrench in a
counterclockwise direction.If needed, finish loosening them
with your fingers. The plastic nut
caps will not come off.
If needed, use the flat end of the
wheel wrench and pry along the
edge of the cover until it comes off.
The edge of the wheel cover could
be sharp, so do not try to remove it
with your bare hands. Do not drop
the cover or lay it face down, as it
could become scratched or
damaged. Store the wheel cover in
the trunk until the flat tire is repaired
or replaced.
Once you have removed the wheel
cover, use the following procedure
to remove the flat tire and install the
spare tire.
1. Do a safety check before
proceeding. See If a Tire Goes
Flat on page 10-64 for more
information.
2. Turn the wheel wrench counterclockwise once on each
wheel nut to loosen it. Do not
remove them yet.
3. Place the jack near the flat tire.
4. Place the wheel blocks on both sides of the tire at the opposite
corner of the tire being changed.
See If a Tire Goes Flat on
page 10-64 for proper wheel
block placement.
Page 414 of 417

Black plate (11,1)Chevrolet Cruze Owner Manual (GMNA-Localizing-U.S./Canada-7707493) -
2015 - crc - 11/25/14
INDEX i-11
Service (cont'd)Maintenance, General
Information . . . . . . . . . . . . . . . . . . 11-1
Parts Identification Label . . . . . 12-1
Publications Ordering
Information . . . . . . . . . . . . . . . . .13-11
Scheduling Appointments . . . . . 13-7
Vehicle Messages . . . . . . . . . . . . 5-33
Services
Special Application . . . . . . . . . . . 11-8
Servicing the Airbag . . . . . . . . . . . 3-26
Shift Lock Control Function Check, Automatic
Transmission . . . . . . . . . . . . . . . . 10-30
Shifting Into Park . . . . . . . . . . . . . . . . . . . . . . 9-23
Out of Park . . . . . . . . . . . . . . . . . . . 9-24
Side Blind Zone
Alert (SBZA) . . . . . . . . . . . . . . . . . 9-47
Sidemarker Bulb Replacement . . . . . . . . . . 10-34
Signals, Turn and Lane-Change . . . . . . . . . . . . . . . . . 6-4
Spare Tire Compact . . . . . . . . . . . . . . . . . . . . 10-81
Special Application Services . . . 11-8 Specifications and
Capacities . . . . . . . . . . . . . . . . . . . . 12-2
Speedometer . . . . . . . . . . . . . . . . . . 5-10
StabiliTrak OFF Light . . . . . . . . . . . . . . . . . . . . . 5-18
Start Vehicle, Remote . . . . . . . . . . 2-9
Starter Switch Check . . . . . . . . . 10-29
Starting the Engine . . . . . . . . . . . . 9-18
Starting the Vehicle Messages . . . . . . . . . . . . . . . . . . . . 5-33
Steering . . . . . . . . . . . . . . . . . . . . . . . . 9-4
Power, Warning Lights . . . . . . . . 5-18
Wheel Adjustment . . . . . . . . . . . . . 5-2
Wheel Controls . . . . . . . . . . . . . . . . 5-2
Stoplamps and Back-Up Lamps Bulb Replacement . . . . . . . . . . 10-34
Storage Areas Center Console . . . . . . . . . . . . . . . . 4-1
Glove Box . . . . . . . . . . . . . . . . . . . . . 4-1 Storage Compartments . . . . . . . . . 4-1
Storing the Tire
Sealant and
Compressor Kit . . . . . .10-72, 10-73
Stuck Vehicle . . . . . . . . . . . . . . . . . . . 9-8
Sun Visors . . . . . . . . . . . . . . . . . . . . . 2-23
Sunroof . . . . . . . . . . . . . . . . . . . . . . . . 2-23
Symbols . . . . . . . . . . . . . . . . . . . . . . . . . . iv
System Infotainment . . . . . . . . . . . . 7-1, 13-15
T
Tachometer . . . . . . . . . . . . . . . . . . . . 5-10
TaillampsBulb Replacement . . . . . . . . . . 10-34
Text Telephone (TTY) Users . . . 13-4
Theft-Deterrent Systems . . . . . . . 2-17 Immobilizer . . . . . . . . . . . . . . . . . . . 2-17
Time . . . . . . . . . . . . . . . . . . . . . . . . . . . . 5-4
Tires . . . . . . . . . . . . . . . . . . . . . . . . . . 10-43 All-Season . . . . . . . . . . . . . . . . . . 10-44
Buying New Tires . . . . . . . . . . . 10-59
Chains . . . . . . . . . . . . . . . . . . . . . . 10-63
Changing . . . . . . . . . . . . . . . . . . . 10-74
Compact Spare . . . . . . . . . . . . . 10-81
Designations . . . . . . . . . . . . . . . 10-48
Page 415 of 417

Black plate (12,1)Chevrolet Cruze Owner Manual (GMNA-Localizing-U.S./Canada-7707493) -
2015 - crc - 11/25/14
i-12 INDEX
Tires (cont'd)Different Size . . . . . . . . . . . . . . . 10-60
If a Tire Goes Flat . . . . . . . . . . 10-64
Inflation Monitor System . . . . 10-53
Inspection . . . . . . . . . . . . . . . . . . 10-57
Low Profile . . . . . . . . . . . . . . . . . 10-45
Messages . . . . . . . . . . . . . . . . . . . . 5-33
Pressure Light . . . . . . . . . . . . . . . . 5-19
Pressure Monitor System . . . 10-52
Rotation . . . . . . . . . . . . . . . . . . . . 10-57
Sealant and
Compressor Kit . . . . . . . . . . . 10-66
Sealant and Compressor Kit,
Storing . . . . . . . . . . . . . 10-72, 10-73
Sidewall Labeling . . . . . . . . . . . 10-45
Terminology and Definitions . . . . . . . . . . . . . . . . . 10-48
Uniform Tire Quality Grading . . . . . . . . . . . . . . . . . . . 10-61
Wheel Alignment and Tire Balance . . . . . . . . . . . . . . . . . . . 10-62
Wheel Replacement . . . . . . . . 10-63
When It Is Time for New
Tires . . . . . . . . . . . . . . . . . . . . . . 10-58
Winter . . . . . . . . . . . . . . . . . . . . . . 10-45 Towing
Driving Characteristics . . . . . . . . 9-62
Equipment . . . . . . . . . . . . . . . . . . . . 9-67
General Information . . . . . . . . . . 9-62
Recreational Vehicle . . . . . . . . 10-85
Trailer . . . . . . . . . . . . . . . . . . . . . . . . 9-66
Vehicle . . . . . . . . . . . . . . . . . . . . . 10-85
Traction Control System (TCS)/StabiliTrak
®Light . . . . . . . . . . . . 5-19
Off Light . . . . . . . . . . . . . . . . . . . . . . 5-18
Traction Control/Electronic Stability Control . . . . . . . . . . . . . . 9-41
Trademarks and License Agreements . . . . . . . . . . . . . . . . . . 7-28
Trailer
Towing . . . . . . . . . . . . . . . . . . . . . . . . 9-66
Transmission Automatic . . . . . . . . . . . . . . . . . . . . . 9-33
Fluid, Automatic . . . . . . . . . . . . 10-16
Fluid, Manual . . . . . . . . . . . . . . . 10-16
Messages . . . . . . . . . . . . . . . . . . . . 5-34 Transportation Program,
Courtesy . . . . . . . . . . . . . . . . . . . . . 13-7
Trip Odometer . . . . . . . . . . . . . . . . . 5-10
Trunk . . . . . . . . . . . . . . . . . . . . . . . . . . 2-14
Turn and Lane-Change Signals . . . . . . . . . . . . . . . . . . . . . . . . 6-4
Turn Signal
Bulb Replacement . . . . . . . . . . 10-34U
Uniform Tire QualityGrading . . . . . . . . . . . . . . . . . . . . . 10-61
Up-Shift Light . . . . . . . . . . . . . . . . . . 5-17
Using This Manual . . . . . . . . . . . . . . . . iii
V
Vehicle
Alarm System . . . . . . . . . . . . . . . . 2-16
Canadian Owners . . . . . . . . . . . . . . . iii
Control . . . . . . . . . . . . . . . . . . . . . . . . 9-3
IdentificationNumber (VIN) . . . . . . . . . . . . . . . 12-1
Load Limits . . . . . . . . . . . . . . . . . . . . 9-9