2015 CHEVROLET CORVETTE brake
[x] Cancel search: brakePage 303 of 393
Black plate (64,1)Chevrolet Corvette Owner Manual (GMNA-Localizing-U.S./Canada/Mexico-
7576293) - 2015 - crc - 10/31/14
10-64 Vehicle Care
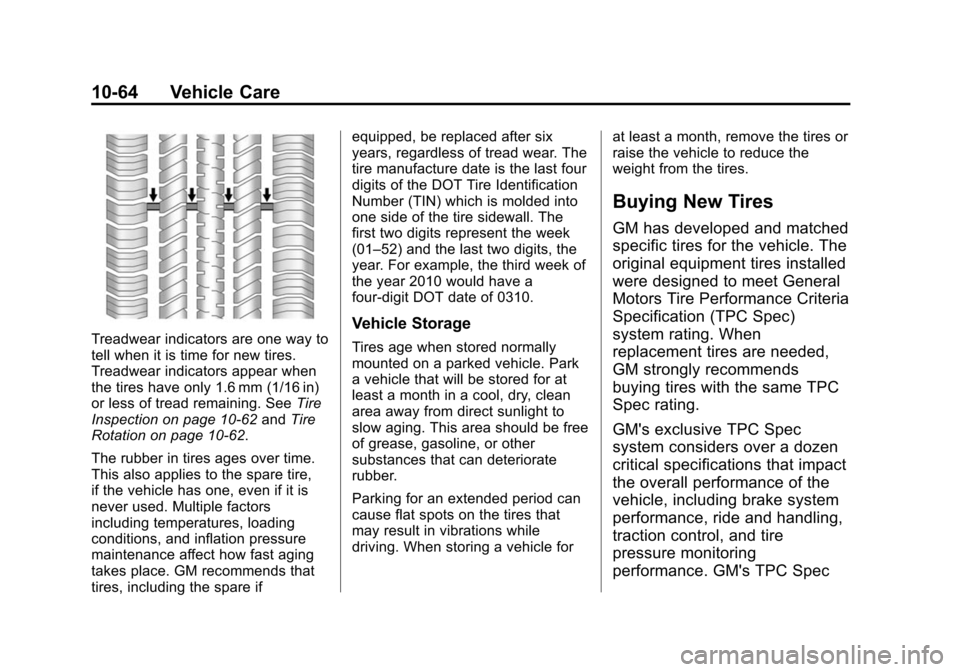
Treadwear indicators are one way to
tell when it is time for new tires.
Treadwear indicators appear when
the tires have only 1.6 mm (1/16 in)
or less of tread remaining. SeeTire
Inspection on page 10-62 andTire
Rotation on page 10-62.
The rubber in tires ages over time.
This also applies to the spare tire,
if the vehicle has one, even if it is
never used. Multiple factors
including temperatures, loading
conditions, and inflation pressure
maintenance affect how fast aging
takes place. GM recommends that
tires, including the spare if equipped, be replaced after six
years, regardless of tread wear. The
tire manufacture date is the last four
digits of the DOT Tire Identification
Number (TIN) which is molded into
one side of the tire sidewall. The
first two digits represent the week
(01–52) and the last two digits, the
year. For example, the third week of
the year 2010 would have a
four-digit DOT date of 0310.Vehicle Storage
Tires age when stored normally
mounted on a parked vehicle. Park
a vehicle that will be stored for at
least a month in a cool, dry, clean
area away from direct sunlight to
slow aging. This area should be free
of grease, gasoline, or other
substances that can deteriorate
rubber.
Parking for an extended period can
cause flat spots on the tires that
may result in vibrations while
driving. When storing a vehicle for
at least a month, remove the tires or
raise the vehicle to reduce the
weight from the tires.
Buying New Tires
GM has developed and matched
specific tires for the vehicle. The
original equipment tires installed
were designed to meet General
Motors Tire Performance Criteria
Specification (TPC Spec)
system rating. When
replacement tires are needed,
GM strongly recommends
buying tires with the same TPC
Spec rating.
GM's exclusive TPC Spec
system considers over a dozen
critical specifications that impact
the overall performance of the
vehicle, including brake system
performance, ride and handling,
traction control, and tire
pressure monitoring
performance. GM's TPC Spec
Page 305 of 393
Black plate (66,1)Chevrolet Corvette Owner Manual (GMNA-Localizing-U.S./Canada/Mexico-
7576293) - 2015 - crc - 10/31/14
10-66 Vehicle Care
If the vehicle tires must be
replaced with a tire that does not
have a TPC Spec number, make
sure they are the same size,
load range, speed rating, and
construction (radial) as the
original tires.
Vehicles that have a tire
pressure monitoring system
could give an inaccurate
low-pressure warning if non-TPC
Spec rated tires are installed.
SeeTire Pressure Monitor
Operation on page 10-60.
The Tire and Loading
Information label indicates the
original equipment tires on the
vehicle. See Vehicle Load Limits
on page 9-15, for the label
location and more information
about the Tire and Loading
Information label.Different Size Tires and
Wheels
If wheels or tires are installed that
are a different size than the original
equipment wheels and tires, vehicle
performance, including its braking,
ride and handling characteristics,
stability, and resistance to rollover
may be affected. If the vehicle has
electronic systems such as antilock
brakes, rollover airbags, traction
control, electronic stability control,
or All-Wheel Drive, the performance
of these systems can also be
affected.
{Warning
If different sized wheels are used,
there may not be an acceptable
level of performance and safety if
tires not recommended for those
wheels are selected. This
increases the chance of a crash
and serious injury. Only use GM
(Continued)
Warning (Continued)
specific wheel and tire systems
developed for the vehicle, and
have them properly installed by a
GM certified technician.
See Buying New Tires on
page 10-64 andAccessories and
Modifications on page 10-2.
Uniform Tire Quality
Grading
The following information relates
to the system developed by the
United States National Highway
Traffic Safety Administration
(NHTSA), which grades tires by
treadwear, traction, and
temperature performance. This
applies only to vehicles sold in
the United States. The grades
are molded on the sidewalls of
most passenger car tires. The
Uniform Tire Quality Grading
Page 308 of 393

Black plate (69,1)Chevrolet Corvette Owner Manual (GMNA-Localizing-U.S./Canada/Mexico-
7576293) - 2015 - crc - 10/31/14
Vehicle Care 10-69
Replace wheels, wheel bolts,
or wheel nuts with new GM original
equipment parts.
{Warning
Using the wrong replacement
wheels, wheel bolts, or wheel
nuts can be dangerous. It could
affect the braking and handling of
the vehicle. Tires can lose air,
and cause loss of control, causing
a crash. Always use the correct
wheel, wheel bolts, and wheel
nuts for replacement.
{Warning
Replacing a wheel with a used
one is dangerous. How it has
been used or how far it has been
driven may be unknown. It could
fail suddenly and cause a crash.
When replacing wheels, use a
new GM original equipment
wheel.
{Caution
The wrong wheel can also cause
problems with bearing life, brake
cooling, speedometer or
odometer calibration, headlamp
aim, bumper height, vehicle
ground clearance, and tire
clearance to the body and
chassis.
Tightening Wheel Lug Nuts
{Warning
Never use oil or grease on studs
or the threads of the wheel nuts.
The wheel nuts might come loose
and the wheel could fall off,
causing a crash.
{Warning
Incorrect wheel nuts or improperly
tightened wheel nuts can cause
the wheel to become loose and
even come off. This could lead to
a crash. Be sure to use the
correct wheel nuts. If you have to
replace them, be sure to get new
GM original equipment
wheel nuts.
{Caution
Improperly tightened wheel nuts
can lead to brake pulsation and
rotor damage. To avoid expensive
brake repairs, evenly tighten the
wheel nuts in the proper
sequence and to the proper
torque specification.
Page 309 of 393
Black plate (70,1)Chevrolet Corvette Owner Manual (GMNA-Localizing-U.S./Canada/Mexico-
7576293) - 2015 - crc - 10/31/14
10-70 Vehicle Care
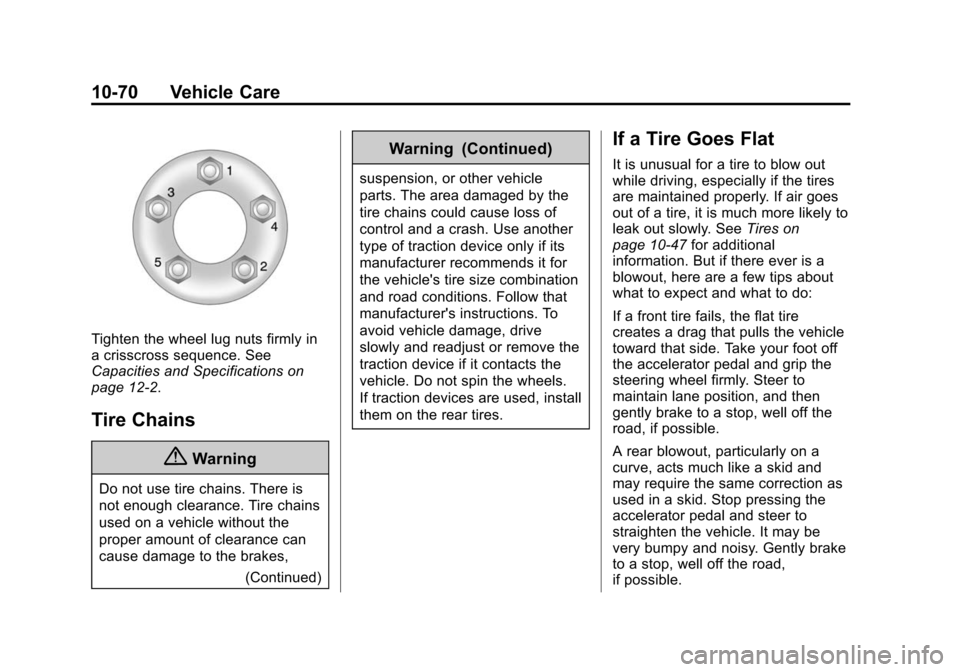
Tighten the wheel lug nuts firmly in
a crisscross sequence. See
Capacities and Specifications on
page 12-2.
Tire Chains
{Warning
Do not use tire chains. There is
not enough clearance. Tire chains
used on a vehicle without the
proper amount of clearance can
cause damage to the brakes,(Continued)
Warning (Continued)
suspension, or other vehicle
parts. The area damaged by the
tire chains could cause loss of
control and a crash. Use another
type of traction device only if its
manufacturer recommends it for
the vehicle's tire size combination
and road conditions. Follow that
manufacturer's instructions. To
avoid vehicle damage, drive
slowly and readjust or remove the
traction device if it contacts the
vehicle. Do not spin the wheels.
If traction devices are used, install
them on the rear tires.
If a Tire Goes Flat
It is unusual for a tire to blow out
while driving, especially if the tires
are maintained properly. If air goes
out of a tire, it is much more likely to
leak out slowly. SeeTires on
page 10-47 for additional
information. But if there ever is a
blowout, here are a few tips about
what to expect and what to do:
If a front tire fails, the flat tire
creates a drag that pulls the vehicle
toward that side. Take your foot off
the accelerator pedal and grip the
steering wheel firmly. Steer to
maintain lane position, and then
gently brake to a stop, well off the
road, if possible.
A rear blowout, particularly on a
curve, acts much like a skid and
may require the same correction as
used in a skid. Stop pressing the
accelerator pedal and steer to
straighten the vehicle. It may be
very bumpy and noisy. Gently brake
to a stop, well off the road,
if possible.
Page 310 of 393

Black plate (71,1)Chevrolet Corvette Owner Manual (GMNA-Localizing-U.S./Canada/Mexico-
7576293) - 2015 - crc - 10/31/14
Vehicle Care 10-71
The vehicle has no spare tire, no
tire changing equipment, and no
place to store a tire.
If the vehicle has run-flat tires, there
is no need to stop on the side of the
road to change a flat tire. See
Run-Flat Tires on page 10-49.
{Warning
Special tools and procedures are
required to service a run-flat tire.
If these special tools and
procedures are not used, injury or
vehicle damage may occur.
Always be sure the proper tools
and procedures, as described in
the service manual, are used.
If this vehicle does not have run-flat
tires and a tire goes flat, avoid
further tire and wheel damage by
driving slowly to a level place, well
off the road, if possible. Turn on the
hazard warning flashers. See
Hazard Warning Flashers on
page 6-4. 1. Turn on the hazard warning
flashers.
2. Set the parking brake firmly.
3. Put an automatic transmission in P (Park) or a manual
transmission in 1 (First) or
R (Reverse).
4. Turn off the ignition.
5. Inspect the flat tire.
{Warning
Driving on a flat tire will cause
permanent damage to the tire.
Re-inflating a tire after it has been
driven on while severely
underinflated or flat may cause a
blowout and a serious crash.
Never attempt to re-inflate a tire
that has been driven on while
severely underinflated or flat.
Have your dealer or an authorized
tire service center repair or
replace the flat tire as soon as
possible. If this vehicle has a tire sealant kit
and the tire has been separated
from the wheel, has damaged
sidewalls, or has a puncture larger
than 6 mm (0.25 in), the tire is too
severely damaged for the tire
sealant and compressor kit to be
effective. If the tire has a puncture
less than 6 mm (0.25 in) in the tread
area of the tire, see
Tire Sealant
and Compressor Kit on page 10-71.
Tire Sealant and
Compressor Kit
{Warning
Idling a vehicle in an enclosed
area with poor ventilation is
dangerous. Engine exhaust may
enter the vehicle. Engine exhaust
contains carbon monoxide (CO)
which cannot be seen or smelled.
It can cause unconsciousness
and even death. Never run the
engine in an enclosed area that
(Continued)
Page 320 of 393
Black plate (81,1)Chevrolet Corvette Owner Manual (GMNA-Localizing-U.S./Canada/Mexico-
7576293) - 2015 - crc - 10/31/14
Vehicle Care 10-81
The battery is under a battery cover
in the hatch/trunk area on the
passenger side under the carpet.
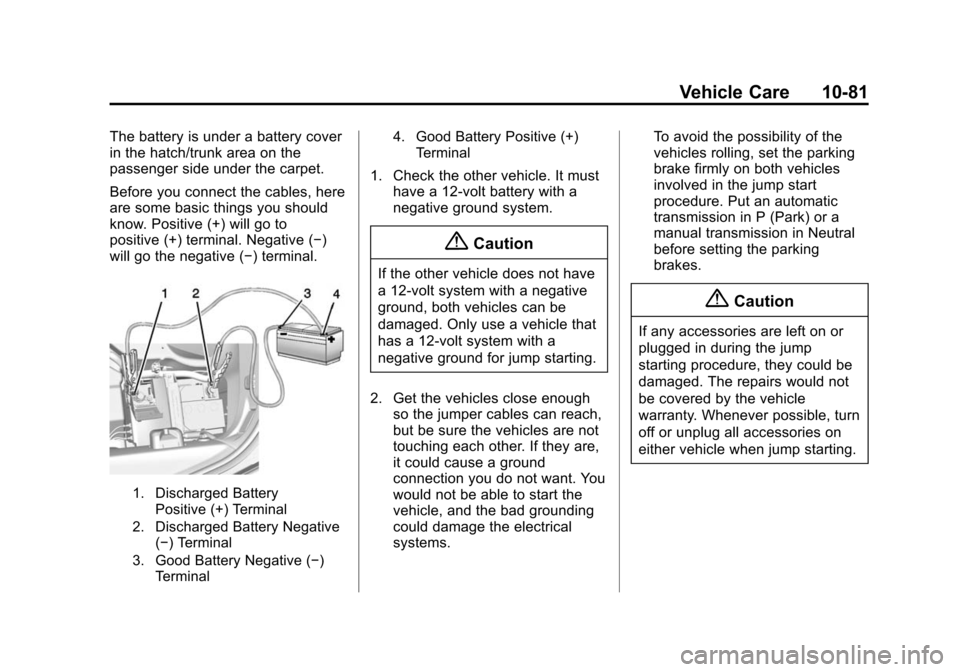
Before you connect the cables, here
are some basic things you should
know. Positive (+) will go to
positive (+) terminal. Negative (−)
will go the negative (−) terminal.
1. Discharged BatteryPositive (+) Terminal
2. Discharged Battery Negative (−) Terminal
3. Good Battery Negative (−) Terminal 4. Good Battery Positive (+)
Terminal
1. Check the other vehicle. It musthave a 12-volt battery with a
negative ground system.
{Caution
If the other vehicle does not have
a 12-volt system with a negative
ground, both vehicles can be
damaged. Only use a vehicle that
has a 12-volt system with a
negative ground for jump starting.
2. Get the vehicles close enough so the jumper cables can reach,
but be sure the vehicles are not
touching each other. If they are,
it could cause a ground
connection you do not want. You
would not be able to start the
vehicle, and the bad grounding
could damage the electrical
systems. To avoid the possibility of the
vehicles rolling, set the parking
brake firmly on both vehicles
involved in the jump start
procedure. Put an automatic
transmission in P (Park) or a
manual transmission in Neutral
before setting the parking
brakes.
{Caution
If any accessories are left on or
plugged in during the jump
starting procedure, they could be
damaged. The repairs would not
be covered by the vehicle
warranty. Whenever possible, turn
off or unplug all accessories on
either vehicle when jump starting.
Page 327 of 393
Black plate (88,1)Chevrolet Corvette Owner Manual (GMNA-Localizing-U.S./Canada/Mexico-
7576293) - 2015 - crc - 10/31/14
10-88 Vehicle Care
Caution (Continued)
automatic car wash that uses
silicone carbide tire cleaning
brushes. Damage could occur
and the repairs would not be
covered by the vehicle warranty.
Brake System
Visually inspect brake lines and
hoses for proper hook-up, binding,
leaks, cracks, chafing, etc. Inspect
disc brake pads for wear and rotors
for surface condition. Inspect drum
brake linings/shoes for wear or
cracks. Inspect other brake parts,
including drums, wheel cylinders,
calipers, parking brake, master
cylinder, brake fluid reservoir,
vacuum pipes, electric vacuum
pump including bracket and vent
hose, if equipped.
Steering, Suspension, and
Chassis Components
Visually inspect steering,
suspension, and chassis
components for damaged, loose,
or missing parts or signs of wear at
least once a year.
Inspect power steering for proper
hook-up, binding, leaks, cracks,
chafing, etc.
Visually check constant velocity joint
boots and axle seals for leaks.
Body Component Lubrication
Lubricate all key lock cylinders,
hood hinges and liftgate hinges,
unless the components are plastic.
Applying silicone grease on
weatherstrips with a clean cloth will
make them last longer, seal better,
and not stick or squeak.
Underbody Maintenance
At least twice a year, spring and fall
use plain water to flush any
corrosive materials from theunderbody. Take care to thoroughly
clean any areas where mud and
other debris can collect.
Composite Springs
{Caution
Do not use acidic or corrosive
cleaning products, engine
degreasers, or aluminum cleaning
agents on fiberglass springs as it
may cause damage. The repairs
would not be covered by the
vehicle warranty. Use only
approved cleaners.
Body Damage
If the vehicle is damaged and
requires sheet metal repair or
replacement, make sure the body
repair shop applies anti-corrosion
material to parts repaired or
replaced to restore corrosion
protection.
Page 332 of 393
Black plate (93,1)Chevrolet Corvette Owner Manual (GMNA-Localizing-U.S./Canada/Mexico-
7576293) - 2015 - crc - 10/31/14
Vehicle Care 10-93
brake pedal. Always check that
the floor mats do not interfere
with the pedals.
.Do not use a floor mat if the
vehicle is not equipped with a
floor mat retainer on the driver
side floor.
.Use the floor mat with the
correct side up. Do not turn
it over.
.Do not place anything on top of
the driver side floor mat.
.Use only a single floor mat on
the driver side.
.Do not place one floor mat on
top of another.
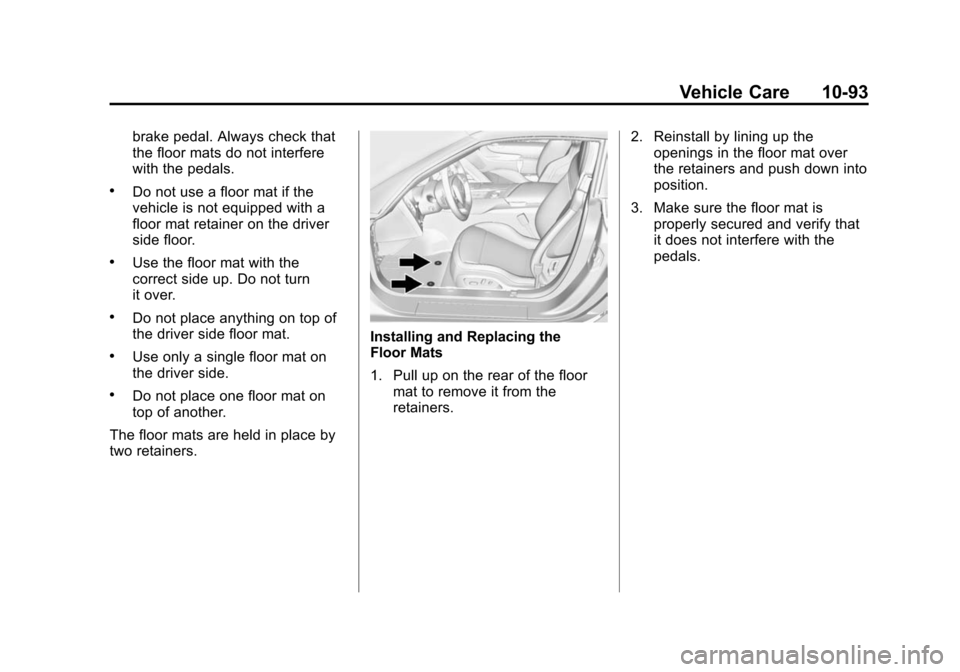
The floor mats are held in place by
two retainers.
Installing and Replacing the
Floor Mats
1. Pull up on the rear of the floor mat to remove it from the
retainers. 2. Reinstall by lining up the
openings in the floor mat over
the retainers and push down into
position.
3. Make sure the floor mat is properly secured and verify that
it does not interfere with the
pedals.