2015 CHEVROLET CORVETTE GRAND SPORT tow
[x] Cancel search: towPage 2 of 391

Black plate (1,1)Chevrolet Corvette Owner Manual (GMNA-Localizing-U.S./Canada/Mexico-
7576293) - 2015 - crc - 6/17/14
2015 Chevrolet Corvette Owner ManualM
In Brief. . . . . . . . . . . . . . . . . . . . . . . . 1-1
Instrument Panel . . . . . . . . . . . . . . 1-2
Initial Drive Information . . . . . . . . 1-4
Vehicle Features . . . . . . . . . . . . . 1-17
Performance and Maintenance . . . . . . . . . . . . . . . . 1-19
Keys, Doors, and Windows . . . . . . . . . . . . . . . . . . . . 2-1
Keys and Locks . . . . . . . . . . . . . . . 2-1
Doors . . . . . . . . . . . . . . . . . . . . . . . . 2-14
Vehicle Security . . . . . . . . . . . . . . 2-16
Exterior Mirrors . . . . . . . . . . . . . . . 2-19
Interior Mirrors . . . . . . . . . . . . . . . . 2-21
Windows . . . . . . . . . . . . . . . . . . . . . 2-21
Roof . . . . . . . . . . . . . . . . . . . . . . . . . . 2-24
Seats and Restraints . . . . . . . . . 3-1
Head Restraints . . . . . . . . . . . . . . . 3-2
Front Seats . . . . . . . . . . . . . . . . . . . . 3-2
Safety Belts . . . . . . . . . . . . . . . . . . . . 3-8
Airbag System . . . . . . . . . . . . . . . . 3-15
Child Restraints . . . . . . . . . . . . . . 3-26 Storage
. . . . . . . . . . . . . . . . . . . . . . . 4-1
Storage Compartments . . . . . . . . 4-1
Additional Storage Features . . . 4-4
Instruments and Controls . . . . 5-1
Controls . . . . . . . . . . . . . . . . . . . . . . . 5-2
Warning Lights, Gauges, and
Indicators . . . . . . . . . . . . . . . . . . . . 5-6
Information Displays . . . . . . . . . . 5-26
Vehicle Messages . . . . . . . . . . . . 5-34
Vehicle Personalization . . . . . . . 5-45
Universal Remote System . . . . 5-52
Lighting . . . . . . . . . . . . . . . . . . . . . . . 6-1
Exterior Lighting . . . . . . . . . . . . . . . 6-1
Interior Lighting . . . . . . . . . . . . . . . . 6-5
Lighting Features . . . . . . . . . . . . . . 6-6
Infotainment System . . . . . . . . . 7-1
Introduction . . . . . . . . . . . . . . . . . . . . 7-1
Performance Data Recorder (PDR) . . . . . . . . . . . . . . 7-1 Climate Controls
. . . . . . . . . . . . . 8-1
Climate Control Systems . . . . . . 8-1
Air Vents . . . . . . . . . . . . . . . . . . . . . . . 8-5
Maintenance . . . . . . . . . . . . . . . . . . . 8-5
Driving and Operating . . . . . . . . 9-1
Driving Information . . . . . . . . . . . . . 9-2
Starting and Operating . . . . . . . 9-18
Engine Exhaust . . . . . . . . . . . . . . 9-26
Automatic Transmission . . . . . . 9-27
Manual Transmission . . . . . . . . . 9-31
Brakes . . . . . . . . . . . . . . . . . . . . . . . 9-34
Ride Control Systems . . . . . . . . 9-37
Cruise Control . . . . . . . . . . . . . . . . 9-48
Driver Assistance Systems . . . 9-51
Fuel . . . . . . . . . . . . . . . . . . . . . . . . . . 9-53
Trailer Towing . . . . . . . . . . . . . . . . 9-57
Conversions and Add-Ons . . . 9-57
Vehicle Care . . . . . . . . . . . . . . . . . 10-1
General Information . . . . . . . . . . 10-2
Vehicle Checks . . . . . . . . . . . . . . . 10-5
Headlamp Aiming . . . . . . . . . . . 10-37
Bulb Replacement . . . . . . . . . . 10-37
Electrical System . . . . . . . . . . . . 10-39
Wheels and Tires . . . . . . . . . . . 10-46
Page 3 of 391

Black plate (2,1)Chevrolet Corvette Owner Manual (GMNA-Localizing-U.S./Canada/Mexico-
7576293) - 2015 - crc - 6/17/14
2015 Chevrolet Corvette Owner ManualM
Jump Starting . . . . . . . . . . . . . . . 10-79
Towing the Vehicle . . . . . . . . . . 10-82
Appearance Care . . . . . . . . . . . 10-82
Service and Maintenance . . . 11-1
General Information . . . . . . . . . . 11-1
Maintenance Schedule . . . . . . . 11-2
Special Application Services . . . . . . . . . . . . . . . . . . . . 11-8
Additional Maintenance and Care . . . . . . . . . . . . . . . . . . . . 11-9
Recommended Fluids, Lubricants, and Parts . . . . . . 11-12
Maintenance Records . . . . . . . 11-15
Technical Data . . . . . . . . . . . . . . . 12-1
Vehicle Identification . . . . . . . . . 12-1
Vehicle Data . . . . . . . . . . . . . . . . . . 12-2
Customer Information . . . . . . . 13-1
Customer Information . . . . . . . . 13-1
Reporting Safety Defects . . . . 13-12
Vehicle Data Recording and Privacy . . . . . . . . . . . . . . . . . . . . 13-14 OnStar
. . . . . . . . . . . . . . . . . . . . . . . 14-1
OnStar Overview . . . . . . . . . . . . . 14-1
OnStar Services . . . . . . . . . . . . . . 14-3
OnStar Additional
Information . . . . . . . . . . . . . . . . . . 14-6
Index . . . . . . . . . . . . . . . . . . . . . i-1
Page 19 of 391

Black plate (12,1)Chevrolet Corvette Owner Manual (GMNA-Localizing-U.S./Canada/Mexico-
7576293) - 2015 - crc - 6/17/14
1-12 In Brief
To adjust the mirrors:
1. Press L (Left) or R (Right) toselect the mirror.
2. Press the control pad to adjust the mirror.
3. Return the switch to the center to deselect the mirror.
See Power Mirrors on page 2-20.
If the vehicle has the memory
feature, a preferred mirror position
can be stored. See Memory Seats
on page 3-4.
To fold, pull the mirror toward the
vehicle. Push the mirror outward to
return it to the original position.
Interior Mirror
Adjustment
Adjust the rearview mirror to clearly
view the area behind the vehicle. Manual Rearview Mirror
To avoid glare of the headlamps
from behind, push the tab forward
for daytime and pull it rearward for
nighttime use.
Automatic Dimming Rearview
Mirror
If equipped, the mirror automatically
reduces the glare of the headlamps
from behind. The dimming feature
comes on when the vehicle is
started.
See
Automatic Dimming Rearview
Mirror on page 2-21.
Steering Wheel
Adjustment
Press the control to move the tilt
and telescoping steering wheel up
and down or forward and rearward.
Both the tilt and telescoping steering
column positions can be stored with
your memory settings. See Memory
Seats on page 3-4.
Do not adjust the steering wheel
while driving.
Page 21 of 391
Black plate (14,1)Chevrolet Corvette Owner Manual (GMNA-Localizing-U.S./Canada/Mexico-
7576293) - 2015 - crc - 6/17/14
1-14 In Brief
Windshield Wiper/Washer
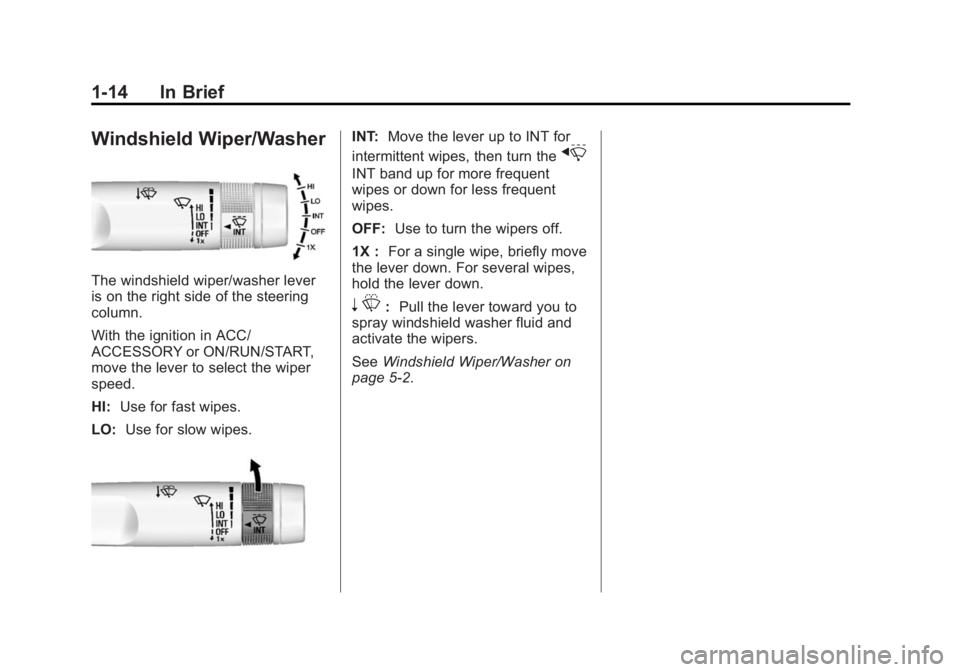
The windshield wiper/washer lever
is on the right side of the steering
column.
With the ignition in ACC/
ACCESSORY or ON/RUN/START,
move the lever to select the wiper
speed.
HI:Use for fast wipes.
LO: Use for slow wipes.
INT: Move the lever up to INT for
intermittent wipes, then turn the
x
INT band up for more frequent
wipes or down for less frequent
wipes.
OFF: Use to turn the wipers off.
1X : For a single wipe, briefly move
the lever down. For several wipes,
hold the lever down.
n L: Pull the lever toward you to
spray windshield washer fluid and
activate the wipers.
See Windshield Wiper/Washer on
page 5-2.
Page 35 of 391
Black plate (6,1)Chevrolet Corvette Owner Manual (GMNA-Localizing-U.S./Canada/Mexico-
7576293) - 2015 - crc - 6/17/14
2-6 Keys, Doors, and Windows
programmed through your dealer.
The vehicle can be reprogrammed
so that lost or stolen transmitters no
longer work. Each vehicle can have
up to eight transmitters programmed
to it.
Programming with a Recognized
Transmitter
A new transmitter can be
programmed to the vehicle when
there is one recognized transmitter.
1. The vehicle must be off and boththe recognized and new
transmitters must be with you.
2. Remove the key base from the recognized RKE transmitter.
3. Place the recognized transmitter in the cupholder.
4. Insert the vehicle key into the key cylinder above the license
plate.
5. Open the hatch/trunk.
6. Turn the key five times within 10 seconds. 7. The DIC displays READY FOR
REMOTE # 3 or 4, up to 8.
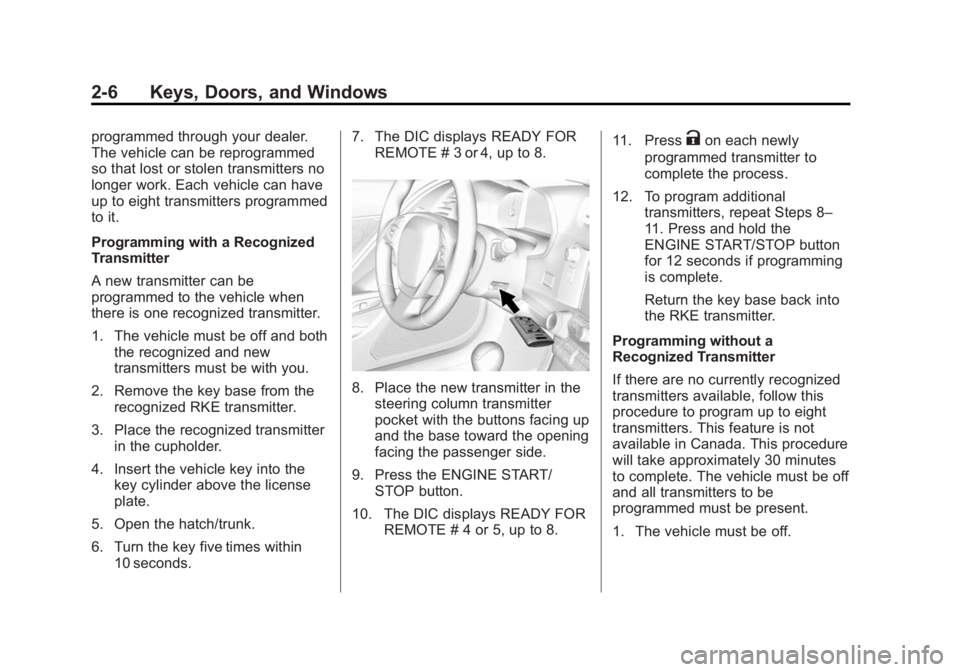
8. Place the new transmitter in thesteering column transmitter
pocket with the buttons facing up
and the base toward the opening
facing the passenger side.
9. Press the ENGINE START/ STOP button.
10. The DIC displays READY FOR REMOTE # 4 or 5, up to 8. 11. Press
Kon each newly
programmed transmitter to
complete the process.
12. To program additional transmitters, repeat Steps 8–
11. Press and hold the
ENGINE START/STOP button
for 12 seconds if programming
is complete.
Return the key base back into
the RKE transmitter.
Programming without a
Recognized Transmitter
If there are no currently recognized
transmitters available, follow this
procedure to program up to eight
transmitters. This feature is not
available in Canada. This procedure
will take approximately 30 minutes
to complete. The vehicle must be off
and all transmitters to be
programmed must be present.
1. The vehicle must be off.
Page 36 of 391
Black plate (7,1)Chevrolet Corvette Owner Manual (GMNA-Localizing-U.S./Canada/Mexico-
7576293) - 2015 - crc - 6/17/14
Keys, Doors, and Windows 2-7
2. Remove the key from thetransmitter and insert the vehicle
key into the key cylinder above
the license plate.
3. Open the hatch/trunk.
4. Turn the key five times within 10 seconds.
The DIC message displays
REMOTE LEARN PENDING
PLEASE WAIT.
5. Return key base back into the RKE transmitter.
6. Wait for 10 minutes until the DIC displays PRESS ENGINE
START BUTTON TO LEARN,
then press the ENGINE START/
STOP button.
The DIC reads REMOTE
LEARN PENDING,
PLEASE WAIT.
7. Repeat Step 6 two additional times. After the third time all
previously known transmitters
will no longer work with the
vehicle. Remaining transmitters
can be relearned during the next steps. The DIC display should
now show READY FOR
REMOTE #1.
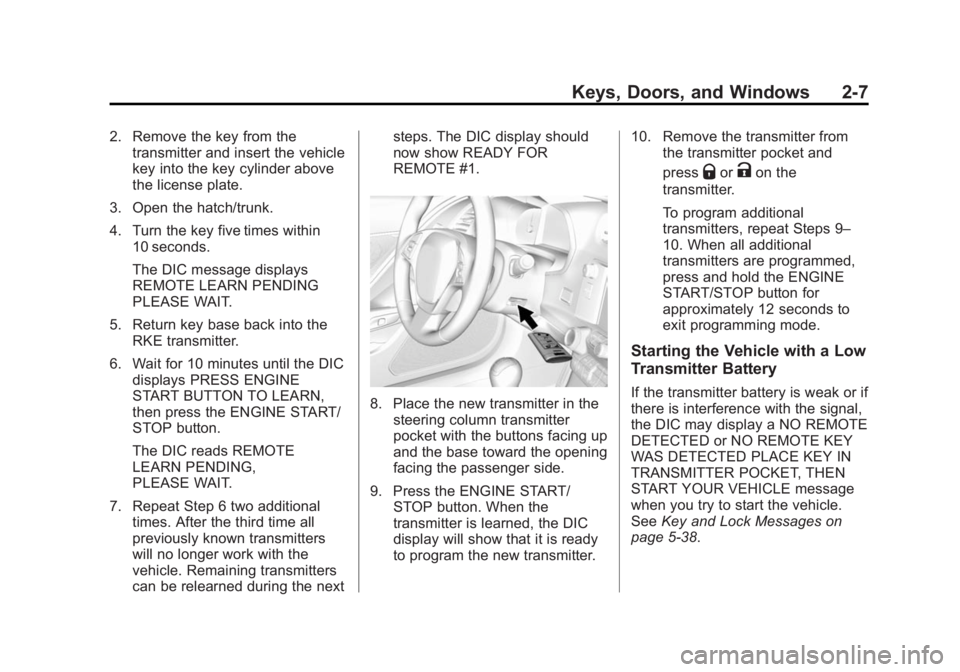
8. Place the new transmitter in the
steering column transmitter
pocket with the buttons facing up
and the base toward the opening
facing the passenger side.
9. Press the ENGINE START/ STOP button. When the
transmitter is learned, the DIC
display will show that it is ready
to program the new transmitter. 10. Remove the transmitter from
the transmitter pocket and
press
QorKon the
transmitter.
To program additional
transmitters, repeat Steps 9–
10. When all additional
transmitters are programmed,
press and hold the ENGINE
START/STOP button for
approximately 12 seconds to
exit programming mode.
Starting the Vehicle with a Low
Transmitter Battery
If the transmitter battery is weak or if
there is interference with the signal,
the DIC may display a NO REMOTE
DETECTED or NO REMOTE KEY
WAS DETECTED PLACE KEY IN
TRANSMITTER POCKET, THEN
START YOUR VEHICLE message
when you try to start the vehicle.
See Key and Lock Messages on
page 5-38.
Page 37 of 391
Black plate (8,1)Chevrolet Corvette Owner Manual (GMNA-Localizing-U.S./Canada/Mexico-
7576293) - 2015 - crc - 6/17/14
2-8 Keys, Doors, and Windows
{Caution
When replacing the battery, do
not touch any of the circuitry on
the transmitter. Static from your
body could damage the
transmitter.
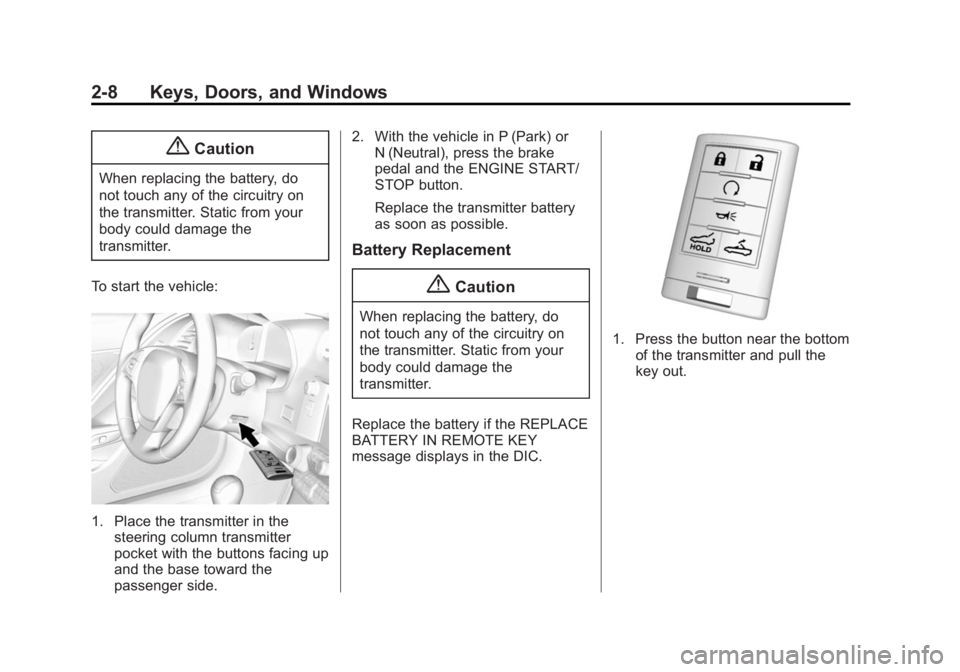
To start the vehicle:
1. Place the transmitter in the steering column transmitter
pocket with the buttons facing up
and the base toward the
passenger side. 2. With the vehicle in P (Park) or
N (Neutral), press the brake
pedal and the ENGINE START/
STOP button.
Replace the transmitter battery
as soon as possible.
Battery Replacement
{Caution
When replacing the battery, do
not touch any of the circuitry on
the transmitter. Static from your
body could damage the
transmitter.
Replace the battery if the REPLACE
BATTERY IN REMOTE KEY
message displays in the DIC.
1. Press the button near the bottom of the transmitter and pull the
key out.
Page 49 of 391
Black plate (20,1)Chevrolet Corvette Owner Manual (GMNA-Localizing-U.S./Canada/Mexico-
7576293) - 2015 - crc - 6/17/14
2-20 Keys, Doors, and Windows
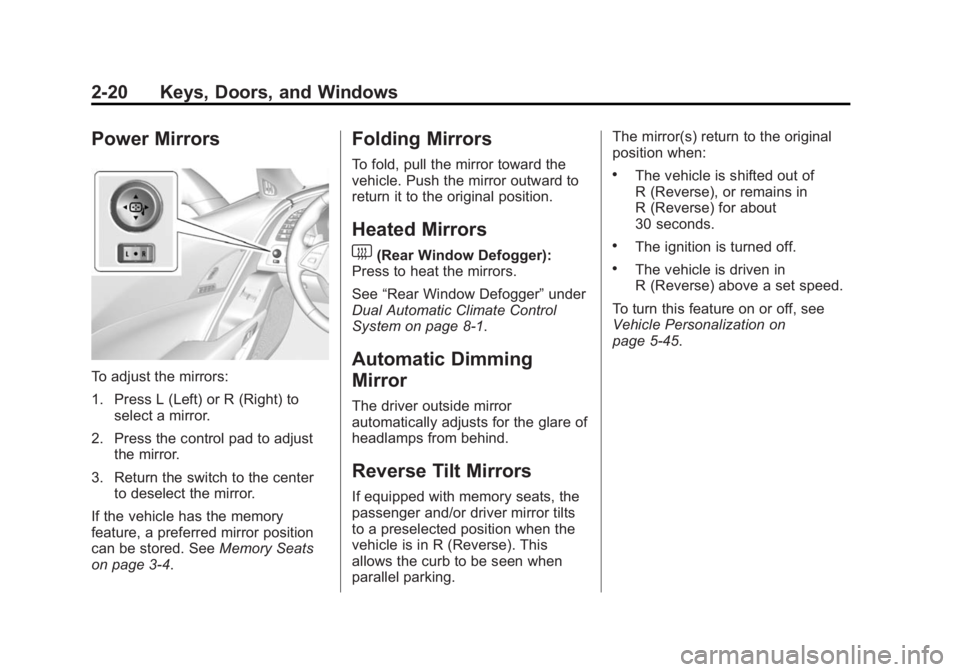
Power Mirrors
To adjust the mirrors:
1. Press L (Left) or R (Right) toselect a mirror.
2. Press the control pad to adjust the mirror.
3. Return the switch to the center to deselect the mirror.
If the vehicle has the memory
feature, a preferred mirror position
can be stored. See Memory Seats
on page 3-4.
Folding Mirrors
To fold, pull the mirror toward the
vehicle. Push the mirror outward to
return it to the original position.
Heated Mirrors
1
(Rear Window Defogger):
Press to heat the mirrors.
See “Rear Window Defogger” under
Dual Automatic Climate Control
System on page 8-1.
Automatic Dimming
Mirror
The driver outside mirror
automatically adjusts for the glare of
headlamps from behind.
Reverse Tilt Mirrors
If equipped with memory seats, the
passenger and/or driver mirror tilts
to a preselected position when the
vehicle is in R (Reverse). This
allows the curb to be seen when
parallel parking. The mirror(s) return to the original
position when:
.The vehicle is shifted out of
R (Reverse), or remains in
R (Reverse) for about
30 seconds.
.The ignition is turned off.
.The vehicle is driven in
R (Reverse) above a set speed.
To turn this feature on or off, see
Vehicle Personalization on
page 5-45.