2015 CHEVROLET CORVETTE GRAND SPORT battery
[x] Cancel search: batteryPage 238 of 391
Black plate (57,1)Chevrolet Corvette Owner Manual (GMNA-Localizing-U.S./Canada/Mexico-
7576293) - 2015 - crc - 6/17/14
Driving and Operating 9-57
Warning (Continued)
.Place the nozzle inside the fill
opening of the container
before dispensing fuel, and
keep it in contact with the fill
opening until filling is
complete.
.Fill the container no more
than 95% full to allow for
expansion.
.Do not smoke, light matches,
or use lighters while
pumping fuel.
.Avoid using cell phones or
other electronic devices.
Trailer Towing
General Towing
Information
The vehicle is neither designed nor
intended to tow a trailer.
Conversions and
Add-Ons
Add-On Electrical
Equipment
{Caution
Some electrical equipment can
damage the vehicle or cause
components to not work and
would not be covered by the
warranty. Always check with your
dealer before adding electrical
equipment.
Add-on equipment can drain the
vehicle's 12-volt battery, even if the
vehicle is not operating.
The vehicle has an airbag system.
Before attempting to add anything
electrical to the vehicle, see
Servicing the Airbag-Equipped
Vehicle on page 3-24 andAdding
Equipment to the Airbag-Equipped
Vehicle on page 3-25.
Page 240 of 391
Black plate (1,1)Chevrolet Corvette Owner Manual (GMNA-Localizing-U.S./Canada/Mexico-
7576293) - 2015 - crc - 6/17/14
Vehicle Care 10-1
Vehicle Care
General Information
General Information . . . . . . . . . . 10-2
California Proposition65 Warning . . . . . . . . . . . . . . . . . 10-2
California Perchlorate Materials Requirements . . . . 10-2
Accessories and Modifications . . . . . . . . . . . . . . . 10-2
Lifting the Vehicle . . . . . . . . . . . . 10-3
Vehicle Checks
Doing Your Own Service Work . . . . . . . . . . . . . . . 10-5
Hood . . . . . . . . . . . . . . . . . . . . . . . . 10-6
Engine Compartment Overview . . . . . . . . . . . . . . . . . . . 10-7
Engine Oil . . . . . . . . . . . . . . . . . . 10-12
Engine Oil Life System . . . . . 10-18
Automatic Transmission Fluid . . . . . . . . . . . . . . . . . . . . . . 10-19
Manual Transmission Fluid . . . . . . . . . . . . . . . . . . . . . . 10-19
Hydraulic Clutch . . . . . . . . . . . . 10-19
Engine Air Cleaner/Filter . . . . 10-20
Cooling System (Engine) . . . 10-22 Cooling System (Aero
Panel) . . . . . . . . . . . . . . . . . . . . . 10-23
Engine Coolant . . . . . . . . . . . . . 10-24
Engine Overheating . . . . . . . . 10-27
Washer Fluid . . . . . . . . . . . . . . . 10-28
Brakes . . . . . . . . . . . . . . . . . . . . . 10-29
Brake Fluid . . . . . . . . . . . . . . . . . 10-32
Battery . . . . . . . . . . . . . . . . . . . . . 10-33
Rear Axle . . . . . . . . . . . . . . . . . . 10-34
Starter Switch Check . . . . . . . 10-35
Automatic Transmission Shift Lock Control Function
Check . . . . . . . . . . . . . . . . . . . . . 10-35
Park Brake and P (Park) Mechanism Check . . . . . . . . 10-36
Wiper Blade Replacement . . . . . . . . . . . . . . 10-36
Windshield Replacement . . . 10-37
Headlamp Aiming
Headlamp Aiming . . . . . . . . . . 10-37
Bulb Replacement
Bulb Replacement . . . . . . . . . . 10-37
High Intensity Discharge (HID) Lighting . . . . . . . . . . . . . 10-37
LED Lighting . . . . . . . . . . . . . . . 10-38
License Plate Lamp . . . . . . . . 10-38
Replacement Bulbs . . . . . . . . . 10-38
Electrical System
Electrical System Overload . . . . . . . . . . . . . . . . . . 10-39
Fuses . . . . . . . . . . . . . . . . . . . . . . 10-39
Engine Compartment Fuse Block . . . . . . . . . . . . . . . . . . . . . 10-39
Rear Compartment Fuse Block . . . . . . . . . . . . . . . . . . . . . 10-43
Wheels and Tires
Tires . . . . . . . . . . . . . . . . . . . . . . . . 10-46
Winter Tires . . . . . . . . . . . . . . . . 10-47
Run-Flat Tires . . . . . . . . . . . . . . 10-48
Low-Profile Tires . . . . . . . . . . . 10-49
Competition OrientedTires . . . . . . . . . . . . . . . . . . . . . . 10-49
Summer Tires . . . . . . . . . . . . . . 10-50
Tire Sidewall Labeling . . . . . . 10-51
Tire Designations . . . . . . . . . . . 10-52
Tire Terminology and Definitions . . . . . . . . . . . . . . . . 10-53
Tire Pressure . . . . . . . . . . . . . . . 10-55
Tire Pressure for High-Speed Operation . . . . . . . . . . . . . . . . . 10-57
Tire Pressure Monitor System . . . . . . . . . . . . . . . . . . . 10-57
Tire Pressure Monitor Operation . . . . . . . . . . . . . . . . . 10-58
Tire Inspection . . . . . . . . . . . . . . 10-61
Page 272 of 391
Black plate (33,1)Chevrolet Corvette Owner Manual (GMNA-Localizing-U.S./Canada/Mexico-
7576293) - 2015 - crc - 6/17/14
Vehicle Care 10-33
After work is done on the brake
hydraulic system, make sure the
level is between the MIN and MAX
marks.
What to Add
Use only new DOT 3 brake fluid
from a sealed container. See
Recommended Fluids and
Lubricants on page 11-12.
Always clean the brake fluid
reservoir cap and the area around
the cap before removing it. This
helps keep dirt from entering the
reservoir.
{Warning
With the wrong kind of fluid in the
brake hydraulic system, the
brakes might not work well. This
could cause a crash. Always use
the proper brake fluid.
{Caution
.Using the wrong fluid can
badly damage brake
hydraulic system parts. For
example, just a few drops of
mineral-based oil, such as
engine oil, in the brake
hydraulic system can damage
brake hydraulic system parts
so badly that they will have to
be replaced. Do not let
someone put in the wrong
kind of fluid.
.If brake fluid is spilled on the
vehicle's painted surfaces,
the paint finish can be
damaged. Be careful not to
spill brake fluid on the
vehicle. If you do, wash it off
immediately.
Battery
The original equipment battery is
maintenance free. Do not remove
the cap and do not add fluid.Refer to the replacement number on
the original battery label when a
new battery is needed.
For battery replacement, see your
dealer or the service manual. To
purchase a service manual, see
Service Publications Ordering
Information on page 13-11.
{Warning
Battery posts, terminals, and
related accessories contain lead
and lead compounds, chemicals
known to the State of California to
cause cancer and reproductive
harm. Wash hands after handling.
Vehicle Storage
{Warning
Batteries have acid that can burn
you and gas that can explode.
You can be badly hurt if you are
(Continued)
Page 273 of 391
Black plate (34,1)Chevrolet Corvette Owner Manual (GMNA-Localizing-U.S./Canada/Mexico-
7576293) - 2015 - crc - 6/17/14
10-34 Vehicle Care
Warning (Continued)
not careful. SeeJump Starting on
page 10-79 for tips on working
around a battery without
getting hurt.
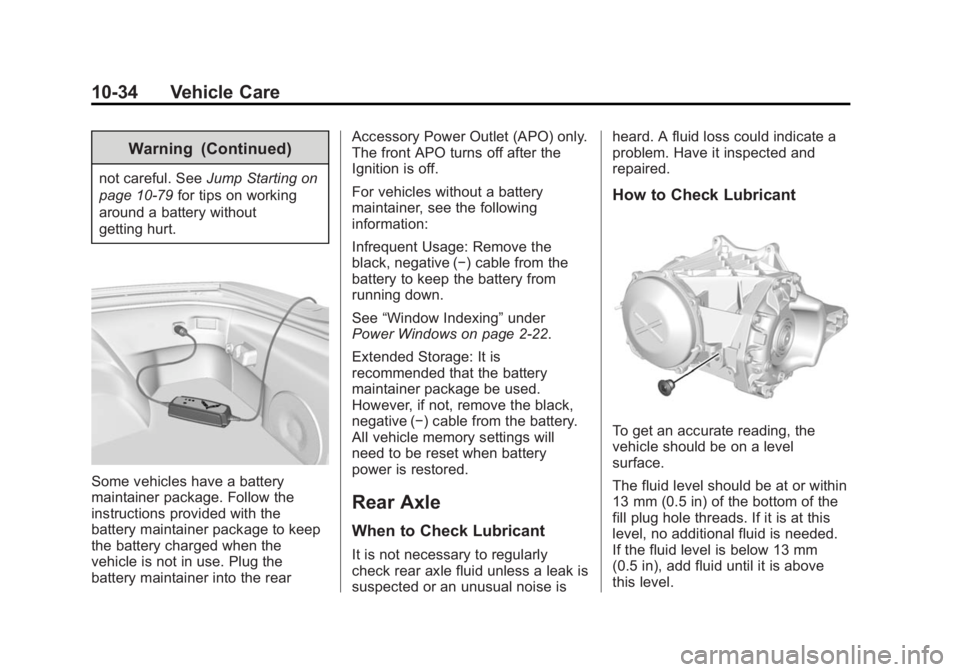
Some vehicles have a battery
maintainer package. Follow the
instructions provided with the
battery maintainer package to keep
the battery charged when the
vehicle is not in use. Plug the
battery maintainer into the rear Accessory Power Outlet (APO) only.
The front APO turns off after the
Ignition is off.
For vehicles without a battery
maintainer, see the following
information:
Infrequent Usage: Remove the
black, negative (−) cable from the
battery to keep the battery from
running down.
See
“Window Indexing” under
Power Windows on page 2-22.
Extended Storage: It is
recommended that the battery
maintainer package be used.
However, if not, remove the black,
negative (−) cable from the battery.
All vehicle memory settings will
need to be reset when battery
power is restored.
Rear Axle
When to Check Lubricant
It is not necessary to regularly
check rear axle fluid unless a leak is
suspected or an unusual noise is heard. A fluid loss could indicate a
problem. Have it inspected and
repaired.
How to Check Lubricant
To get an accurate reading, the
vehicle should be on a level
surface.
The fluid level should be at or within
13 mm (0.5 in) of the bottom of the
fill plug hole threads. If it is at this
level, no additional fluid is needed.
If the fluid level is below 13 mm
(0.5 in), add fluid until it is above
this level.
Page 284 of 391
Black plate (45,1)Chevrolet Corvette Owner Manual (GMNA-Localizing-U.S./Canada/Mexico-
7576293) - 2015 - crc - 6/17/14
Vehicle Care 10-45
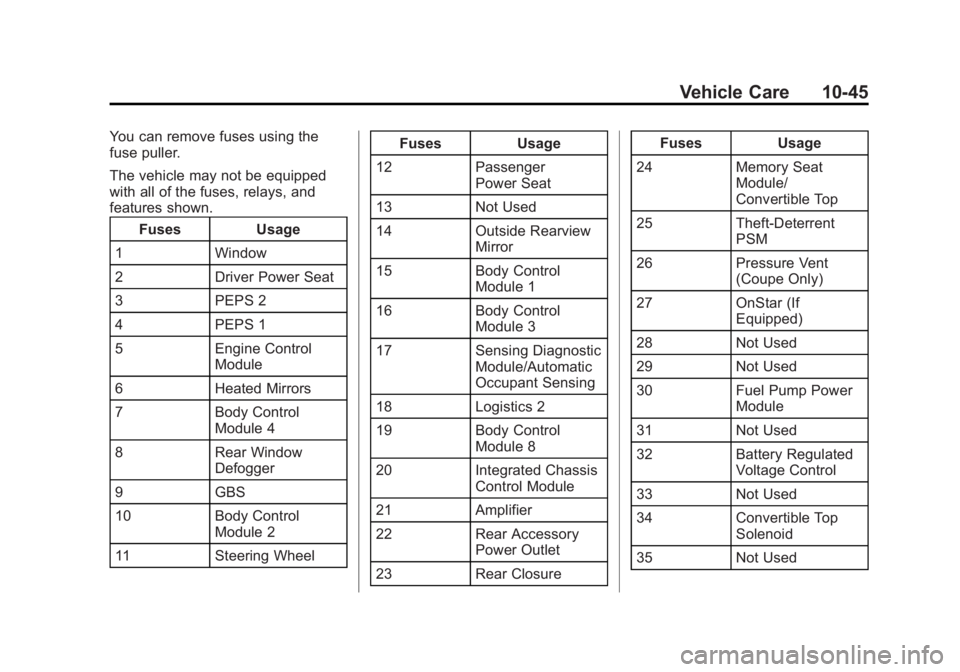
You can remove fuses using the
fuse puller.
The vehicle may not be equipped
with all of the fuses, relays, and
features shown.Fuses Usage
1 Window
2 Driver Power Seat
3 PEPS 2
4 PEPS 1
5 Engine Control Module
6 Heated Mirrors
7 Body Control Module 4
8 Rear Window Defogger
9 GBS
10 Body Control Module 2
11 Steering Wheel Fuses Usage
12 Passenger Power Seat
13 Not Used
14 Outside Rearview Mirror
15 Body Control Module 1
16 Body Control Module 3
17 Sensing Diagnostic Module/Automatic
Occupant Sensing
18 Logistics 2
19 Body Control Module 8
20 Integrated Chassis Control Module
21 Amplifier
22 Rear Accessory Power Outlet
23 Rear Closure Fuses Usage
24 Memory Seat Module/
Convertible Top
25 Theft-Deterrent PSM
26 Pressure Vent (Coupe Only)
27 OnStar (If Equipped)
28 Not Used
29 Not Used
30 Fuel Pump Power Module
31 Not Used
32 Battery Regulated Voltage Control
33 Not Used
34 Convertible Top Solenoid
35 Not Used
Page 318 of 391
Black plate (79,1)Chevrolet Corvette Owner Manual (GMNA-Localizing-U.S./Canada/Mexico-
7576293) - 2015 - crc - 6/17/14
Vehicle Care 10-79
Jump Starting
For more information about the
vehicle battery, seeBattery on
page 10-33.
If the battery has run down, use
another vehicle and some jumper
cables to start the vehicle. Be sure
to use the following steps to do it
safely.
{Warning
Batteries can hurt you. They can
be dangerous because:
.They contain acid that can
burn you.
.They contain gas that can
explode or ignite.
.They contain enough
electricity to burn you.
If you do not follow these steps
exactly, some or all of these
things can hurt you.
{Caution
Ignoring these steps could result
in costly damage to the vehicle
that would not be covered by the
vehicle warranty. Trying to start
the vehicle by pushing or pulling it
will not work, and it could damage
the vehicle.
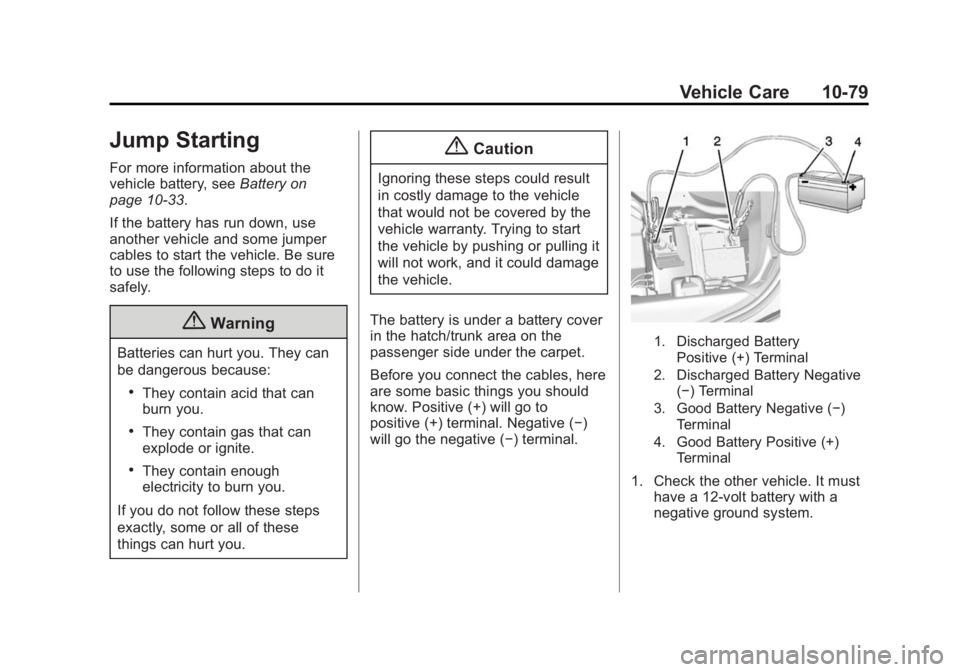
The battery is under a battery cover
in the hatch/trunk area on the
passenger side under the carpet.
Before you connect the cables, here
are some basic things you should
know. Positive (+) will go to
positive (+) terminal. Negative (−)
will go the negative (−) terminal.
1. Discharged Battery Positive (+) Terminal
2. Discharged Battery Negative (−) Terminal
3. Good Battery Negative (−) Terminal
4. Good Battery Positive (+) Terminal
1. Check the other vehicle. It musthave a 12-volt battery with a
negative ground system.
Page 319 of 391
Black plate (80,1)Chevrolet Corvette Owner Manual (GMNA-Localizing-U.S./Canada/Mexico-
7576293) - 2015 - crc - 6/17/14
10-80 Vehicle Care
{Caution
If the other vehicle does not have
a 12-volt system with a negative
ground, both vehicles can be
damaged. Only use a vehicle that
has a 12-volt system with a
negative ground for jump starting.
2. Get the vehicles close enough so the jumper cables can reach,
but be sure the vehicles are not
touching each other. If they are,
it could cause a ground
connection you do not want. You
would not be able to start the
vehicle, and the bad grounding
could damage the electrical
systems.
To avoid the possibility of the
vehicles rolling, set the parking
brake firmly on both vehicles
involved in the jump start
procedure. Put an automatic
transmission in P (Park) or a manual transmission in Neutral
before setting the parking
brakes.
{Caution
If any accessories are left on or
plugged in during the jump
starting procedure, they could be
damaged. The repairs would not
be covered by the vehicle
warranty. Whenever possible, turn
off or unplug all accessories on
either vehicle when jump starting.
3. Turn off the ignition on both vehicles. Unplug unnecessary
accessories plugged into the
cigarette lighter or the accessory
power outlet. Turn off the radio
and all lamps that are not
needed. This will avoid sparks
and help save both batteries.
And it could save the radio!
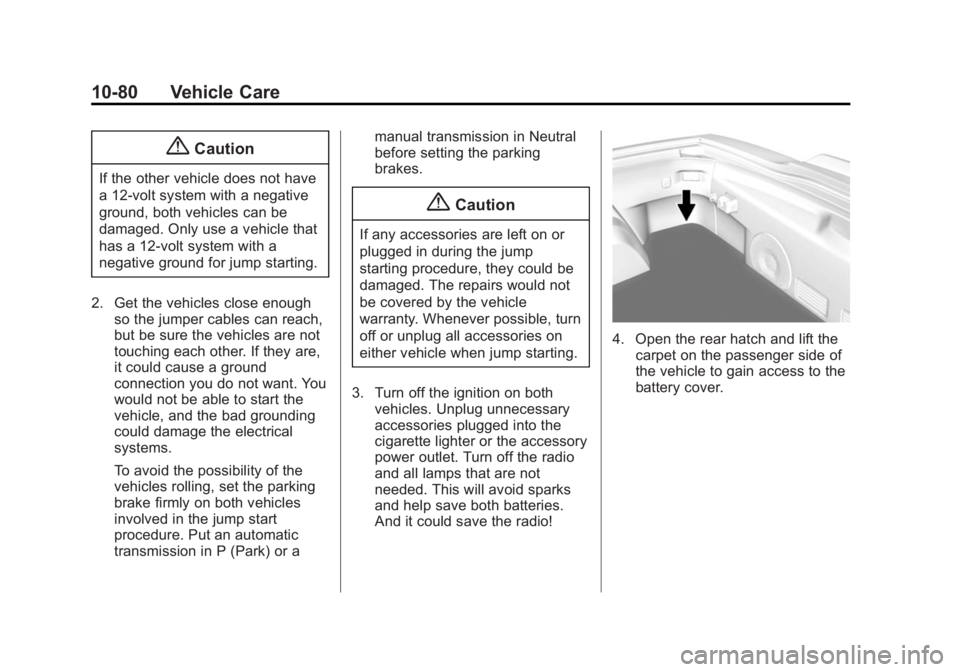
4. Open the rear hatch and lift thecarpet on the passenger side of
the vehicle to gain access to the
battery cover.
Page 320 of 391
Black plate (81,1)Chevrolet Corvette Owner Manual (GMNA-Localizing-U.S./Canada/Mexico-
7576293) - 2015 - crc - 6/17/14
Vehicle Care 10-81
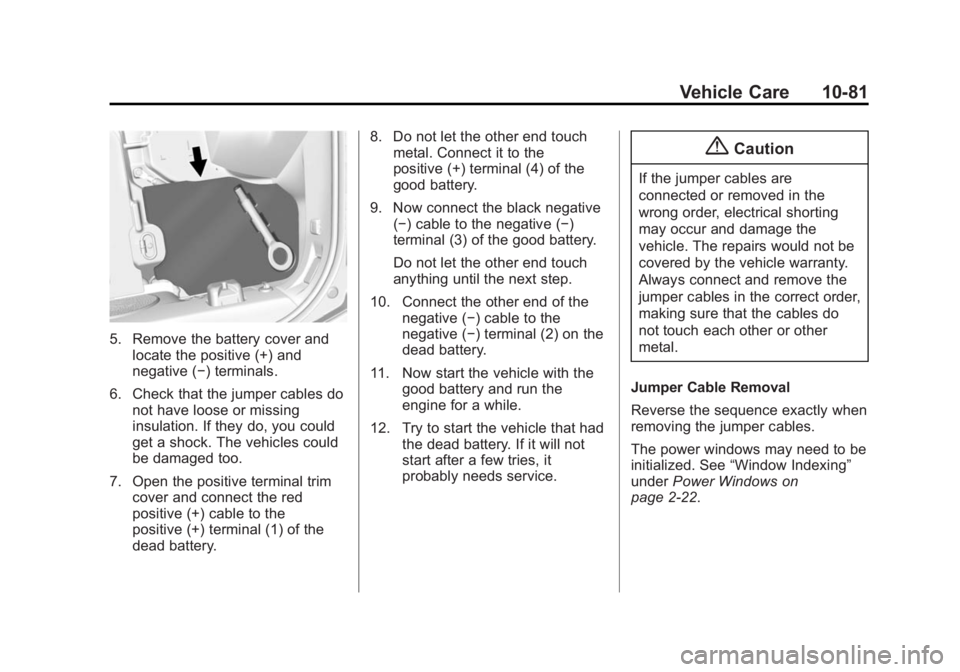
5. Remove the battery cover andlocate the positive (+) and
negative (−) terminals.
6. Check that the jumper cables do not have loose or missing
insulation. If they do, you could
get a shock. The vehicles could
be damaged too.
7. Open the positive terminal trim cover and connect the red
positive (+) cable to the
positive (+) terminal (1) of the
dead battery. 8. Do not let the other end touch
metal. Connect it to the
positive (+) terminal (4) of the
good battery.
9. Now connect the black negative (−) cable to the negative (−)
terminal (3) of the good battery.
Do not let the other end touch
anything until the next step.
10. Connect the other end of the negative (−) cable to the
negative (−) terminal (2) on the
dead battery.
11. Now start the vehicle with the good battery and run the
engine for a while.
12. Try to start the vehicle that had the dead battery. If it will not
start after a few tries, it
probably needs service.
{Caution
If the jumper cables are
connected or removed in the
wrong order, electrical shorting
may occur and damage the
vehicle. The repairs would not be
covered by the vehicle warranty.
Always connect and remove the
jumper cables in the correct order,
making sure that the cables do
not touch each other or other
metal.
Jumper Cable Removal
Reverse the sequence exactly when
removing the jumper cables.
The power windows may need to be
initialized. See “Window Indexing”
under Power Windows on
page 2-22.