2015 CHEVROLET COLORADO clock
[x] Cancel search: clockPage 209 of 431

Black plate (4,1)Chevrolet Colorado Owner Manual (GMNA-Localizing-U.S./Canada-
7586788) - 2015 - crc - 2/9/15
8-4 Climate Controls
When the indicator light is on, the
system is in full automatic operation.
If the air delivery mode or fan
setting is manually adjusted, the
auto indicator turns off and displays
will show the selected settings.
To place the system in
automatic mode:
1. Press AUTO.
2. Set the temperature.To find your comfort setting, start
with 22°C (72°F) and allow the
system time to stabilize. Then
adjust the temperature as
needed for best comfort.
To improve fuel efficiency and to
cool the vehicle faster, recirculation
may be automatically selected in
warm weather.
The recirculation light will not come
on when automatically controlled.
Press
@to manually select
recirculation; press it again to select
outside air. Do not cover the solar sensor on the
top of the instrument panel near the
windshield. This sensor regulates
air temperature based on sun load.
See
“Sensors” later in this section.
Manual Operation
O(On/Off): PressOto turn the
climate control system on or off.
Outside air still enters the vehicle,
and is directed to the floor. This
direction can be changed by
pressing the air delivery mode.
A(Fan Control): Turn clockwise
or counterclockwise to increase or
decrease the fan speed. There is
about a 5 second delay when the
fan is turned on. Press the knob to
turn the fan off.
Press AUTO to return to automatic
operation.
Temperature Control: Turn the
knob clockwise or counterclockwise
to increase or decrease temperature
setting. Air Delivery Mode Controls:
Press
Y,\,[, or-to change
the direction of the airflow. An
indicator light comes on in the
selected mode button.
Changing the mode cancels the
automatic operation and the system
goes into manual mode. Press
AUTO to return to automatic
operation.
Y(Vent): Air is directed to the
instrument panel outlets.
\(Bi-Level): Air is divided
between the instrument panel and
floor outlets.
[(Floor): Air is directed to the
floor outlets, with some to the
windshield, outboard instrument
panel outlets, side window outlets,
and second row floor outlets.
-(Defog): This mode clears the
windows of fog or moisture. Air is
directed to the windshield, floor
outlets, outboard instrument panel
outlets and side window vents. The
system automatically forces outside
Page 252 of 431
Black plate (39,1)Chevrolet Colorado Owner Manual (GMNA-Localizing-U.S./Canada-
7586788) - 2015 - crc - 2/9/15
Driving and Operating 9-39
Shifting Out of 4n
1. To shift out of 4nthe vehicle
must be stopped or moving less
than 5 km/h (3 mph) with the
transmission in N (Neutral) and
the ignition in ON/RUN. It is best
for the vehicle to be moving
1.6 to 3.2 km/h (1 to 2 mph).
2. Turn the knob to 4
mor 2m. Wait
for the 4
mor 2mindicator light to
stop flashing before shifting the
transmission into gear.
If the transmission is in gear and/or
moving more than 5 km/h (3 mph),
the 4
mor 2mindicator light will flash
for 30 seconds, but will not complete
the shift. With the vehicle moving
less than 5 km/h (3 mph), and the
transmission in N (Neutral), attempt
the shift again.
Shifting Into N (Neutral)
To shift:
1. Park the vehicle on a level surface. 2. Set the parking brake and press
and hold the brake pedal. See
Parking Brake on page 9-41.
3. Start the vehicle or turn the ignition to ON/RUN.
4. Shift the transmission to N (Neutral).
5. Shift the transfer case to 2
m.
6. Turn the transfer case knob clockwise to N (Neutral) until it
stops and hold it there until the
N (Neutral) light starts blinking.
This will take at least
10 seconds. Then slowly release
the dial to the 4
nposition. The
N (Neutral) light will come on
when the transfer case shift to
N (Neutral) is complete.
7. With the engine running, verify that the transfer case is in
N (Neutral) by shifting the
transmission to R (Reverse),
then to D (Drive). There should
be no movement of the vehicle
while shifting the transmission. 8. Turn the engine off, and the
ignition to ACC/ACCESSORY.
9. Place the transmission shift lever in P (Park). See
Recreational Vehicle Towing on
page 10-77.
10. Turn the ignition to LOCK/OFF.
Shifting Out of N (Neutral)
To shift:
1. Set the parking brake and apply the brake pedal.
2. Turn the ignition to ON/RUN with the engine off.
3. Shift the transmission to N (Neutral).
4. Turn the transfer case knob to 2
m.
After the transfer case has
shifted out of N (Neutral), the
N (Neutral) light will go out.
5. Release the parking brake.
Page 268 of 431
Black plate (55,1)Chevrolet Colorado Owner Manual (GMNA-Localizing-U.S./Canada-
7586788) - 2015 - crc - 2/9/15
Driving and Operating 9-55
Fuels in Foreign
Countries
If planning to drive in countries
outside the U.S. or Canada, the
proper fuel might be hard to find.
Check regional auto club or fuel
retail brand websites for availability
in the country where driving. Never
use leaded gasoline, fuel containing
methanol, manganese, or any other
fuel not recommended. Costly
repairs caused by use of improper
fuel would not be covered by the
vehicle warranty.
Fuel Additives
To keep fuel systems clean, TOP
TIER Detergent Gasoline is
recommended. SeeFuel on
page 9-53.
If TOP TIER Detergent Gasoline is
not available, one bottle of Fuel
System Treatment PLUS added to
the fuel tank at every engine oil
change, can help. Fuel System
Treatment PLUS is the only gasoline additive recommended by
General Motors. It is available at
your dealer.
Filling the Tank
{Warning
Fuel vapor burns violently and a
fuel fire can cause bad injuries.
To help avoid injuries to you and
others, read and follow all the
instructions on the fuel pump
island. Turn off the engine when
refueling. Do not smoke near fuel
or when refueling the vehicle. Do
not use cellular phones. Keep
sparks, flames, and smoking
materials away from fuel. Do not
leave the fuel pump unattended
when refueling the vehicle. This is
against the law in some places.
Do not re-enter the vehicle while
pumping fuel. Keep children away
from the fuel pump; never let
children pump fuel.
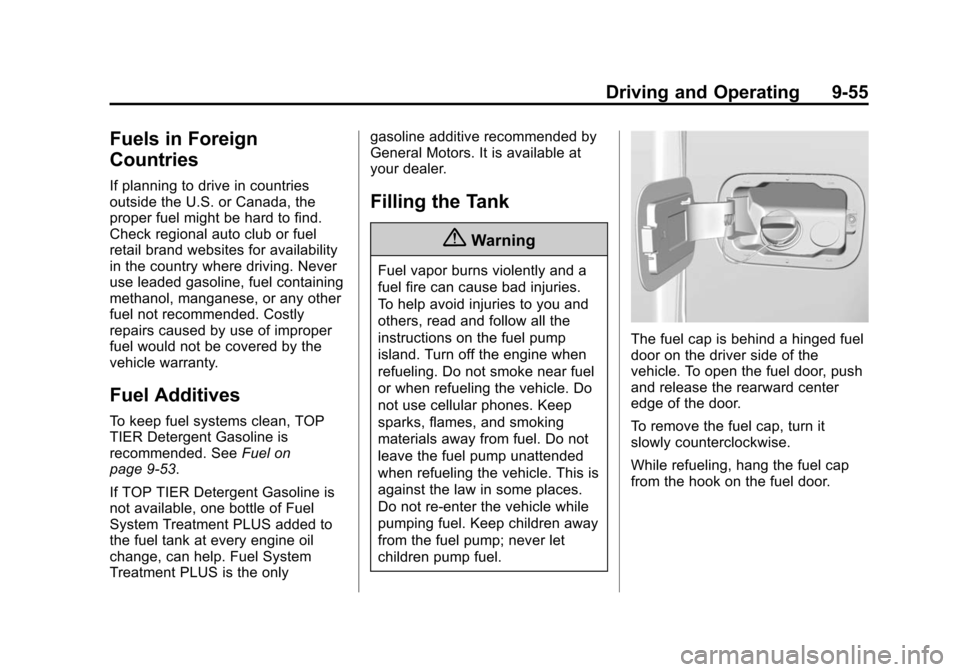
The fuel cap is behind a hinged fuel
door on the driver side of the
vehicle. To open the fuel door, push
and release the rearward center
edge of the door.
To remove the fuel cap, turn it
slowly counterclockwise.
While refueling, hang the fuel cap
from the hook on the fuel door.
Page 269 of 431

Black plate (56,1)Chevrolet Colorado Owner Manual (GMNA-Localizing-U.S./Canada-
7586788) - 2015 - crc - 2/9/15
9-56 Driving and Operating
{Warning
Fuel can spray out on you if you
open the fuel cap too quickly.
If you spill fuel and then
something ignites it, you could be
badly burned. This spray can
happen if the tank is nearly full,
and is more likely in hot weather.
Open the fuel cap slowly and wait
for any hiss noise to stop. Then
unscrew the cap all the way.
Be careful not to spill fuel. Do not
top off or overfill the tank and wait a
few seconds after you have finished
pumping before removing the
nozzle. Clean fuel from painted
surfaces as soon as possible. See
Exterior Care on page 10-82.
When replacing the fuel cap, turn it
clockwise until it clicks. Make sure
the cap is fully installed. The
diagnostic system can determine if
the fuel cap has been left off or
improperly installed. This would
allow fuel to evaporate into the atmosphere. If the fuel cap is not
properly installed, a message
appears on the Driver Information
Center (DIC) and the check engine
light will be lit on the instrument
cluster. See
Fuel System Messages
on page 5-29 andMalfunction
Indicator Lamp on page 5-14.
{Warning
If a fire starts while you are
refueling, do not remove the
nozzle. Shut off the flow of fuel by
shutting off the pump or by
notifying the station attendant.
Leave the area immediately.
{Caution
If a new fuel cap is needed, be
sure to get the right type of cap
from your dealer. The wrong type
of fuel cap may not fit properly,
may cause the malfunction
(Continued)
Caution (Continued)
indicator lamp to light, and could
damage the fuel tank and
emissions system. See
Malfunction Indicator Lamp on
page 5-14.
Filling a Portable Fuel
Container
{Warning
Never fill a portable fuel container
while it is in the vehicle. Static
electricity discharge from the
container can ignite the fuel
vapor. You can be badly burned
and the vehicle damaged if this
occurs. To help avoid injury to you
and others:
.Dispense fuel only into
approved containers.(Continued)
Page 298 of 431
Black plate (19,1)Chevrolet Colorado Owner Manual (GMNA-Localizing-U.S./Canada-
7586788) - 2015 - crc - 2/9/15
Vehicle Care 10-19
The coolant surge tank pressure
cap can be removed when the
cooling system, including the surge
tank pressure cap and upper
radiator hose, is no longer hot.
1. Turn the pressure cap slowlycounterclockwise. If a hiss is
heard, wait for that to stop.
A hiss means there is still some
pressure left.
2. Keep turning the cap and remove it.
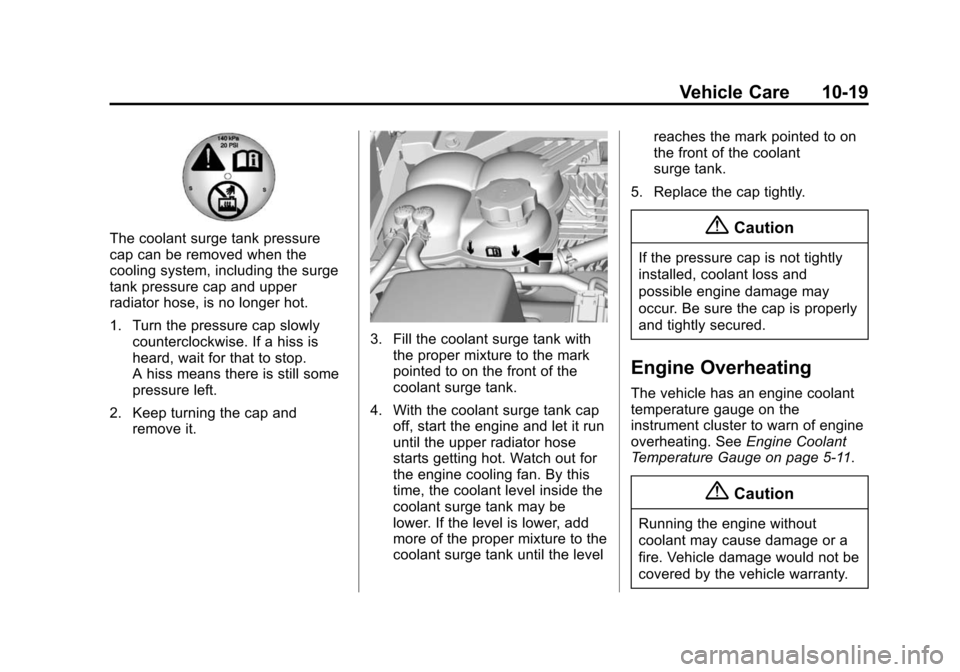
3. Fill the coolant surge tank withthe proper mixture to the mark
pointed to on the front of the
coolant surge tank.
4. With the coolant surge tank cap off, start the engine and let it run
until the upper radiator hose
starts getting hot. Watch out for
the engine cooling fan. By this
time, the coolant level inside the
coolant surge tank may be
lower. If the level is lower, add
more of the proper mixture to the
coolant surge tank until the level reaches the mark pointed to on
the front of the coolant
surge tank.
5. Replace the cap tightly.
{Caution
If the pressure cap is not tightly
installed, coolant loss and
possible engine damage may
occur. Be sure the cap is properly
and tightly secured.
Engine Overheating
The vehicle has an engine coolant
temperature gauge on the
instrument cluster to warn of engine
overheating. See Engine Coolant
Temperature Gauge on page 5-11.
{Caution
Running the engine without
coolant may cause damage or a
fire. Vehicle damage would not be
covered by the vehicle warranty.
Page 310 of 431

Black plate (31,1)Chevrolet Colorado Owner Manual (GMNA-Localizing-U.S./Canada-
7586788) - 2015 - crc - 2/9/15
Vehicle Care 10-31
2. Remove the headlamp bulbcover by turning it
counterclockwise.
3. Turn the bulb socket counterclockwise to remove it
from the headlamp assembly
and pull it straight out.
4. Unplug the electrical connector from the old bulb by releasing
the clip on the bulb socket.
Turn Signal/Sidemarker/
Parking Lamp
1. Open the hood.
2. Turn the bulb socket
counterclockwise to remove it
from the headlamp assembly
and pull it straight out.
3. Remove the bulb by pulling it straight out of the bulb socket.
Taillamps, Turn Signal,
Stoplamps, and Back-Up
Lamps
1. Open the tailgate.
2. Remove the two rear lampassembly screws.
3. Pull the rear lamp assembly outboard away from the box side
until the retainers release. There
will be a noise when the
retainers release.
4. Pull the rear lamp assembly
straight back to remove it from
the vehicle.
5. Turn the bulb socket counterclockwise.
6. Pull the bulb straight out from the socket.
7. Replace the bulb, then insert the bulb socket into the rear lamp
assembly and turn clockwise.
Page 311 of 431
Black plate (32,1)Chevrolet Colorado Owner Manual (GMNA-Localizing-U.S./Canada-
7586788) - 2015 - crc - 2/9/15
10-32 Vehicle Care
9. Verify the retainer ring is in theproper position. If the retainer
ring is out of position, it will not
engage. Reset the retainer by
pulling it forward with a tool.
10. Push the rear lamp assembly straight in until it is seated
against the vehicle.
11. Make sure the rear lamp assembly is flush with the
box side.
12. Reinstall the two rear lamp assembly screws.
Center High-Mounted
Stoplamp (CHMSL) and
Cargo Lamp
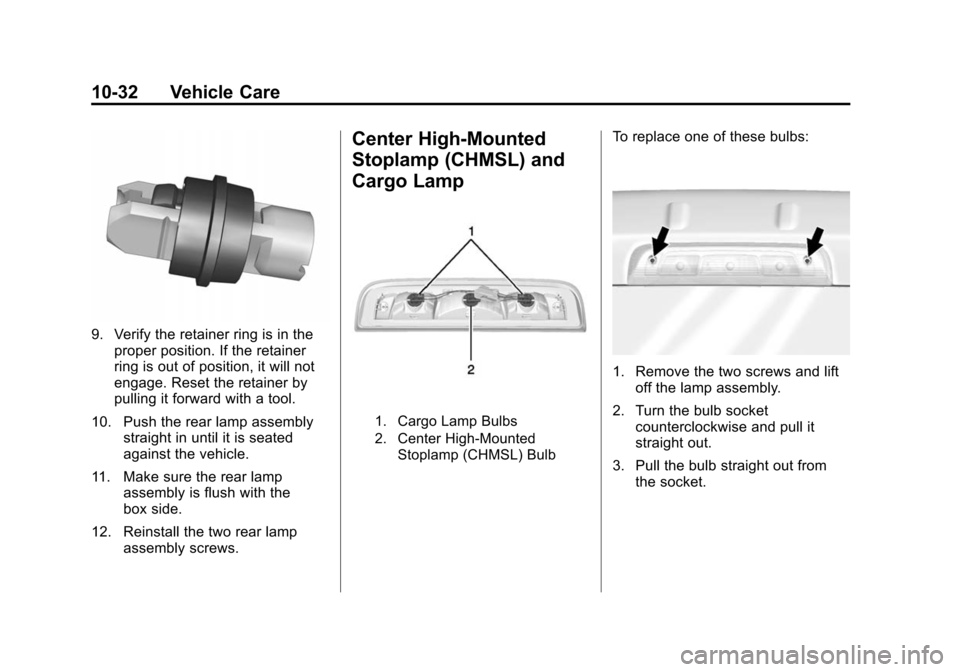
1. Cargo Lamp Bulbs
2. Center High-Mounted
Stoplamp (CHMSL) Bulb
To replace one of these bulbs:
1. Remove the two screws and liftoff the lamp assembly.
2. Turn the bulb socket counterclockwise and pull it
straight out.
3. Pull the bulb straight out from the socket.
Page 343 of 431
Black plate (64,1)Chevrolet Colorado Owner Manual (GMNA-Localizing-U.S./Canada-
7586788) - 2015 - crc - 2/9/15
10-64 Vehicle Care
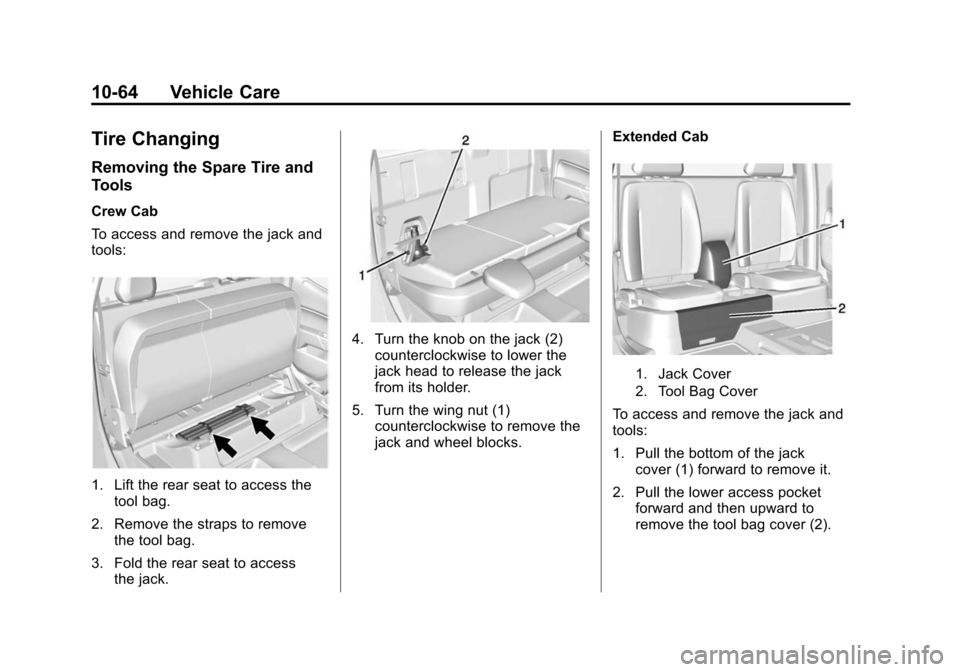
Tire Changing
Removing the Spare Tire and
Tools
Crew Cab
To access and remove the jack and
tools:
1. Lift the rear seat to access thetool bag.
2. Remove the straps to remove the tool bag.
3. Fold the rear seat to access the jack.
4. Turn the knob on the jack (2)
counterclockwise to lower the
jack head to release the jack
from its holder.
5. Turn the wing nut (1) counterclockwise to remove the
jack and wheel blocks. Extended Cab
1. Jack Cover
2. Tool Bag Cover
To access and remove the jack and
tools:
1. Pull the bottom of the jack
cover (1) forward to remove it.
2. Pull the lower access pocket forward and then upward to
remove the tool bag cover (2).