2015 CHEVROLET CAMARO maintenance schedule
[x] Cancel search: maintenance schedulePage 245 of 435

Black plate (44,1)Chevrolet Camaro Owner Manual (GMNA-Localizing-U.S./Canada/Mexico-
7695163) - 2015 - crc - 9/4/14
9-44 Driving and Operating
pedal to wide open throttle.
A smooth, quick release of the
clutch, while maintaining the fully
pressed accelerator pedal, will
manage wheel slip. Complete shifts
are described inManual
Transmission on page 9-34.
After the vehicle is launched, the
system continues in Competitive
Driving Mode or PTM.
Competitive Driving Mode, PTM,
and Launch Control are systems
designed for a closed course race
track and not intended for use on
public roads. The systems are not
intended to compensate for lack of
driver experience or familiarity with
the race track.
ZL1 Coupe Only
Use mode 5 for the most consistent
performance during drag strip use.
Limited-Slip Rear Axle
Vehicles with a limited-slip rear axle
can give more traction on snow,
mud, ice, sand, or gravel. When
traction is low, this feature allows
the drive wheel with the most
traction to move the vehicle. The
limited-slip rear axle also gives the
driver enhanced control when
cornering hard or completing a
maneuver, such as a lane change.
For vehicles with limited slip
differential, driven under severe
conditions, the rear axle fluid should
be changed. See Competitive
Driving Mode on page 9-40 and
Maintenance Schedule on
page 11-2.
Selective Ride Control
ZL1 Only
The vehicle has a ride control
system called Magnetic Selective
Ride Control. The system provides
the following performance benefits:
.Reduced Impact Harshness
.Improved Road Isolation
.Improved High-Speed Stability
.Improved Handling Response
.Better Control of Body Ride
Motions
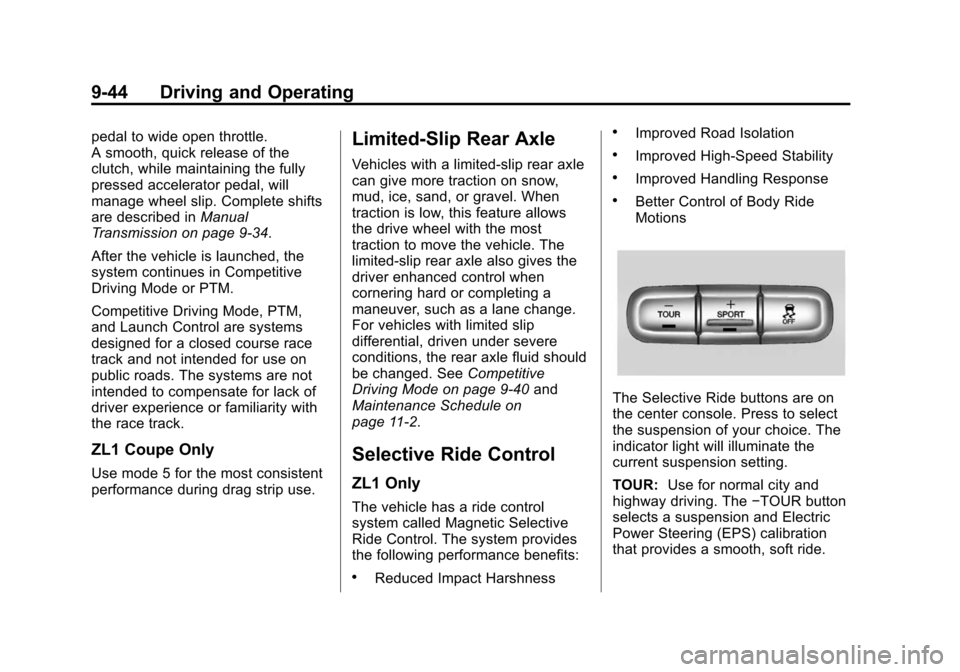
The Selective Ride buttons are on
the center console. Press to select
the suspension of your choice. The
indicator light will illuminate the
current suspension setting.
TOUR: Use for normal city and
highway driving. The −TOUR button
selects a suspension and Electric
Power Steering (EPS) calibration
that provides a smooth, soft ride.
Page 260 of 435

Black plate (59,1)Chevrolet Camaro Owner Manual (GMNA-Localizing-U.S./Canada/Mexico-
7695163) - 2015 - crc - 9/4/14
Driving and Operating 9-59
2. Let up on the brake pedal.
3. Drive slowly until the trailer isclear of the chocks.
4. Stop and have someone pick up and store the chocks.
Maintenance When Trailer
Towing
The vehicle needs service more
often when pulling a trailer. See the
Maintenance Schedule on
page 11-2. Things that are
especially important in trailer
operation are automatic
transmission fluid, engine oil, axle
lubricant, belts, cooling system and
brake system. Inspect these before
and during the trip.
Check periodically to see that all
hitch nuts and bolts are tight.
Engine Cooling When Trailer
Towing
The cooling system may temporarily
overheat during severe operating
conditions. See Engine Overheating
on page 10-35.
Trailer Towing (ZL1 or
Z/28)
The vehicle is neither designed nor
intended to tow a trailer.
Trailer Towing (Except
ZL1 or Z/28)
Before pulling a trailer, three
important considerations have to do
with weight:
.Weight of the trailer.
.Weight of the trailer tongue.
.Total weight on your vehicle's
tires.
Weight of the Trailer
How heavy can a trailer safely be?
It should never weigh more than
454 kg (1,000 lb). But even that can
be too heavy.
It depends on how the rig is used.
For example, speed, altitude, road
grades, outside temperature, and
how much the vehicle is used to pull a trailer are all important. It can
depend on any special equipment
on the vehicle, and the amount of
tongue weight the vehicle can carry.
See
“Weight of the Trailer Tongue”
later in this section.
Maximum trailer weight is calculated
assuming only the driver is in the
tow vehicle and it has all the
required trailering equipment. The
weight of additional optional
equipment, passengers, and cargo
in the tow vehicle must be
subtracted from the maximum trailer
weight.
Ask your dealer for trailering
information or advice, or write us at
our Customer Assistance Offices.
See Customer Assistance Offices
on page 13-3.
Weight of the Trailer Tongue
The tongue load (1) of any trailer is
an important weight to measure
because it affects the total gross
weight of the vehicle. The Gross
Vehicle Weight (GVW) includes the
curb weight of the vehicle, any
Page 284 of 435

Black plate (21,1)Chevrolet Camaro Owner Manual (GMNA-Localizing-U.S./Canada/Mexico-
7695163) - 2015 - crc - 9/4/14
Vehicle Care 10-21
Change the fluid and filter at the
intervals listed inMaintenance
Schedule on page 11-2, and be sure
to use the fluid listed in
Recommended Fluids and
Lubricants on page 11-12.
Manual Transmission
Fluid
It is not necessary to check the
manual transmission fluid level.
A transmission fluid leak is the only
reason for fluid loss. If a leak
occurs, take the vehicle to your
dealer and have it repaired as soon
as possible. See Recommended
Fluids and Lubricants on page 11-12
for the proper fluid to use.
Hydraulic Clutch
For vehicles with a manual
transmission, it is not necessary to
regularly check brake/clutch fluid
unless there is a leak suspected.
Adding fluid will not correct a leak. A fluid loss in this system could
indicate a problem. Have the
system inspected and repaired.
When to Check and What
to Use
The brake/hydraulic clutch fluid
reservoir cap has this symbol on it.
The common hydraulic clutch and
brake master cylinder fluid reservoir
is filled with DOT 3 brake fluid as
indicated on the reservoir cap. See
Engine Compartment Overview on
page 10-6
for reservoir location.
How to Check and Add Fluid
Visually check the brake/clutch fluid
reservoir to make sure the fluid level
is at the MIN (minimum) line on the
side of the reservoir. The brake/
hydraulic clutch fluid system should
be closed and sealed. Do not remove the cap to check the
fluid level or to top‐off the fluid level.
Remove the cap only when
necessary to add the proper fluid
until the level reaches the MIN line.
Engine Air Cleaner/Filter
(Except ZL1 and Z/28))
See
Engine Compartment Overview
on page 10-6 for the location of the
engine air cleaner/filter.
When to Inspect the Engine Air
Cleaner/Filter
Inspect the air cleaner/filter at the
scheduled maintenance intervals
and replace it at the appropriate
interval. See Maintenance Schedule
on page 11-2 for more information.
If driving in dusty/dirty conditions,
inspect the filter at each engine oil
change.
Page 286 of 435

Black plate (23,1)Chevrolet Camaro Owner Manual (GMNA-Localizing-U.S./Canada/Mexico-
7695163) - 2015 - crc - 9/4/14
Vehicle Care 10-23
Warning (Continued)
helps to stop flames if the engine
backfires. Use caution when
working on the engine and do not
drive with the air cleaner/filter off.
{Caution
If the air cleaner/filter is off, dirt
can easily get into the engine,
which could damage it. Always
have the air cleaner/filter in place
when you are driving.
Engine Air Cleaner/Filter
(ZL1 Only)
SeeEngine Compartment Overview
on page 10-6 for the location of the
engine air cleaner/filter.
{Caution
If water is sprayed and enters the
engine air cleaner/filter intake and
housing, the engine could be
damaged. The repairs would not
be covered by the vehicle
warranty.
When to Inspect the Engine Air
Cleaner/Filter
Inspect the air cleaner/filter at the
scheduled maintenance intervals
and replace it at the appropriate
interval. See Maintenance Schedule
on page 11-2 for more information.
If driving in dusty/dirty conditions,
inspect the filter at each engine oil
change.
How to Inspect the Engine Air
Cleaner/Filter
To inspect the air cleaner/filter,
remove the filter from the vehicle
and lightly shake the filter to release loose dust and dirt. If the filter
remains covered with dirt, a new
filter is required.
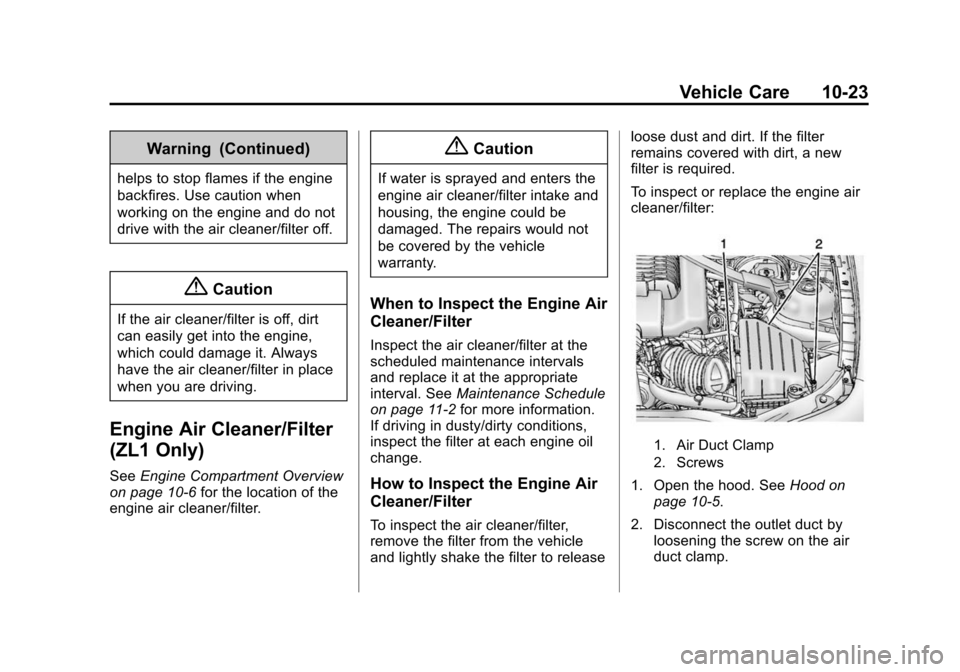
To inspect or replace the engine air
cleaner/filter:
1. Air Duct Clamp
2. Screws
1. Open the hood. See
Hood on
page 10-5.
2. Disconnect the outlet duct by loosening the screw on the air
duct clamp.
Page 287 of 435

Black plate (24,1)Chevrolet Camaro Owner Manual (GMNA-Localizing-U.S./Canada/Mexico-
7695163) - 2015 - crc - 9/4/14
10-24 Vehicle Care
3. Remove the two screwssecuring the cover on the air
cleaner/filter housing.
4. Pull straight up on the cover; while holding the cover, remove
the air filter.
5. Inspect or replace the air filter. See Maintenance Replacement
Parts on page 11-14.
6. Reverse Steps 2–5 to reinstall the cover.
{Warning
Operating the engine with the air
cleaner/filter off can cause you or
others to be burned. The air
cleaner not only cleans the air; it
helps to stop flames if the engine
backfires. Use caution when
working on the engine and do not
drive with the air cleaner/filter off.
{Caution
If the air cleaner/filter is off, dirt
can easily get into the engine,
which could damage it. Always
have the air cleaner/filter in place
when you are driving.
Engine Air Cleaner/Filter
(Z/28 Only)
See Engine Compartment Overview
on page 10-6 for the location of the
engine air cleaner/filter.
{Caution
If water is sprayed and enters the
engine air cleaner/filter intake and
housing, the engine could be
damaged. The repairs would not
be covered by the vehicle
warranty.
When to Inspect the Engine Air
Cleaner/Filter
Inspect the air cleaner/filter at the
scheduled maintenance intervals
and replace it at the appropriate
interval. See Maintenance Schedule
on page 11-2 for more information.
If driving in dusty/dirty conditions,
inspect the filter at each engine oil
change.
How to Inspect the Engine Air
Cleaner/Filter
To inspect the air cleaner/filter,
remove the filter from the vehicle
and lightly shake the filter to release
loose dust and dirt. If the filter
remains covered with dirt, a new
filter is required.
Page 306 of 435

Black plate (43,1)Chevrolet Camaro Owner Manual (GMNA-Localizing-U.S./Canada/Mexico-
7695163) - 2015 - crc - 9/4/14
Vehicle Care 10-43
.To check the P (Park)
mechanism's holding ability:
With the engine running, shift to
P (Park). Then release the
parking brake followed by the
regular brake.
Contact your dealer if service is
required.
Wiper Blade Replacement
Windshield wiper blades should be
inspected for wear and cracking.
See Maintenance Schedule on
page 11-2 for more information.
Replacement blades come in
different types and are removed in
different ways. For proper type and
length, see Maintenance
Replacement Parts on page 11-14.
To replace the windshield wiper
blade:
1. Pull the windshield wiper
assembly away from the
windshield.
2. Lift up on the latch in the middleof the wiper blade where the
wiper arm attaches.
3. With the latch open, pull the wiper blade down toward the
windshield far enough to release
it from the J-hooked end of the
wiper arm.
4. Remove the wiper blade. Allowing the wiper blade arm to
touch the windshield when no
wiper blade is installed could
damage the windshield. Any
damage that occurs would not
be covered by the vehicle warranty. Do not allow the wiper
blade arm to touch the
windshield.
5. Reverse Steps 1–3 for wiper blade replacement.
Windshield Replacement
If the Head-Up display (HUD)
system and the windshield need to
be replaced, get one that is
designed for HUD or the HUD
image may look out of focus.
Page 333 of 435

Black plate (70,1)Chevrolet Camaro Owner Manual (GMNA-Localizing-U.S./Canada/Mexico-
7695163) - 2015 - crc - 9/4/14
10-70 Vehicle Care
A horn chirp confirms that the
sensor identification code has
been matched to this tire and
wheel position.
9. Proceed to the passenger side front tire, and repeat the
procedure in Step 8.
10. Proceed to the passenger side rear tire, and repeat the
procedure in Step 8.
11. Proceed to the driver side rear tire, and repeat the procedure
in Step 8. The horn sounds two
times to indicate the sensor
identification code has been
matched to the driver side rear
tire, and the TPMS sensor
matching process is no longer
active. The TIRE LEARNING
ACTIVE message on the DIC
display screen goes off.
12. Turn the ignition to LOCK/OFF.
13. Set all four tires to the recommended air pressure
level as indicated on the Tire
and Loading Information label.Tire Inspection
We recommend that the tires,
including the spare tire, if the
vehicle has one, be inspected
for signs of wear or damage at
least once a month.
Replace the tire if:
.The indicators at three or
more places around the tire
can be seen.
.There is cord or fabric
showing through the tire's
rubber.
.The tread or sidewall is
cracked, cut, or snagged
deep enough to show cord or
fabric.
.The tire has a bump, bulge,
or split.
.The tire has a puncture, cut,
or other damage that cannot
be repaired well because of
the size or location of the
damage.
Tire Rotation
If the vehicle has non-directional
tires, they should be rotated
every 12 000 km/7,500 mi. See
Maintenance Schedule on
page 11-2.
Tires are rotated to achieve a
uniform wear for all tires. The
first rotation is the most
important.
Anytime unusual wear is
noticed, rotate the tires as soon
as possible, check for proper tire
inflation pressure, and check for
damaged tires or wheels. If the
unusual wear continues after the
rotation, check the wheel
alignment.
Page 372 of 435

Black plate (1,1)Chevrolet Camaro Owner Manual (GMNA-Localizing-U.S./Canada/Mexico-
7695163) - 2015 - crc - 9/4/14
Service and Maintenance 11-1
Service and
Maintenance
General Information
General Information . . . . . . . . . . 11-1
Maintenance Schedule
Maintenance Schedule . . . . . . . 11-2
Special Application Services
Special ApplicationServices . . . . . . . . . . . . . . . . . . . . 11-8
Additional Maintenance
and Care
Additional Maintenanceand Care . . . . . . . . . . . . . . . . . . . 11-9
Recommended Fluids,
Lubricants, and Parts
Recommended Fluids andLubricants . . . . . . . . . . . . . . . . . 11-12
Maintenance Replacement Parts . . . . . . . . . . . . . . . . . . . . . . 11-14
Maintenance Records
Maintenance Records . . . . . . 11-16
General Information
Your vehicle is an important
investment. This section describes
the required maintenance for the
vehicle. Follow this schedule to help
protect against major repair
expenses resulting from neglect or
inadequate maintenance. It may
also help to maintain the value of
the vehicle if it is sold. It is the
responsibility of the owner to have
all required maintenance performed.
Your dealer has trained technicians
who can perform required
maintenance using genuine
replacement parts. They have
up-to-date tools and equipment for
fast and accurate diagnostics. Many
dealers have extended evening and
Saturday hours, courtesy
transportation, and online
scheduling to assist with service
needs.
Your dealer recognizes the
importance of providing
competitively priced maintenance
and repair services. With trained technicians, the dealer is the place
for routine maintenance such as oil
changes and tire rotations and
additional maintenance items like
tires, brakes, batteries, and wiper
blades.
{Caution
Damage caused by improper
maintenance can lead to costly
repairs and may not be covered
by the vehicle warranty.
Maintenance intervals, checks,
inspections, recommended fluids,
and lubricants are important to
keep the vehicle in good working
condition.
The Tire Rotation and Required
Services are the responsibility of the
vehicle owner. It is recommended to
have your dealer perform these
services every 12 000 km/7,500 mi.
Proper vehicle maintenance helps to
keep the vehicle in good working
condition, improves fuel economy,
and reduces vehicle emissions.