2015 CADILLAC CTS SEDAN tow
[x] Cancel search: towPage 265 of 401

Black plate (2,1)Cadillac CTS Owner Manual (GMNA-Localizing-U.S./Canada/Mexico-
7707478) - 2015 - crc - 10/1/14
10-2 Vehicle Care
Buying New Tires . . . . . . . . . . . 10-59
Different Size Tires andWheels . . . . . . . . . . . . . . . . . . . 10-60
Uniform Tire Quality Grading . . . . . . . . . . . . . . . . . . . 10-61
Wheel Alignment and Tire Balance . . . . . . . . . . . . . . . . . . . 10-62
Wheel Replacement . . . . . . . . 10-62
Tire Chains . . . . . . . . . . . . . . . . . 10-63
If a Tire Goes Flat . . . . . . . . . . 10-64
Jump Starting
Jump Starting . . . . . . . . . . . . . . 10-65
Towing the Vehicle
Towing the Vehicle . . . . . . . . . 10-68
Recreational Vehicle Towing . . . . . . . . . . . . . . . . . . . . 10-68
Appearance Care
Exterior Care . . . . . . . . . . . . . . . 10-71
Interior Care . . . . . . . . . . . . . . . . 10-75
Floor Mats . . . . . . . . . . . . . . . . . . 10-79
General Information
For service and parts needs, visit
your dealer. You will receive
genuine GM parts and GM-trained
and supported service people.
Genuine GM parts have one of
these marks:
California Proposition
65 Warning
Most motor vehicles, including this
one, contain and/or emit chemicals
known to the State of California to cause cancer and birth defects or
other reproductive harm. Engine
exhaust, many parts and systems,
many fluids, and some component
wear by-products contain and/or
emit these chemicals.
California Perchlorate
Materials Requirements
Certain types of automotive
applications, such as airbag
initiators, safety belt pretensioners,
and lithium batteries contained in
Remote Keyless Entry transmitters,
may contain perchlorate materials.
Special handling may be necessary.
For additional information, see
www.dtsc.ca.gov/hazardouswaste/
perchlorate.
Accessories and
Modifications
Adding non‐dealer accessories or
making modifications to the vehicle
can affect vehicle performance and
safety, including such things as
airbags, braking, stability, ride and
Page 273 of 401

Black plate (10,1)Cadillac CTS Owner Manual (GMNA-Localizing-U.S./Canada/Mexico-
7707478) - 2015 - crc - 10/1/14
10-10 Vehicle Care
1. Windshield Washer FluidReservoir. See Washer Fluid on
page 10-22.
2. Remote Positive (+) Battery Terminal. See Battery on
page 10-25.
3. Engine Compartment Fuse
Block on page 10-32.
4. Engine Coolant Surge Tank and Pressure Cap. See Cooling
System on page 10-16.
5. Remote Negative (-) Battery Terminal. See Battery on
page 10-25.
6. Engine Cooling Fan (Out of View). See Cooling System on
page 10-16.
7. Engine Oil Fill Cap. See Engine
Oil on page 10-10.
8. Engine Oil Dipstick. See Engine
Oil on page 10-10.
9. Engine Air Cleaner/Filter on
page 10-14.
10. Brake Fluid Reservoir. See Brakes on page 10-23.Engine Oil
To ensure proper engine
performance and long life, careful
attention must be paid to engine oil.
Following these simple, but
important steps will help protect
your investment:
.Always use engine oil approved
to the proper specification and of
the proper viscosity grade. See
“Selecting the Right Engine Oil”
in this section.
.Check the engine oil level
regularly and maintain the
proper oil level. See “Checking
Engine Oil” and“When to Add
Engine Oil” in this section.
.Change the engine oil at the
appropriate time. See Engine Oil
Life System on page 10-12.
.Always dispose of engine oil
properly. See “What to Do with
Used Oil” in this section.
Checking Engine Oil
It is a good idea to check the engine
oil level at each fuel fill. In order to
get an accurate reading, the vehicle
must be on level ground. The
engine oil dipstick handle is a loop.
SeeEngine Compartment Overview
on page 10-5 for the location of the
engine oil dipstick.
1. If the engine has been running recently, turn off the engine and
allow several minutes for the oil
to drain back into the oil pan.
Checking the oil level too soon
after engine shutoff will not
provide an accurate oil level
reading.
{Warning
The engine oil dipstick handle
may be hot; it could burn you.
Use a towel or glove to touch the
dipstick handle.
Page 274 of 401

Black plate (11,1)Cadillac CTS Owner Manual (GMNA-Localizing-U.S./Canada/Mexico-
7707478) - 2015 - crc - 10/1/14
Vehicle Care 10-11
2. Pull out the dipstick and wipe itwith a clean paper towel or cloth,
then push it back in all the way.
Remove it again, keeping the tip
down, and check the level.
When to Add Engine Oil
If the oil is below the cross-hatched
area at the tip of the dipstick, add
1 L (1 qt) of the recommended oil
and then recheck the level. See
“Selecting the Right Engine Oil” in
this section for an explanation of
what kind of oil to use. For engine
oil crankcase capacity, see
Capacities and Specifications on
page 12-2.
{Caution
Do not add too much oil. Oil
levels above or below the
acceptable operating range
shown on the dipstick are harmful
to the engine. If you find that you
have an oil level above the
operating range, i.e., the engine
has so much oil that the oil level
gets above the cross-hatched
area that shows the proper
operating range, the engine could
be damaged. You should drain
out the excess oil or limit driving
of the vehicle and seek a service
professional to remove the
excess amount of oil.
See Engine Compartment Overview
on page 10-5 for the location of the
engine oil fill cap.
Add enough oil to put the level
somewhere in the proper operating
range. Push the dipstick all the way
back in when through.
Selecting the Right Engine Oil
Selecting the right engine oil
depends on both the proper oil
specification and viscosity grade.
See Recommended Fluids and
Lubricants on page 11-13.
Specification
Ask for and use engine oils that
meet the dexos1™ specification.
Engine oils that have been
approved by GM as meeting the
dexos1 specification are marked
with the dexos1 approved logo. See
www.gmdexos.com.
Page 294 of 401

Black plate (31,1)Cadillac CTS Owner Manual (GMNA-Localizing-U.S./Canada/Mexico-
7707478) - 2015 - crc - 10/1/14
Vehicle Care 10-31
1. Bulb Socket
2. Bulb
3. Lamp Assembly
To replace one of these bulbs:
1. Push the lamp assembly (3)toward the center of the vehicle.
2. Pull the lamp assembly down to remove.
3. Turn the bulb socket (1) counterclockwise to remove it
from the lamp assembly (3).
4. Pull the bulb (2) straight out of the bulb socket (1).
5. Push the replacement bulb straight into the bulb socket and
turn the bulb socket clockwise to
install it into the lamp assembly.
6. Push the lamp assembly back into position until the release tab
locks into place.
Replacement Bulbs
Exterior Lamp Bulb
Number
License
Plate Lamp W5W LL
For replacement bulbs not listed
here, contact your dealer.
Electrical System
Electrical System
Overload
The vehicle has fuses and circuit
breakers to protect against an
electrical system overload.
When the current electrical load is
too heavy, the circuit breaker opens
and closes, protecting the circuit
until the current load returns to
normal or the problem is fixed. This
greatly reduces the chance of circuit
overload and fire caused by
electrical problems.
Fuses and circuit breakers protect
power devices in the vehicle.
Replace a bad fuse with a new one
of the identical size and rating.
If there is a problem on the road and
a fuse needs to be replaced, the
same amperage fuse can be
borrowed. Choose some feature of
the vehicle that is not needed to use
and replace it as soon as possible.
Page 321 of 401

Black plate (58,1)Cadillac CTS Owner Manual (GMNA-Localizing-U.S./Canada/Mexico-
7707478) - 2015 - crc - 10/1/14
10-58 Vehicle Care
Warning (Continued)
towel can be used; however, use
a scraper or wire brush later to
remove all rust or dirt.
Lightly coat the center of the
wheel hub with wheel bearing
grease after a wheel change or
tire rotation to prevent corrosion
or rust build-up. Do not get
grease on the flat wheel
mounting surface or on the
wheel nuts or bolts.
When It Is Time for New
Tires
Factors such as maintenance,
temperatures, driving speeds,
vehicle loading, and road conditions
affect the wear rate of the tires.
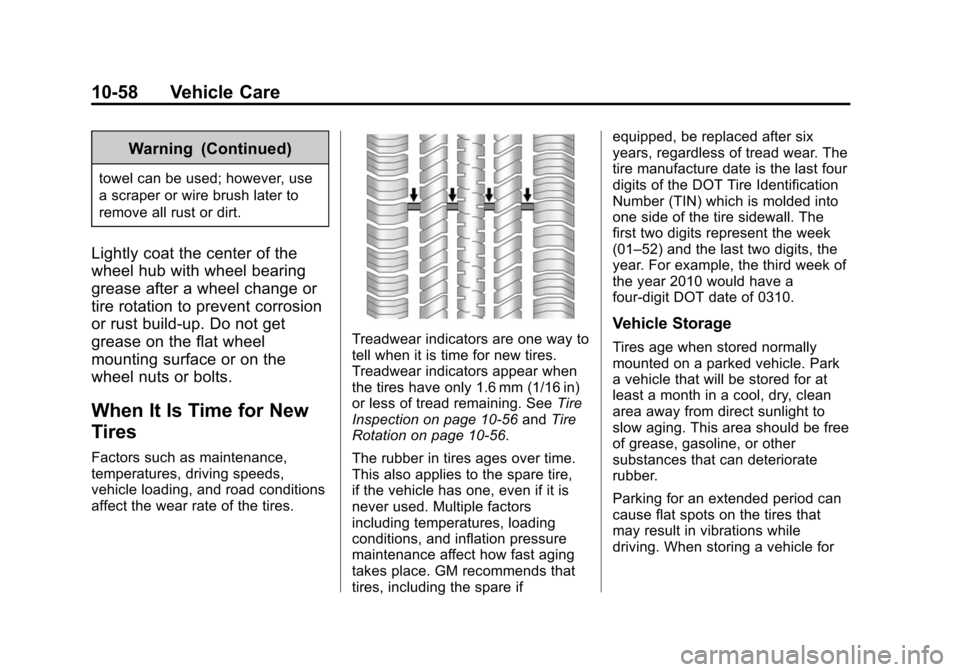
Treadwear indicators are one way to
tell when it is time for new tires.
Treadwear indicators appear when
the tires have only 1.6 mm (1/16 in)
or less of tread remaining. SeeTire
Inspection on page 10-56 andTire
Rotation on page 10-56.
The rubber in tires ages over time.
This also applies to the spare tire,
if the vehicle has one, even if it is
never used. Multiple factors
including temperatures, loading
conditions, and inflation pressure
maintenance affect how fast aging
takes place. GM recommends that
tires, including the spare if equipped, be replaced after six
years, regardless of tread wear. The
tire manufacture date is the last four
digits of the DOT Tire Identification
Number (TIN) which is molded into
one side of the tire sidewall. The
first two digits represent the week
(01–52) and the last two digits, the
year. For example, the third week of
the year 2010 would have a
four-digit DOT date of 0310.Vehicle Storage
Tires age when stored normally
mounted on a parked vehicle. Park
a vehicle that will be stored for at
least a month in a cool, dry, clean
area away from direct sunlight to
slow aging. This area should be free
of grease, gasoline, or other
substances that can deteriorate
rubber.
Parking for an extended period can
cause flat spots on the tires that
may result in vibrations while
driving. When storing a vehicle for
Page 327 of 401

Black plate (64,1)Cadillac CTS Owner Manual (GMNA-Localizing-U.S./Canada/Mexico-
7707478) - 2015 - crc - 10/1/14
10-64 Vehicle Care
Warning (Continued)
or other vehicle parts. The area
damaged by the tire chains could
cause loss of control and a
crash. Use another type of
traction device only if its
manufacturer recommends it for
the vehicle's tire size combination
and road conditions. Follow that
manufacturer's instructions. To
avoid vehicle damage, drive slow
and readjust or remove the
traction device if it contacts the
vehicle. Do not spin the wheels.
If traction devices are used, install
them on the rear tires.
{Caution
If the vehicle is equipped with a
tire size other than P245/40R18,
245/40R18, 275/35R18, or 255/
35R19, use tire chains only where(Continued)
Caution (Continued)
legal and only when necessary.
Use low profile chains that add no
more than 12 mm thickness to the
tire tread and inner sidewall. Use
chains that are the proper size for
the tires. Install them on the tires
of the rear axle. Don't use chains
on the tires of the front axle.
Tighten them as tightly as
possible with the ends securely
fastened. Drive slowly and follow
the chain manufacturer's
instructions. If the chains contact
the vehicle, stop and retighten
them. If the contact continues,
slow down until it stops. Driving
too fast or spinning the wheels
with chains on will damage the
vehicle.
If a Tire Goes Flat
It is unusual for a tire to blow out
while driving, especially if the tires
are maintained properly. If air goes
out of a tire, it is much more likely to
leak out slowly. SeeTires on
page 10-41 for additional
information. But if there ever is a
blowout, here are a few tips about
what to expect and what to do:
If a front tire fails, the flat tire
creates a drag that pulls the vehicle
toward that side. Take your foot off
the accelerator pedal and grip the
steering wheel firmly. Steer to
maintain lane position, and then
gently brake to a stop, well off the
road, if possible.
A rear blowout, particularly on a
curve, acts much like a skid and
may require the same correction as
used in a skid. Stop pressing the
accelerator pedal and steer to
straighten the vehicle. It may be
very bumpy and noisy. Gently brake
to a stop, well off the road,
if possible.
Page 331 of 401

Black plate (68,1)Cadillac CTS Owner Manual (GMNA-Localizing-U.S./Canada/Mexico-
7707478) - 2015 - crc - 10/1/14
10-68 Vehicle Care
Towing the Vehicle
{Caution
Incorrectly towing a disabled
vehicle may cause damage. The
damage would not be covered by
the vehicle warranty.
Have the vehicle towed on a flatbed
car carrier. A wheel lift tow truck
could damage the vehicle.
Consult your dealer or a
professional towing service if the
disabled vehicle must be towed.
Use the tow eye for towing a
disabled vehicle or loading it onto a
flatbed car carrier. The tow eye
should not be used to recover a
vehicle from an off road situation.
{Caution
Improper use of the tow eye can
cause vehicle damage. Use
caution and low speeds to
prevent damage to the vehicle.
Carefully open the cover in the
fascia by using the small notch that
conceals the tow eye socket.
Install the tow eye into the socket by
turning it clockwise until it stops.
When the tow eye is removed,
reinstall the cover with the notch in
the original position.
Recreational Vehicle
Towing
Recreational vehicle towing means
towing the vehicle behind another
vehicle such as a motor home. The
two most common types of
recreational vehicle towing are
known as dinghy towing and dolly
towing. Dinghy towing is towing the
vehicle with all four wheels on the ground. Dolly towing is towing the
vehicle with two wheels on the
ground and two wheels up on a
device known as a dolly.
Here are some important things to
consider before recreational vehicle
towing:
.What is the towing capacity of
the towing vehicle? Be sure to
read the tow vehicle
manufacturer's
recommendations.
.What is the distance that will be
traveled? Some vehicles have
restrictions on how far and how
long they can tow.
.Is the proper towing equipment
going to be used? See your
dealer or trailering professional
for additional advice and
equipment recommendations.
.Is the vehicle ready to be
towed? Just as preparing the
vehicle for a long trip, make sure
the vehicle is prepared to be
towed.
Page 332 of 401

Black plate (69,1)Cadillac CTS Owner Manual (GMNA-Localizing-U.S./Canada/Mexico-
7707478) - 2015 - crc - 10/1/14
Vehicle Care 10-69
Dinghy Towing
{Caution
If the vehicle is towed with all four
wheels on the ground, the
drivetrain components could be
damaged. The repairs would not
be covered by the vehicle
warranty. Do not tow the vehicle
with all four wheels on the
ground.The vehicle was not designed to be
towed with all four wheels on the
ground. If the vehicle must be
towed, a dolly should be used. See
the following information on dolly
towing.
{Caution
Use of a shield mounted in front
of the vehicle grille could restrict
airflow and cause damage to the
transmission. The repairs would
not be covered by the vehicle
warranty. If using a shield, only
use one that attaches to the
towing vehicle.
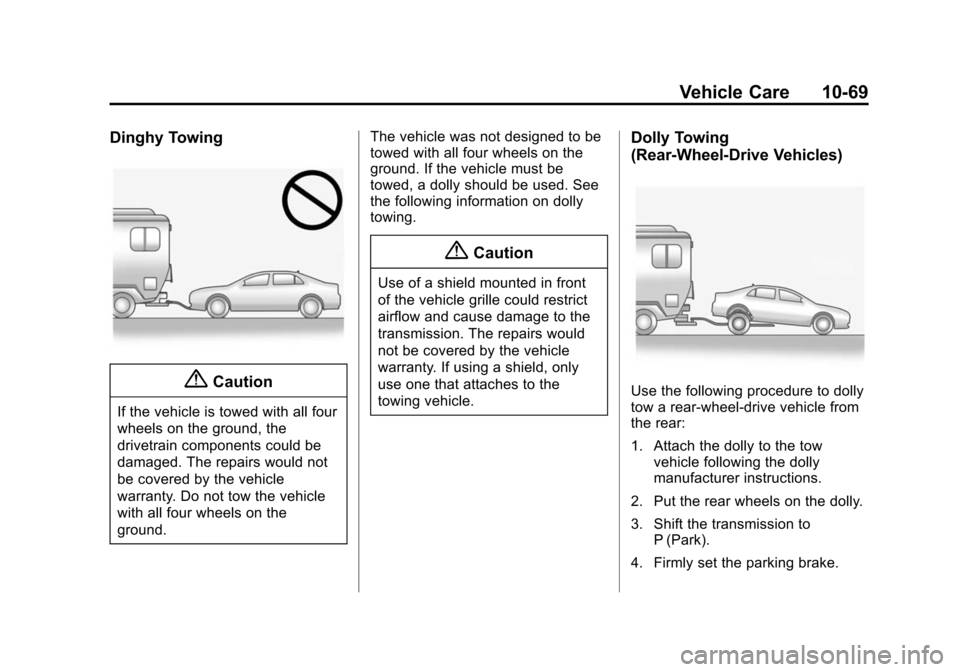
Dolly Towing
(Rear-Wheel-Drive Vehicles)
Use the following procedure to dolly
tow a rear-wheel-drive vehicle from
the rear:
1. Attach the dolly to the tow
vehicle following the dolly
manufacturer instructions.
2. Put the rear wheels on the dolly.
3. Shift the transmission to P (Park).
4. Firmly set the parking brake.