2015 CADILLAC CTS SEDAN warning
[x] Cancel search: warningPage 217 of 401

Black plate (24,1)Cadillac CTS Owner Manual (GMNA-Localizing-U.S./Canada/Mexico-
7707478) - 2015 - crc - 10/1/14
9-24 Driving and Operating
{Caution
Shifting to R (Reverse) while the
vehicle is moving forward could
damage the transmission. The
repairs would not be covered by
the vehicle warranty. Shift to
R (Reverse) only after the vehicle
is stopped.
R (Reverse): Use this gear to
back up.
At low vehicle speeds, R (Reverse)
can be used to rock the vehicle
back and forth to get out of snow,
ice, or sand without damaging your
transmission. See If the Vehicle Is
Stuck on page 9-10.
N (Neutral): In this position, the
engine does not connect with the
wheels. To restart when the vehicle
is already moving, use N (Neutral)
only. You can also use N (Neutral)
when the vehicle is being towed.
{Warning
Shifting into a drive gear while the
engine is running at high speed is
dangerous. Unless your foot is
firmly on the brake pedal, the
vehicle could move very rapidly.
You could lose control and hit
people or objects. Do not shift
into a drive gear while the engine
is running at high speed.
{Caution
Shifting out of P (Park) or
N (Neutral) with the engine
running at high speed may
damage the transmission. The
repairs would not be covered by
the vehicle warranty. Be sure the
engine is not running at high
speed when shifting the vehicle. D (Drive):
This position is for
normal driving. It provides the best
fuel economy. If you need more
power for passing, and you are:
.Going less than 55 km/h
(35 mph), push the accelerator
pedal about halfway down.
.Going about 55 km/h (35 mph) or
more, push the accelerator all
the way down.
The transmission will shift down
to a lower gear and have more
power.
Downshifting the transmission in
slippery road conditions could result
in skidding. See “Skidding”under
Loss of Control on page 9-5.
M (Manual Mode): This mode can
be entered with the shift lever in the
D (Drive) position by pressing the
M (Manual Mode) button on the top
of the shift lever. M (Manual Mode)
allows the driver to select gears
appropriate for current driving
conditions. M (Manual Mode) can be
Page 220 of 401

Black plate (27,1)Cadillac CTS Owner Manual (GMNA-Localizing-U.S./Canada/Mexico-
7707478) - 2015 - crc - 10/1/14
Driving and Operating 9-27
Brakes
Antilock Brake
System (ABS)
This vehicle has ABS, an advanced
electronic braking system that helps
prevent a braking skid.
When the vehicle begins to drive
away, ABS checks itself.
A momentary motor or clicking noise
might be heard while this test is
going on, and it might even be
noticed that the brake pedal moves
a little. This is normal.
If there is a problem with ABS, this
warning light stays on. SeeAntilock
Brake System (ABS) Warning Light
on page 5-23. If driving safely on a wet road and it
becomes necessary to slam on the
brakes and continue braking to
avoid a sudden obstacle, a
computer senses the wheels are
slowing down. If one of the wheels
is about to stop rolling, the computer
will separately work the brakes at
each wheel.
ABS can change the brake pressure
to each wheel, as required, faster
than any driver could. This can help
you steer around the obstacle while
braking hard.
As the brakes are applied, the
computer keeps receiving updates
on wheel speed and controls
braking pressure accordingly.
Remember: ABS does not change
the time needed to get a foot up to
the brake pedal or always decrease
stopping distance. If you get too
close to the vehicle in front of you,
there will not be enough time to
apply the brakes if that vehicle
suddenly slows or stops. Always
leave enough room up ahead to
stop, even with ABS.
Using ABS
Do not pump the brakes. Just hold
the brake pedal down firmly and let
ABS work. You may hear the ABS
pump or motor operating and feel
the brake pedal pulsate. This is
normal.
Braking in Emergencies
ABS allows you to steer and brake
at the same time. In many
emergencies, steering can help
more than even the very best
braking.
Page 221 of 401

Black plate (28,1)Cadillac CTS Owner Manual (GMNA-Localizing-U.S./Canada/Mexico-
7707478) - 2015 - crc - 10/1/14
9-28 Driving and Operating
Electric Parking Brake
The vehicle has an Electric Parking
Brake (EPB). The switch for the
EPB is on the instrument panel, to
the left of the steering wheel. The
EPB can always be activated, even
if the ignition is off. To prevent
draining the battery, avoid repeated
cycles of the EPB system when the
engine is not running.The system has a red parking brake
status light and an amber parking
brake warning light. See
Parking
Brake Light on page 5-22 and
Service Electric Parking Brake Light
on page 5-23. There are also
parking brake-related Driver
Information Center (DIC) messages.
See Brake System Messages on
page 5-36. In case of insufficient
electrical power, the EPB cannot be
applied or released.
Before leaving the vehicle, check
the red parking brake status light to
ensure that the parking brake is
applied.
EPB Apply
To apply the EPB:
1. Be sure the vehicle is at a complete stop.
2. Lift up the EPB switch momentarily.
The red parking brake status light
will flash and then stay on once the
EPB is fully applied. If the red
parking brake status light flashes continuously, then the EPB is only
partially applied or there is a
problem with the EPB. A DIC
message will display. Release the
EPB and try to apply it again. If the
light does not come on, or keeps
flashing, have the vehicle serviced.
Do not drive the vehicle if the red
parking brake status light is flashing.
See your dealer. See
Parking Brake
Light on page 5-22.
If the amber parking brake warning
light is on, lift up on the EPB switch
and hold it up. Continue to hold the
switch until the red parking brake
status light remains on. If the amber
parking brake warning light remains
on, see your dealer.
If the EPB is applied while the
vehicle is moving, the vehicle will
decelerate as long as the switch is
held up. If the switch is held up until
the vehicle comes to a stop, the
EPB will remain applied.
The vehicle may automatically apply
the EPB in some situations when
the vehicle is not moving. This is
Page 222 of 401

Black plate (29,1)Cadillac CTS Owner Manual (GMNA-Localizing-U.S./Canada/Mexico-
7707478) - 2015 - crc - 10/1/14
Driving and Operating 9-29
normal, and is done to periodically
check the correct operation of the
EPB system.
If the EPB fails to apply, the rear
wheels should be blocked to
prevent vehicle movement.
EPB Release
To release the EPB:
1. Place the ignition in the ACC/ACCESSORY or ON/RUN
position.
2. Apply and hold the brake pedal.
3. Push down momentarily on the EPB switch.
The EPB is released when the red
parking brake status light is off.
If the amber parking brake warning
light is on, release the EPB by
pushing down on the EPB switch
and holding it down. Continue to
hold the switch until the red parking
brake status light is off. If either light
stays on after release is attempted,
see your dealer.
{Caution
Driving with the parking brake on
can overheat the brake system
and cause premature wear or
damage to brake system parts.
Make sure that the parking brake
is fully released and the brake
warning light is off before driving.
Automatic EPB Release
The EPB will automatically release if
the vehicle is running, placed into
gear, and an attempt is made to
drive away. Avoid rapid acceleration
when the EPB is applied, to
preserve parking brake lining life.
If parking on a hill, or if the vehicle
is pulling a trailer, see Driving
Characteristics and Towing Tips on
page 9-65.
Brake Assist
This vehicle has a brake assist
feature designed to assist the driver
in stopping or decreasing vehicle
speed in emergency driving
conditions. This feature uses the
stability system hydraulic brake
control module to supplement the
power brake system under
conditions where the driver has
quickly and forcefully applied the
brake pedal in an attempt to quickly
stop or slow down the vehicle. The
stability system hydraulic brake
control module increases brake
pressure at each corner of the
vehicle until the ABS activates.
Minor brake pedal pulsation or
pedal movement during this time is
normal and the driver should
continue to apply the brake pedal as
the driving situation dictates. The
brake assist feature will
automatically disengage when the
brake pedal is released or brake
pedal pressure is quickly
decreased.
Page 227 of 401

Black plate (34,1)Cadillac CTS Owner Manual (GMNA-Localizing-U.S./Canada/Mexico-
7707478) - 2015 - crc - 10/1/14
9-34 Driving and Operating
Limited-Slip Differential
(LF3 Only)
If equipped, the Electronic Limited
Slip Differential (ELSD) is
automatically activated. ELSD
actively monitors vehicle sensors
and driver inputs to determine the
amount of change for the
conditions. With ELSD, the
vehicle has:
.Enhanced high-speed control.
.Improved traction through
corners, allowing more
acceleration.
.More precise steering.
.Increased vehicle agility.
.Integration with StabiliTrak.
For vehicles with limited slip
differential, driven under severe
conditions, the rear axle fluid should
be changed. See Competitive
Driving Mode (LF3 Only) on
page 9-33 andMaintenance
Schedule on page 11-3.
Cruise Control
{Warning
Cruise control can be dangerous
where you cannot drive safely at
a steady speed. Do not use
cruise control on winding roads or
in heavy traffic.
Cruise control can be dangerous
on slippery roads. On such roads,
fast changes in tire traction can
cause excessive wheel slip, and
you could lose control. Do not use
cruise control on slippery roads.
With cruise control, a speed of
about 40 km/h (25 mph) or more can
be maintained without keeping your
foot on the accelerator. Cruise
control does not work at speeds
below about 40 km/h (25 mph).
If the StabiliTrak
®system begins to
limit wheel spin while using cruise
control, the cruise control
automatically disengages. See
Traction Control/Electronic
Stability Control on page 9-30. If a
collision alert occurs when cruise
control is activated, cruise control is
disengaged. See Forward Collision
Alert (FCA) System on page 9-52.
When road conditions allow the
cruise control to be safely used,
cruise control can be turned
back on.
If the brakes are applied, the cruise
control disengages.
Page 230 of 401

Black plate (37,1)Cadillac CTS Owner Manual (GMNA-Localizing-U.S./Canada/Mexico-
7707478) - 2015 - crc - 10/1/14
Driving and Operating 9-37
.PressJ.
Erasing Speed Memory
The cruise control set speed is
erased from memory if
Jis
pressed or if the ignition is
turned off.
Adaptive Cruise Control
If equipped with Adaptive Cruise
Control (ACC), it allows the driver to
select the cruise control set speed
and following gap. Read this entire
section before using this system.
The following gap is the following
time between your vehicle and a
vehicle detected directly ahead in
your path moving in the same
direction. If no vehicle is detected in
your path, ACC works like regular
cruise control. ACC uses camera
and radar sensors. See Radio
Frequency Statement on
page 13-11.
If a vehicle is detected in your path,
ACC can apply acceleration or
limited, moderate braking to maintain the selected following gap.
To disengage ACC, apply the brake.
If ACC is controlling your vehicle
speed when the Traction Control
System (TCS) or electronic stability
control system activates, the ACC
may automatically disengage. See
Traction Control/Electronic Stability
Control on page 9-30. When road
conditions allow ACC to be safely
used, the ACC can be turned
back on.
ACC will not engage if the TCS or
electronic stability control system is
disabled.
{Warning
ACC has limited braking ability
and may not have time to slow
the vehicle down enough to avoid
a collision with another vehicle
you are following. This can occur
when vehicles suddenly slow or
stop ahead, or enter your lane.
Also see
“Alerting the Driver” in
(Continued)
Warning (Continued)
this section. Complete attention is
always required while driving and
you should be ready to take
action and apply the brakes. See
Defensive Driving on page 9-3.
{Warning
Adaptive Cruise Control will not
detect or brake for children,
pedestrians, animals, or other
objects.
Do not use Adaptive Cruise
Control when:
.On winding and hilly roads or
when the sensors are
blocked by snow, ice, or dirt.
The system may not detect a
vehicle ahead. Keep the
entire front of the vehicle
clean. (Continued)
Page 231 of 401

Black plate (38,1)Cadillac CTS Owner Manual (GMNA-Localizing-U.S./Canada/Mexico-
7707478) - 2015 - crc - 10/1/14
9-38 Driving and Operating
Warning (Continued)
.Visibility is low, such as in
fog, rain, or snow conditions.
Adaptive Cruise Control
performance is limited under
these conditions.
.On slippery roads where fast
changes in tire traction can
cause excessive wheel slip.
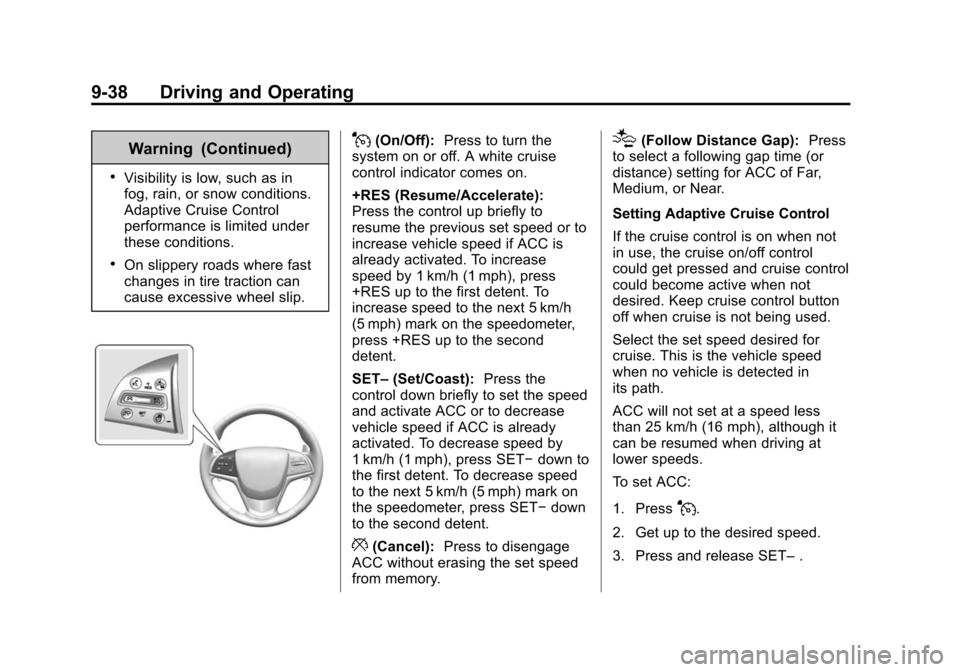
J(On/Off):Press to turn the
system on or off. A white cruise
control indicator comes on.
+RES (Resume/Accelerate):
Press the control up briefly to
resume the previous set speed or to
increase vehicle speed if ACC is
already activated. To increase
speed by 1 km/h (1 mph), press
+RES up to the first detent. To
increase speed to the next 5 km/h
(5 mph) mark on the speedometer,
press +RES up to the second
detent.
SET– (Set/Coast): Press the
control down briefly to set the speed
and activate ACC or to decrease
vehicle speed if ACC is already
activated. To decrease speed by
1 km/h (1 mph), press SET− down to
the first detent. To decrease speed
to the next 5 km/h (5 mph) mark on
the speedometer, press SET− down
to the second detent.
*(Cancel): Press to disengage
ACC without erasing the set speed
from memory.
[(Follow Distance Gap): Press
to select a following gap time (or
distance) setting for ACC of Far,
Medium, or Near.
Setting Adaptive Cruise Control
If the cruise control is on when not
in use, the cruise on/off control
could get pressed and cruise control
could become active when not
desired. Keep cruise control button
off when cruise is not being used.
Select the set speed desired for
cruise. This is the vehicle speed
when no vehicle is detected in
its path.
ACC will not set at a speed less
than 25 km/h (16 mph), although it
can be resumed when driving at
lower speeds.
To set ACC:
1. Press
J.
2. Get up to the desired speed.
3. Press and release SET– .
Page 232 of 401

Black plate (39,1)Cadillac CTS Owner Manual (GMNA-Localizing-U.S./Canada/Mexico-
7707478) - 2015 - crc - 10/1/14
Driving and Operating 9-39
4. Remove foot from theaccelerator.
After ACC is set, it may immediately
apply the brakes if a vehicle ahead
is detected closer than the selected
following gap.
The ACC indicator displays in the
instrument cluster and Head-Up
Display (HUD) (if equipped). When
the ACC is active, the indicator
turns green.
Be mindful of speed limits,
surrounding traffic speeds, and
weather conditions when selecting
the set speed. Resuming a Set Speed
If the ACC is set at a desired speed
and then the brakes are applied, the
ACC is disengaged without erasing
the set speed from memory.
To begin using ACC again, press
+RES up briefly. The vehicle returns
to the previous set speed.
Increasing Speed While ACC is at
a Set Speed
If ACC is already activated, do one
of the following:.Use the accelerator to get to the
higher speed. Press SET–
down.
Release the control and the
accelerator pedal. The vehicle
will now cruise at the higher
speed.
When the accelerator pedal is
pressed, ACC will not brake
because it is overridden.
A warning message will appear
on the Driver Information Center
(DIC) and the Head-Up Display
(HUD) (if equipped). See Cruise
Control Messages on page 5-37.
.Press and hold +RES up until
the desired set speed appears
on the display, then release it.
.To increase vehicle speed in
small increments, press +RES
up to the first detent. For each
press, the vehicle goes 1 km/h
(1 mph) faster.
.To increase vehicle speed in
larger increments, press +RES
up to the second detent. For
each press, the vehicle speed
increases to the next 5 km/h
(5 mph) mark on the
speedometer.
When it is determined that there is
no vehicle ahead or the vehicle
ahead is beyond the selected
following gap, then the vehicle
speed will increase to the set speed.
The speedometer reading can be
displayed in either English or metric
units. See Instrument Cluster on
page 5-10. The increment value
used depends on the units
displayed.