2015 CADILLAC CTS SEDAN page 50
[x] Cancel search: page 50Page 111 of 401

Black plate (2,1)Cadillac CTS Owner Manual (GMNA-Localizing-U.S./Canada/Mexico-
7707478) - 2015 - crc - 10/1/14
4-2 Storage
To open, press the button. Close the
glove box manually.
Cupholders
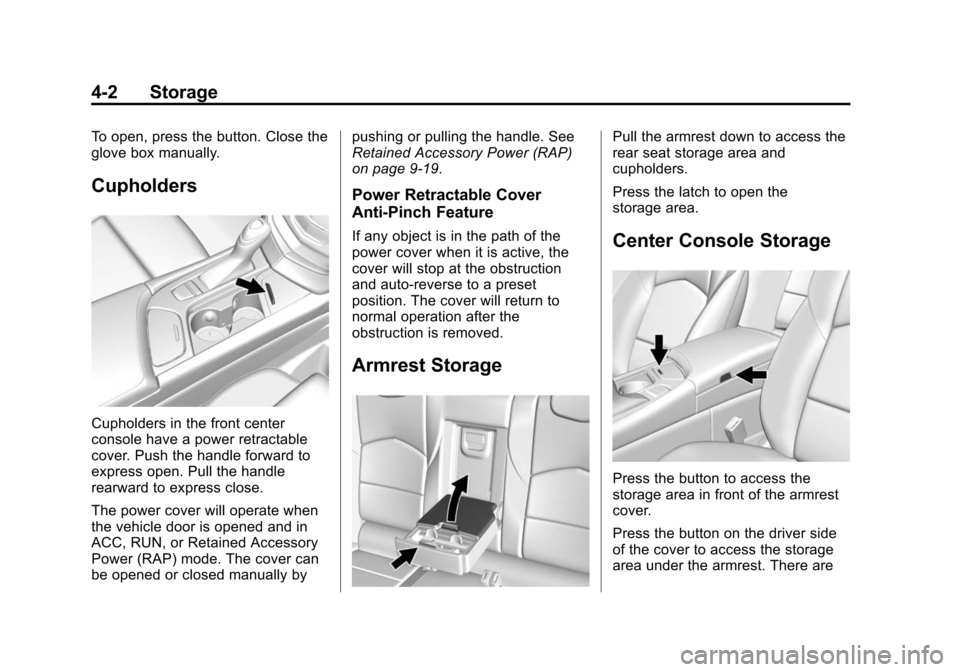
Cupholders in the front center
console have a power retractable
cover. Push the handle forward to
express open. Pull the handle
rearward to express close.
The power cover will operate when
the vehicle door is opened and in
ACC, RUN, or Retained Accessory
Power (RAP) mode. The cover can
be opened or closed manually bypushing or pulling the handle. See
Retained Accessory Power (RAP)
on page 9-19.
Power Retractable Cover
Anti-Pinch Feature
If any object is in the path of the
power cover when it is active, the
cover will stop at the obstruction
and auto-reverse to a preset
position. The cover will return to
normal operation after the
obstruction is removed.
Armrest Storage
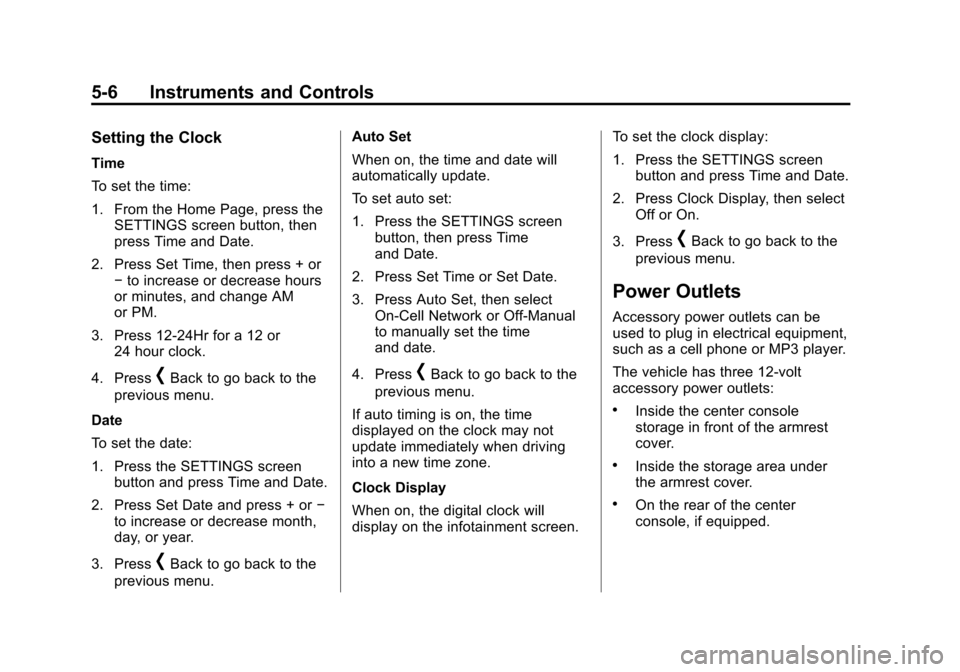
Pull the armrest down to access the
rear seat storage area and
cupholders.
Press the latch to open the
storage area.
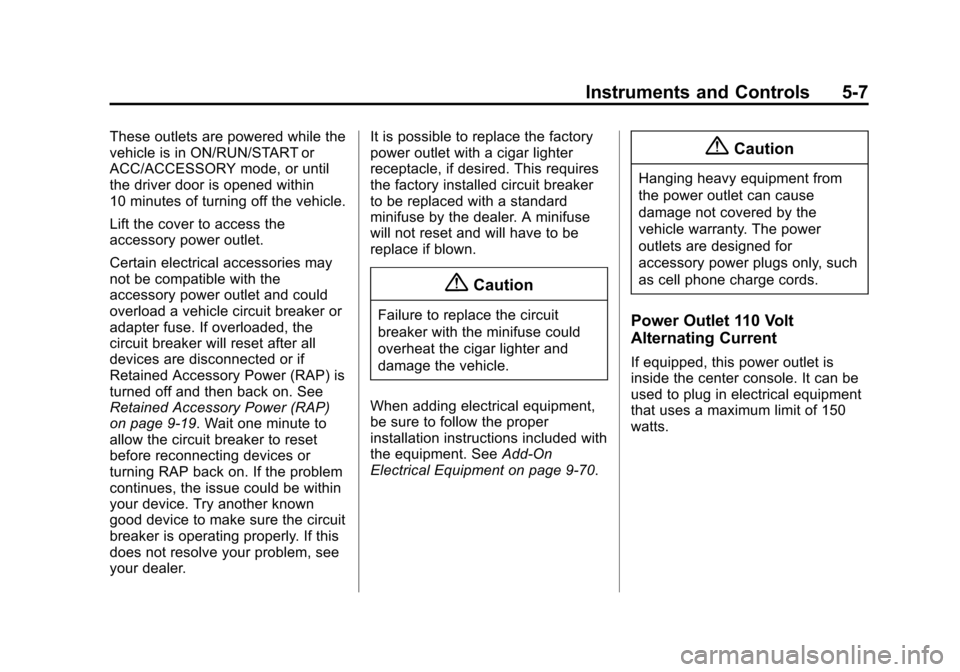
Center Console Storage
Press the button to access the
storage area in front of the armrest
cover.
Press the button on the driver side
of the cover to access the storage
area under the armrest. There are
Page 116 of 401

Black plate (3,1)Cadillac CTS Owner Manual (GMNA-Localizing-U.S./Canada/Mexico-
7707478) - 2015 - crc - 10/1/14
Instruments and Controls 5-3
To set the power tilt wheel memory
position, seeMemory Seats on
page 3-6.
Steering Wheel Controls
The infotainment system can be
operated by using the steering
wheel controls. See "Steering
Wheel Controls" in the infotainment
manual.
Heated Steering Wheel
((Heated Steering Wheel, If
Equipped): Press to turn the
heated steering wheel on or off.
A light next to the button displays
when the feature is turned on. The steering wheel takes about
three minutes to be fully heated.
Horn
Pressaon the steering wheel pad
to sound the horn.
Windshield Wiper/Washer
With the ignition in ACC/
ACCESSORY or ON/RUN/START,
move the windshield wiper lever to
select the wiper speed.
HI: Use for fast wipes.
LO: Use for slow wipes.
INT (Intermittent Wipes): Move
the lever up to INT for intermittent
wipes, then turn the
xINT band
up for more frequent wipes or down
for less frequent wipes.
If the windshield wipers are in use
for about six seconds while driving,
the exterior lamps come on
automatically if the exterior lamp
control is in AUTO. See
“Wiper-Activated Headlamps” later
in this section.
OFF: Use to turn the wipers off.
1X (Mist): For a single wipe, briefly
move the wiper lever down. For
several wipes, hold the wiper
lever down.
Page 117 of 401

Black plate (4,1)Cadillac CTS Owner Manual (GMNA-Localizing-U.S./Canada/Mexico-
7707478) - 2015 - crc - 10/1/14
5-4 Instruments and Controls
Clear snow and ice from the wiper
blades and windshield before using
them. If frozen to the windshield,
carefully loosen or thaw them.
Damaged blades should be
replaced. SeeWiper Blade
Replacement on page 10-28.
Heavy snow or ice can overload the
wiper motor. See Electrical System
Overload on page 10-31.
Wiper Parking
When using intermittent or
Rainsense™ wipes, the wipers
pause briefly on the windshield.
If the wiper lever is moved to OFF
or if Rainsense and additional wipes
are not required, the wipers may
move to the base of the windshield.
If the ignition is put in OFF while the
wipers are on LO, HI, or INT, they
will immediately stop.
If the windshield wiper lever is then
moved to OFF before the driver
door is opened or within 10 minutes,
the wipers will restart and move to
the base of the windshield. If the ignition is put in OFF while the
wipers are performing wipes due to
windshield washing or Rainsense
wipes, the wipers continue to run
until they reach the base of the
windshield.
Rainsense
If equipped with Rainsense, a
sensor near the top center of the
windshield detects the amount of
water on the windshield and
controls the frequency of the
windshield wiper.
Keep this area of the windshield
clear of debris to allow for best
system performance.
INT (Rainsense Wipe Sensitivity
Control):
Move the windshield
wiper lever to INT. Turn the
xINT
band on the wiper lever to adjust the
sensitivity.
.Turn the band up for more
sensitivity to moisture.
.Turn the band down for less
sensitivity to moisture.
.Move the windshield wiper lever
out of the INT position to
deactivate Rainsense.
This feature can be changed. See
“Comfort and Convenience” under
Vehicle Personalization on
page 5-47.
Wiper Arm Assembly Protection
If equipped with wiper arm assembly
protection, when using an automatic
car wash, move the windshield
wiper lever to OFF. This disables
the automatic Rainsense windshield
wipers.
Page 118 of 401

Black plate (5,1)Cadillac CTS Owner Manual (GMNA-Localizing-U.S./Canada/Mexico-
7707478) - 2015 - crc - 10/1/14
Instruments and Controls 5-5
With Rainsense, if the transmission
is in N (Neutral) and the vehicle
speed is very slow, the wipers will
automatically stop at the base of the
windshield.
The wiper operations return to
normal when the transmission is no
longer in N (Neutral) or the vehicle
speed has increased.
nL(Windshield Washer): Pull
the windshield wiper lever toward
you to spray windshield washer fluid
and activate the wipers. The wipers
will continue until the lever is
released or the maximum wash time
is reached. When the windshield
wiper lever is released, additional
wipes may occur depending on how
long the windshield washer had
been activated. See Washer Fluid
on page 10-22 for information on
filling the windshield washer fluid
reservoir.
{Warning
In freezing weather, do not use
the washer until the windshield is
warmed. Otherwise the washer
fluid can form ice on the
windshield, blocking your vision.
Wiper-Activated Headlamps
This feature activates the
headlamps and parking lamps after
the windshield wipers have been in
use for about six seconds. For this
feature to work, the exterior lamp
control must be in AUTO.
The wiper-activated headlamps
immediately turn off when the
ignition is turned to LOCK/OFF,
or the windshield wiper control is
turned off.
Compass
The vehicle may have a compass
display on the Driver Information
Center (DIC). The compass receives
its heading and other information from the Global Positioning
System (GPS) antenna,
StabiliTrak
®, and vehicle speed
information.
The compass system is designed to
operate for a certain number of
miles or degrees of turn before
needing a signal from the GPS
satellites. When the compass
display shows CAL, drive the
vehicle for a short distance in an
open area where it can receive a
GPS signal. The compass system
will automatically determine when a
GPS signal is restored and provide
a heading again. See Compass
Messages on page 5-37 for the
messages that may be displayed for
the compass.
Clock
The infotainment system controls
are used to access the time and
date settings through the menu
system. See “Home Page” in the
infotainment manual for information
about how to use the menu system.
Page 119 of 401

Black plate (6,1)Cadillac CTS Owner Manual (GMNA-Localizing-U.S./Canada/Mexico-
7707478) - 2015 - crc - 10/1/14
5-6 Instruments and Controls
Setting the Clock
Time
To set the time:
1. From the Home Page, press theSETTINGS screen button, then
press Time and Date.
2. Press Set Time, then press + or −to increase or decrease hours
or minutes, and change AM
or PM.
3. Press 12-24Hr for a 12 or 24 hour clock.
4. Press
[Back to go back to the
previous menu.
Date
To set the date:
1. Press the SETTINGS screen button and press Time and Date.
2. Press Set Date and press + or −
to increase or decrease month,
day, or year.
3. Press
[Back to go back to the
previous menu. Auto Set
When on, the time and date will
automatically update.
To set auto set:
1. Press the SETTINGS screen
button, then press Time
and Date.
2. Press Set Time or Set Date.
3. Press Auto Set, then select On-Cell Network or Off-Manual
to manually set the time
and date.
4. Press
[Back to go back to the
previous menu.
If auto timing is on, the time
displayed on the clock may not
update immediately when driving
into a new time zone.
Clock Display
When on, the digital clock will
display on the infotainment screen. To set the clock display:
1. Press the SETTINGS screen
button and press Time and Date.
2. Press Clock Display, then select Off or On.
3. Press
[Back to go back to the
previous menu.
Power Outlets
Accessory power outlets can be
used to plug in electrical equipment,
such as a cell phone or MP3 player.
The vehicle has three 12-volt
accessory power outlets:
.Inside the center console
storage in front of the armrest
cover.
.Inside the storage area under
the armrest cover.
.On the rear of the center
console, if equipped.
Page 120 of 401

Black plate (7,1)Cadillac CTS Owner Manual (GMNA-Localizing-U.S./Canada/Mexico-
7707478) - 2015 - crc - 10/1/14
Instruments and Controls 5-7
These outlets are powered while the
vehicle is in ON/RUN/START or
ACC/ACCESSORY mode, or until
the driver door is opened within
10 minutes of turning off the vehicle.
Lift the cover to access the
accessory power outlet.
Certain electrical accessories may
not be compatible with the
accessory power outlet and could
overload a vehicle circuit breaker or
adapter fuse. If overloaded, the
circuit breaker will reset after all
devices are disconnected or if
Retained Accessory Power (RAP) is
turned off and then back on. See
Retained Accessory Power (RAP)
on page 9-19. Wait one minute to
allow the circuit breaker to reset
before reconnecting devices or
turning RAP back on. If the problem
continues, the issue could be within
your device. Try another known
good device to make sure the circuit
breaker is operating properly. If this
does not resolve your problem, see
your dealer.It is possible to replace the factory
power outlet with a cigar lighter
receptacle, if desired. This requires
the factory installed circuit breaker
to be replaced with a standard
minifuse by the dealer. A minifuse
will not reset and will have to be
replace if blown.
{Caution
Failure to replace the circuit
breaker with the minifuse could
overheat the cigar lighter and
damage the vehicle.
When adding electrical equipment,
be sure to follow the proper
installation instructions included with
the equipment. See Add-On
Electrical Equipment on page 9-70.
{Caution
Hanging heavy equipment from
the power outlet can cause
damage not covered by the
vehicle warranty. The power
outlets are designed for
accessory power plugs only, such
as cell phone charge cords.
Power Outlet 110 Volt
Alternating Current
If equipped, this power outlet is
inside the center console. It can be
used to plug in electrical equipment
that uses a maximum limit of 150
watts.
Page 121 of 401

Black plate (8,1)Cadillac CTS Owner Manual (GMNA-Localizing-U.S./Canada/Mexico-
7707478) - 2015 - crc - 10/1/14
5-8 Instruments and Controls
An indicator light on the outlet turns
on to show it is in use. The light
comes on when the ignition is in
ON/RUN, equipment requiring less
than 150 watts is plugged into the
outlet, and no system fault is
detected.The indicator light does not come on
when the ignition is in LOCK/OFF or
if the equipment is not fully seated
into the outlet.
If equipment is connected using
more than 150 watts or a system
fault is detected, a protection circuit
shuts off the power supply and the
indicator light turns off. To reset the
circuit, unplug the item and plug it
back in or turn the Retained
Accessory Power (RAP) off and
then back on. See
Retained
Accessory Power (RAP) on
page 9-19. The power restarts when
equipment using 150 watts or less is
plugged into the outlet and a system
fault is not detected. The power outlet is not designed for
the following and may not work
properly, if this equipment is
plugged in:
.Equipment with high initial peak
wattage such as:
compressor-driven refrigerators
and electric power tools.
.Other equipment requiring an
extremely stable power supply
such as:
microcomputer-controlled
electric blankets, touch sensor
lamps, etc.
.Medical equipment.
Page 126 of 401

Black plate (13,1)Cadillac CTS Owner Manual (GMNA-Localizing-U.S./Canada/Mexico-
7707478) - 2015 - crc - 10/1/14
Instruments and Controls 5-13
Use the five-way control on the right
side of the steering wheel to move
between the different display zones
and scroll through the different
displays.
To change the cluster configuration:
1. With the vehicle in P (Park), findthe Settings page in one of the
interactive display zones on the
cluster.
2. Press SEL to enter the Settings menu.
3. Scroll down to highlight Display Layout. Then press SEL to
select it.
4. Each layout in the menu is represented by a small preview
image of the display layout.
Scroll up or down and highlight
the selection. Press SEL to
select the desired cluster
configuration.
5. Exit the Display Layout menu by pressing
S.
Cluster Application Displays
The cluster can display information
regarding Navigation, Audio, and
Phone. On the base cluster, a
speedometer can also be displayed
in the center zone.
Navigation (If Equipped)
If there is no active route, a
compass will be displayed. If there
is an active route, press SEL to end
route guidance or turn the voice
prompts on or off.
Audio
While the Audio application page is
displayed, press SEL to enter the
Audio menu. In the Audio menu,
search for music, select from
favorites, or change the audio
source
Phone
While the Phone application page is
displayed, press SEL to enter the
Phone menu. In the Phone menu,
if there is no active phone call, view
recent calls, select from favorites, or scroll through contacts. If there is
an active call, mute the phone or
switch to handset operation.
Cluster Settings Menu
To enter the cluster settings menu:
1. Use the five-way control on the
right side of the steering wheel
to find the Settings page in one
of the interactive display zones
on the cluster.
2. Press SEL on the center of the five-way control to enter the
Settings menu.
Units: Press SEL while Units is
highlighted to enter the Unit menu.
Choose English or metric units by
pressing SEL while the desired item
is highlighted. A checkmark will be
displayed next to the selected item.
Info Pages: Press SEL while Info
Pages is highlighted to select the
items to be displayed in the DIC info
displays. See Driver Information
Center (DIC) on page 5-29.