2015 CADILLAC ATS SEDAN ECU
[x] Cancel search: ECUPage 292 of 443

Black plate (69,1)Cadillac ATS Owner Manual (GMNA-Localizing-U.S./Canada/Mexico-
7707477) - 2015 - crc - 9/15/14
Driving and Operating 9-69
{Warning
When towing a trailer, exhaust
gases may collect at the rear of
the vehicle and enter if the
liftgate, trunk/hatch, or rear-most
window is open.
When towing a trailer:
.Do not drive with the liftgate,
trunk/hatch, or rear-most
window open.
.Fully open the air outlets on
or under the instrument
panel.
.Also adjust the climate
control system to a setting
that brings in only outside air.
See“Climate Control
Systems” in the Index.
For more information about
Carbon Monoxide, see Engine
Exhaust on page 9-23. Towing a trailer requires a certain
amount of experience. The
combination you are driving is
longer and not as responsive as the
vehicle itself. Get acquainted with
the handling and braking of the rig
before setting out for the open road.
Before starting, check all trailer hitch
parts and attachments, safety
chains, electrical connectors, lamps,
tires, and mirrors. If the trailer has
electric brakes, start the
combination moving and then apply
the trailer brake controller by hand
to be sure the brakes work.
During the trip, check occasionally
to be sure that the load is secure
and the lamps and any trailer
brakes still work.
Following Distance
Stay at least twice as far behind the
vehicle ahead as you would when
driving the vehicle without a trailer.
This can help to avoid heavy
braking and sudden turns.
Passing
More passing distance is needed
when towing a trailer. The
combination will not accelerate as
quickly and is longer so it is
necessary to go much farther
beyond the passed vehicle before
returning to the lane.
Backing Up
Hold the bottom of the steering
wheel with one hand. To move the
trailer to the left, move that hand to
the left. To move the trailer to the
right, move your hand to the right.
Always back up slowly and,
if possible, have someone
guide you.
Making Turns
{Caution
Making very sharp turns while
trailering could cause the trailer to
come in contact with the vehicle.
(Continued)
Page 312 of 443

Black plate (15,1)Cadillac ATS Owner Manual (GMNA-Localizing-U.S./Canada/Mexico-
7707477) - 2015 - crc - 9/15/14
Vehicle Care 10-15
Do not remove the cap to check the
fluid level or to top off the fluid level.
Remove the cap only when
necessary to add the proper fluid
until the level reaches the MIN line.
Engine Air Cleaner/Filter
The engine air cleaner/filter is in the
engine compartment on the driver
side of the vehicle. SeeEngine
Compartment Overview on
page 10-5 for location.
When to Inspect the Engine Air
Cleaner/Filter
Inspect the air cleaner/filter at the
scheduled maintenance intervals.
SeeMaintenance Schedule on
page 11-3. If you are driving in
dusty/dirty conditions, inspect the
filter at each engine oil change.
How to Inspect the Engine Air
Cleaner/Filter
To inspect the engine air cleaner/
filter, remove the filter from the
vehicle and lightly shake the filter to release loose dust and dirt. If the
filter remains covered with dirt, a
new filter is required.
To inspect or replace the air cleaner/
filter:
2.0L L4 LTG Engine Shown, 2.5L
L4 LCV Engine, and 3.6L V6 LFX Engine Similar
1. Remove the four screws and lift the cover out of the assembly.
2. Inspect or replace the engine air cleaner/filter.
3. Lower the cover and secure with the four screws. See
Maintenance Schedule on
page 11-3 for replacement intervals.
{Warning
Operating the engine with the air
cleaner/filter off can cause you or
others to be burned. The air
cleaner not only cleans the air; it
helps to stop flames if the engine
backfires. Use caution when
working on the engine and do not
drive with the air cleaner/filter off.
{Caution
If the air cleaner/filter is off, dirt
can easily get into the engine,
which could damage it. Always
have the air cleaner/filter in place
when you are driving.
Page 317 of 443

Black plate (20,1)Cadillac ATS Owner Manual (GMNA-Localizing-U.S./Canada/Mexico-
7707477) - 2015 - crc - 9/15/14
10-20 Vehicle Care
1. Remove the coolant surge tankpressure cap from the top
chamber when the cooling
system, including the coolant
surge tank pressure cap and
upper radiator hose, is no
longer hot.
Turn the pressure cap slowly
counterclockwise. If you hear a
hiss, wait for that to stop. This
will allow any pressure still left to
be vented out the
discharge hose.
2. Keep turning the pressure cap slowly and remove it. Open the
surge tank service port cap to
the lower chamber
3. Fill the surge tank top chamber with the proper DEX-COOL
coolant mixture to the bottom of
the fill neck. The top chamber
needs to be completely full. Fill
the surge tank bottom chamber
through the service port to
approximately half. 4. With the coolant surge tank
pressure cap off and the surge
tank service port cap open, start
the engine and let it run until you
can feel the upper radiator hose
getting hot. Watch out for the
engine cooling fan.
By this time, the coolant level
inside the coolant surge tank top
chamber may be lower. If the
level is lower, add more of the
proper DEX-COOL coolant
mixture to the surge tank top
chamber until the level reaches
the bottom of the fill neck.
5. Replace the surge tank pressure cap tightly and close the surge
tank service port cap.
{Caution
If the pressure cap is not tightly
installed, coolant loss and
possible engine damage may
occur. Be sure the cap is properly
and tightly secured. Check the level in the surge tank
top and bottom chambers when the
cooling system has cooled down.
If the coolant is not at the proper
levels, repeat Steps 1–3 and
reinstall the pressure cap and close
the service port. If the coolant still is
not at the proper levels when the
system cools down again, see your
dealer.
Engine Overheating
The vehicle has several indicators
to warn of the engine overheating.
There is an engine coolant
temperature gauge and an engine
coolant temperature warning light on
the instrument cluster See
Engine
Coolant Temperature Gauge on
page 5-13 andEngine Coolant
Temperature Warning Light on
page 5-22. The vehicle may also
display a message on the Driver
Information Center (DIC). See
Engine Cooling System Messages
on page 5-34.
Page 359 of 443

Black plate (62,1)Cadillac ATS Owner Manual (GMNA-Localizing-U.S./Canada/Mexico-
7707477) - 2015 - crc - 9/15/14
10-62 Vehicle Care
Warning (Continued)
suspension, or other vehicle
parts. The area damaged by the
tire chains could cause loss of
control and a crash. Use another
type of traction device only if its
manufacturer recommends it for
the vehicle's tire size combination
and road conditions. Follow that
manufacturer's instructions. To
avoid vehicle damage, drive slow
and readjust or remove the
traction device if it contacts the
vehicle. Do not spin the wheels.
If traction devices are used, install
them on the rear tires.
{Caution
If the vehicle is equipped with a
tire size other than 225/40R18,
225/40RF18, 255/35RF18, 225/
35R19, or 255/30R19, use tire(Continued)
Caution (Continued)
chains only where legal and only
when necessary. Use low profile
chains that add no more than
12 mm thickness to the tire tread
and inner sidewall. Use chains
that are the proper size for the
tires. Install them on the tires of
the rear axle. Don't use chains on
the tires of the front axle. Tighten
them as tightly as possible with
the ends securely fastened. Drive
slowly and follow the chain
manufacturer's instructions. If the
chains contact the vehicle, stop
and retighten them. If the contact
continues, slow down until it
stops. Driving too fast or spinning
the wheels with chains on will
damage the vehicle.
If a Tire Goes Flat
If the vehicle has run-flat tires, there
is no need to stop on the side of the
road to change a flat tire. See
Run-Flat Tires on page 10-42.
{Warning
Special tools and procedures are
required to service a run-flat tire.
If these special tools and
procedures are not used, injury or
vehicle damage may occur.
Always be sure the proper tools
and procedures, as described in
the service manual, are used.
Page 374 of 443

Black plate (77,1)Cadillac ATS Owner Manual (GMNA-Localizing-U.S./Canada/Mexico-
7707477) - 2015 - crc - 9/15/14
Vehicle Care 10-77
3. Firmly set the parking brake.See Parking Brake (Electric) on
page 9-30 orParking Brake
(Manual) on page 9-32.
4. Put the vehicle in P (Park).
5. Securely attach the vehicle being towed to the dolly.
6. Clamp the steering wheel in a straight-ahead position with a
clamping device designed for
towing.
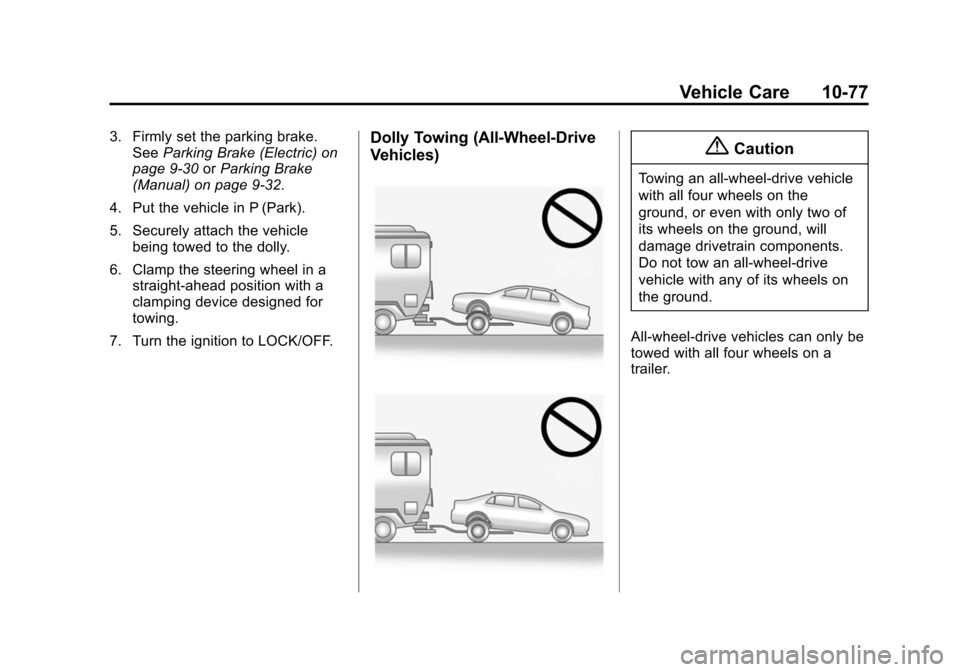
7. Turn the ignition to LOCK/OFF.Dolly Towing (All-Wheel-Drive
Vehicles){Caution
Towing an all-wheel-drive vehicle
with all four wheels on the
ground, or even with only two of
its wheels on the ground, will
damage drivetrain components.
Do not tow an all-wheel-drive
vehicle with any of its wheels on
the ground.
All-wheel-drive vehicles can only be
towed with all four wheels on a
trailer.
Page 383 of 443

Black plate (86,1)Cadillac ATS Owner Manual (GMNA-Localizing-U.S./Canada/Mexico-
7707477) - 2015 - crc - 9/15/14
10-86 Vehicle Care
Use the following guidelines for
proper floor mat usage.
.The original equipment floor
mats were designed for your
vehicle. If the floor mats need
replacing, it is recommended
that GM certified floor mats be
purchased. Non-GM floor mats
may not fit properly and may
interfere with the pedals. Always
check that the floor mats do not
interfere with the pedals.
.Do not use a floor mat if the
vehicle is not equipped with a
floor mat retainer on the driver
side floor.
.Use the floor mat with the
correct side up. Do not turn
it over.
.Do not place anything on top of
the driver side floor mat.
.Use only a single floor mat on
the driver side.
.Do not place one floor mat on
top of another.The driver side floor mat is held in
place by button-type retainers.
Removing and Replacing the
Floor Mats
1. Pull up on the rear of the floor
mat to unlock the retainers and
remove.
2. Reinstall by lining up the floor mat retainer openings over the
carpet retainers and snap into
position.
3. Make sure the floor mat is properly secured in place.
Page 408 of 443

Black plate (5,1)Cadillac ATS Owner Manual (GMNA-Localizing-U.S./Canada/Mexico-
7707477) - 2015 - crc - 9/15/14
Customer Information 13-5
Cadillac Owner Centre
(Canada) cadillacowner.ca
Visit the Cadillac Owner Centre:
.Chat live with online help
representatives.
.Locate owner resources such as
lease-end, financing, and
warranty information.
.Retrieve favorite articles,
quizzes, tips, and multimedia
galleries organized into the
Featured Articles and Auto Care
Sections.
.Download owner manuals.
.Find Cadillac-recommended
maintenance services.
Roadside Service
U.S.: 1-800-224-1400.
Canada: 1-800-882-1112.
Text Telephone (TTY) Users (U.S.
Only): 1-888-889-2438.
Service is available 24 hours a day,
365 days a year.
Calling for Service
When calling Roadside Service,
have the following information
ready:
.Your name, home address, and
home telephone number.
.Telephone number of your
location.
.Location of the vehicle.
.Model, year, color, and license
plate number of the vehicle.
.Odometer reading, Vehicle
Identification Number (VIN), and
delivery date of the vehicle.
.Description of the problem.
Coverage
Services are provided up to 6 years/
110 000 km (70,000 mi), whichever
comes first.
In the U.S., anyone driving the
vehicle is covered. In Canada, a
person driving the vehicle without
permission from the owner is not
covered.Roadside Service is not a part of the
New Vehicle Limited Warranty.
General Motors North America and
Cadillac reserve the right to make
any changes or discontinue the
Roadside Service program at any
time without notification.
General Motors North America and
Cadillac reserve the right to limit
services or payment to an owner or
driver if they decide the claims are
made too often, or the same type of
claim is made many times.
Cadillac Owner Privileges™
.Emergency Fuel Delivery:
Delivery of enough fuel for the
vehicle to get to the nearest
service station.
.Lock-Out Service:
Service to
unlock the vehicle if you are
locked out. A remote unlock may
be available if you have OnStar.
For security reasons, the driver
must present identification
before this service is given.
Page 414 of 443

Black plate (11,1)Cadillac ATS Owner Manual (GMNA-Localizing-U.S./Canada/Mexico-
7707477) - 2015 - crc - 9/15/14
Customer Information 13-11
Service Bulletins
Service Bulletins give additional
technical service information
needed to knowledgeably service
General Motors cars and trucks.
Each bulletin contains instructions
to assist in the diagnosis and
service of the vehicle.
Owner Information
Owner publications are written
specifically for owners and intended
to provide basic operational
information about the vehicle. The
Owner Manual includes the
Maintenance Schedule for all
models.
In-Portfolio: Includes a Portfolio,
Owner Manual, and Warranty
Manual.
RETAIL SELL PRICE: $35.00–
$40.00 (U.S.) plus handling and
shipping fees.
Without Pouch: Owner Manual only. RETAIL SELL PRICE:
$25.00 (U.S.) plus handling and
shipping fees.
Current and Past Models
Technical Service Bulletins and
Manuals are available for current
and past model GM vehicles.
ORDER TOLL FREE:
1-800-551-4123 Monday
–Friday
8:00 AM –6:00 PM Eastern Time
For Credit Card Orders Only
(VISA-MasterCard-Discover), see
Helm, Inc. at: www.helminc.com.
Or write to:
Helm, Incorporated
Attention: Customer Service
47911 Halyard Drive
Plymouth, MI 48170
Prices are subject to change without
notice and without incurring
obligation. Allow ample time for
delivery.
All listed prices are quoted in U.S.
funds. Make checks payable in U.S.
funds.
Radio Frequency
Identification (RFID)
RFID technology is used in some
vehicles for functions such as tire
pressure monitoring and ignition
system security, as well as in
connection with conveniences such
as Remote Keyless Entry (RKE)
transmitters for remote door locking/
unlocking and starting, and
in-vehicle transmitters for garage
door openers. RFID technology in
GM vehicles does not use or record
personal information or link with any
other GM system containing
personal information.