2015 CADILLAC ATS SEDAN fuel cap
[x] Cancel search: fuel capPage 289 of 443

Black plate (66,1)Cadillac ATS Owner Manual (GMNA-Localizing-U.S./Canada/Mexico-
7707477) - 2015 - crc - 9/15/14
9-66 Driving and Operating
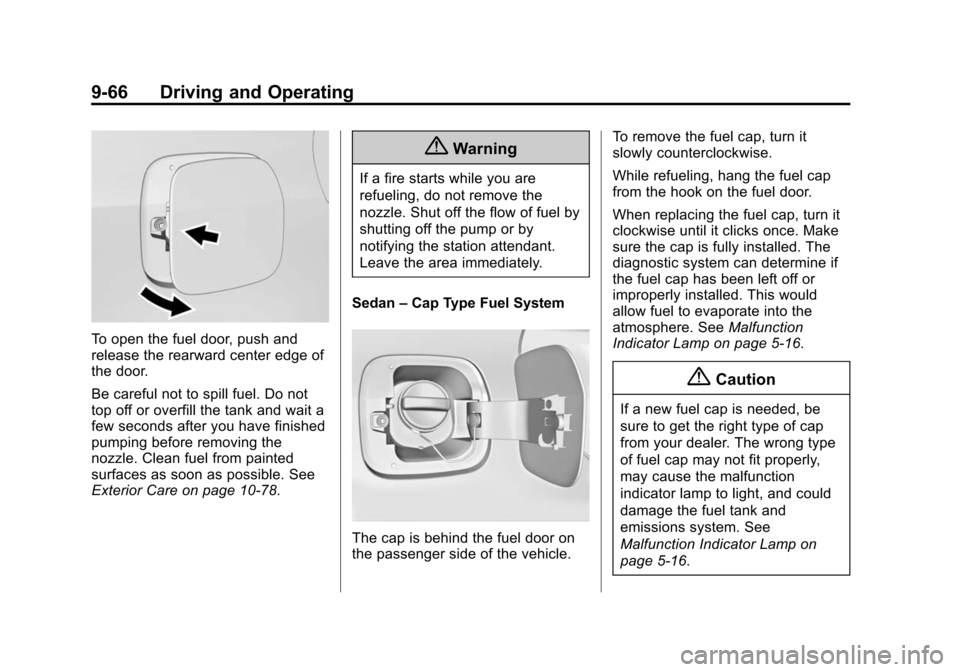
To open the fuel door, push and
release the rearward center edge of
the door.
Be careful not to spill fuel. Do not
top off or overfill the tank and wait a
few seconds after you have finished
pumping before removing the
nozzle. Clean fuel from painted
surfaces as soon as possible. See
Exterior Care on page 10-78.
{Warning
If a fire starts while you are
refueling, do not remove the
nozzle. Shut off the flow of fuel by
shutting off the pump or by
notifying the station attendant.
Leave the area immediately.
Sedan –Cap Type Fuel System
The cap is behind the fuel door on
the passenger side of the vehicle. To remove the fuel cap, turn it
slowly counterclockwise.
While refueling, hang the fuel cap
from the hook on the fuel door.
When replacing the fuel cap, turn it
clockwise until it clicks once. Make
sure the cap is fully installed. The
diagnostic system can determine if
the fuel cap has been left off or
improperly installed. This would
allow fuel to evaporate into the
atmosphere. See
Malfunction
Indicator Lamp on page 5-16.
{Caution
If a new fuel cap is needed, be
sure to get the right type of cap
from your dealer. The wrong type
of fuel cap may not fit properly,
may cause the malfunction
indicator lamp to light, and could
damage the fuel tank and
emissions system. See
Malfunction Indicator Lamp on
page 5-16.
Page 290 of 443

Black plate (67,1)Cadillac ATS Owner Manual (GMNA-Localizing-U.S./Canada/Mexico-
7707477) - 2015 - crc - 9/15/14
Driving and Operating 9-67
Coupe–Capless Fuel System
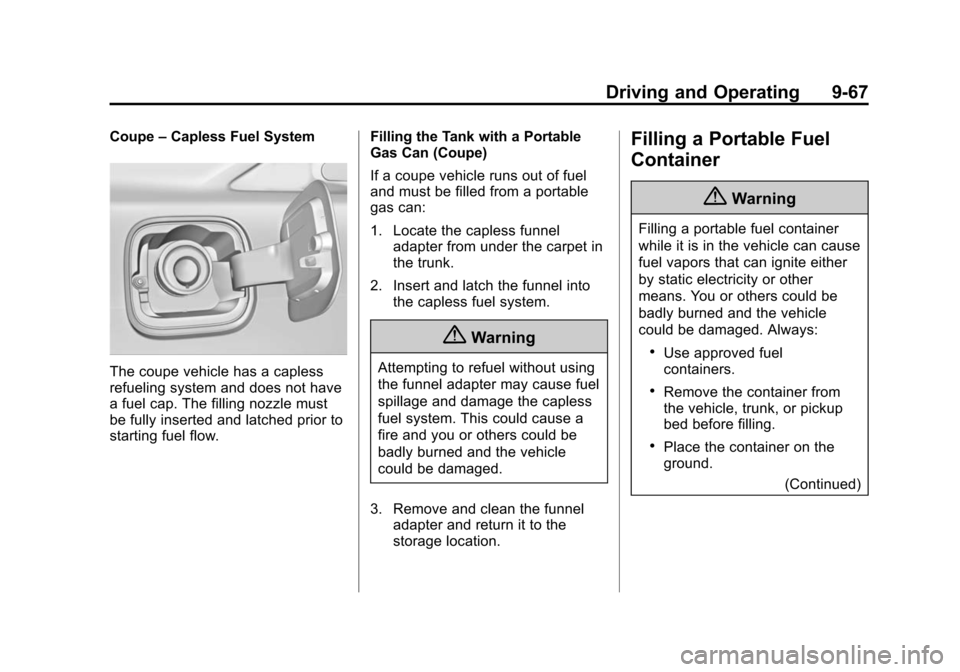
The coupe vehicle has a capless
refueling system and does not have
a fuel cap. The filling nozzle must
be fully inserted and latched prior to
starting fuel flow. Filling the Tank with a Portable
Gas Can (Coupe)
If a coupe vehicle runs out of fuel
and must be filled from a portable
gas can:
1. Locate the capless funnel
adapter from under the carpet in
the trunk.
2. Insert and latch the funnel into the capless fuel system.
{Warning
Attempting to refuel without using
the funnel adapter may cause fuel
spillage and damage the capless
fuel system. This could cause a
fire and you or others could be
badly burned and the vehicle
could be damaged.
3. Remove and clean the funnel adapter and return it to the
storage location.
Filling a Portable Fuel
Container
{Warning
Filling a portable fuel container
while it is in the vehicle can cause
fuel vapors that can ignite either
by static electricity or other
means. You or others could be
badly burned and the vehicle
could be damaged. Always:
.Use approved fuel
containers.
.Remove the container from
the vehicle, trunk, or pickup
bed before filling.
.Place the container on the
ground.
(Continued)
Page 307 of 443

Black plate (10,1)Cadillac ATS Owner Manual (GMNA-Localizing-U.S./Canada/Mexico-
7707477) - 2015 - crc - 9/15/14
10-10 Vehicle Care
1. Windshield Washer FluidReservoir. See Washer Fluid on
page 10-22.
2. Positive (+) Battery Terminal. See Battery on page 10-25.
3. Engine Coolant Surge Tank and Pressure Cap. See Cooling
System on page 10-16.
4. Engine Compartment Fuse
Block on page 10-32.
5. Engine Cooling Fan (Out of View). See Cooling System on
page 10-16.
6. Engine Oil Fill Cap. See Engine
Oil on page 10-10.
7. Engine Oil Dipstick. See Engine
Oil on page 10-10.
8. Engine Air Cleaner/Filter on
page 10-15.
9. Brake/Clutch Fluid Reservoir. See Brakes on page 10-23 and
Hydraulic Clutch on page 10-14.Engine Oil
To ensure proper engine
performance and long life, careful
attention must be paid to engine oil.
Following these simple, but
important steps will help protect
your investment:
.Always use engine oil approved
to the proper specification and of
the proper viscosity grade. See
“Selecting the Right Engine Oil”
in this section.
.Check the engine oil level
regularly and maintain the
proper oil level. See “Checking
Engine Oil” and“When to Add
Engine Oil” in this section.
.Change the engine oil at the
appropriate time. See Engine Oil
Life System on page 10-12.
.Always dispose of engine oil
properly. See “What to Do with
Used Oil” in this section.
Checking Engine Oil
It is a good idea to check the engine
oil level at each fuel fill. In order to
get an accurate reading, the vehicle
must be on level ground. The
engine oil dipstick handle is a loop.
SeeEngine Compartment Overview
on page 10-5 for the location of the
engine oil dipstick.
1. If the engine has been running recently, turn off the engine and
allow several minutes for the oil
to drain back into the oil pan.
Checking the oil level too soon
after engine shutoff will not
provide an accurate oil level
reading.
{Warning
The engine oil dipstick handle
may be hot; it could burn you.
Use a towel or glove to touch the
dipstick handle.
Page 342 of 443

Black plate (45,1)Cadillac ATS Owner Manual (GMNA-Localizing-U.S./Canada/Mexico-
7707477) - 2015 - crc - 9/15/14
Vehicle Care 10-45
diagonal or bias ply
construction; and the letter B
means belted-bias ply
construction.
(5) Rim Diameter
:Diameter of
the wheel in inches.
(6) Service Description
:These
characters represent the load
index and speed rating of the
tire. The load index represents
the load carrying capacity a tire
is certified to carry. The speed
rating is the maximum speed a
tire is certified to carry a load.
Tire Terminology and
Definitions
Air Pressure:The amount of
air inside the tire pressing
outward on each square inch of
the tire. Air pressure is
expressed in kPa (kilopascal)
or psi (pounds per square inch). Accessory Weight
:The
combined weight of optional
accessories. Some examples of
optional accessories are
automatic transmission, power
windows, power seats, and air
conditioning.
Aspect Ratio
:The relationship
of a tire's height to its width.
Belt
:A rubber coated layer of
cords between the plies and the
tread. Cords may be made from
steel or other reinforcing
materials.
Bead
:The tire bead contains
steel wires wrapped by steel
cords that hold the tire onto
the rim.
Bias Ply Tire
:A pneumatic tire
in which the plies are laid at
alternate angles less than
90 degrees to the centerline of
the tread. Cold Tire Pressure
:The
amount of air pressure in a tire,
measured in kPa (kilopascal)
or psi (pounds per square inch)
before a tire has built up heat
from driving. See Tire Pressure
on page 10-47.
Curb Weight
:The weight of a
motor vehicle with standard and
optional equipment including the
maximum capacity of fuel, oil,
and coolant, but without
passengers and cargo.
DOT Markings
:A code molded
into the sidewall of a tire
signifying that the tire is in
compliance with the U.S.
Department of Transportation
(DOT) Motor Vehicle Safety
Standards. The DOT code
includes the Tire Identification
Number (TIN), an alphanumeric
designator which can also
Page 345 of 443

Black plate (48,1)Cadillac ATS Owner Manual (GMNA-Localizing-U.S./Canada/Mexico-
7707477) - 2015 - crc - 9/15/14
10-48 Vehicle Care
{Caution
Neither tire underinflation nor
overinflation is good.
Underinflated tires, or tires
that do not have enough air,
can result in:
.Tire overloading and
overheating which could
lead to a blowout.
.Premature or
irregular wear.
.Poor handling.
.Reduced fuel economy.
Overinflated tires, or tires that
have too much air, can
result in:
.Unusual wear.
.Poor handling.
.Rough ride.
.Needless damage from
road hazards. The Tire and Loading
Information label on the vehicle
indicates the original equipment
tires and the correct cold tire
inflation pressures. The
recommended pressure is the
minimum air pressure needed to
support the vehicle's maximum
load carrying capacity.
For additional information
regarding how much weight the
vehicle can carry, and an
example of the Tire and Loading
Information label, see
Vehicle
Load Limits on page 9-11. How
the vehicle is loaded affects
vehicle handling and ride
comfort. Never load the vehicle
with more weight than it was
designed to carry.
When to Check
Check the tires once a month
or more. How to Check
Use a good quality pocket-type
gauge to check the tire
pressure. Proper tire inflation
cannot be determined by looking
at the tire. Check the tire
inflation pressure when the tires
are cold, meaning the vehicle
has not been driven for at least
three hours or no more than
1.6 km (1 mi).
Remove the valve cap from the
tire valve stem. Press the tire
gauge firmly onto the valve to
get the pressure measurement.
If the cold tire inflation pressure
matches the recommended
pressure on the Tire and
Loading Information label, no
further adjustment is necessary.
If the inflation pressure is low,
add air until the recommended
pressure is reached. If the
inflation pressure in high, press
on the metal stem in the center
Page 377 of 443

Black plate (80,1)Cadillac ATS Owner Manual (GMNA-Localizing-U.S./Canada/Mexico-
7707477) - 2015 - crc - 9/15/14
10-80 Vehicle Care
Cleaning Exterior Lamps/
Lenses, Emblems, Decals and
Stripes
Use only lukewarm or cold water, a
soft cloth, and a car washing soap
to clean exterior lamps, lenses,
emblems, decals and stripes. Follow
instructions under "Washing the
Vehicle" previously in this section.
Lamp covers are made of plastic,
and some have a UV protective
coating. Do not clean or wipe them
when dry.
Do not use any of the following on
lamp covers:
.Abrasive or caustic agents.
.Washer fluids and other cleaning
agents in higher concentrations
than suggested by the
manufacturer.
.Solvents, alcohols, fuels,
or other harsh cleaners.
.Ice scrapers or other hard items.
.Aftermarket appearance caps or
covers while the lamps are
illuminated, due to excessive
heat generated.
{Caution
Failure to clean lamps properly
can cause damage to the lamp
cover that would not be covered
by the vehicle warranty.
{Caution
Using wax on low gloss black
finish stripes can increase the
gloss level and create a
non-uniform finish. Clean low
gloss stripes with soap and
water only.
Air Intakes
Clear debris from the air intakes,
between the hood and windshield
when washing the vehicle.
Windshield and Wiper Blades
Clean the outside of the windshield
with glass cleaner.
Clean rubber blades using a lint-free
cloth or paper towel soaked with
windshield washer fluid or a mild
detergent. Wash the windshield
thoroughly when cleaning the
blades. Bugs, road grime, sap, and
a buildup of vehicle wash/wax
treatments may cause wiper
streaking.
Replace the wiper blades if they are
worn or damaged. Damage can be
caused by extreme dusty
conditions, sand, salt, heat, sun,
snow, and ice.
Weatherstrips
Apply Dielectric silicone grease on
weatherstrips to make them last
longer, seal better, and not stick or
squeak. Lubricate weatherstrips at
least once a year. Hot, dry climates
may require more frequent
application. Black marks from
rubber material on painted surfaces
Page 402 of 443

Black plate (3,1)Cadillac ATS Owner Manual (GMNA-Localizing-U.S./Canada/Mexico-
7707477) - 2015 - crc - 9/15/14
Technical Data 12-3
ApplicationCapacities
Metric English
Fuel Tank 62.5 L 16.5 gal
Transfer Case –AWD 0.8 L0.8 qt
Rear Axle (with limited slip) 1.0 L1.0 qt
Transmission Fluid (Pan Removal and Filter Replacement)
6-Speed Automatic 6.0 L6.4 qt
Wheel Nut Torque 140Y 100 lb ft
All capacities are approximate. When adding, be sure to fill to the approximate level, as recommended in this
manual. Recheck fluid level after filling.
Engine Specifications
Engine VIN CodeTransmission Spark Plug Gap
2.0L L4 Engine XAutomatic
Manual 0.9 mm (0.035 in)
2.5L L4 Engine AAutomatic 1.1 mm (0.043 in)
3.6L V6 Engine 3Automatic 1.1 mm (0.043 in)
Page 431 of 443

Black plate (2,1)Cadillac ATS Owner Manual (GMNA-Localizing-U.S./Canada/Mexico-
7707477) - 2015 - crc - 9/15/14
i-2 INDEX
AutomaticDoor Locks . . . . . . . . . . . . . . . . . . . 2-13
Headlamp System . . . . . . . . . . . . . 6-4
Transmission . . . . . . . . . . . . . . . . . 9-24
Transmission Fluid . . . . . . . . . 10-14
Automatic Transmission Manual Mode . . . . . . . . . . . . . . . . . 9-26
Shift Lock Control
Function Check . . . . . . . . . . . 10-27
Auxiliary Jack . . . . . . . . . . . . . . . . . . 7-18
B
Battery . . . . . . . . . . . . . . . . . . . . . . . 10-25 Exterior Lighting BatterySaver . . . . . . . . . . . . . . . . . . . . . . . . 6-8
Jump Starting . . . . . . . . . . . . . . . 10-72
Power Protection . . . . . . . . . . . . . . 6-8
Voltage and Charging Messages . . . . . . . . . . . . . . . . . . . 5-32
Blade Replacement, Wiper . . . 10-28
Bluetooth Overview . . . . . . . . . 7-20, 7-22, 7-26
Brake
System Warning Light . . . . . . . . 5-18 Brakes . . . . . . . . . . . . . . . . . . . . . . . . 10-23
Antilock . . . . . . . . . . . . . . . . . . . . . . . 9-29
Assist . . . . . . . . . . . . . . . . . . . . . . . . . 9-33
Fluid . . . . . . . . . . . . . . . . . . . . . . . . 10-23
Parking . . . . . . . . . . . . . . . . . 9-30, 9-32
System Messages . . . . . . . . . . . . 5-33
Braking . . . . . . . . . . . . . . . . . . . . . . . . . 9-3
Braking System
Active Emergency . . . . . . . . . . . . 1-20
Break-In, New Vehicle . . . . . . . . . 9-15
Bulb Replacement . . . . . . . . . . . . 10-31 Back-up Lamps . . . . . . . . . . . . . 10-30
Halogen Bulbs . . . . . . . . . . . . . . 10-29
Headlamp Aiming . . . . . . . . . . . 10-29
Headlamps . . . . . . . . . . . . . . . . . 10-29
High Intensity Discharge(HID) Lighting . . . . . . . . . . . . . 10-29
License Plate Lamps . . . . . . . 10-30
Buying New Tires . . . . . . . . . . . . . 10-56
C
Cadillac Premium Care Maintenance . . . . . . . . . . . . . . . . . 11-3
Calibration . . . . . . . . . . . . . . . . . . . . . . 5-6 California
Fuel Requirements . . . . . . . . . . . 9-64
Perchlorate Materials
Requirements . . . . . . . . . . . . . . . 10-3
Warning . . . . . . . . . . . . . . . . . . . . . . 10-2
Canadian Vehicle Owners . . . . . . . . iii
Capacities and Specifications . . . . . . . . . . . . . . . . 12-2
Carbon Monoxide Engine Exhaust . . . . . . . . . . . . . . . 9-23
Trunk . . . . . . . . . . . . . . . . . . . . . . . . . 2-14
Winter Driving . . . . . . . . . . . . . . . . . 9-9
Card Reader SD . . . . . . . . . . . . . . . . . . . . . . . . . . . . 7-18
Cargo Tie-Downs . . . . . . . . . . . . . . . . . . . . . 4-2
Cautions, Danger, and Warnings . . . . . . . . . . . . . . . . . . . . . . . . iv
CD Player . . . . . . . . . . . . . . . . . . . . . 7-12
Chains, Tire . . . . . . . . . . . . . . . . . . 10-61
Charging System Light . . . . . . . . 5-15
Check Engine Light . . . . . . . . . . . . . . . . . . 5-16